


I'm delighted today to share with you a tutorial written especially for you by Anke, one of the So Sew Easy readers. She used the Easy Cosmetics Bag pattern and improved it immensely. When she sent me photos, I knew I wanted to sew this so I begged her to share it with us all. I'm so pleased she said yes. Please welcome Anke from Germany.
[Anke uses cm and mm so if you need to convert because you are used to inches, here is a handy online measurements converter here or a ready-made table here.]
UPDATE – you can now find my own project including a step-by-step video for how to sew this bag – click on the image here.
Subscribe to the YouTube channel:
* * * * * *
Hi everyone!
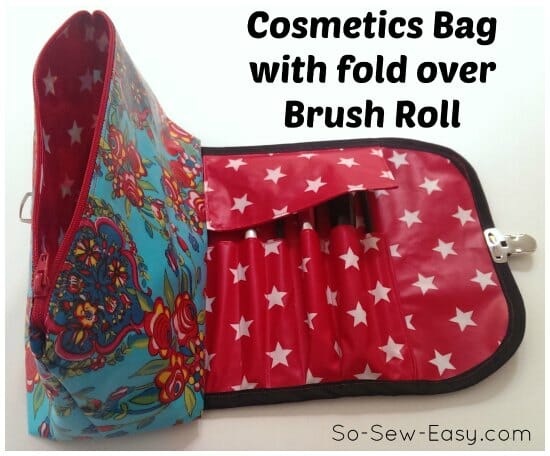
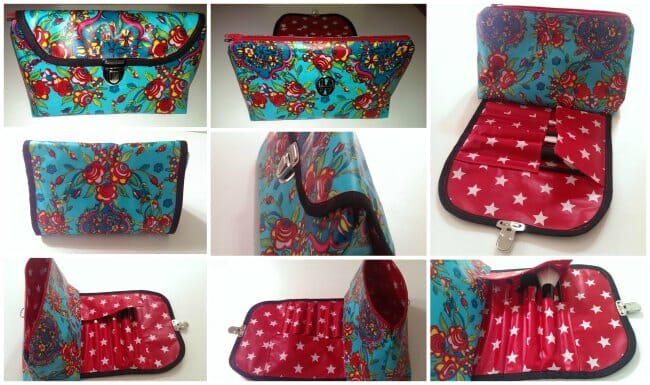
I have sewn several zipper bags, but usually, I end up with a different result than I planned and so this time I searched for a pattern – and I found Deby’s. The perfect size for the most important cosmetic stuff I have to carry around when I travel. The one thing I always hate – my brushes always fly around in a mess and this is something you really shouldn’t do to your brushes! The best solution in my eyes is a brush roll, but carry around two bags? No. So I decided to pimp the pattern a bit and combine it – a make-up bag with a brush roll!
When I showed Deby the pictures of what I have done with her pattern she asked me if I would share them with you. And here I am – please be kind to me, this is my first tutorial ever. J
At the beginning some side notes:
- Seam allowances are given by my sewing foot; I either take a foot width (which is 7 mm) or from the middle to the first marking on my foot (which is about 3 – 4 mm); if not mentioned I used the wider seam allowance
- If you use laminated fabric you don’t need to use interfacing; with all other fabrics I would recommend a stiff interfacing so that the bag stands on its own
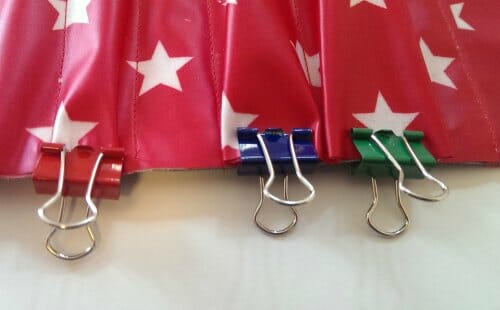
- Secure your fabric pieces before stitching! I like to use binder clips for laminated fabrics as they don’t destroy your fabric. You can of course also use pins, but then make sure only to pin within the seam allowance
And now let’s start!
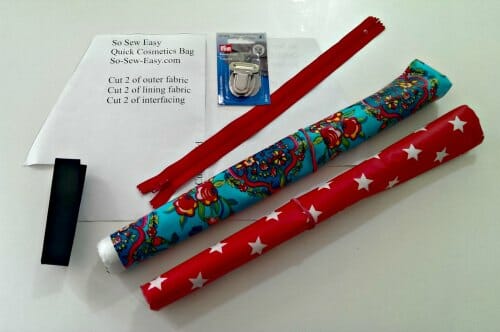
What you need:
- Outer and lining fabric: I used laminated fabric, so you can easily wipe of any makeup dirt from your bag; I bought two pieces of 55 * 80 cm, and that was perfect
- Bias fold binding, about 80 cm
- A zipper, at least 24 cm; I usually take a longer zipper than I need and trim after sewing
- A tuck lock (Deby – I ordered mine here from Amazon)
- The pattern
You can download the pattern and instructions for the Cosmetics Bag with Brush Roll from my design account at Payhip. It's a PDF file containing both instructions and pattern all in the same file. Enjoy!
Trouble downloading the pattern? Check out this article - How to Download and Print PDF Sewing Patterns.
1) Cut your fabric
- 2 bag main pieces (A) from outer fabric
- 2 bag main pieces (A) from lining fabric
- 1 bag flap piece (B) from outer fabric
- 1 bag flap piece (B) from lining fabric
- 2 brush flap pieces (C) from fabric of choice
- 1 brush holder piece (D) from fabric of choice
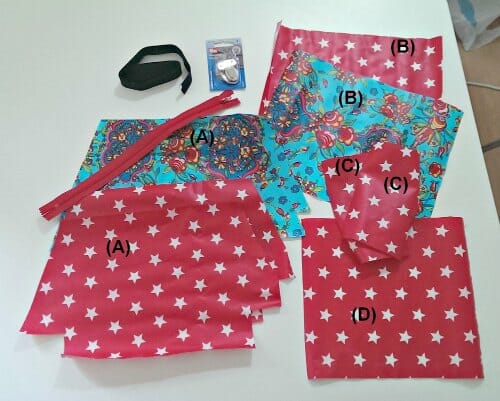
You can cut piece (B) as a rectangle; you can cut the round corners in a later step
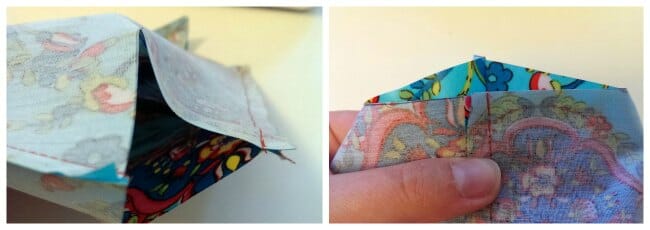
2) Sew brush flap
Place the brush flap pieces with right sides together and clip or pin
Sew around three sides of the flap pieces (two short sides and one long side)
Clip the corners
Turn the piece inside out and topstitch along your seams
If you don’t have a Teflon foot for sewing with laminates, I recommend using a bit of tissue paper under your sewing piece; in that way, the laminated fabric doesn’t stick to your sewing machine
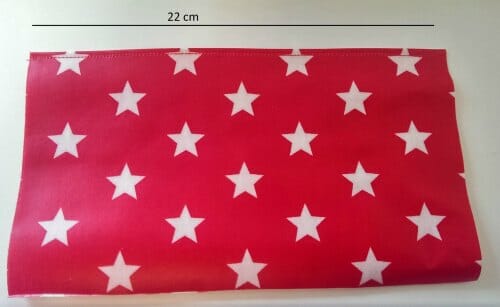
3) Sew brush holder piece
Fold the brush holder piece in half, right sides together (the fold should be on the 22 cm side)
Topstitch along the folded edge
4) Sew brush holder piece to bag flap piece
To sew the brush holder piece, you have two options: use my markings, or use your brushes to get the size of the pockets
First option: Use my markings
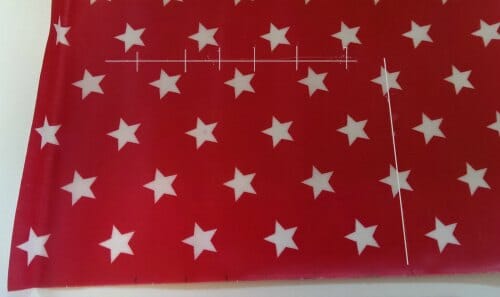
Draw the markings onto the bag flap piece
At the right side of the brush holder fold back the fabric at the most right marking and press with your fingers to create a crease
Place the piece on the lining bag flap piece, aligning the bottom edges, 8 cm from the right edge (where the rounded corners are)
Sew the right side of the piece with a small seam allowance
Draw the markings onto your brush holder fabric (in the picture I highlighted the markings; I made them with sewing chalk but in the picture, it was barely to be sewn)
Align most right marking on the brush holder piece with most right marking on the lining bag flap piece
Pin or clip in place
Stitch down from top to bottom
Repeat for other markings, from right to left
Tuck under the left edge and stitch down with a small seam allowance
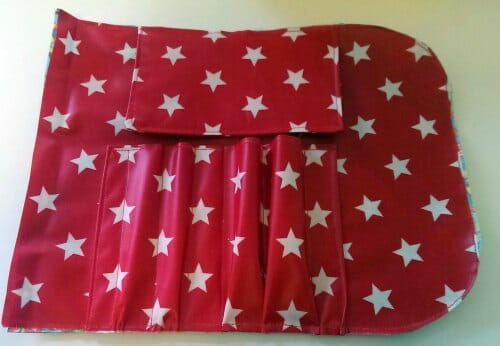
Now you have finished your brush holder!
Second option: Measure your brushes (unfortunately I don’t have pictures here)
At the right side of the brush holder tuck under about 5 to 10 mm and press with your fingers to create a crease
Place the piece on the lining bag flap piece, aligning the bottom edges, 8 cm from the right edge (where the rounded corners are)
Sew the right side of the piece with a small seam allowance, as before. Take your brush and measure the space they need. Pin or clip and stitch down. Repeat for other brushes. Tuck under the left edge and stitch down with a small seam allowance.
Now you have finished your custom brush holder!
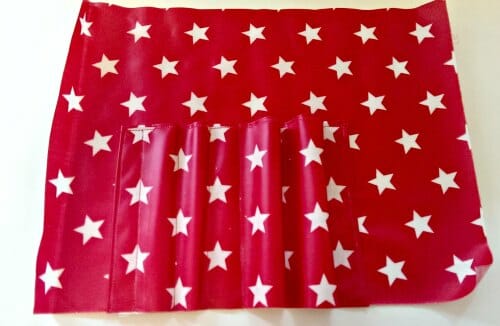
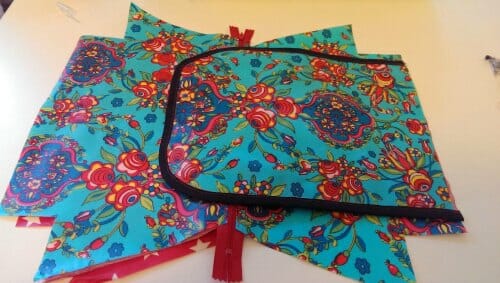
5) Assemble the bag flap
Place the brush flap on the top of the inner bag flap piece, 8 cm from the edge (rounded side), top edges aligned
Press flat the bottom edges of the brush holder and clip in place
Sew bag flap lining and outer fabric wrong sites together with small seam allowances; you don’t need to sew at the small, unrounded side.
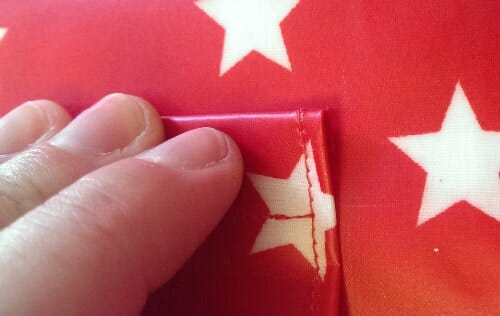
If you cut your fabric as a rectangle, sew along the markings for the round corners and trim it afterward
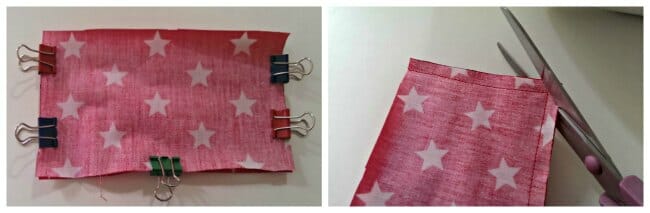
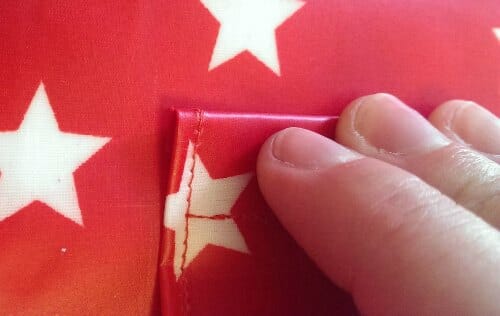
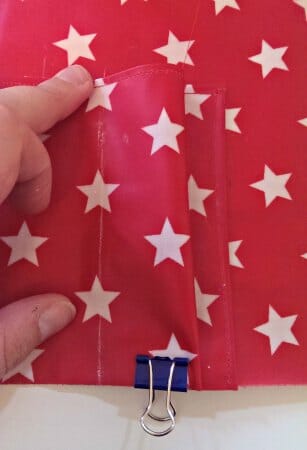
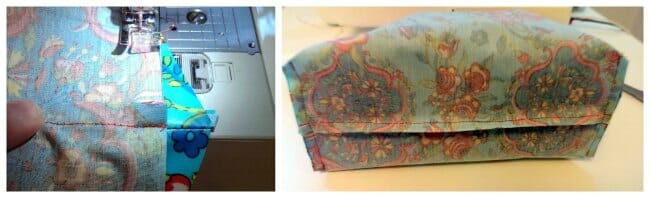
6) Add binding to flap
If you never added binding to a sewing piece I recommend reading one of the tutorials you can find on the internet before sewing; as you can see in my pictures, I am still not a pro in that part 😉
Unfold the bias binding and clip or pin it to the bag flap, aligning the edges
Stitch down on the inner side inside the crease of the bias binding
Fold over the binding to the outer side and clip or pin in place; make sure the folded edge of the bias binding is just a snatch beyond the first seam (so you cannot see the first seam anymore)
Sew with a very small seam allowance along the inner edge of the bias binding, outer fabric on top
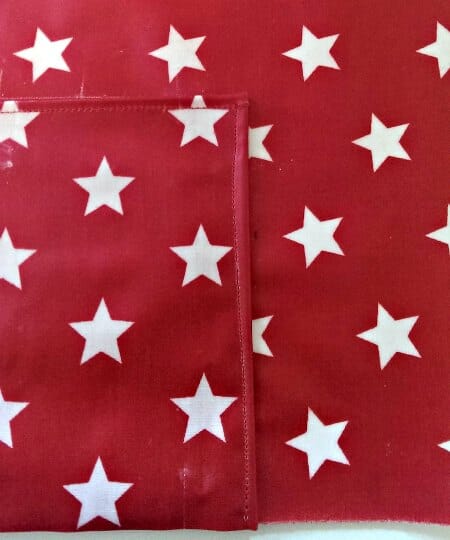
Bag flap finished!
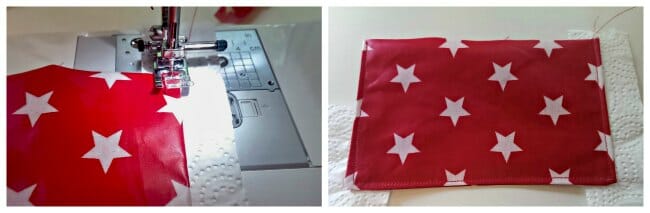
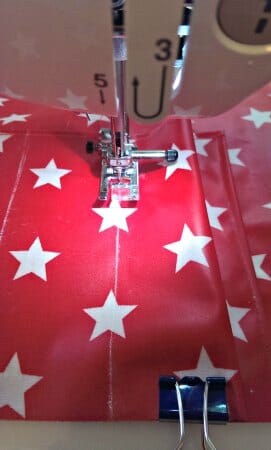
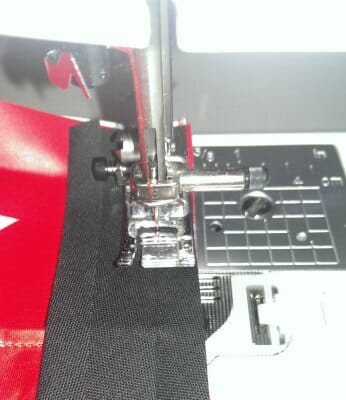
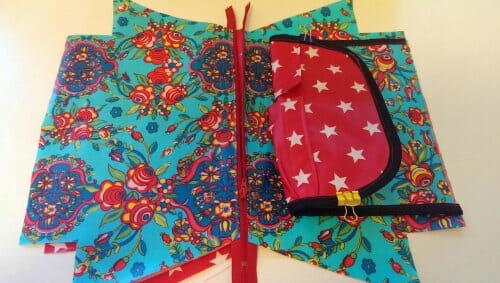
7) Add zipper to bag main pieces
Sandwich your fabrics:
- Lining fabric with right side up
- Zipper with right side up (it is your personal choice if you like the zipper opened or closed; I prefer to sew it closed)
- Outer fabric with right side down

Align the top edges of zipper and fabrics, so that you cannot see the zipper – it is sandwiched between your fabric; pin or clip in place
Using your zipper foot, stitch this together as near to the zipper teeth as possible
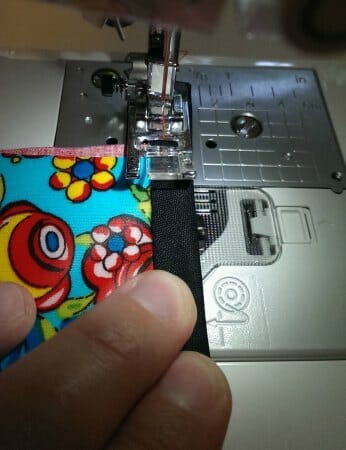
Fold back both fabrics and press flat your seems with your fingers (or with the iron if you don’t use laminated fabrics); make sure the seam is proper folded away and does not overlap over the zipper anymore
Topstich with a very small seam allowance
Repeat for the other side; sandwich your fabrics the same way as before
8) Stitch bag flap to the main bag
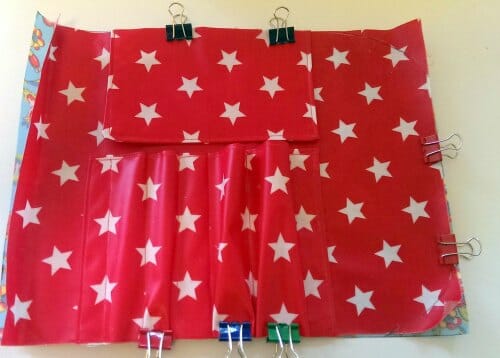
Lay out your bag pieces with the outer fabric up in front of you (see above).
Make sure the lining fabric is fold away to the other side, so you do not accidently sew it to the outer fabric
Mark both the center point of the flap piece and the middle of the main bag piece.
Place your bag flap piece lining down onto one of the outer pieces of the main bag, aligning the raw edges and aligning the center points; the right side of the outer bag piece faces the lining side of the flap piece
Sew the bag flap to the main bag, using a small seam allowance.
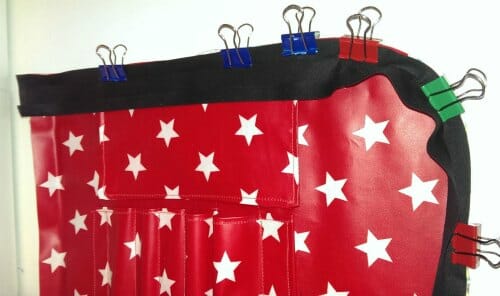
Fold back the flap and secure it with clips or pins, so they don’t get in between your other seams when you assemble your bag
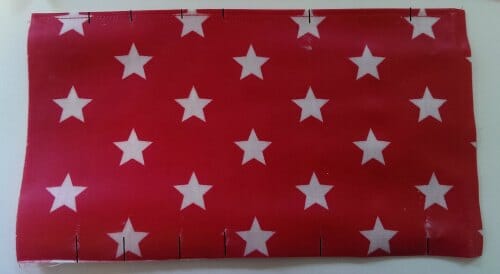
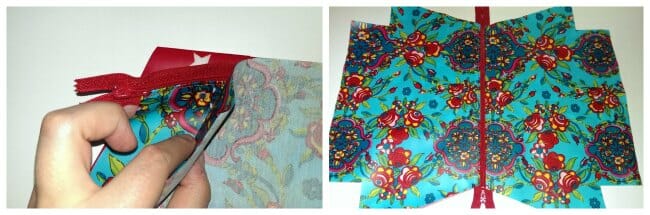
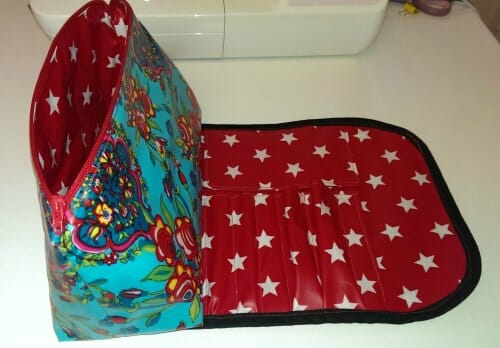
9) Assemble the bag
Open the zipper – this is very important! When you forget this, you cannot turn your bag later
Refold your fabrics: Both the outer and the lining pieces should now face right sides together; clip or pin in place
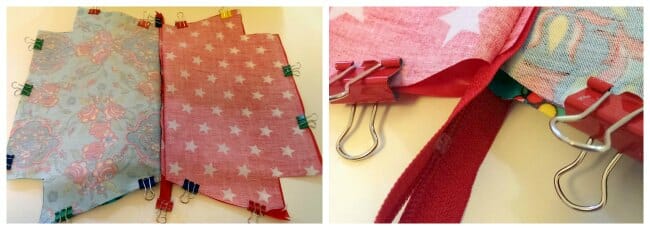
When pinning the fabrics in place make sure that the teeth of the zipper face the lining side; in that case your bag will (hopefully 😉 ) have nice and neat corners
Sew around your bag, leaving out the seams of the little squares. You can see in the picture, which seams are to be sewn; IMPORTANT: at the bottom edge of the lining fabric leave an opening of about 13 cm for turning the bag!
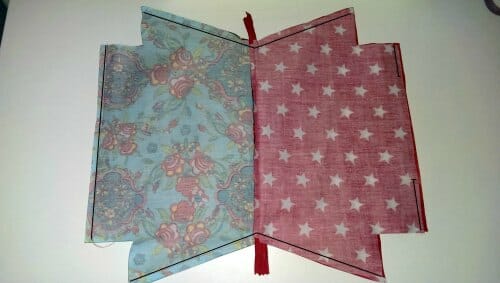
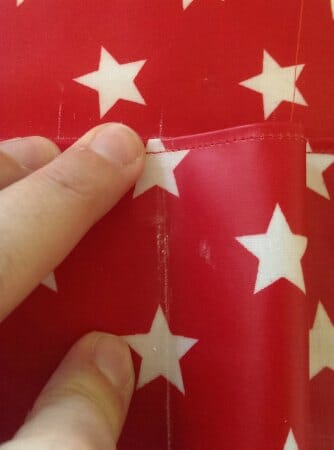
Fold open your seams at the little squares and align the middle seams (look at the pictures for a better understanding; if this doesn’t help I recommend the video from Deby, this is very helpful!)
Sew along the raw edge of one of the former square opening and trim the excess fabric. Take care not to sew over your flap in the inside!
Repeat for the other 3 corners. Your bag is now boxed!
Turn your bag through the opening and push out all corners
Looks quite finished already, hm?
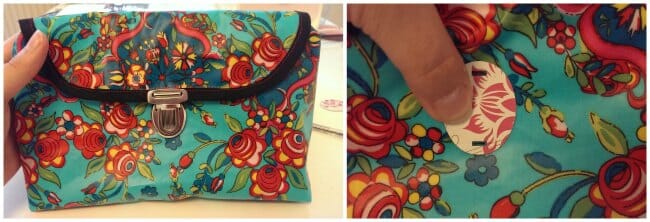
10) Attach tuck lock
Mark the center point of the bag flap edge
Slip the lock over the binding and mark the position of the holes, unslip the lock
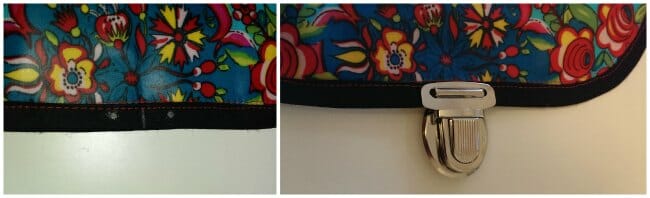
Carefully make two holes with your seam ripper at your markings
Slip the lock over again and secure with the metal piece; take care of the direction of the lock! The top of the lock should be at the side of your outer fabric.
Slip the lock into the holder piece.
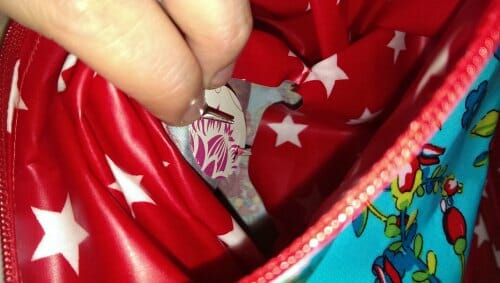
“Close” your bag flap and mark where the bottom piece of the lock should be placed.
Use the back piece of the bottom piece as pattern and again mark the position of the holes
Cut again the marked holes with your seam ripper, but carefully! You don’t want to cut the lining fabric! Grab into the bag and slip your hand through the opening of the lining, this will help you
“Unlock” the lock and place the lock holder piece into the holes; secure from the bag with the securing piece, again grabbing through the opening in the lining; fold over the metal pieces to secure the lock
11) Finish the bag
Pull out the lining fabric and press the opening flat; it should look as if there was a seam
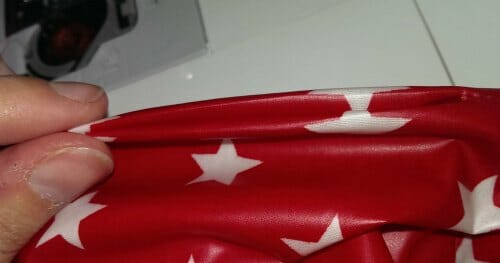
Close the opening either with hand stitching or with your machine with the smallest seam allowance as possible
Put back the lining into the bag and straighten all seams.
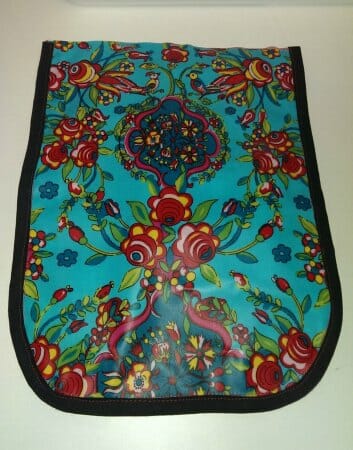
12) You’re done! Congratulations!
If you want to share your finished bag with me or if you have questions – I would be very happy! Please mail at anke.sews@gmail.com
* * * * * *
Wow Anke, that was one EPIC tutorial. Must have taken you hours. Thank you so much. I've got my tuck locks on order and I'll be making up one or two of these myself. Your fabrics really are gorgeous too – you've got some great style girl! Thank you very much for sharing your tutorial. The pattern download includes all the pieces you need as well as the full instructions from above.
You can download the pattern and instructions for the Cosmetics Bag with Brush Roll from my design account at Payhip. It's a PDF file containing both instructions and pattern all in the same file. Enjoy!
Trouble downloading the pattern? Check out this article - How to Download and Print PDF Sewing Patterns.


Thank you very much for your tutorial ! I use it for a Christmas present ! I enjoy sewing it with imitation leather and fabric.
Excellent material for it!
Love this !!! I turned one into an electronics bag (holds ipod, phone and their cords).
Excellent tutorial! Great idea! Thanks for sharing.
This could easily be converted for knitting or crochet needles and the bag used for notions!
Anke, what a brilliant add on to this bag! Thank you for sharing all your hard work. Beautiful job❤️
There are 6 measurements for the brush flap part but only 5 for the brush holder part. I can’t seem to figure out the missing measurement.
Would be easy enough to adjust the brush part to hold one additional brush?
I’m having trouble with piece D. The lines total 16.5 cm and the pattern is 22 cm wide. This leaves 5.5 extra cm. According to the video and your tutorial the last marked vertical line should have .5 cm for turn over and the rest makes the 2 cm pocket. I still have 5 cm left over. What am I doing wrong?
Thank you so much for the post Deby, and for this pattern Anke! Just finished making mine, but with a few adaptations. I chose to put pockets inside, and snaps on the brush cover. I also left the ends of the zipper out, and covered them with matching fabric. I used PUL fabric for the whole thing, including the contrast binding, and used DecorBond interfacing to give it the body it needs to stand up. It came together really well, and the instructions were easy to follow! Thanks again!
Has anybody actually made this? I need the measurements for the main bag to draw out, I’ve already cut the other bits out, my printer has lost its life this week…
Thanks so much for this Deby ! I’m painfully slow at sewing projects, but currently working on this bag. Finished the brush roll portion. Couldn’t find a way to post the pix here directly, so here are the links to where I’m at so far (one is with the brush roll folded over so you can see the exterior fabric):
https://drive.google.com/open?id=0B0YwXSD2J9fRYzdWN1dhdzJsaEU
https://drive.google.com/open?id=0B0YwXSD2J9fRWVlocHBWc0xnb3M
Thanks for all your hard work on the video tutorials and for sharing patterns too! You are very talented and an excellent teacher.
oh, and I had to add a second top stitch line onto the exterior as I’m sure you noticed.. sewing in the ditch only caught the middle portion of the bias on the other side so it was flopping out until I added that second line. I don’t know how I messed that up, but I always have issues with sewing, so I’m quite happy with it so far regardless 🙂
Hi Karin, wow, that looks great! Well done. Thanks so much for sharing. Kind regards, Mayra
Hi! I just love this pattern! I have made one for myself and for my friends who will be traveling with me and they love it! Your instructions and pictures were very clear. Thank you for sharing
Thank you!! I’m so happy!
Thanks a lot for this beautiful tutorial.
Thank you so much! I don’t know if I will ever get to making it, but I saved it just in case. It is a beautiful pattern and a fabulous tutorial video.
Thank you!
Makes me happy to know that you like it. I hope you do find the time to give it a try one day. Drop back and let me know how you get on.
I can’t see the measurements for the main bag ….. just the pattern shape. is it somewhere obvious and I’m just not seeing it?
You don’t need any measurements for the bag, simply use the pattern piece to cut out your fabric. The measurements are given for the other pieces simply because they are rectangles and can be drawn right onto the fabric, but for hte main bag you’ll need to used the shaped pattern.
I can’t find a link to print pattern pieces B and C. Can anyone help, please? Thank you.
Everything you need is in the one file download Donna. If you have the download, then you must have all the pieces and pages with it. Pieces B, C and D are on page 23 out of 24, and piece A is on page 24. So if you have piece D, then you must also have pieces B and C because they are on the same page. Just transfer the dimensions given over to your fabric. Let me know if you still aren’t sure what to do.
I love this idea! I’m putting this on my to sew list 🙂
Thanks for a great idea & tutorial! Just what I need! Added to my sewing list!
This is great Anke. So much better for easy cleaning. Thank you for the great idea. I am going to make many for Christmas & Birthday gifts.
This sounds great and I have the perfect oilcloth fabric for it (purchased on a trip to Finland). I know my sister would like one of these so hers is first.
Thank you for sharing.
Clever idea, Anke. Thanks for sharing.
Very clever, Anke. So, so much better than the plastic bag I use for my brushes.
Hi Anke and Deby. I’ve featured your great tutorial today.
Thanks so much Pam, dropping over now to take a look at what you’ve chosen this week. I think you always pick such a varied and interesting selection for us all to browse through, so thank you for your efforts.
Awesome bag. Looks great and is very useful. It doesn’t get any better than that.
Thanks Cinday – that’s what I thought when Anke sent me her picture. She’s a star for doing all this work for us.
Thanks to both of you!
This is such a great idea!! I’ve got a Craft Gossip post scheduled for tomorrow that links to your tutorial:
http://sewing.craftgossip.com/tutorial-travel-makeup-pouch-brush-roll-all-in-one/2014/10/02/
–Anne
Thanks so much Anne.
Wow, how cool is that! Thanks!
this bag looks awesome. Have already made a couple of the original bag and will now have to try this one for my daughters for Christmas gifts. Thank you for sharing.
I am sure they will like it 🙂