


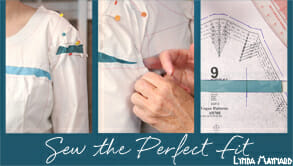
I'm embarking upon an epic fitting exercise and learning to sew the perfect fit this year, following along with the Craftsy course of the same name and the lovely instructor Lynda Maynard. You can read Part 1 of the series at 2013 is the year of Sew the Perfect Fit. Today, fitting the bust and bodice adjustment.
In the last post I talked about the mystery of pattern sizing. According to my measurements I should have been anywhere from a size 14 to a 20 based on the pattern envelope, but with Lynda's advice in the course, I picked a size 12, based on my high-bust measurement to get a good fit around the neckline, shoulders and chest and then was prepared to make other changes lower down to get the good fit.
The lessons
The next few lessons went as follows:
Lesson 3 – The Muslin Test Garment, why, how, marking, construction
Lesson 4 – Fitting Standards, Assessing proper fit and what it should look like, fitting patterns
Lesson 5 – Neck and shoulders, narrow or wide shoulders, rounded shoulders and more
Lesson 6 – Upper body, full bust adjustment, lengthening, etc. How to transfer all of those adjustments to the paper pattern.
Tracing the pattern and making the muslin
I wanted to keep the pattern intact so I used my Clover Double Tracing Wheel and the Saral transfer paper to transfer the pattern to my muslin using this method – How to Trace a Pattern. I was able to mark the cutting line and the stitching line and darts, and then followed Lynda's advice to mark a number of horizontal and vertical lines on the muslin to assist with fitting later.
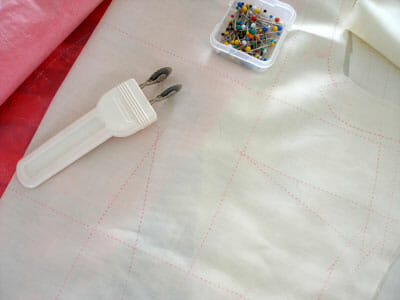
I went over all of the lines with a dark contrasting thread so I could see them easily, sewed up the darts and side seams along the marked stitch lines, basted in a zip to allow for easier fitting and it was ready.
Here is the muslin right out of the packet made in a size 12.
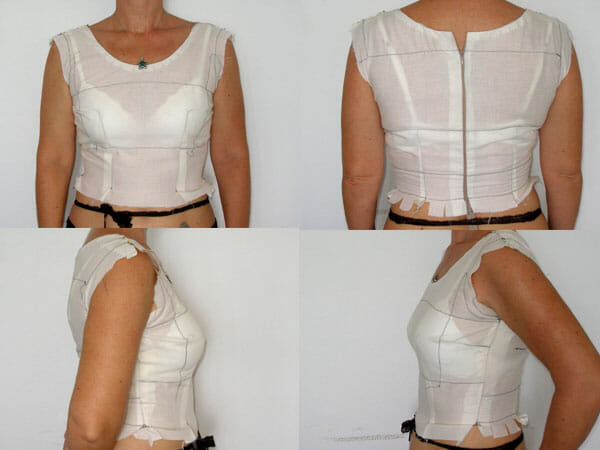
I had to breathe in mightily to get this zip closed and was not able to breathe too easily for the rushed photos. Yes, the fit around the neckline, shoulders and upper chest was perfect – Lynda was right! I don't want to change this at all. But the rest was too tight and too short. Great, gives me lots to work on. (Sorry about the revealing photos, should have used a darker fabric. Just imagine its a bikini and we're on the beach.)
One of the things I really love about this course is that Lynda uses three different models for the fitting, all with very different body shapes and sizes and shows us how to deal with each fitting issue – makes it so much easier when you can see the adjustments on a real person.
Bodice Adjustments
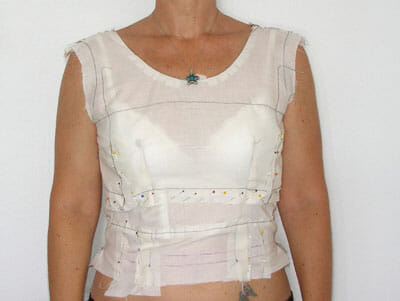
Once I had this on, it was pretty obvious what was wrong and where. And once I had slashed the fabric open in the too tight areas, it was easy to allow the fabric to do its own thing and show me where more was needed.
1 – The black stretch lace in the photo falls on my natural waist and the stitch line of the pattern is about 2 inches too high so it was obvious I need to add some more length. I slashed straight across the middle and added in some more fabric both front and back to bring the stitch line I had marked at the waist down to the natural waistline.
2 – The bust darts also fall a bit too high, so I made a mark and a note to shorten them when I made my pattern changes. It's all still very new to me and I'm not seeking perfection on my first attempt – I'm still just learning!
3 – It's too tight in the front, especially at the waist and some at the bust. So I slashed from the bottom up to the side dart point and added in some fabric on each side. I also allowed for the fact that the bust would increase a little anyway by lowering the dart.
4 – It's also too tight everywhere in the back, so I slashed from the bottom to the shoulder and added a piece of fabric from nothing at the top to the widest point at the waist.
Let's take a look at what the franken-bodice now looks like.

That's a LOT of pins! It's a little bit uneven but its not always easy to pin onto yourself while wearing it! I think I could still make a small adjustment to the front, and open a little above the bust along that horizontal line to drop it down a little. I think I'll see how this first try goes and maybe do that next time.
Next up is transferring all of those adjustments to my paper pattern and then making another bodice to double check. Be back with that soon.
Good news for So Sew Easy readers - in return for this class review, Payhip have offered you all an exclusive discount off the Sew the Perfect Fit course - get 20% off using this direct link.
Disclosure – I bought the course myself and am not being compensated in any way from Craftsy for this course review. I really love the Craftsy classes and negotiated this special rate for your benefit. I am an affiliate so will receive a commission if you buy this course using my special discount link.
Authored by: Deby at So Sew Easy


How in the world did you fit the back on yourself?!! (I’m taking this class too – Lynda is AWESOME)
There was a lot of taking on and off involved. I wish I’d had a helper, but I fitted a zip in the bodice rather than pin the back closed so this helped a lot. I don’t think I could have done it otherwise. So carefully baste in a zip, either open ended or a really long one so it can hang loose at the bottom. Then I would stand in front of a mirror and pinch out what I needed, eyeball it, take it off, pin and then try again. It got it close enough for my first try. Good luck with it.
I do intend to take this class…and will come back and sign up at your link…I should have signed up for it first probably…I signed up for a class with Janet Pray’s Jacket. I love your site…your blog, your free patterns….etc…I’m working on some Christmas right now so not getting much done but appreciate all your inspiration and knowledge…all that aside..my question for you is..would you have been better off to have started with a larger sized pattern? seems to me you had to add a lot if fabric and it just seemed to me that starting and scaling from a larger pattern would have been easier…
I thought so too Ruth and this is exactly where I was going wrong in all of my projects and having so many problems with getting a good fit. Once I had tried this method, I really did find it was much easier to pick the smaller size for the high bust to get a good fit in the upper chest and shoulders because these are the hardest to adjust, then add fabric to the waist and hips – adding in these areas was much easier than cutting a larger size and then trying to remove excess from the loose parts. But it was a fitting exercise and so I deliberately went exactly with what the course suggested as part of my review. In real life, and now based on what I have learned, I would probably grade out from the small size at the chest, to the larger sizes at waist and hips where I need it, and then make muslin fitting adjustments from there.
You make this course look so easy. I have signed up for 20+ courses and never seem to find time to take them. I’ve only completed ONE of the courses and trying to get through another. I have this class in my “wish” list for now. I’ve never been able to sew anything from a pattern that I liked, and I’m sure it was because of the fit. I haven’t tried anything from a pattern in roughly 30 years and now I have a renewed interest, all thanks to Craftsy and posts like yours. Now if I could just find the time!
Hi Deby,
The first time I attempted sewing using a pattern from New Look. I thought I don’t need adjustments. I was also having a hard time picking the correct size. This is great. Btw, thanks for joining Pin It Monday Hop every week 🙂
Judy
I need to get back to drafting my own patterns Deby. I used to do it many years ago. Always love your projects. Just letting you know that my guest host this week has chosen this post to be featured at tomorrow’s Thriving on Thursday linky party. Congratulations!
Anne xx
That’d lovely to hear the post gets a feature – thank you very much. Its such an interesting topic, I’ve learned so much. Now just trying to put it into action. But fitting on yourself without help is still a big challenge.
Deby, I just started taking this class too! I’m a complete novice at pattern fitting, so some of it is over my head but I’m enjoying the learning process. You’re an inspiration and I will be following along with you.
Oh don’t think I got it the first time. The good thing is you can watch it over and over and ask questions until you do get it. I’m not aiming for the perfect fit for my first project = I’ll settle for a reasonably good fit with not too much effort and move on from there. Small steps…
Great job on making the muslin fit, Deby. I always find that if I go by pattern measurements, the garment ends up WAY too big in most places. Altering patterns is something I know next to nothing about, but I’m keen to learn more when time permits. The Craftsy course sounds well worth the time and money spent.
That was always my problem to Pam, it was so so big! I was losing the shape and style by having to take everything in so much. But now I know how to pick the size better and the new basic pattern I will have by the end of the course will be a great template against which I can measure any new patterns for ideal size.
I have always wanted to learn to sew. My step mother was a beast on the sewing machine and she made a lot of my gowns for my modeling pageants.
It looks like you are off to a great start.
Sophia
twentyfiveseasons.com
I’ve been wanting to take their courses but it pretty much comes down to money. Which I have none of. And it’s depressing ’cause I’m trying to start a small business and my current sewing skills aren’t worth the time & effort of starting said business. I need to learn more!!
Loved this post though. I’m currently working on something and this’ll be a help 🙂
Well keep following along Jenny because I’ve Craftsy have agreed to do a giveaway for So Sew Easy readers at the end of the course review so there will be a chance to win the course for free! (Shhh, its a secret so far.)
You might also pop over to my other site at Moms Make Money and look for some tips on how to make money from your blog. very little helps.
That’s great you made a perfect sloper for your body. You will get a lot of use out of that!
Well I wouldn’t call it perfect, I’m sure I’ll still tweak it here and there as I go, but it is going to be really useful in determining which pattern size to cut, where I need to make changes for length etc. Already what I’ve learned from the course has been invaluable. So glad I decided to put in the effort.