


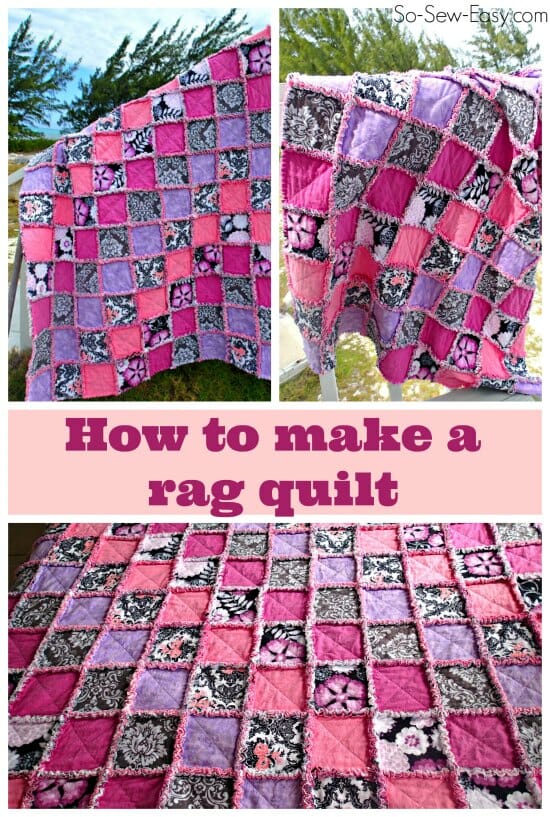
I'm sure you've seen these before. I've been drooling over all the lovely soft and snuggly rag quilts I see on my Pinterest feed and have been longing to find out how to make one. So I gave it a try, took some photos and a video along the way to share the process with you, in case you'd like to give it a go too.
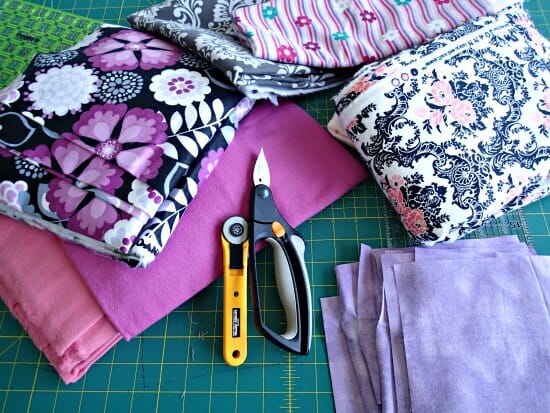
Materials to make a rag quilt
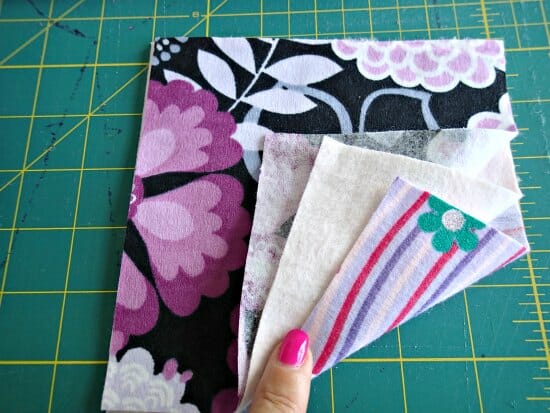
- Flannel fabric in prints, solids or both
- Matching or contrasting thread
- Ideally but optional – ragging shears
- Ideally but optional – rotary cutter and a long ruler
- Ideally but optional – walking foot
- Time and patience 🙂
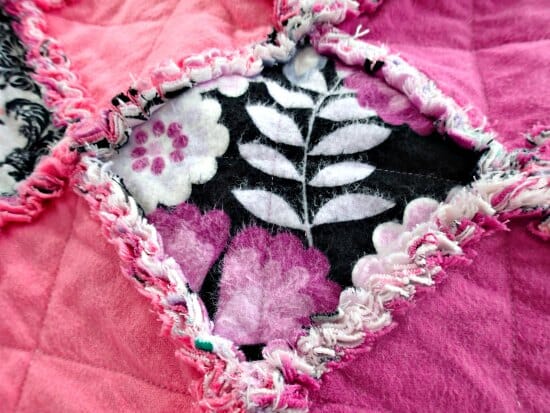
How much flannel you need will obviously depend on how big you want your quilt to be and how many layers you want to add. My finished quilt is 9 squares by 13, each square started out at 6 inches and I used 3 layers in each square. So I used a total of 351 squares. Assuming you can get 36 x six-inch squares from a yard of flannel (you might get more depending on your fabric width) then I needed 10 yards of flannel to make my quilt in total. That's a lot! You can obviously make a smaller quilt and use less fabric. Making bigger squares would also mean a bigger quilt or less fabric because of less seam allowances.
Watch me make my flannel rag quilt
Subscribe to the YouTube channel:
How to make a rag quilt
Decide on what size to cut your squares. Ideally a larger finished quilt size can support a larger square. Keep in mind that this can be a time consuming project, and I recommend not making your squares any smaller than 6 inches.
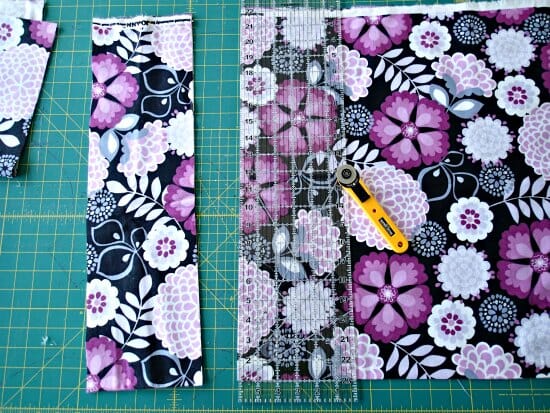
Use a rotary cutter and long 24 inch ruler if you have them. If not, mark your fabric and cut with scissors (but that will take you much longer). Cut out rows of fabric and then cut the rows into squares until you have all of your squares.
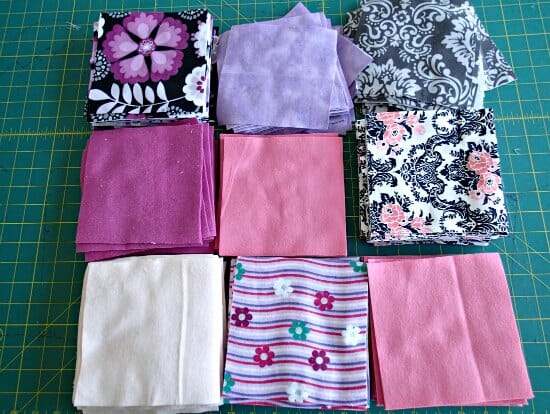
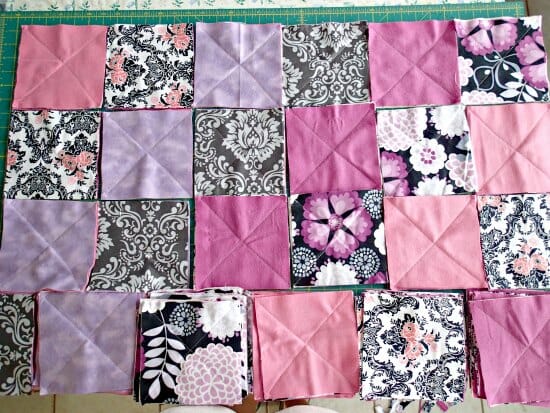
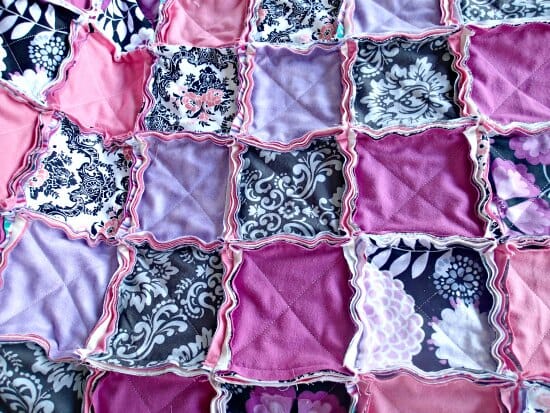
Now have fun designing your quilt. Will you use the same fabric top and bottom? Will you go for a regular placement, something entirely random? I went for a regular placement, offsetting by one in each row. More on that later 😉
Set out all of your sets of 3.

Place the backing piece face down, then your middle layer face up then your top layer face up.
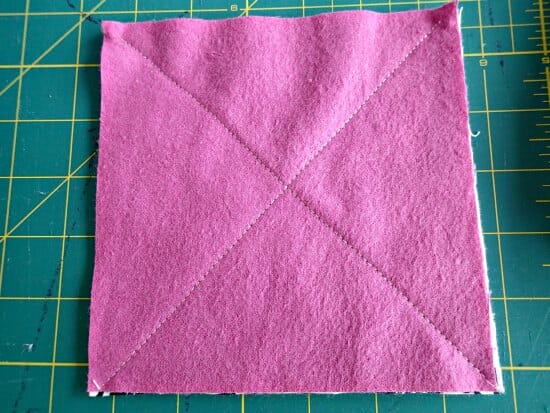
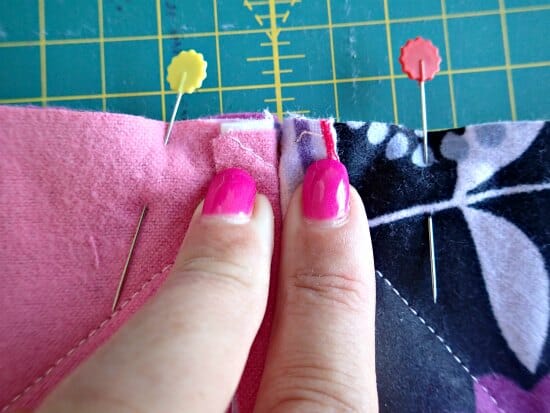
Stitch a large X through the center of your 3 layers from corner to corner. A walking foot is going to be useful here in keeping all the layers neatly together as you sew, but its not essential. The flannel clings to itself so you won't really need any pins.
Repeat, repeat, repeat until you have all of your squares sewn with crosses. This is an excellent time to do a bit of mindless sewing. Sew a few squares here and there when you get 10 minutes. This is an easy pick up and put down project.
Now start to sew your rows. Decide on a seam allowance – for my 6 inch squares I used 1/2 inch. For a larger square you could use a larger seam allowance to get more of a balanced look.
Opposite to usual sewing, you'll be sewing with the WRONG sides together – whatever you want on the back needs to be sewn facing and then the fabrics on the front and the seam allowance will appear on top. Repeat, repeat, repeat until you have all of your rows sewn.
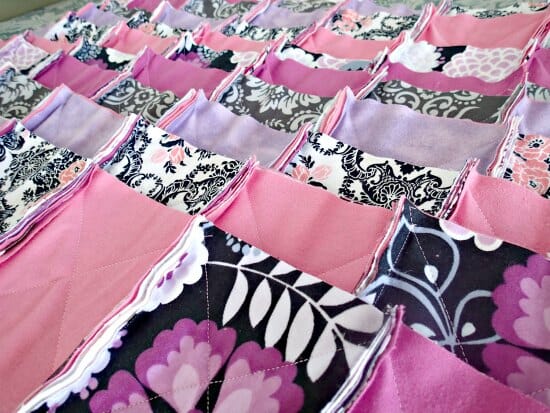
You're starting to see the big picture now. Time to sew together your rows. Remember to sew them WRONG side or back sides together. Open up the seam allowance front and back as you sew and try to match the seam allowances on your squares.
Phew, its been a sewing marathon and we're not quite finished yet. We need to take care of the outside edges, so now sew a line of stitching all the way around the perimeter using your same seam allowance. Now you are done. Put your sewing machine away and put your feet up. But not too long….
Now it's time to snip. Use your spring loaded ragging shears if you have them, or your regular sewing scissors if not. Depending on the size of your quilt and the number of seam allowances you could be snipping for some time! Put on your favorite movie or an audio book and snip away. I snipped about every 3/8 to 1/2 of an inch. Of course be careful not to snip into your stitching or you'll have to sew that seam again.
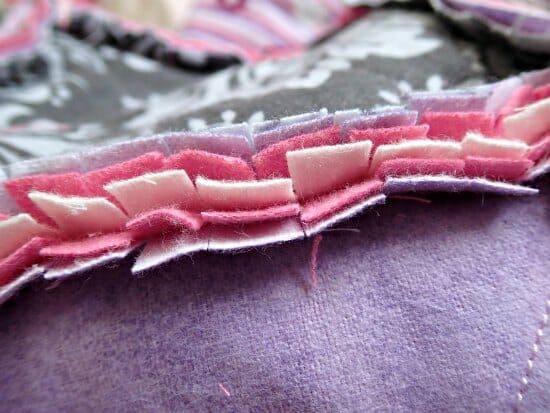
Snip all around the edges too. I created quite a blister on one knuckle where it was rubbing on the scissors – who knew this could be so dangerous!

OK, nearly done. It looks good but here is where we make it look awesome. Toss it in the washing machine with a couple of towels. I read its best not to use a liquid fabric softener. You'll get quite a bit of fluff in your washer, but it should almost all end up stuck onto the damp towels after spinning so should be easy to just wipe around and pick up any last little bits. Then throw it in the dryer or line dry. Repeat the washing and drying if you like to get a more frayed effect.
And you are done. Isn't it lovely. All soft and snuggly and so pretty.
I held it up proudly and showed it to hubby after all my hours of work. What do you think I asked? Erm he said, what's wrong with the pattern?
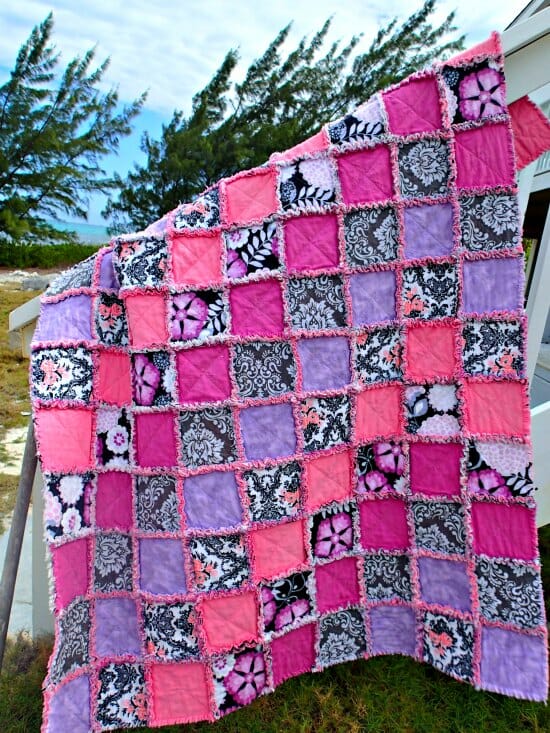
Arrghghh. I don't believe it! After all that hard work, I sewed the very last row on wrong – look, it goes the wrong way. Not sure yet if I'll remove that last row or just leave it as a design feature. I never even noticed until he pointed it out! Sigh.


I’ve loved putting this together! I read the part about neatening up the blocks once the x is sewn, after I made mine. I will definitely do this next time! I’m about to start the snipping. Should I unpick the threads from the x’s and seam allowance or just snip on either side of seam? Help!
I’ve made a few rag quilts now. I loved the idea of using flannel in the middle and they turn out great.
i just love your tutorial … thank you …. i have made several of these in past years and it is great knowing that i have been doing them right …
now as for the pattern not being overall the way you probably envisaged … i look at this very cute little bargello raggy quilt and think … oh wow .. that is gorgeous …
I have a friend who used this method for making a quilt with all her husband’s T-shirts after he died of cancer. She cut out large squares, probably 12 inches from the front & back, showing the front design on top and the usually plain T-shirt fabric on the back. He had lots of Tshirts from the yearly Sturgis SD motorcycle rides. She used red flannel for the inside. She sewed the X’s and ragged it exactly as you describe. It turned out really nice!
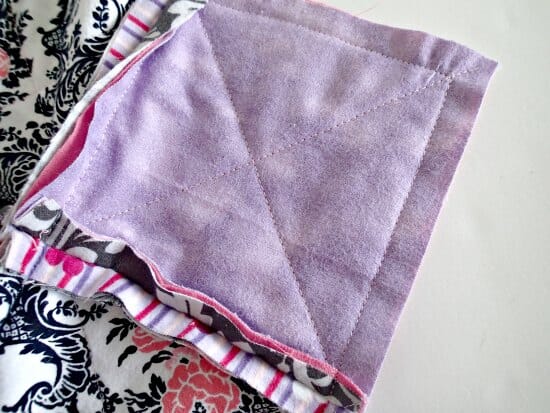
Mayra- so I see the front has the repeating pattern, which I really like. I did not see any comment or pictures of what the backside looks like. With the front side being so uniform, I would think the back would be very hap hazard. Want to try to make but having problems envisioning the back side.
I just looks like a tiled floor, that is the best description I can give you.
i,m making a rag quit now i,m dissapointed because i never cut by blocks all same size suppose be 12×12 but some of them when i sewed them together is 11,5 and 11 cant notice it so much on front ,but on back i can notice . it,s my first rag quilt , i said well no doupt it,s a rag quilt . and the frenges is differant height lol , but at least i tried . my Grandaughter loves it so that main thing ,it,s for her . maybe i,ll do another one later ,
Looks great!! I made the same mistake with a quilt I am making my new granddaughter>>>>its called personalization!!!
Wondering how many prints and how much of each your purchased? I know you mentioned 10 yards in total.
It’s gorgeous! Great work! I don’t sew very often, but I just made a rag quilt out of my sons tees for his highschool grad. And guess what??? I switched the last two rows !! Arghhh! I feel your pain. After having 5 people tell me to leave it alone, I ripped it out!! Ha!
I’m ready to try another one with pretty fabrics like yours.
I have a couple questions.
First, those rotary scissors didn’t cut through the tees or flannel very well. Am I doing something wrong? Do I need a better pair?
Second, the tee material was shifty and stretchy causing gathers and pleats. Next time I will fuse it. Does a quilting type cotton stay in place better?
Thank you!!!
They are NOT Rotary Scissors, they are RAG Scissors and they work great if you follow the directions
I love that rag quilts are so quickly put together and so easy to personalized too. I couldn’t tell you how many I’ve put together as a quick gift.
FYI: A good source for flannel fabric is a Good Will store. I regularly buy clothing such as men’s shirts for quilt fabric. It’s inexpensive and helps the community also.
Just gorgeous! I have made at least 3 of these rag quilts and I often use cotton, jeans, and flannel all within the same quilt. I’ve always done 3 layers, but I’m tempted to try a 2 layer rag quilt.
This is beautiful and I’m going to start one for my granddaughter using denim. But could you pleas tell me how much flannel I need to purchase for a double bed.
Hi, Mazzie, Measure the bed width and length including how far down to the floor you want. Then check how wide is the fabric, then you will know how much to purchase 🙂
I think your quilt is beautiful. Thank you for sharing, I always do better if I can see how someone else does it. I have always wanted to make one, but sometimes just reading directions isn’t always clear. So thank you again for the video.
hi there! Found that my quilt somehow turned out smaller than I had anticipated, I cut squares 7″ batting 6″ and did a 1/2″ seam allowance and snipped all the seams . Found some of my “x”s were off ( 🙁 ) . Blanket looks way smaller. So, I bought more fabric to add to the present quilt. I had washed and dried the quilt x2. The outside border did not fluff up very well. So Have taken all my seams apart. I will be ironing and re-sewing the squares. thinking about taking the “x”s out of the squares and re-sewing them too and then add the new material. What do you think I could do to fix this?
Try cutting your fleece an inch smaller as it doesn’t rag. Also, if you want a more full rag look, cut extra half inch strips to sew into edges and have extra layer of “rag.” 🙂
Ok so you cant use batting on the inside. I had watch another women make one and she made 6 in. top and bottom flannel then 5 inch batting . She sewed the x and then did sew the rows together 1/2 in. Is that ok. ?? I like your way better looks much easier to just make al the same and all flannel. Thank you for your video it made it much easier to understand
Your quilt is beautiful. Your frayed seam allowances are full because they contain 3 layers of fabric vs 2 layers if you use batting. I’ve made dozens of rag quilts using everything from the salvageable parts of old blue jeans (include the back pockets if they’re still good, but don’t use batting in these quilts). I’ve used up old blankets for the batting by cutting them into 4 inch squares for each 6 inch quilt squares. If you’re going to donate these quilts, use up all of your ends of your spools of thread–the mismatched thread adds to the fun of these. I do double stitch each block and row together as well as around the perimeter of the quilt as these quilts get a lot of use and I don’t want the seams to come apart. Before I ever made I rag quilt, I bought a pair of Heritage Cutlery Rag Quilting Snips which I maintain with the drop of oil that they recommend and they’ve saved me sore hands!
Do you always cut batting the same size as your squares? Do you feel it makes clipped part fuller even if you use a dark fabric and your batting is off white, is that ok?
Great quilt but I can’t see what’s wrong with the last row what do you mean it’s going the wrong way
It’s actually the last COLUMN showing here (right side)… Still beautiful! 🙂
I enjoyed your video very much, but I do have another question. I have a bunch of white flannel that has already been pre-washed. How do you think it would turn out if used for the middle of two unwashed squares? Sounds undoable? I’m not crazy about white flannel for babies–it just gets grubby looking so quickly. Any other suggestions for my white flannel? I really loved the solid pastels and prints you used in this rag quilt!
How do you cut where all the corners meet?
You do not cut the corners since you need the seam allowance hole for the next row.
So after its all sewn together cut the raw edges but not the corners
You never cut the raw edges, you need to snip the seam allowance so it looks ragged. Snip the seam allowance at 3/8 of 1/2″. This is going to be a time consuming job.
yes the seem allowance I’ve done a couple before but have always been confused on how to cut where all the corners meet up
Can you please send me a picture at my email mayra@ so-sew-easy.com so i can understand where you are having trouble. Thanks in advance.
Yes, you really do cut the raw edges. Every seam has raw edges of each fabric, unless you make french seams like the legs of blue jeans.
I sent email
Got it and replied to you, let me know if you have any other question, don’t hesitate to drop me a line or leave a comment.
I also wonder how to cut at the corners. You end up with a square tab – is that what you want to happen?
So how do you cut where the 4 corners of each block come together ?
Just watched your video as I am trying my first rag quilt. It was great and very informative. I will definitely be watching more and will follow you on Pinterest. Thank you.
Absolutely LOVE your color choices, and I agree with the other comments here, that you should leave the last row the way it is, it adds character. I initially thought it was purposefully done that way.
Love your quilt the way it is!!!!!! When I made mine years ago, I made a king and made it with 2 ragged borders. Also, instead of an X I put the squares on the emb. machine and used a simple quilting design. Turned out real nice and hubby loves it. Only quilt we need with the cold winters in AR – and we have a window open.
Hi, I made a small lap type quilt, the rag seized my washer and when it came out of the dryer wasn’t very raggy. Suggestions.
When I sew my X I sometimes get a gathering on the overlap of the first /, I try to be very careful. Any tips on preventing this?
Do you have to use middle layer or can you just use the top and bottom??
I’ve seen them where they just use the top and bottom and use quilt batting in between,, but the fringe part doesn’t look as full.
I love your Quilt and I’m making my First rag quilt with cotton. Do I sew the X with the Batting in the Middle first and then sew them all together?
Yes. Sew the X first on all of them then start sewing together.
Does it have to have an x
I made my first rag quilt over the last month. I made it just to see if I could. I really love it, I’m officially hooked!your quilt is so beautiful, I want to make a large one. So glad you gave your square size in your instructions. I used 5 inch squares in mine. It is cute for a child, but it is labor of love intensive! Thank you for this forum to see what other quilters think. I would leave the last row just like it is also, adds character! Be Blessed everybody!
You are a funny one! I love your quilt! I would leave that last row on. Like the Amish, they purposely put in a mistake to keep them humble. I’ve made many rag quilts and my favorite one was made with all our old jeans. Thanks for your tutorial. Loved it! Ellie B
Great tutorial! I made one using my mom’s flannel pj’s. She’s been gone 7 yrs. Always feel like i’m getting a hug when i’m snuggled under it!
Excited to make one tonight! Loved the humor in your writing
I have also used batting for the middle squares and cut them 2″ smaller than the outside squares (I use a 1″ seam), I also cut my flannel 2″ smaller if I’m using flannel as my middle piece. This helps with the cost savings too.
I just bought all my flannel today….do I pre-wash it??
No, will have to wash it after you piece the quilt together.
What a great tutorial, thank you. I made mine with homespun and embroidered stars in every other blocks
Sounds beautiful Pat!
Fabulous!! Can you use cotton on the top rather than flannel all the way through?
I never tried, but as long as it ravels do not see why not.
I made a rag quilt with all western fabrics and put an embroidery on each square
that was like an outline so it looked ok on both sides. turned out awesome. and it was out of cotton fabric not flannel.
Is all of the fabric flannel or are the prints a different type of fabric?
HI Kelly, yes All flannel.
I have terry cloth squares. Is it possible to use them for a rag quilt? If so, what should I use for the middle fabric?
I have never done it, but worth a try. Since terry cloth is already bulky I would go for flannel inside or 100 % bedding cotton.
Just finished my first rag quilt…..I made it because yours is beautiful. I am a person that is never happy with what I make, I always seem to point out what I did wrong.
Well, with this quilt I am Oh! so very happy! I can’t wait to make my next one.
Thank you for the great tutorial…
Hi Rosemary, glad it came out so well. Kind regards and happy sewing!
I like to use a lightweight denim for the backside… cute!!
Love it! I had to really look to see your “flaw”. How many hours did this take? I’m thinking of making a lap quilt. Your’s really is beautiful. Thanks for sharing f:)
I plan to make a rag quilt but I’m going to use my grandmother’s antique hankies. I was thinking of putting them on top of the top piece of flannel and then sew the X on all layers. Of course, I think I’ll have to use 8 inch squares. Do you think it will make any difference as far as the ends fraying? I’d been trying to come up with something to do with the hankies and a friend suggested this idea.
Hi Peg, I think it will be fine. Sounds great what you are doing with the hankies!
I made one with squares from old flannel pajama bottoms for a reminiscent twist.