


Why design your own pencil skirt sloper pattern?
Have you EVER owned a pencil skirt that fit you properly? I find the ready to wear either gape in the waist, or are too tight across the hip or thigh or the darts aren't right. I guess perhaps my waist to hip ratio does not match the ideal hourglass figure. Neither is my widest point in the regular hip – I am a true pear with my thighs wider than my hips but with a very square waist to hips too.

Does your skirt fit like this? You need a custom pattern.
Now that I can sew (a little) I thought it was about time I tried to rectify this with my own pencil skirt. But buying a pattern would not solve the problems and would require so many alterations and it's so difficult to fit on myself without any help. So drafting my own pattern from scratch seemed to be the way to go. I know you all love free sewing patterns as much as I do, so let's give this a go.
I'm going to show you how you can make your own custom pattern too.
Want to make your own perfectly fitting skirt pattern – read on!
How to make a pencil skirt sloper
There are a number of tutorials online and I took inspiration from several to eventually come up with a system that worked for me and I drafted my pattern as follows:
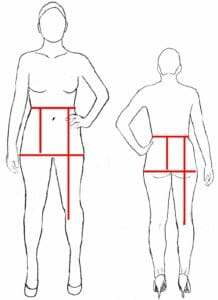
- Take measurements at the natural waistline and at the widest part of the body (hips, bottom or thighs if needed).
- If you have a tape measure that uses centimeters, I recommend using that for this pattern drafting as it will give a more accurate measurement than using inches. If you cannot use centimeters, then try to be as accurate as possible with your measurements in inches for the best finished result. Do not round to the nearest inch.
- Mark on the body where the measurements were taken, or tie around a piece of string or loose elastic and then measure the vertical distance between your measurements from waist to widest part of the body.

- Measure how long you want your standard skirt length from waist to hemline.
- Use large sheets of paper or tape together enough smaller pieces until you make up a piece of paper big enough to draw your pattern. Many sewists like to use Sewable Swedish Tracing Paper
or Medical Pattern Paper
for pattern making – it's strong enough to use again and again and can even be pinned to the body to check for fit.
- Make the paper the length of your skirt plus 4 inches, and the width of your widest measurement, divided by two and add back 4 inches. This will give you some working area and allow for you to write down your measurements and calculations.
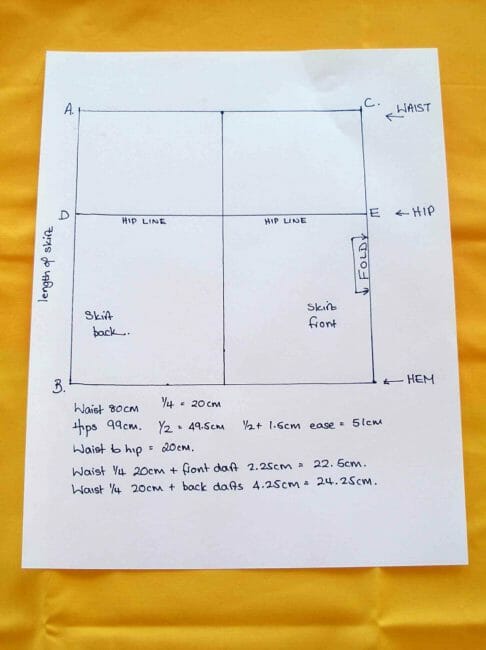
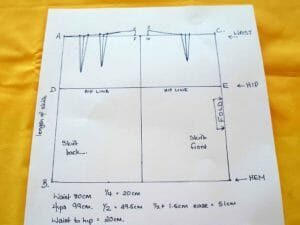
- Now draw a rectangle in the center of your paper which is the length of your finished skirt measurement from waist to hem, and the 1/2 width of your widest measurement plus sitting ease. We will need some ‘ease' in our skirt if it is not to be skin tight and then split when we sit down and our bottom and thighs expand. So add some ease to your hip measurement – for slimmer bodies allow 1.5cm, for softer bodies allow 2.5cm. Example – my hip measurement is 99 centimeters, so I divide by two to get 49.5 cm, add on 1.5 cm for ease and make my rectangle 51 cm wide.
- Length A to B is the length of the skirt from waist to hemline excluding the width of any waistband.
- Length A to C is the hip measurement divided by two, plus your ease of 1.5 or 2.5cm.
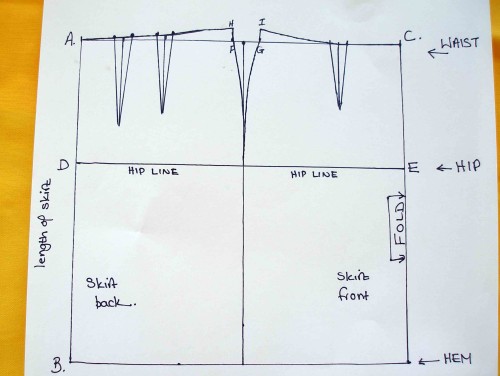
- Now find the center of the line at the top and bottom and draw a vertical line down the center to make two pattern pieces. On the right hand side, make this the skirt front and mark that it is to be cut on the fold. The left hand piece is the skirt back.
- Add a hip line D to E across the full width and down from the waistline according to your measurement from waist to hip. Length A to D is the waist down to hip measurement.
- Your basic pattern should look like this so far. I'm working in miniature so it is easier to photograph!
The basic rectangle of length and hips plus sitting ease.
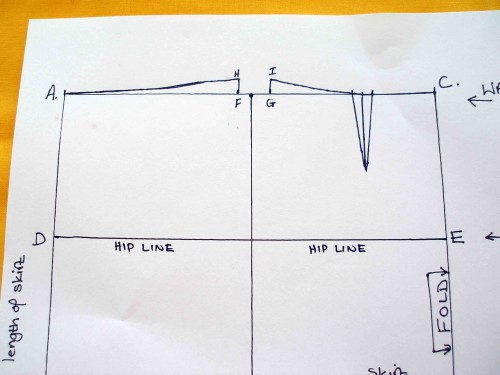
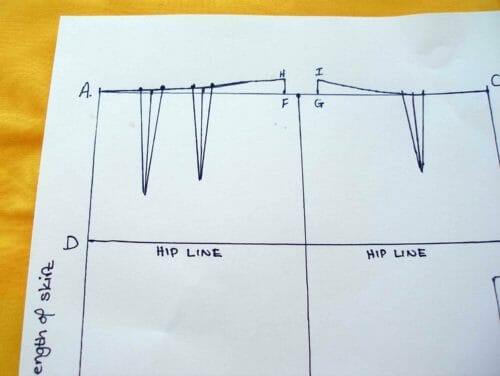
- Our bodies are curved at the waist so we need to curve our pattern. First mark across on each side for a quarter of the waist measurement plus 4.25cm for the two darts on the back, and quarter waist plus 2.25 cm for the one dart on the front. Make these points F and G.
- Now measure up 1.5cm from F and G and make these points H and I. Draw lines from H to A and from I to C. Make these lines slightly curved.
- Now to add the darts – let's do the front first. The dart should be centered 4 inches from the fold, so measure in 4 inches and make a mark on the waistline. This is the center of the dart. Now measure out 1cm on each side of your mark and these are the outsides of your dark. Mark. The length of your front dart is 10cm and it should run parallel to the skirt front. Draw up the dart, joining up the points you just marked.
- It should look like this.
Showing the curve of the waist at the top of each piece.
- Procedures are the same for the two back darts. We will space them evenly so divide your quarter waist measurement into 3 for the spacing. My quarter waist is 20cm, so the first dart is at 6.7cm and the second at 13.3cm. Dart lengths are 14cm for the one on the far left, and 12.5cm for the one on the right. Each will be 2cm wide and run parallel to the side. It should look something like this when finished, although yours may be neater because I am working in miniature.
Showing the front and back darts added
Your pattern so far
- Now marks F and G need to be smoothly curved from the waist to the hip line. Yours may be more exaggerated than mine because I am rather square. Your body is curved so draw a smooth curve rather than a straight line between waist and hip. A drafting curve
can help and will come in useful if you plan to draft or alter patterns yourself.
Curve from waist to hip
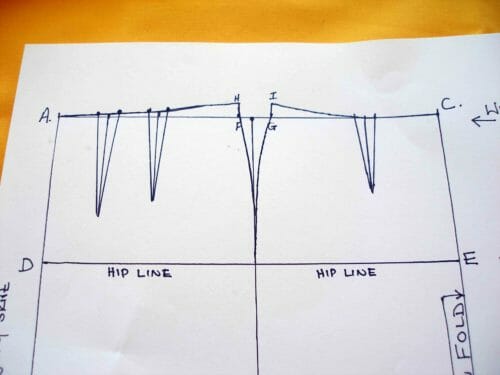
- Now your basic sloper is ready. However you do need to add seam allowances.
The finished pattern – now add seam allowances
- Cut out your pattern pieces separately and then stick them down on a large sheet of paper and draw in your seam allowances around the outside. 5/8th of an inch is standard, you may want to add 2 inches for the bottom hemline. Do not add a seam allowance to the front center as this is cut on the fold.

Testing your sloper pattern
Now, not all bodies are the same, and some of us like a skirt to fit differently to others. So before you go cutting into any special or expensive fabric, do try out your new pattern on some muslin, cheapy remnant or old sheet to check the fit. Then if any adjustment is needed, do remember to alter your sloper for next time.
Making a waistband for your skirt sloper
You can sew the skirt without an added waistband, just with facings and a zipper right up to the top. Or you can add a simple straight waistband. For the waistband:
- Draw a rectangle 6cm wide by the length of your waist measurement plus 4cm. This extra is for the center back overlap for any button or closure.
- Add a 5/8th inch seam allowance around the entire outside and once folded in half, this will form a simple one piece waistband for the skirt.
Making a skirt from your sloper pattern
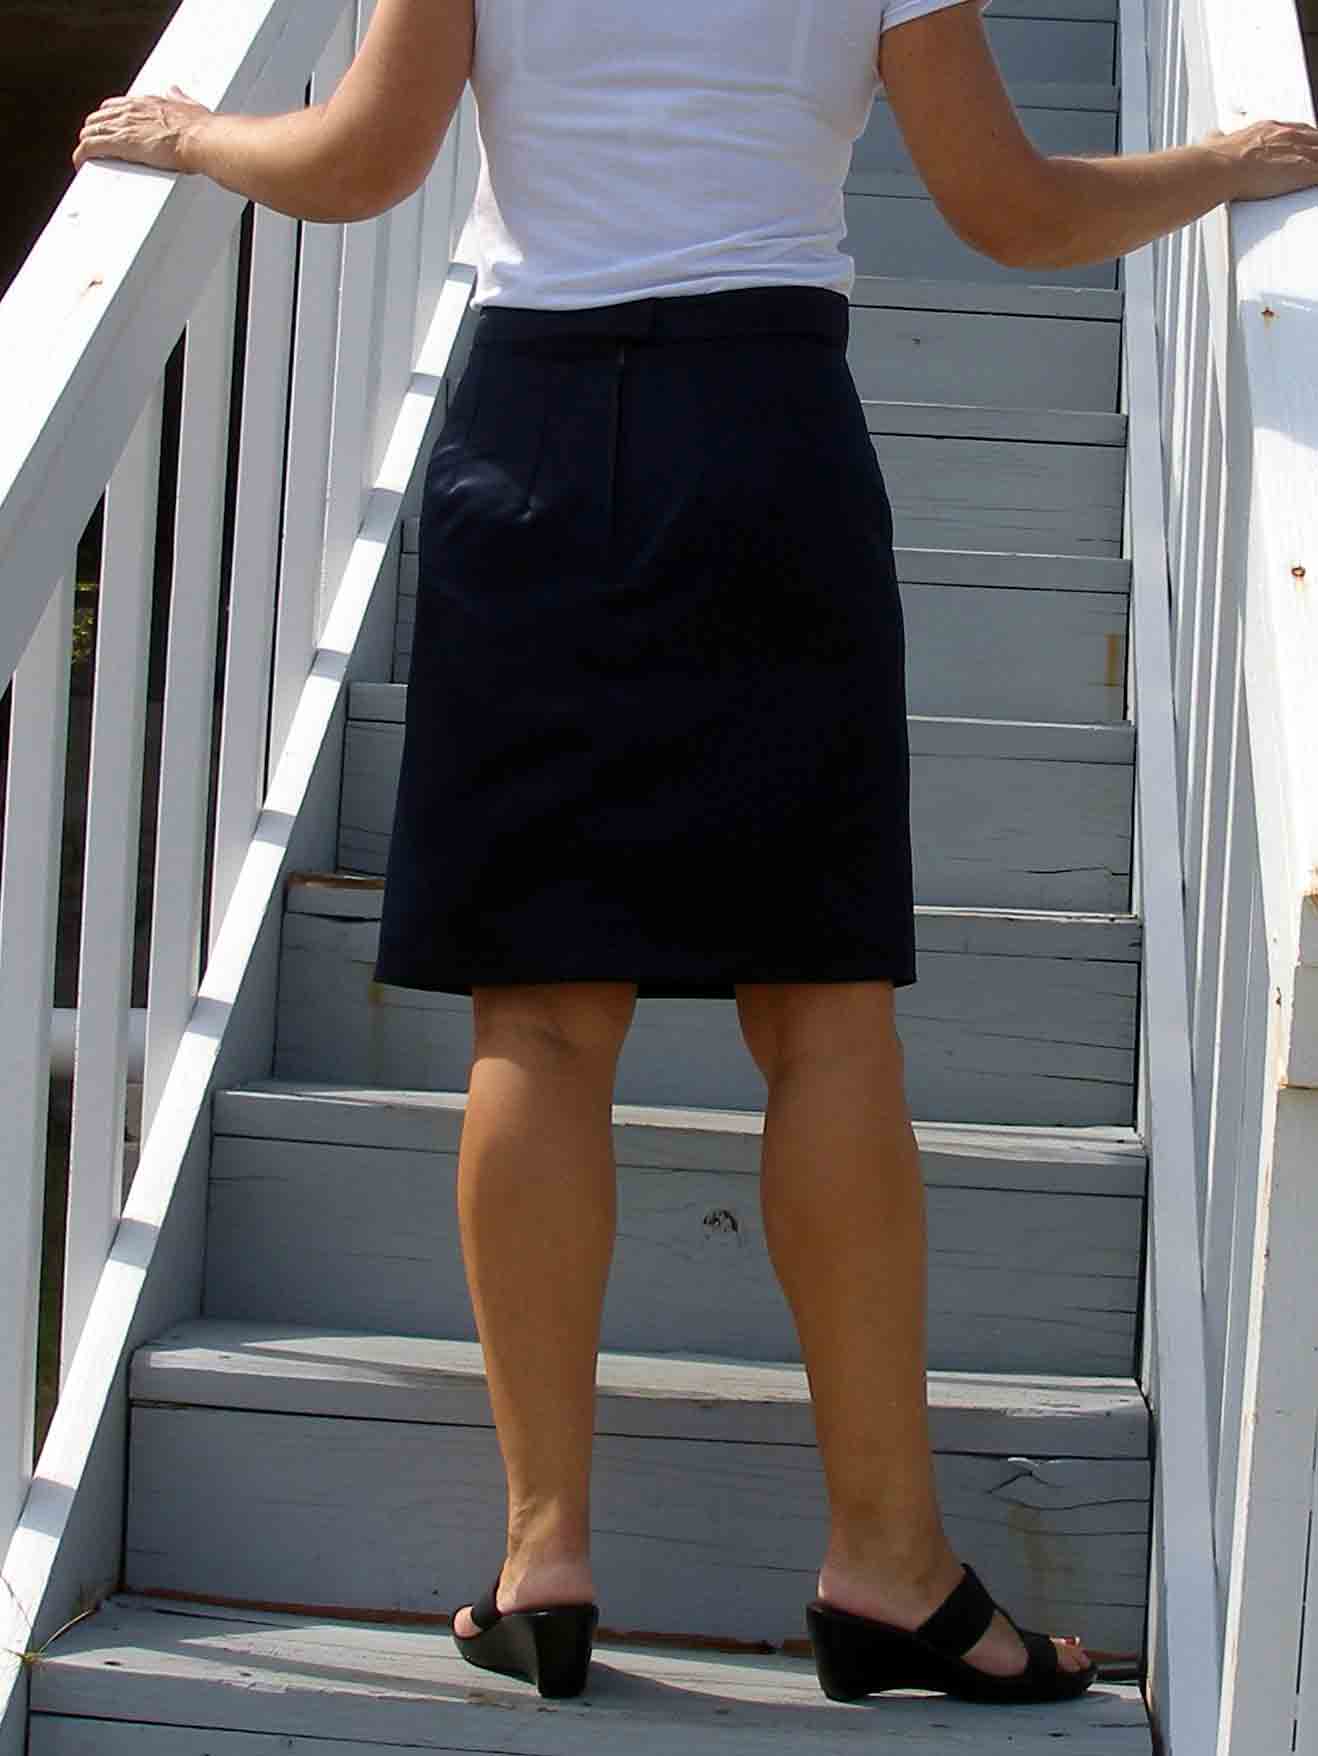
Well, all this looks good in theory but will it actually work out in practice? Let's see. I had a piece of quite thick shiny satin in a navy blue from the remnant bin this week that was perfect for a trial piece.
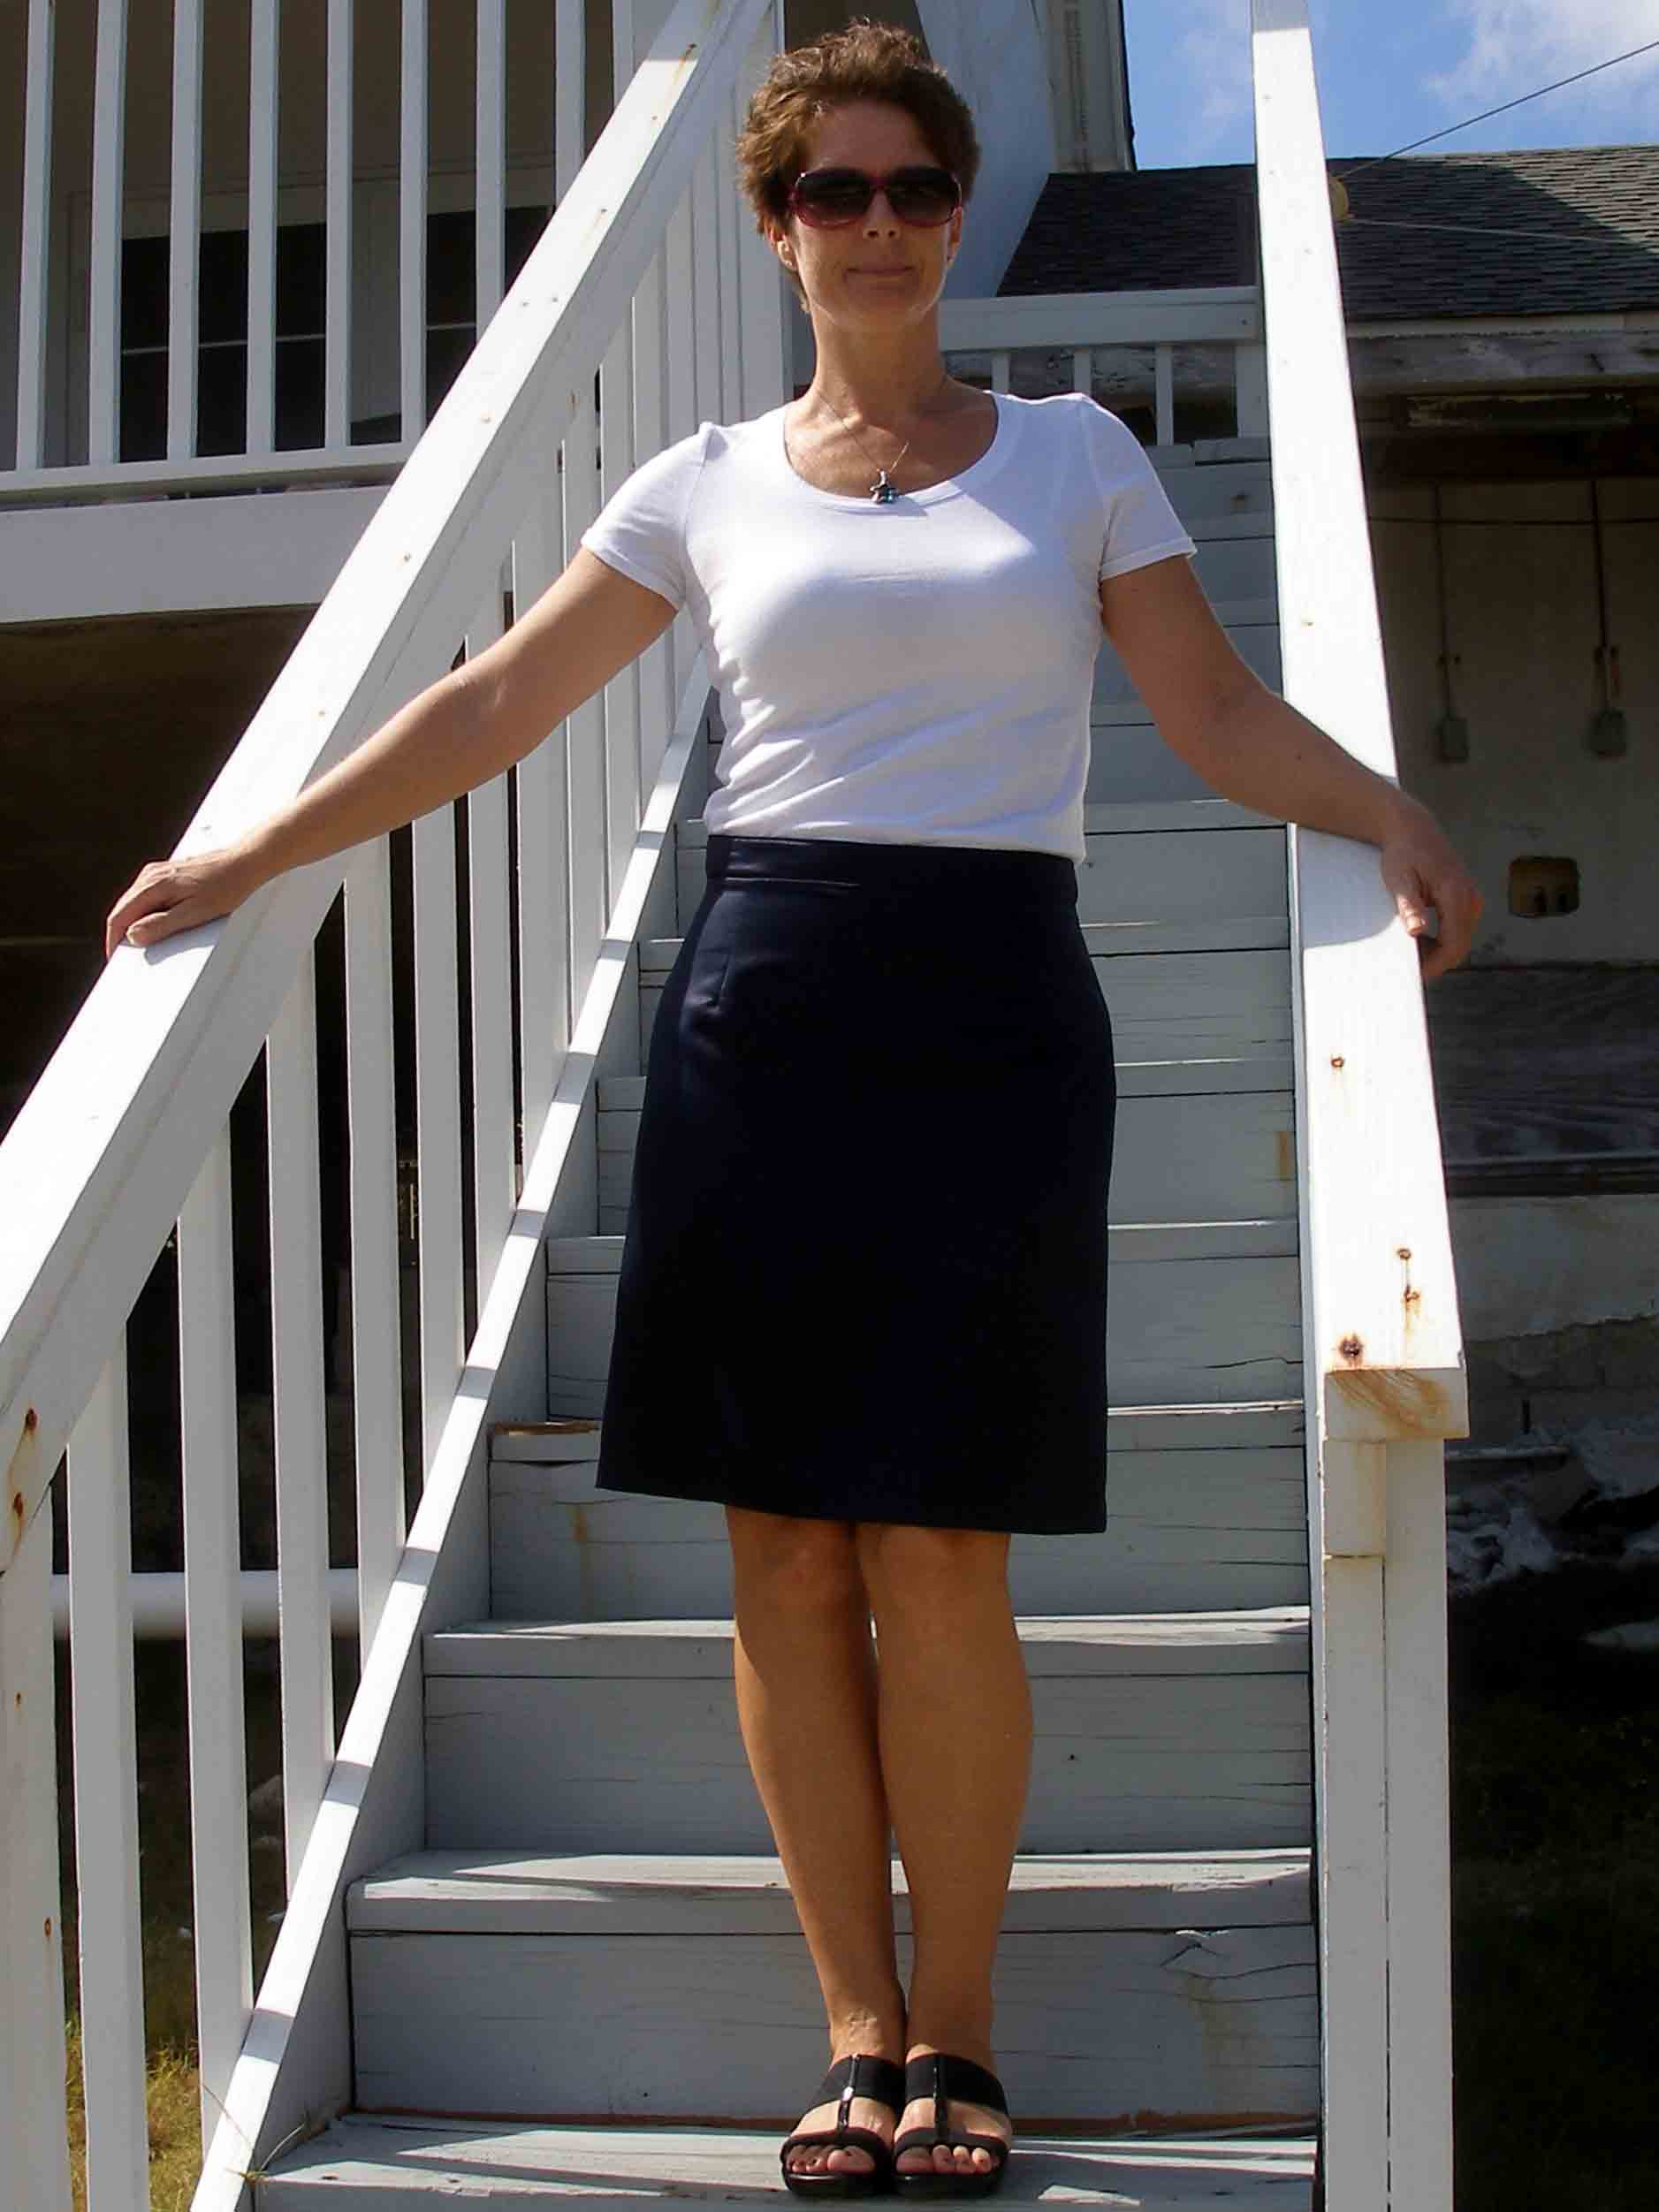
YAY – it works! I made up this skirt directly from my sloper without any adjustment or fitting needed at all. I sewed it, I put it on, it fitted! And I have to say this is the best fitting pencil skirt I have EVER owned. You can see from the following pictures how I am so square that its no wonder I've never got a RTW skirt that fits me properly.
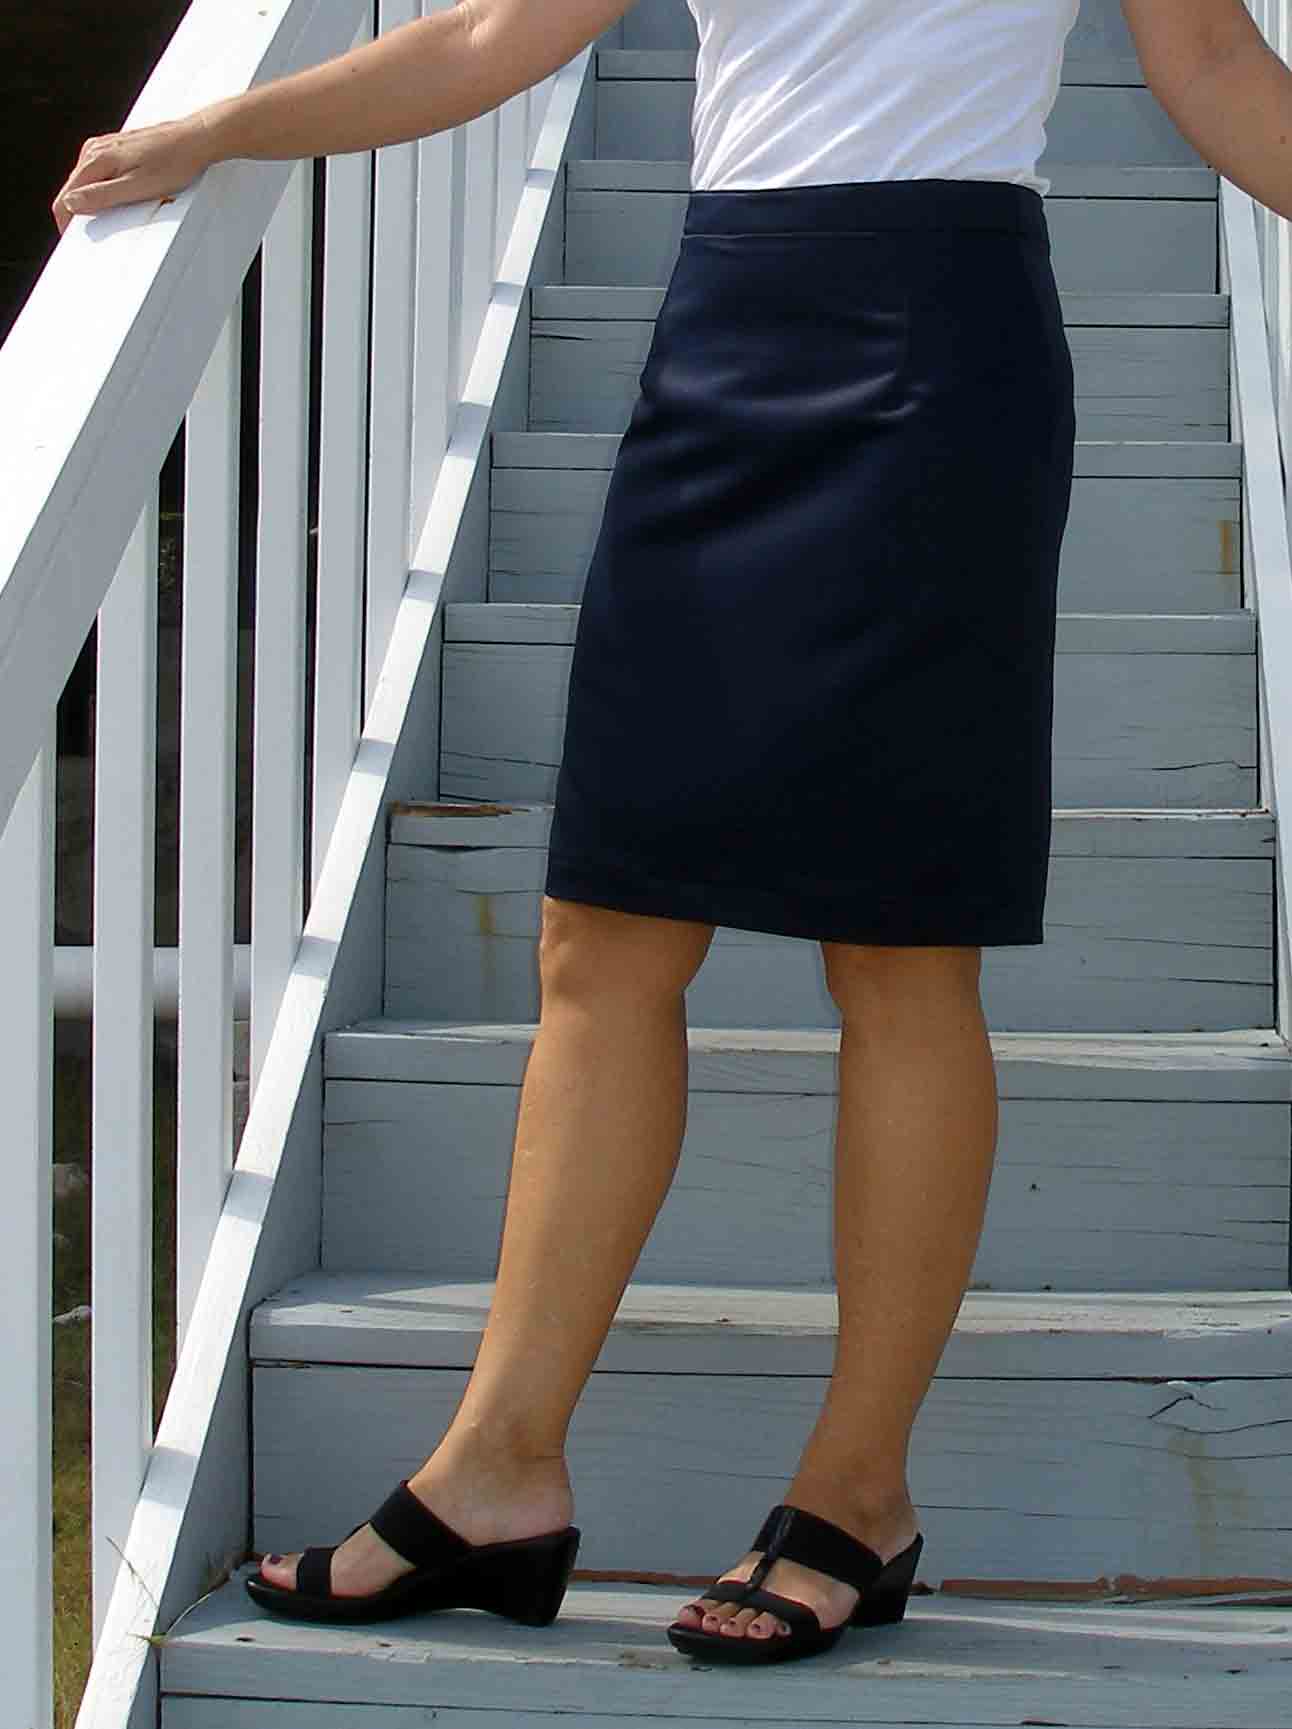 I am really surprised how the skirt actually appears to make me look slimmer. I think this must just be down to the fact that it fits my body properly so there are no lumps and bumps showing, no places where the fabric is stretched making horizontal lines across my hips and no gaping waist. Sadly the dark color doesn't show up the fit in these photos as well as I would like – should have gone for a lighter color.
 I am DELIGHTED with the results of this sloper. Now that I have this basic pattern I can quickly run it up in any fabric knowing that it is going to fit me perfectly. And it's a great basis for starting to think about some kind of styling to the skirt – a yoke perhaps? Pockets? Color blocking, vertical seaming, or a contrast band at the bottom? Or I could reduce the width at the bottom and make it longer and narrower for a retro fit. The possibilities are now endless.
Do give this a try – its not too difficult and I'll be happy to give any further explanation or help below. Get stuck anywhere – drop me a note in the comments and I'll do my best to help you out.
Enjoy – and if you make a skirt I'd love to see it. Do post a link below.
UPDATE JUNE 2013 – this skirt is now the basis for our Sew A Skirt beginners tutorial series. You can following along and draft and sew this skirt over the course of 13 different tutorial posts. Covering choosing and preparing fabric, more about the drafting and seam allowances, marking and sewing darts, matching patterns, inserting a zipper, lining the skirt, hem finishes and more. Join us for the Sew A Skirt series – click the button below to go to the first post.
Authored by: Deby at So Sew Easy
If You'd Like To Support Our Site
If you want to help us continue to bring you a wide selection of free sewing patterns and projects, please consider buying us a coffee. We'd really, really appreciate it.Never miss a post, and follow along with the Sew A Skirt tutorial series. I'll send all updates to your mailbox twice a week for you to keep and follow along at your own pace.
I'm really looking forward to seeing your skirt and featuring it on Sew So Easy!
I promise, no spam. Just an email once or twice a week with the new posts.


I love these instructions! I’m excited to try a skirt! The calculator still is not up so I’m going to try it on my own….I read your tutorial series and it seems that will be hugely helpful…my question is if I want a waistband and a liner would i still follow the tutorial series regarding the lining right up to the finishing and then just attach the waistband as this post suggests?
I tried to download the XLS link, but I got a 404 error. Is this spreadsheet still around?
No it is not i will update it and share the instructions soon. Will email you when I do.
Hello! Did the new spreadsheet get created? I love this and want to create my own!
No I have rewrite the entire post.
This is such a wonderful site. Your photos and explanations are so clear. Does anyone who reads this site have a copy of the spreadsheet? I am just getting started with a skirt and would love to try this out!
Sorry no the calculator is no longer available. However you can use https://www.metric-conversions.org/length/inches-to-centimeters.htm or simply goggle “inches to cm” and use the calculator at the top.
great pattern – I’m assuming a regular hidden zipper would work great. My legs are SUPER long so I usually need a kick pleat in the back… no idea how to even start that though!
HAhah!!! I love this comment it has brought a huge smile to my face. I wish i had your problem. But this would be a separate tutorial. Will be writing it as soon as I can.
I Love, Love Love this skirt pattern! I’ve made at least 15 versions, in fabrics for year round. It really tickled my fancy that I could make my own pattern, so I just went right ahead and did it! Great fit, all of them look great, and are comfortable to wear. Thank you so much for this, Deby, it was a real turnaround..!
Hi, I really like this easy to follow tutorial. I’m having trouble sewing the side seams however because the shape of my back pieces H,F and the shape of my front piece I,G don’t line up. I don’t think it’s a drawing or measuring mistake since I see it in your sloper pattern too. This misalignment is exaggerated by the darts as well so… did I mess up? How do you solve this?
Hi, thanks for the pattern! 5 years later this beginner will give it a try too 😉
I’m a little confused about the back darts at step 17: “We will space them evenly so divide your quarter waist measurement into 3 for the spacing”.
Shouldn’t it be [quarter waist + 4.25cm] divided by 3? That is also what the spreadsheet does, or not?
A second question, why is the pattern cut in 2 in the end? Could I not leave it as one pattern piece and have less seams on the side?
Thanks again for the pattern, I am really curious to see how it will fit! My body shape is pretty similar to yours, so high hopes!
Thanks so much for this. I made a dress and the pleated skirt was all wrong on my body so I’m going to try and make a pencil skirt for the bottom and this really helps. I live in Ecuador and there are no sewing patterns here, only ones I can download and print.
I had a little trouble understanding the first part of step #13. “First mark across on each side for a quarter of the waist measurement plus 4.25cm for the two darts on the back, and quarter waist plus 2.25 cm for the one dart on the front.” Is there any other way to explain that that might make sense to my brain?
Please how do u determine the A – D line for the waistline
Hi Silky A is for your waist and D is the hips, (widest part).
That is the distance between your hips and your waist.
So measure from the widest part from your hips to where you want the waist to be (high waisted is above the navel of find your natural waistline).
When adding the seam allowances at the waist what do you do about the dart legs that will need to extend up to the seam allowance? Will this mess up the measurement of the darts (i.e. darts are 3/4 wide, if extend up to seam allowance will the dart width increase or be too long?).
HI Charmaine, you do not need to touch the dart at all to add seam allowance.
Thanks for the sloper tutorial! I’ve triple checked mine, but it still seems quite large. I did notice, when reading over you instructions, that you say line A-C is your hip measurment divided by two plus ease – shouldn’t that be your natural waist measurement?
At the beginning in the drawing AC is the same length as DE and B-hem. Then later you add the darts and the wedge between F and G to bring in the waist to your actual waist measurement.
[…] You’ll just need a few measurements, and you can draft the pattern from those measurements. Just make sure you add extra allowances for seams. Also, It is helpful to take additional measurements in your hip region, so that you know you are drawing your curves correctly. A good resource for drafting your own pencil skirt is this tutorial by Sew So Easy. […]
Hi, your sloper is fantastic! If I want to turn it in a very high waist, can I use this drawing process the same, just measuring my high waist instead natural waist? Or I will have problem with darts? Thank you
Hello Viola, yes you can use your hight waist and don’t forget to extend the darts as well.
Help, Im new to all this and a little confused. So are all darts 1cm in width from the centre point of the dart?
HI Lisa, Please measure out 1 cm on each side of your mark.
I’m new to sewing. I Loved your Pattern, very good instructions, easy to follow. Thank You for sharing. Just finished first skirt, on old sheet, looks great. Again Thank you y MUCHAS GRACIAS!
Make sure you have adobe reader, and the scale is to actual size. Use adobe reader and a desktop. Let me know if you are still having problems, Regards, Mayra
I made the sloper according to the directions-which were so clear!-for my daughter who has a very slim frame and likes her skirts form fitting. (I couldn’t find a pattern that came close). The skirt came out beautifully but the side seams didn’t match at all. The front is about 3/4 inches longer at the bottom. Is this because of the darts/curves? I just evened it out to make the hem.
It is probably due to the curve, without someone watching every step it is hard to know why it happened, but it seams that you fixed it, congratulations!
I recently made a lovely Brief Encounter dress (photos to come soon) and tonight I finally cut out my denim pencil skirt with an added kick pleat. Baring unforeseen events it should be completed with photos tomorrow!
Thanks for the update Valerie! We look forward to seeing the pics.
I just completed my first skirt from scratch, your Show Some Flair Skirt, and it looks great! I’m hooked!
I LOVE the look of this skirt but am addicted to pockets, I know it wouldn’t be a classic “pencil skirt” but do you think pockets ala SSF could work?
Absolutely, yes, add them! They are discreet, flat, low volume. I think these sort of pockets would look great on a pencil skirt. Draw up your skirt pattern as usual, then just trace the pattern pieces for the show some flare onto your new skirt pattern and you’ll be set!
I love how easy this looks. I do have one question however, I am planning on making this for my mother-in-law who is very large in the hips but nowhere else I’m worried it will be too loose fitting in the legs to look like a pencil skirt on her, any tips on making it a little more fitted in the legs?
You can certainly give the skirt some taper. If you started a couple of inches below the widest point on the body, you can smoothly and gradually take it in a little from that point towards the hemline to make it more closely fitted about the knee. Yes, I understand what you are saying about the shape. With more extreme shaping needed, you’ll certainly need to muslin to check on darts etc, because they may need changing significantly for more abrupt shape changes. It will be quite some investment in time to get it just right perhaps, but then you’ll have a go-to pattern that can be used over and over again.
Is it possible to alter my skirt so it is not so shapeless at bottom ?
Yes of course. It’s your pattern, so if you don’t want it as a straight skirt, then change it to whatever shape you would like.
any particular reason why i dont seem able to use your automatic calculator? the spreadsheet doesnt seem to allow me to type into it!!!
That’s very odd. Have you downloaded it to your computer? Then what program did you use to open it. It’s just a regular spreadsheet so if you open it with a spreadsheet program, you should be able to enter the numbers.
Hi Deby,
Your finished skirt looks great. When I started to follow the instructions though for making my own skirt sloper, I noticed in step 10 that the rectangle is divided equally between the front and back pattern pieces.
I thought this was strange as back pattern pieces are always a little wider needing to go around our wonderful bums, so wouldn’t that mean that the side seams end up not sitting on the middle of our legs but migrating towards our rear?
From my measuring, my rear is 3cm larger than my front at my hips (largest point) so the back pattern needs to be 1.5cm wider than the front to move the seamline into the correct position. Is this right? Or have I just confused myself.
Thanks.
Actually in pattern drafting for skirts, the front is usually made a little bigger, about 1/2 inch. This seems to give a little more of a flattering fit and look than if the side seams are more towards the back of the body. If your shape is very pronounced in the rear, then you may find when you sew your test that the side seams will bow a little to the back and if so, you’ll need to make a slight change in the muslin and move that back to the pattern piece. Most will find their skirt fits well from these instructions, but a few may still need changes at the muslin stage to account for a large tummy, different dart lengths etc. I hope you get a good result in the end.
Thank you for this discussion, both of the sloper and this particular question. All along, I’ve been wondering this very question myself about front/back symmetry.
Thanks for the information Deby,
It had brought me to a halt but I really need to start on my muslin and see it translated into the end product. I feel confident doing that now.
Happy sewing 🙂
Hi. This is brilliant. I can’t wait to try but it also struck me that it would make an ideal school uniform skirt for my granddaughters – who always need new ones. I put the measurements in the calculator but I thought maybe I should shorten the darts for a when the hip measurement is only a few cm below the waist. I would appreciate your thoughts.
Thanks very much for this tutorial. I’ve sewn on and off throughout my life and I’m just starting (i.e. reading a lot, thinking about it) to try to make my own patterns. I’ve lived frustrated for years with ready made clothing that just doesn’t fit well and a fashion taste that never goes with the times. I’m thinking of adapting this pattern to make a slim line skirt w/ deep kick-pleats. I love watching 30s and 40s films where this kind of fashion detail reigned.
Really useful, but you switch to inches in point 15 which is a little confusing.
Only for the standard length of the dart which is mentioned at 4 inches and also at 10 cm. Both are the same, within a few mm. If you are happy with working in Cm, then draw your dart at 10cm rather than 4 inches and it really won’t make any difference at all. I’m old enough (and British) that I grew up with inches and can use cm when I need to be more accurate, but inches, yards and pounds are what I work with and visualise more easily.
Thanks for such a great post. I’m going to give it a bash as I have a very odd shape (hollow back, huge bum). When i get it right i’ll be making skirts in every possible colour and fabric – YAY
Hey Leighrushbrook, I know this comment is quite old but it made me laugh, I have the same body shape as you it sounds like! Were your attempts successful?
Hi there! Great pattern and spreadsheet!! I really want to give this a try. What I’m wondering is how would one actually work out a color block piece for this skirt? A section in the middle or sides? Thanks!!!
Yes, you could cut out a middle section from your sloper pattern and add on seam allowances then to the middle and the side pieces. It might be a nice idea to cut at the dart line and then eliminate the darts altogether by cutting at the outer dart legs instead of down the center, making more of a princess seam effect down the center of the skirt. In fact, once you have the sloper, you can cut it in any direction to make diagonal seams and blocks – whatever you like!
Dear Deby, frankly I am sewing my own dresses and skirts since I was 9 years old, continuing with my daughter who is 24 years old, first time I see such an easy and wonderful way to sew a pencil skirt. Really simple and amazing. thank you
Glad you liked it Eva.
Hi Deby, thank you for your post. I learned how to sew understitching from another one of your posts, thanks! I have a question about adding a waistband to this skirt. You said to make a rectangle for the waistband. Since the top of the skirt pattern is curved, doesn’t the waistband need to be curved too so it doesn’t buckle or have gaps at the sides? Or am I just having trouble envisioning how this gets put together? Thanks a lot! PS your skirt looks like it fits great.
Michelle
So long as the waist of the skirt sits at your actual waist, then it’s OK to have a straight waistband, and the slight curve on the top of the skirt eases in just fine as it curves around the body. But if you lower the waist on the skirt, then the part you cut off to lower it, then becomes the contoured waist band for the skirt. Add on seam allowances and you are good to go. So it depends on where your waist band sits – at the waist, straight is OK. Lower on the hips, then the waistband should follow the shape of the skirt. Hope this helps.
Yes that helps a lot… thanks!!!
Hi Deby – If I wanted to make the skirt to sit on the waist, how would I work out how to make the curved facing?
Julie
HI Julie. If you want the skirt to sit at the waist, then you need to make a straight waistband, which is the right size for your waist, plus any overlap for seam allowances and a button at the back. It’s only for skirts that sit below the waist, on the high hip, that you make a curved waistband or facing. Hope that helps.
und this sight. This is fantastic! Thank you!!!!!!!!!!!!
Step 13 isn’t making sense to me. My quarter waist is 23.75 cm. If I add cm for the darts on the front and back it crosses the middle line on my page. Making points F & G not where I believe they are supposed to be. Can you help tell me where I’ve gone wrong?
Is your waist measurement very close in size to your hips, or did you measure much lower down than your waist? This can often be the cause if you don’t have enough difference in the measurements. If you drafted with a very low waist, try again using the actual waist where it is narrower, and then chop the top off what you have drawn later on if you want the resulting skirt to sit lower down. Or if you really don’t have much difference in waist and hip measurements then you probably don’t need the darts as suggested anyway. You would have to draft leaving them out and then adjust at muslin stage to see how it works in real life and then transfer any adjustments back to the pattern. It can be complicated!
I have the same issue!
I love the sloper spreadsheet. Do you have a formula for taking all that information and giving a total fabric requirement?
I haven’t included that because it depends on so much, such as the width of the fabric you are using and whether it has any print or pattern that needs to be matched. Assuming you are using a solid fabric with no pattern to match, you’ll basically need twice as much as the pattern you draw. Once once the pattern is drawn out you can measure it, add on your seam allowance and hem allowance etc, and hopefully there is your answer. Most straight skirts should fit on a yard of fabric, depending on the width of the fabric versus the width of your hips.
Do you have any tutorials for a fitted bodice sloper?
Sorry Sheila, I don’t. The bodice is a lot more complicated than the skirt and I’ve not yet made one for myself. It’s certainly on my to do list for one day, but its difficult without a person to help with the accurate measurements needed for this one.
Hi there, I thought I’d share the results of my pencil skirt I drafted from your tutorial. This is the first time I’ve drafted something from scratch, though I would say I’m an intermediate sewer. http://imgur.com/a/LYUPq
I think it turned out fantastic! I only had to make a few minor adjustments along the way, and mostly due to my inexperience at drafting. I did lengthen the front dart to 14cm to sit at my hip joint, and I tapered down to the knees and added a vent. Maybe because of my tapering, I ended up with a bulge about half way down each side of the dress, so I added in a rather unorthodox dart, parallel to the ground. Whatever works right? 🙂
Thanks for a great, easy to follow tutorial!
That looks amazing! I really love it, thank you so much for sharing what you made. I really like the floral one I made. I think the simple design of the skirt allows for a more bold fabric choice. I wonder if the length of the dart combined with where you started the tapering to create that little extra bulge of fabric at the hip? But so long as it works and fits, then its a unique design feature!
Hi, just a quick question. I have made sloper for my daughter. It fits great, but she wants the waist lowered from her natural waist to where she likes to wear her skirts. When I lower the waist line all but one dart in the back are only 1 1/2″ long. She isn’t very big, but I am not sure what to do at this point. Do I add a bit to the side and create new darts?? Do I just go with it??
Hi Lana,
I wonder if she already has a ready-to-wear skirt that has a similar fit that she likes? Perhaps you could get some idea about the darts for your sloper by getting her to try this one on, and then taking a look at the shaping, how well it fits, where the darts might fall. In your daughter, if she is nice and young and slim, sometimes they really don’t need much in the way of darts. It also depends on the distance between the top of the skirt and the fullest part of the body – in a short distance because of a lower sitting ‘waist’ then the darts may be quite short and still work out. I hope these ideas help.
Hi, I am trying to put together this pattern and have made it down to the back darts. At this point I am to divide the quarter waist measurement by three to find the even spacing for the two darts. However, going back to step 9, when making the A to C line (waist line on the chart), it instructs one to take the widest HIP, not waist, measurement and divide by 2, and then add the ease measurement. On the chart, the A to C is referred to as the waist and the C to D line the hip. My dilemma is that the measurements for the A to C line are too big on my chart and don’t correspond to my waist at all, when calculating for the back darts. Please explain and maybe by put your measurements on the chart as well. Thanks for you r help.
P.S. I am new to this circuit…:)
Your waist has been curved in at earlier steps and now you will have a line at the back from A to H for your back waist measurement, which would usually be less than your hip. This already includes the allowance for the width of the darts. So simply trust your calculations at this stage for the darts. “divide your quarter waist measurement into 3 for the spacing. My quarter waist is 20cm, so the first dart is at 6.7cm and the second at 13.3cm. ” Measure the thirds along the curved waist line A to H from the point A and this will space them evenly. You can carry out a double check, by measuring the length A to H, subtracting the width of the darts and if you have worked it all out correctly, that should now come out to the quarter waist measurement and you should be able to see that it is less than the width of the hip. Mine is not very exaggerated because I have a thick waist. If you still are stuck, let me know.
[…] Have you EVER owned a pencil skirt that fit you properly? I find the ready to wear either gape in the waist, or are too tight across the hip or thigh or the darts aren’t right. I guess perhaps my waist to hip ratio does not match the ideal hourglass figure. Neither is my widest point in the regular hip – I am a true pear with my thighs wider than my hips but with a very square waist to hips too. You can find step by step instruction AND there’s even a spreadsheet that you can download and enter in your own measurements and it will work out all of the numbers for you to enter into the pattern. You can find this personalized pattern at So Sew Easy […]
Great skirt pattern, but technically this isn’t a pencil skirt?? I thought pencil skirts follow the contours of the body, narrowing at the hem line?
Perhaps its a difference in terminology depending where you come from. In the UK, we would call this a pencil skirt – its straight up and down, like a pencil. Even a tighter tapered skirt would be a pencil skirt too. At least where I come from. If you wanted it tapered, then you would simple move in the bottom hemline and inch or two and draw slightly curved line down from the widest part of the hip to the new narrower hemline.
[…] I’ve had this kermit green linen in my stash for more than a year, and I decided to make a skirt with it. The problem is that I had such a small amount that I couldn’t make the skirt of my choice. I thought about Vogue 1247, but decided that I needed a pencil skirt! Now I know I have a couple of pencil skirt patterns, but could not find them (in spite of archeological dig style activity), so I drafted my own, using the tutorial from So Sew Easy. […]
thank you so much for this post! I did pattern making in my 20’s, so ive forgotten all the formula’s I used. Your method has brought it all back. I’m pear shaped with a tiny waist so I’ve been stressed about using commercial patterns. I’ll post an update once I’ve done my skirt.
Thank you so much for this. My first fitted garment, and it looks good! My daughter is in total awe of me (and a 21 she doesnt think i am good for much) and now seems to think i am a great seamstress…oh dear. I love how you explain things, and find both your patterns and your instructions so easy to follow.
Lisa
Great news Lisa – so good to hear that it worked for you – see, it wasn’t too hard. And now you have your basic pattern, know how to sew it and know it its, you can make a similar skirt in lots of different fabrics and lengths. I’d really like to do a series on how to adapt the pattern to make other well-fitting styles of skirt – one more thing on my ever expanding to-do list! One day….And thank you for the thanks, it means a lot to me.