


I've always been impressed by butcher knife rolls and Victorian physician surgical tools rolls: One of my dreams (and I have quite a few), was to have something similar for my sewing tools, a sort of emergency kit I can grab to take with me when I spend my lunch break finishing a project to be blogged on Serger Pepper.
Well, today is The Day! And, just because I love to share my patterns… here's my gift for you:
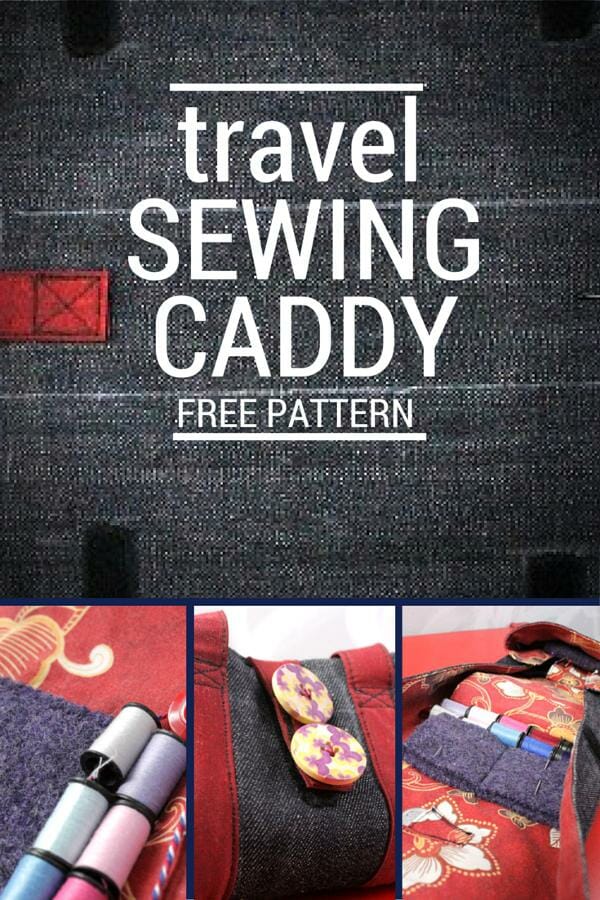
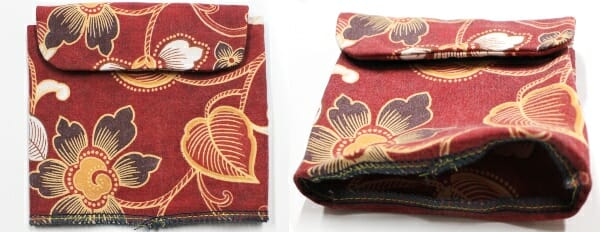
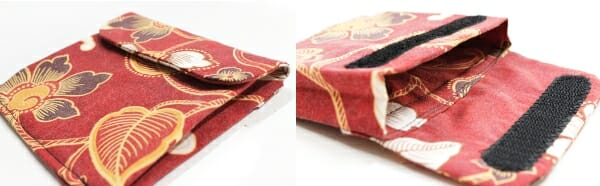
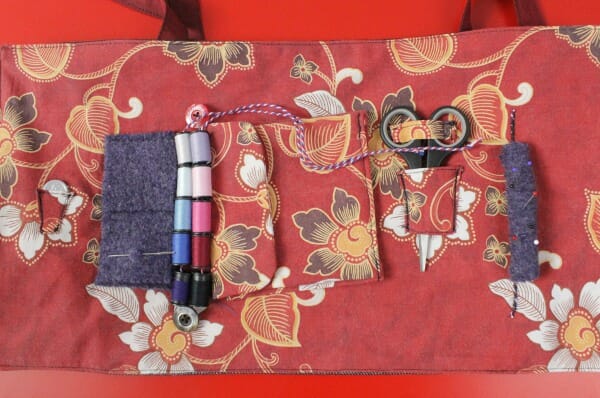
The Travel Sewing Caddy
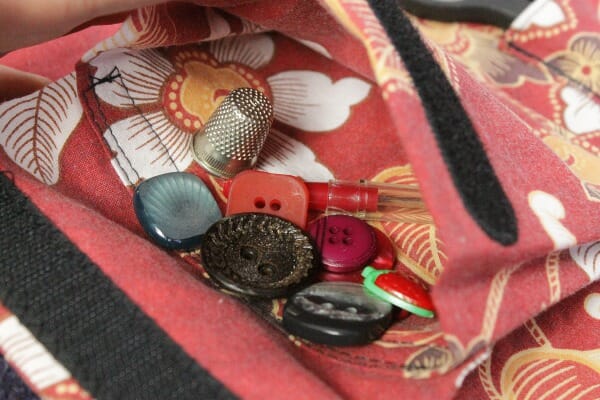
featuring a detachable accordion pocket, perfect to host a seam ripper, a thimble, buttons and all those tiny objects.
Just as all of my bags (remember the Padded Laptop Bag?), this Sewing Caddy has extra long bag handles to be worn cross-body, leaving your hands free.
Another cool feature is the detachable accordion pocket: I use it to keep the thimble and the seam ripper (+ any button/other decoration I need to add to my project) safe from wandering around on my bag.
To sew this Sewing Caddy, you have two options:
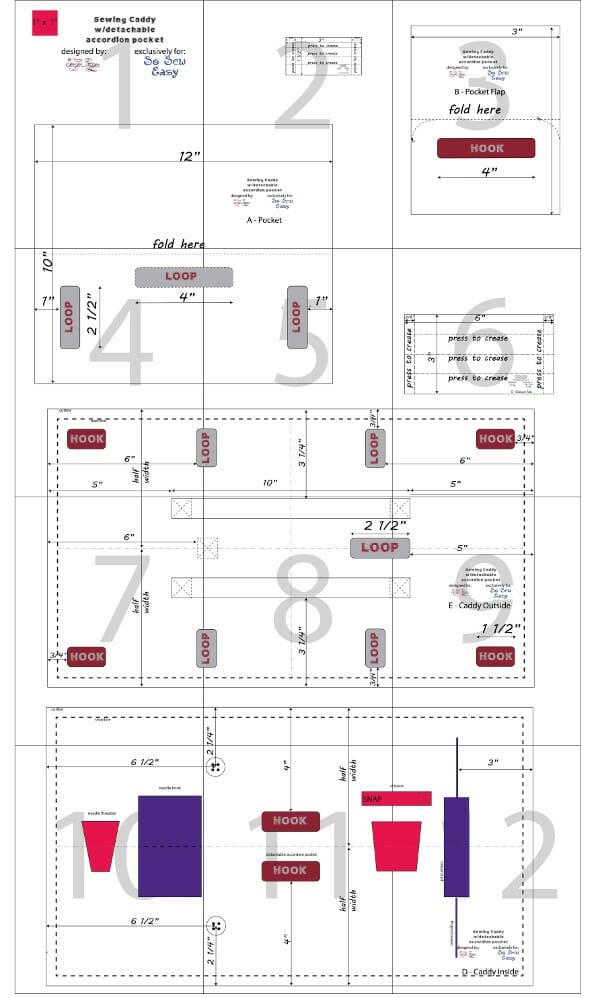
1. print the 12 pages PDF sewing pattern you can download here, for free
or 2. cut fabric following measurements, given in each section.
The PDF sewing pattern can be print in both A4 and legal size paper sheets. If you need some tip for easily printing and assembling one of my patterns, refer to this post.
Seam Allowances are 3/8″, unless otherwise stated!
You can obviously decide to add/subtract pockets and customize sizes: this is my version, you may have other tools you need to keep in your caddy, like a small ruler or a pen: change the width of the pockets accordingly to accommodate your favorite sewing gizmos!
This sewing caddy is perfect for your couch armrest for those little hand sewing tasks you can accomplish while watching your favorite series on the TV (I am a Grey's Anatomy fan, and I'm enjoying Lilyhammer and The Blacklist too, lately) without leaving your hands idle. You can use it in your car too, during long trips, possibly when you're not driving 😉
I will use it during my lunch breaks, upgrading from my (boring) IKEA blue box!

Disclaimer: I used black thread, just to be sure you could see my stitches. I would suggest you a more blending color, to hide any not-so-perfect topstitch!
What you need:
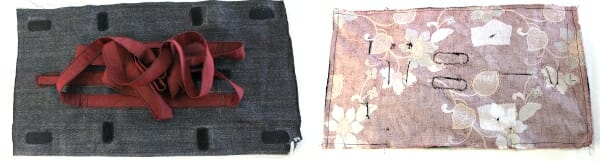
- denim fabric (approx. 20″ x 11″)
- cotton fabric for the inside (approx. 20″ x 17″)
- medium-weight fabric for handles and closure tab (approx. 60″ x 6″ + 3″ x 6″)
- lightweight fusible interfacing (approx. 20″ x 17″, scraps will perfectly work)
- 3/4″ width hook and loop (about 20″ both sides)
- 1 small sew-on snap fastener
- felt scraps or an old sweater
- 8″ twine cording (or similar) 30″ approx.
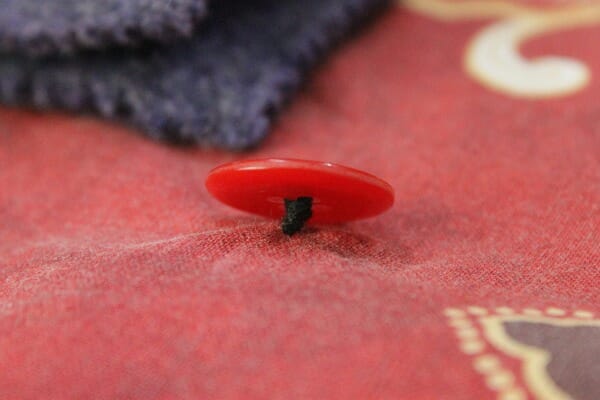
- 3/4″ buttons, 2 pieces
- 1″ buttons, 2 pieces (decorative only, optional, for the closure tab)
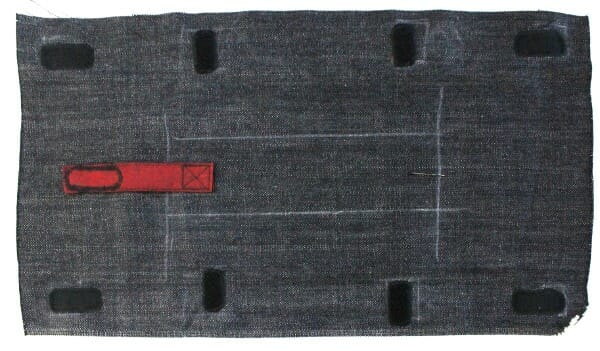
If you prefer to print your pattern, just download it now, open it with Adobe Reader and print it without resizing. Assemble it following the print layout below:
If you prefer to cut by measurements, go on reading and you'll get them!
Pattern Pieces:
- A – Pocket
- B – Pocket Flap
- C – Caddy Inside
- D – Caddy outside
- E – Closure Tab
- F – Scissors Tab
Cut also (no pattern pieces for these – customize measures to your needs – instructions included below):
- – needle book (from felt/sweater felt)
- – pincushion (from felt/sweater felt)
- – needle threader pocket
- – scissors pocket
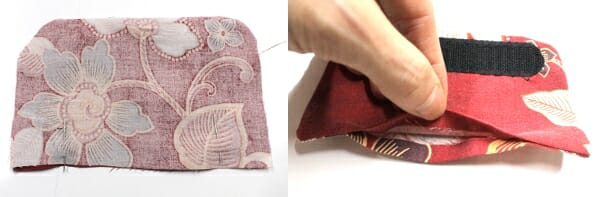
The Detachable Accordion Pocket
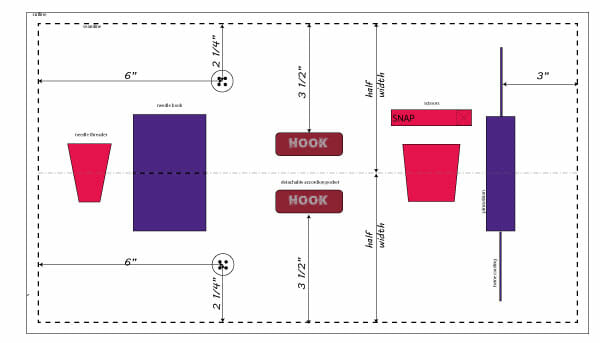
Cut pattern pieces A and B from the PDF pattern or two pieces of fabric following the diagrams below.
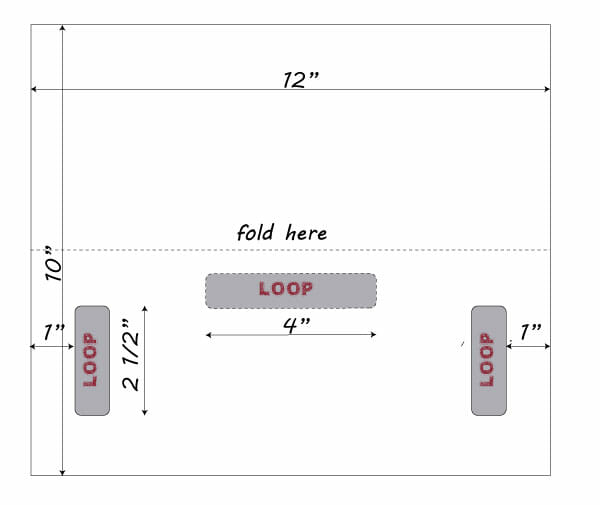

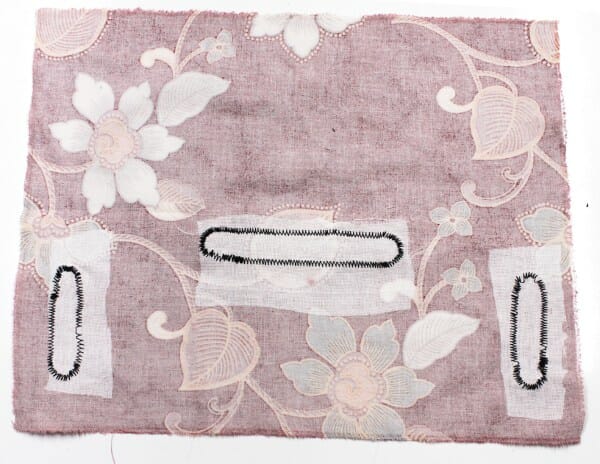
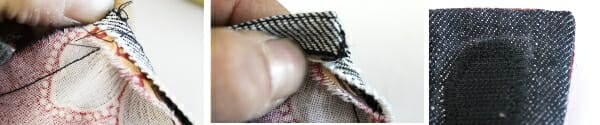
Iron on some fusible interfacing to the wrong side of the fabric right where the hook & loop pieces will be sewn on.
Fold the pocket flap along the fold line and trim away the rounded edges: eyeballing the curve will work just fine.
To make both sides even, cut the fabric folding the flap in half a second time, to align the side edges, so you cut 4 layers of fabric in one time:
Sew the hook & loop strips as noted in the pattern/diagrams, to the right side of the fabric, using a short zig-zag with your sewing machine.
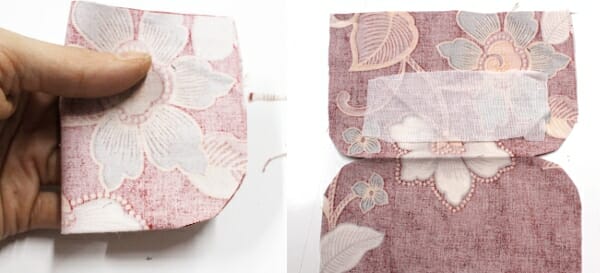
Right sides together, sew all around the pocket flap, leaving a small gap in the longer side: use it to turn it right side out after you've trimmed the seam allowances.
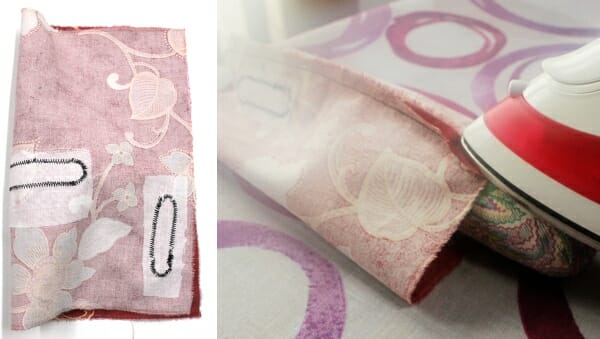
Press the edges flat and edgestitch, if you like.
Interface in the wrong side and add hook & loop strips to the right side of the fabric of the accordion pocket main piece (A).
Fold it in half, right sides together, and sew along the 10″ side. Press the seam open (a small-sized sausage roll is perfect for this kind of things: DIY with my tutorial!)
Assembling the pocket
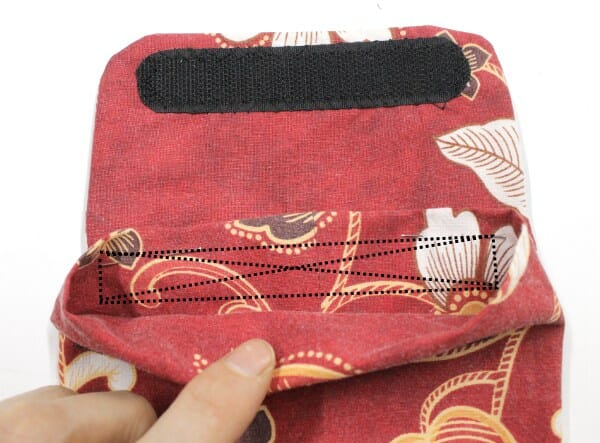
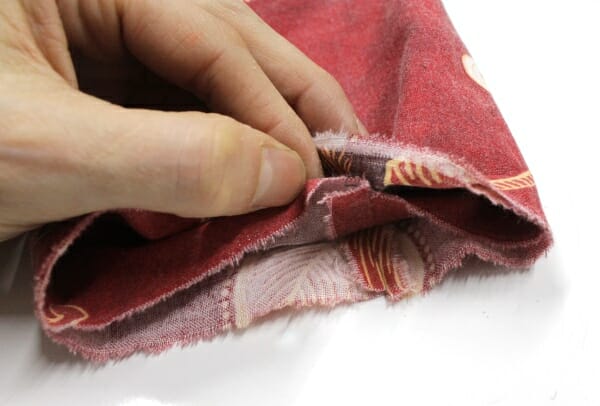
Slip the flap below the pocket mouth and test the hook & loop to find the perfect position. Sew it in place: sew a square and then a cross inside it, just to be safe!
The accordion
Fold in half the pocket, wrong sides together, matching the two ends of the seam you've just pressed open and aligning the raw edges.
Center that seam in the back of the pocket, so the 4″ loop strip is centered in the pocket front.
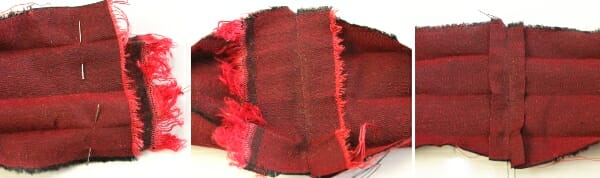
Finish the two layers of bottom raw edges in the round, leaving the pocket open: I used my serger, but a zig-zag will be just fine!
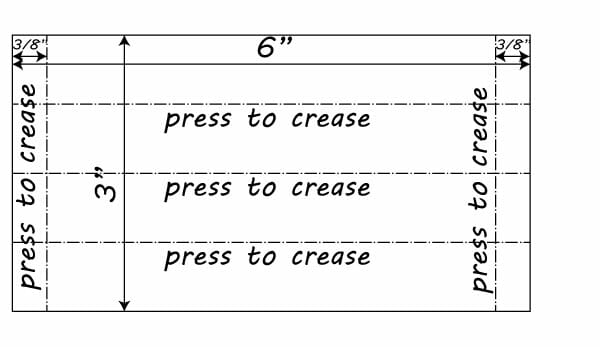
Fold the serged hem toward the inside of the pocket (3/8″) and press it to crease.
Create the accordion by pushing both sides in, along the whole pocket:Pin the bottom of the pocket, then stitch it closed.
Tip: I use this little handmade tool I call the thick-y when I have to start a seam on multiple layers of fabric: works like a charm 😉
Step back, and admire your detachable accordion pocket: thin when empty, roomy if needed. Put it aside.
Straps
Create the straps following the same steps as for the padded laptop bag straps (you can leave the interfacing out this time). Straps total length is 120″, finished width is 3/4″ (cut strips 3″ wide). Feel free to make the straps shorter, if you prefer!
This time will close them in a loop before we attach them to the bag. Make sure you're not twisting them before you pin them right sides together.
Sew, press open, then trim seam allowances.
Lay straps flat on the table, centering the seam you've just sewn (arrow).
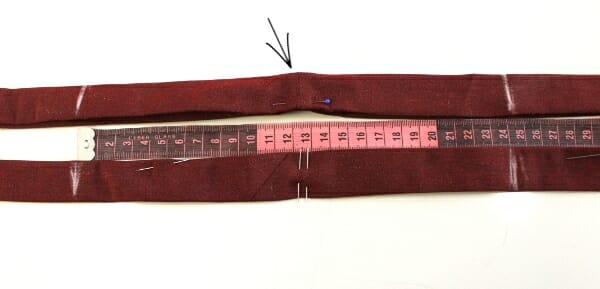
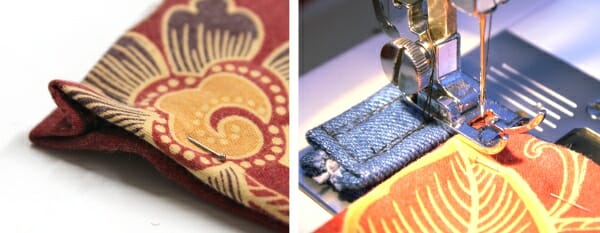
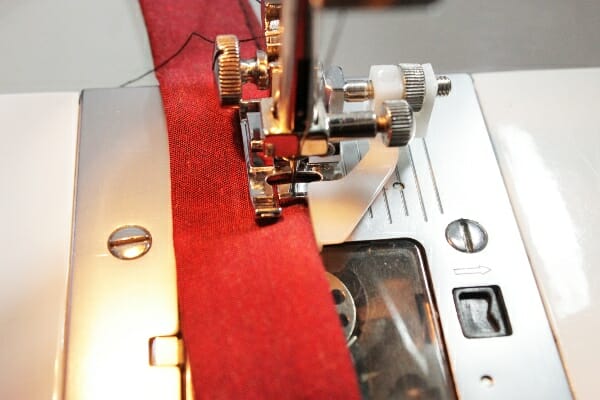
Mark a 10″ gap on both straps (5″ on each side of the seam).Edgestitch straps outside those 10″ marks, just as we did on the padded laptop bag. I've found useful the adjustable edgestitch foot I've bought recently:
Closure Tab:
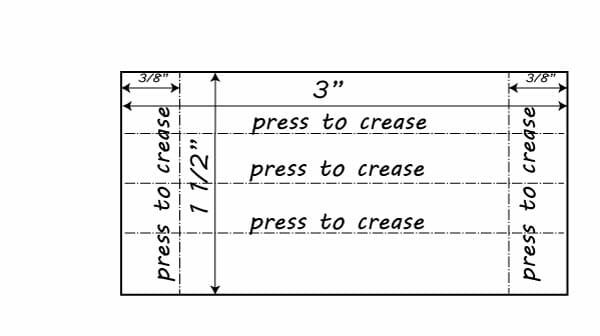
Cut the closure tab piece and press to crease as shown in the diagram, always keeping wrong sides together.Fold in the short sides, then fold long sides to touch the center fold and then, again, in half. Edgestitch all around.
Sew a 2″ hook strip to one end. Set aside.
Sewing Caddy Inside & Outside
Cut two squares 11″ by 19″: one from the inside fabric (I used a recycled bed sheet I had in my stash), the other from the outside (heavy weight denim, for me).
I missed one important step here, which is interfacing the inside fabric (on the wrong side) where seams are going to be (hook strips, buttons, pincushion, needle book, scissors, and needle threader). To make it even easier and faster, you can interface the whole Caddy Inside piece (C).
I think it's safer adding it, to be sure your Sewing Caddy will last you (almost) forever!
Caddy Inside (C)
Attach the hook strips in the middle, where the accordion pocket will go. This will help you figuring out where to place all the rest.
Now it's a wise move to lay on top of your sewing-caddy-to-be all the stuff you want to place on, to decide where to place everything.
You can either follow my suggested layout or be creative!
To better help you figure out the placement, I'm showing you how the Caddy Inside will look when you will have all the components sewn. I'm showing you how to create them in a moment!
You can easily lay your tool above the Caddy Inside, to customize their placement.
Caddy Outside (D)
Transfer your marks with chalk on the right side for the hooks & loops and the closure placement (sew it so the hook is facing the right side of the Caddy Outside).
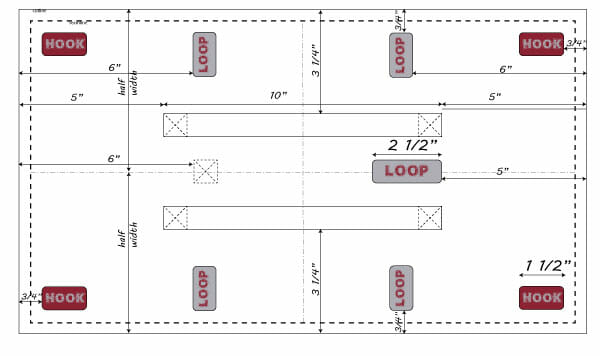
Sew them in place, then mark the strap placement too:Sew the straps on, reinforcing them sewing a square and a cross where they leave the caddy. Set aside.

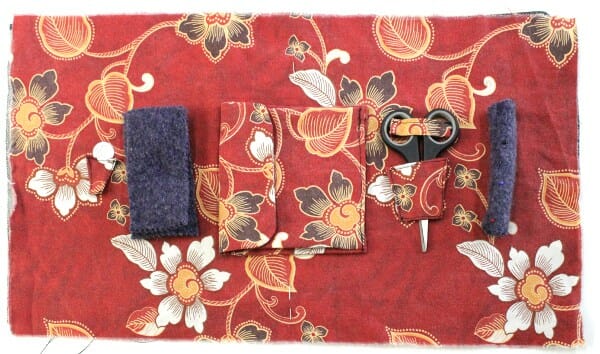
Needle Book and Pincushion
I have a thing for refashions (and a huge pile of to-be-refashioned clothes, if you listen to hubby), so I cut a felted wool sweater. You can use store-bought felt, it will work in the same way (or even better).
Cut 3 pieces 4 1/2″ by 2″. One will be your rolled pincushion, the other two will create the needle book. I cut them using my IKEA pinking shears, to add some interest.
Needle Book
Place the needle book on the left of the pocket, on top of your Caddy Inside (C), and stitch it in place on the right side of the fabric, by running one or two rows of straight stitches, right in the middle.
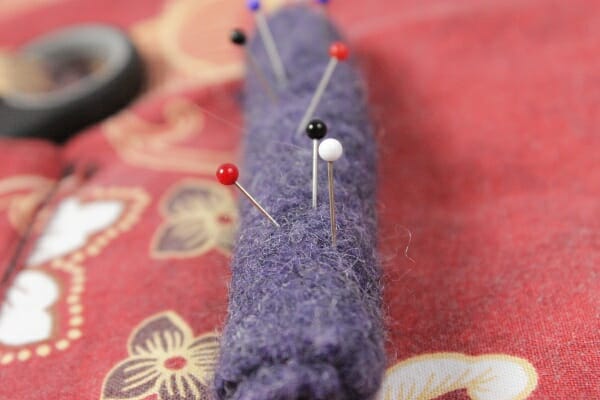
Pincushion
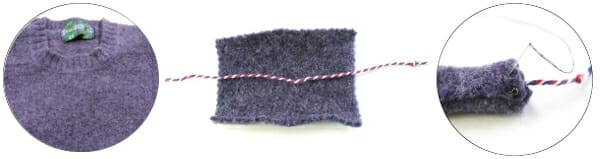
Roll tightly the third felt rectangle around an 8″ length of a twine cord (or your favorite cording); pin it closed and slipstitch it by hand.
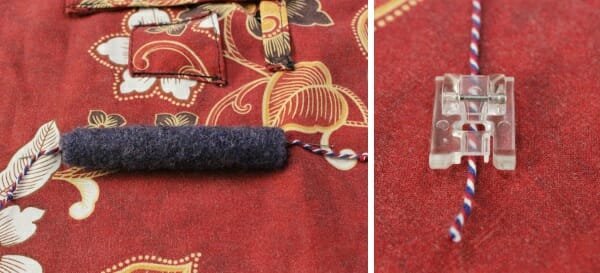
Sew it in place, using a short zig-zag,at the other end of the sewing caddy. I've found useful a cording feet, to accommodate the bulky cord below it.
Needle threader
Cut a strip of fabric 1 1/2″ high, 3″ wide. Finger press 1/8″ of the 3″ sides to the back and topstitch to secure them this way.
Put your needle threader and under the strip, marking with chalk a fold line that can accommodate it. Trim fabric 1/8-1/4″ wider.
Fold each corner 45° to the wrong side, then press (or finger press) the side seams to crease. Edgestitch and double check if it still fits your needle threader.
My needle threader pouch finished measurements were 1″ top width, 1/2″ bottom width, 1 1/4″ height – add 1/8-1/4″ seam allowances!
Sew in place on the caddy inside (C), to the right side of the fabric.
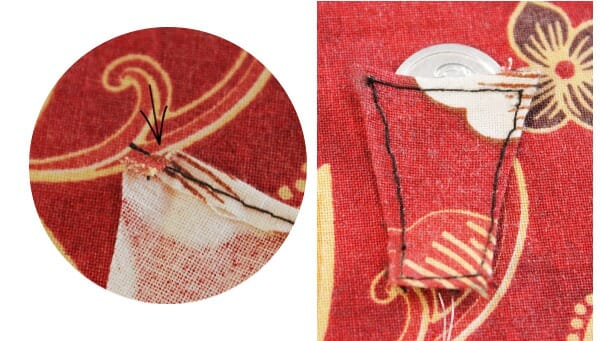
Scissors holder
Create the pocket exactly as you did for the needle threader.
My finished measurements were: 2″ top width, 1 3/4″ bottom width, 2″ height – add 1/8-1/4″ seam allowances!).
While needle threaders are almost universally shaped, scissors are not. Measure your own to be sure they fit – my scissors are 5″ head to toe!
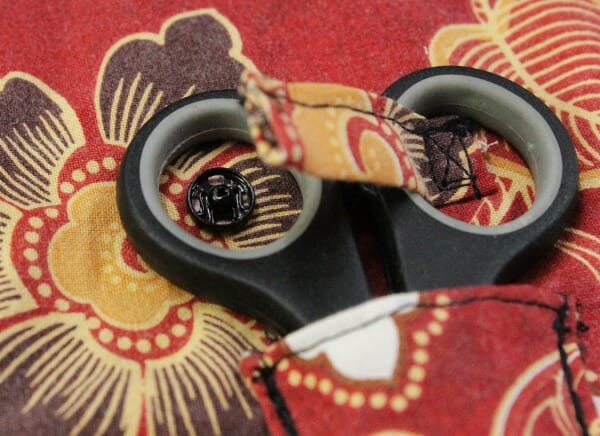
Create the Scissors Tab (F) as you did for the Closure Tab (E), but using the following measurements. Skip the hook strip.Assemble the scissors holder: sew the pouch in place to the caddy inside (C) and mark the tab placement:
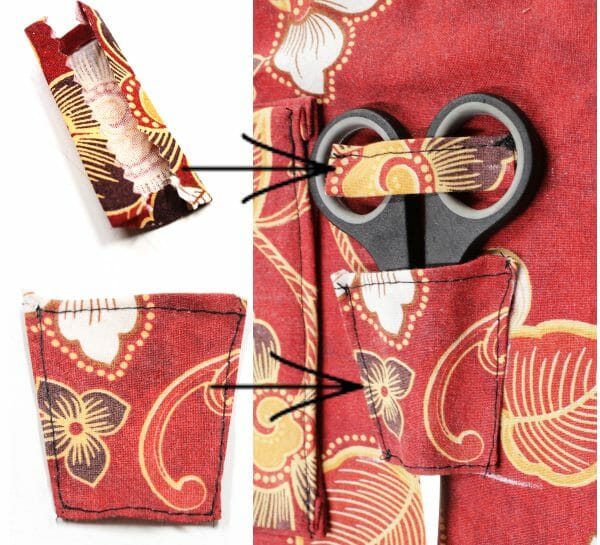
Stitch the Scissors Tab to one side and hand sew a snap to the other side.
Buttons and twine
The whole sewing caddy was created re-using materials and I had this lovely twine cording, that was wrapping a cut of fabric that Sandra at OrloSubito gave me as a gift … it was perfect as a thread holder!
I've then sewn two buttons (check the pattern for placement) leaving a nice stem to be able to wrap around them the twine cording that carries the spools (by going through them).
Assembling the whole thing a.k.a: “Line the caddy”
Lay the Caddy Outside on your table, right side up. Make sure the straps are grouped in the middle, far from the edges: pin them to stay there, if necessary!
Lay the Caddy Inside (detaching the accordion pocket to reduce bulk) with the wrong side up on top of it, aligning the raw edges and sandwiching straps inside.
Pin them together, double checking everything is flat. Sew all around, leaving a gap on one of the long sides (I use a “double pin” code so I remember I need to stop and backstitch there).
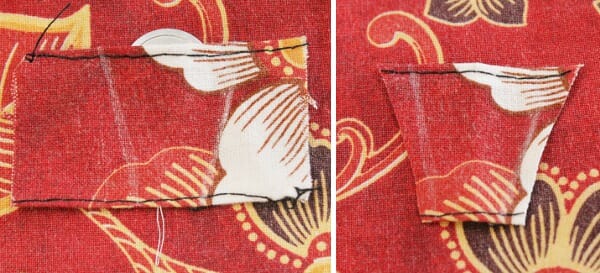
Sew each side starting a new seam (do not pivot at 3/8″ from each fabric raw edge).
Do not cut corners at 45°!
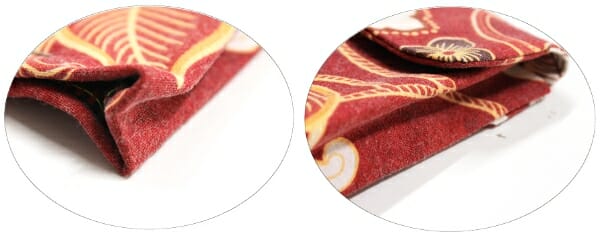
To turn the corners right side out, finger press 1″ on one side, then repeat for another inch on the other side. Holding the corner in place with your fingers, turn it right side out and admire the perfect corner, full but flat… it's a great tip I've learned lately.. no more 45° corner cutting for me… no more floppy corners!
Repeat for the other three corners.
Press the edges and topstitch all around, stitching the gap closed too.
Add the accordion pocket, your tools and spools of thread… and enjoy your new Travel Sewing Caddy!
Decorative Buttons (optional)
I had to add a couple of decorative buttons to the closure tab, as an afterthought: the black zig-zag was an eyesore and I needed a nice touch. You can skip it if you were so wise to follow my suggestion and use a blending thread color 😉

How to close it
Fold the long sides in, then one of the short sides, closing the velcro. Repeat on the other side. Close with the tab: you're all set to go! There is plenty of space inside for you to store whatever extra tools you might need, and the project you are working on. Enjoy taking your sewing project with you.
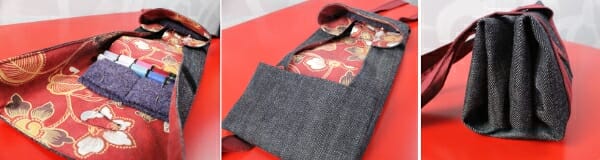
Let's take a closer look to our new Travel Sewing Caddy:

If You'd Like To Support Our Site
If you want to help us continue to bring you a wide selection of free sewing patterns and projects, please consider buying us a coffee. We'd really, really appreciate it.
Hi! I'm Irene "MammaNene" and I blog about anything sewing on Serger Pepper. I love designing my own patterns, I have a thing for refashions and I am Pinterest addicted! My favorite sewing muse is my almost 6 years old daughter... but sometimes I sew for me too!


I love this concept. I’ve only owned a sewing machine for a year and I’m still trying to decide how to wrangle all my bits and pieces. The idea of a sewing caddy appeals to me because I have to pack up my sewing space each week. With this I could keep the threads, notions, and tools I need for my current projects neatly organized instead of all loose in a basket or going through the work of putting them all the way away only to dig each peice out again in a couple days.
My mind is bursting with ideas for optional features. Instead of throwing my seam ripper in the pocket I would like to keep it more readily accessible by sewing a small bit of elastic to hold it in line (probably next to the scissors). The same idea with elastic could secure various objects like a marking pencil/pen, turner, purple thing, bodkin,.. etc. Depending on what will be stored in the removable pocket, a clear vinyl window on the front of the pocket could be beneficial. I’d also like to use my existing needle book and just have a way to attach that inside the roll. However, I can’t decide on using ribbon to tie in place, fasten a strap around it with velcro or snaps, slide it behind some elastic or into its own pocket.
You’ve really got my brain turning with ideas. I’d love to see pictures of how those inspired by your post personalize their own sewing caddy.
Very handy idea!
Thank you, Cinda!
I still use it every time I sew while not being in my sewing room 🙂
Irene // Serger Pepper Designs
Pinning, Irene. You’ve got everything covered.
That is really adorable and useful! I don’t usually take my sewing out, but maybe if I had one of these…! 🙂 Lisa
That’s so great! I’ve got a Craft Gossip post scheduled for tomorrow that links to your tutorial: http://sewing.craftgossip.com/?p=82511 –Anne