


Well, it's been that time of year when many of us don't have much time for sewing, me included! Actually, my wardrobe is exploding right now. I was so enthusiastic about my sewing last year that I made so many clothes that I feel almost embarrassed! In a country where flip-flops, clean shorts, and a t-shirt is the only dress code for almost every occasion, I don't really have the excuse to sew a big wardrobe full of clothes.
So I'm using this time to brush up on my sewing skills and learn some new ones, trying out lots of different things on all my fabric scraps.
Towards the end of last year, I concentrated a lot on learning good fitting skills. Now I want to learn more about how to get a really nice finish on the inside of my work so that the inside looks (almost) as good as the outside. One area to concentrate on is seam finishes.
I admit I can be a very lazy sewer and at least when I first started out I was always so keen to finish everything that I didn't worry too much about how and when (or if!) I finished my seams. That's going to change this year so I'm going to be learning some new seam finishes and I'll share them as I master them.
Firstly, why ‘finish' seams in the first place and what does that mean? Well, if you look inside your store-bought clothing you are highly unlikely to just see the raw edges of the fabric. Some fabrics will fray if left unchecked, and some fray like crazy! That means that they shed the edges of the fabric, and guess what – if they keep on shedding those threads, eventually the seam allowances will wear away to nothing and your seams will fall apart.
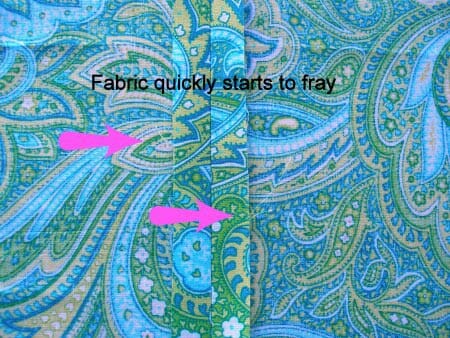
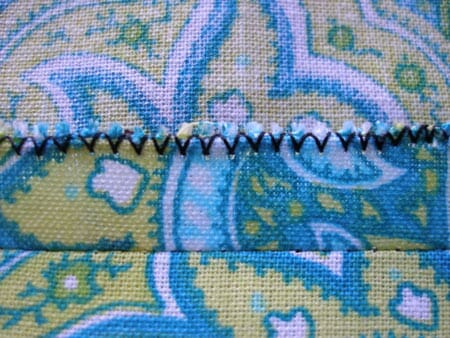
On this test piece, it was already starting to fray before I had even had a chance to properly press the seam open. So we ‘finish' the seam by treating that raw edge in some way to stop the fabric from fraying. There are lots of different ways to finish the seam. Some are dependent on the type of fabric or garment being made, but many are interchangeable and you may just use your favorites.
Today, the very basics – finishing the raw edges with a zig-zag stitch seam finish. This should be easy right? Except I always kept getting things really bunched up. I have fiddled with my settings and eventually settled on:
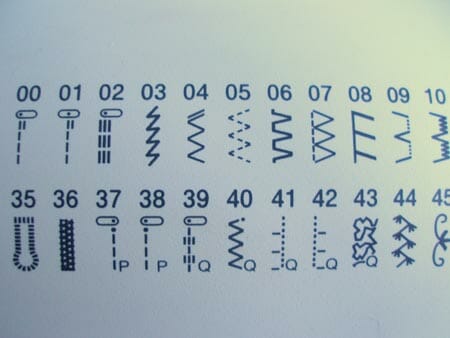
Set a regular zig-zag stitch – stitch number 4 on my machine.
Set the stitch width quite wide – 5.0 and the stitch length quite small – 1.4.
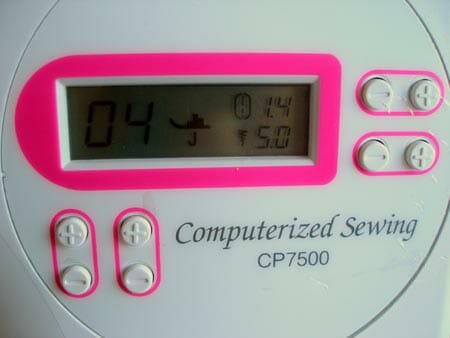
As I sewed along the raw edge, the right-hand swing of the needle JUST fell outside the edge of the fabric, causing it to be brought in just a little bit. And here is the finished result.
You may need to vary the stitch settings on your own machine to get the best results. Practice on some scraps.
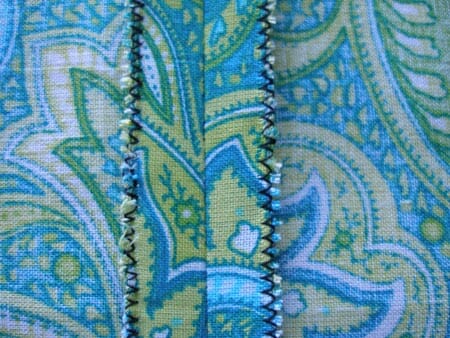
I don't think this seam finish would win any prizes. It's adequate on fabrics that don't fray too badly, is reasonably flat and thin, is very quick and easy to do, and ideal for beginners. But it doesn't look especially attractive. Obviously, I have done mine in a contrasting thread for effect, but still – it's not that pretty.
There is a variation you can use to get a neater finish. If your machine comes with an overlocking foot, this can be used to great effect with the zig-zag seam finish. Using exactly the same settings, this foot is lined up against the edge of the fabric as you sew keeping you on the straight and narrow and a little part of the foot just helps those zig-zag stitches sit neater. With this foot you could even increase the stitch length (see the seam on the left) and still have it lie nice and flat.
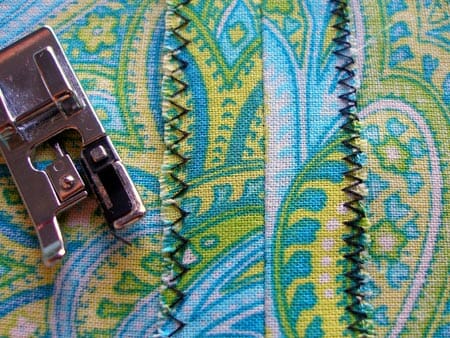
See – much flatter. I'll also be looking at using the overlocking foot in a future seam finish too. It's a really useful piece of kit.
Next, I think I'll try the Flat Felled Seam. Not an obvious seam finish for many garments, but worth learning.


To make this annoying chore a bit easier: Think of it not as “finishing seams” but as “preparing fabric” instead. I learned it this way: wash your fabric, cut your pattern, and then, before any seam is sewn, zig-zag all around each piece. Thus, all is still flat and a lot easy to handle.
Thank you for this! I love learning these little tips. I like neat and it really does make a difference.
Thanks for the seam finish ideas. I’ve been sewing a bit over a year & had no idea how to have seams that look good (& I definitely can’t afford a serger). I never knew you could fell the needle just outside the edge of fabric. This could change things. Thanks again.
Never gave seam finishing much thought but you are right! And it looks very nice as well. Glad I found this. And thanks for sharing.
This is great advice. I do mostly quilts and crafts and not much garment sewing, but you still need to finish seams occasionally.
Can’t wait for your next post. I have been wanting to clean up the inside of my projects so this is perfect. Now to the pile of fixes on my sewing table so I can get to the real fun; making all those fun summer dresses!
Yes, I agree that the Overlocking Foot is most definitely the way to go. That is what I use. I also use a Serger with a lot of fabrics (if you have a serger). A serger is a very good investment.
Great article. Thanks for posting.
This was the way i was taught to finish seams when i was sewing for my kids over 35 yrs ago. I had 2 grandsons born 18 yrs ago (they were born a month apart so it was like having twins) and after a year of sewing for them i went out and bought a serger. I hated how much time it took to sew, trim and finish the seams! The first time i used it i was holy cow did you see how fast i made the pjs?
I think it’s so great that you are doing some tutorials on the basics! Thanks for linking it up at Monday Funday!
Hi Deby! I am not brave enough to sew clothes yet! For some reason it just scares me! Your tutorial is great and very informative! I will definitely bookmark this for future use! 🙂
I am giving away a fat quarter bundle on my blog today! I would love for you to come over and enter! Happy New Year!
Awesome! I don’t sew much but once in a while I tackle a sewing project for a holiday decoration. Thanks for sharing-Andrea
Love your blog Deby. Yes…the zigzag seam finish is not the cleanest finish. In Home Ec sewing (50+ yrs ago) we had to use pinking shears & then sew a straight stitch on each side of the pinked seam. No wonder I hated sewing as a teenager. Seam finishes must have been the driving force that led me to my first serger in 1986. Sew long.
I have a serger finally…but before I did finishing seams that tended to fray…cottons, linens, I loved and still do making the French seam….just gorgeous…zig zag stitches still ravel after washing and just look crappy to me…and around some place like a sleeve where you cannot obviously use a French seam I would use something like “Seams Great” or something similar to protect it from fraying…or bias tape…hate, hate messy inside seams…or if I did zig zag, I would press the seam flat, then press either side barely under and then zig zag…much better than a plain zig zag
Absolutely agree Mary. I wouldn’t use the zig-zag in any areas that were to be visible because it’s not a pretty finish. But when you are starting out in sewing, this is tyically the first seam ‘finish’ you are taught so it is therefore part 1 in the series about seams. It’s a great idea to just turn under the seam a tiny bit and then zig-zag, would look neater for sure. I was taught this years ago, turn under a tiny edge and then run a straight stitch, but it always made the seam edge just that little bit visible from the outside on thinner fabrics and often left a crease when the project was ironed later on. I appreciate your input and hope you’ll continue to make suggestions on the other posts in the series. One of the best things about this site, is the huge number of experienced sewers always ready to jump in with advice and new ideas for us all. Thanks Mary.
I have been wanting to learn to sew forever. Thanks for the clear instructions. I need to blow the dust off my machine and try this out.
Thank you for another excellent tutorial!
I truly wish I had you around when I was making my girls clothes when they were younger. I am pinning this for future use.
Thank you for stop by and linking this post up at 1st Wonderful Wednesday Blog Hop “2014″.
I look froward to following your social medias.
Blessings and happy New Year!
Diane Roark
Well now I now I’m not the only one who’s purchased classes on Craftsy and not finished them. I am just starting to watch Sew The Perfect Fit although I purchased it several months ago.
Check your manual but I think stitches 6 & 7 on your machine might actually be overcasting stitches. It will give you a slightly better finish than the zig zag stitch. Is your machine a Brother? I have the exact same foot that came with my machine but I spent money on a serger before taking the time to learn what that foot was for. lol
Well spotted about the overcasting stitches (I use them all the time) – I’ll be moving on to those later on, but I wanted to start with the Zig-zag because not everyone has the overcasting stitch option on their machines. Yes it is a Brother – I love it! A serger may well be on my wish list for the future, but for now, I’m managing quite happily with my regular machine.
I also have a Brother and I love it, I have never used the overcast stitch for seams until now, I will never use anything else again… I always used the zig zag before ( my old machine didn’t have the overcast stitch) Thanks for the info..
They are wonderful, aren’t they. Glad to be able to introduce you to something new.
Great job. I do this on the kid clothes I make for my daughter! The poor girl’s serger I call it