


So many people spend hundreds of dollars on a good sewing machine, use it for a few months and then they give up, and put it back in the box in the basement where it remains for years –untouched. Somewhere in their sewing journey, many aspiring sewers become afraid or demotivated because the project did not turn out the way they wanted.
A big pile of unfinished garments is a dead giveaway! Our brain is trained to look for inconsistencies and it is how we judge beauty. Unconsciously, we know something is off and we give up before we finish. The reason for this doomed journey starts at the fabric store but is often made worse by how we end up cutting the fabric. Here are my top 5 mistakes to avoid when cutting fabric.
The reason for this doomed journey starts at the fabric store but is often made worse by how we end up cutting the fabric. Here are my top 5 mistakes to avoid when cutting fabric.
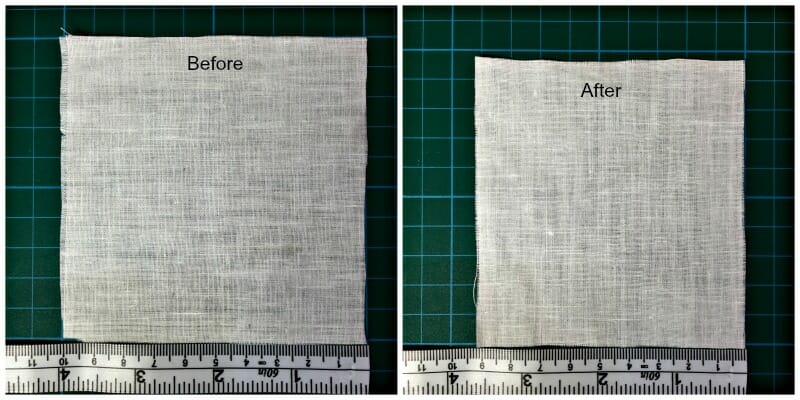
#1. Not washing the fabric before cutting.
Natural fibers come from vegetable material (cotton, hemp, flax, etc) or animals (wool, cashmere, silk, alpaca, etc). Below I have tested a 100% cotton swatch measuring 10 x 10cm, I soaked and washed the swatch and ironed it with a very hot iron. As you can see in the second photograph the swatch shrunk considerably, this is because when fabrics are being woven the fibers are being tensed.
When these fibers come in contact with water they relax, but by applying heat once again, the fibers go back to their original state. This process is similar to how a spring works. Normally it will take several washes for some fabrics to relax. A good example of this is cotton and linen. Both fabrics become smooth after a few washes, but when too much heat is applied –for example when we forget the cloth in the dryer for too long– the size of the garment will shrink considerably.
#2. Not squaring and truing the fabric.
To understand squaring and truing we need to learn a couple of terms that relate to fabrics. In the picture below, the yarn being pulled is called the weft. The yarn that runs perpendicular to it is the warp. In order to true the fabric we need to make a cut on the weft, pull the thread, and cut in the space that is left by the thread, as is seen in the picture.
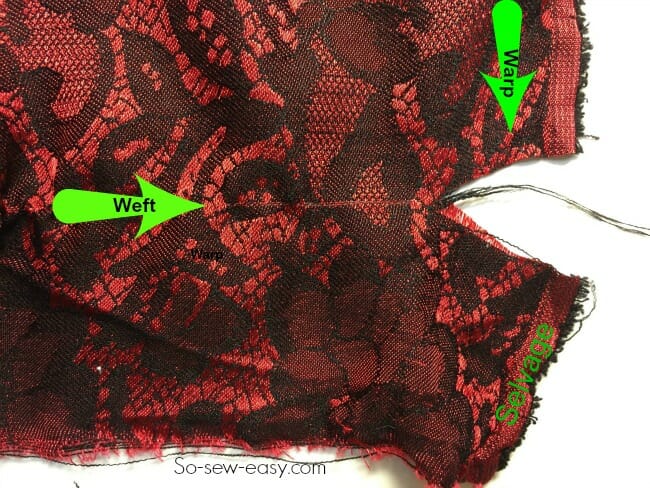
To be able to square the fabric you must cut away the selvage which is the fuzzy edge that runs along the length of the fabric or, as is known, the warp of the fabric. Cut away the edge by making a cut and pulling the thread and cutting the same way you did with the weft or the horizontal thread.
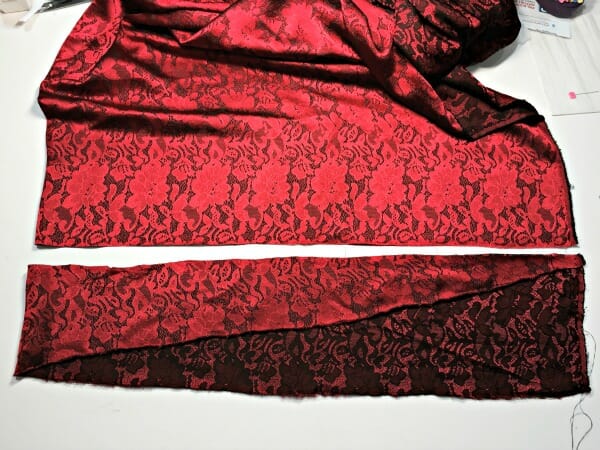
Sometimes when you go to the fabric store, the chatty woman at the counter makes a cut in the fabric and rips your piece out, this action actually distorts the shape of your fabric. In the following picture, you can see the effect of this action. I lost almost a bit more than a 1/4 of a yard getting the fabric to have a uniform edge!
To square the fabric, after you have taken the selvage out, get someone to help you pull one corner of the fabric while you pull the diagonal corner, change and do the other corners. You are trying to restore the shape of the fabric. This step is particularly important if you are using a cotton/elastane combination.
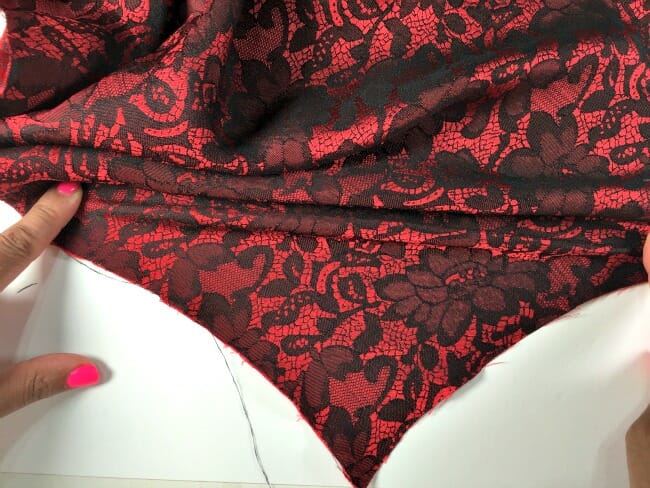
#3. Not following pattern instructions for placement of the fabric grain.
Ending up with something so tight that it looks like Shapewear or a too-short mini skirt because you didn't shrink your fabric before sewing is still not as bad as not using the grain of the fabric to place your pattern. To find the grain of your fabric, all you have to do is square and true the fabric, join the side where the selvage was, and fold the fabric.
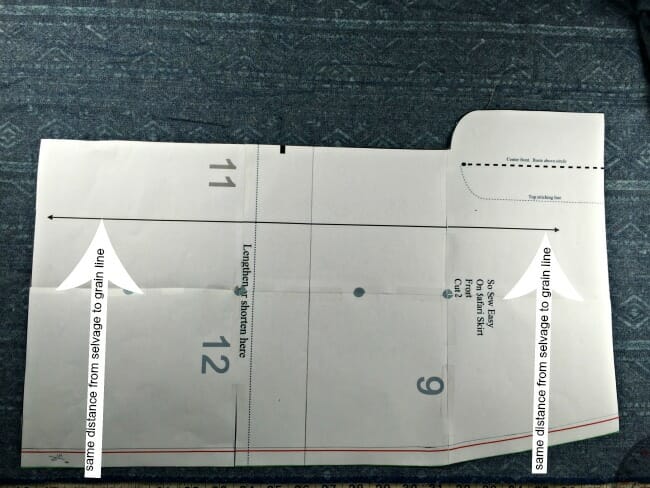
The fabric grain is indicated on the pattern as the long arrow that runs the length of the pattern piece it will cause the fabric to hang correctly because it will be cut at a right angle. Not only does it look bad, it's annoying to wear because your skirt or pants will keep twisting around or clinging to you, but more importantly, the pieces of your pattern will not match. This is simply because the fabric will stretch at an angle. A perfect example of this is a skirt cut on a bias. We've all had t-shirts where they cut slightly off grain to save time and can twist around the torso.
Avoid this by making sure to place your pattern pieces accurately on the grain when you cut out your patterns. You can achieve this by measuring the distance from the selvage to the grain arrow and making sure it is equidistant, as shown in the picture below.
#4. Not having enough fabric to match plaids or stripes.
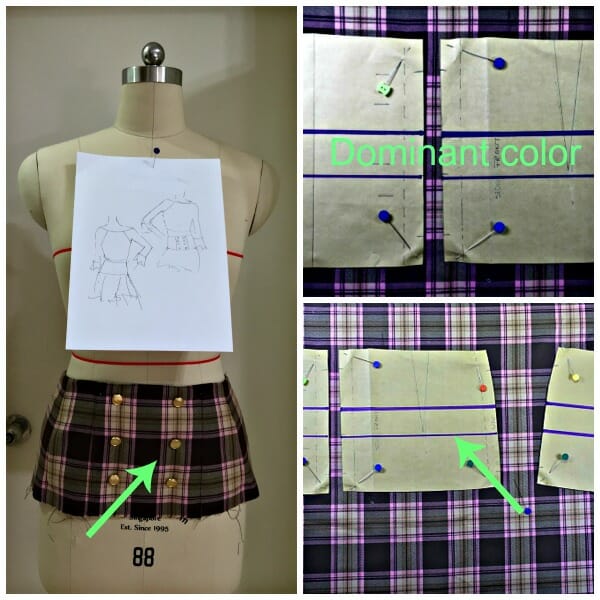
This is the classic mistake easily avoided by buying more fabric and placing the pattern so it matches the prints or plaid. On your pattern, mark where the most prominent color is. In my example below, I have marked the brown color in all the pattern pieces, because is the most dominant, notice how you actually will use more fabric because not only do you have to use the direction of the color, but also you have to maintain the grain of the fabric. As a rule, how much fabric you will need, will always depend on your size and the width of the fabric you intend to use.
#5. Using the wrong fabric.
Thin silky fabric will not make an appealing jacket due to its lack of structure. It would, however, make a very good lining. A knit fabric will perform differently from a woven fabric because of the stretchability of the knit, therefore, the pattern pieces on a knitted garment are going to be less wide than normal patterns. All Patterns will give you suggestions for what fabrics to use. It is possible to substitute the fabric according to its drapability.
Follow the instructions on the back of the envelope to the letter. It will be clearly marked what kind of fabric will be best suited for the pattern, study the drawing, see how the garment falls away or clings to the body. Look at the illustration and try to match what the designer has used. For a sample of swatches and their common uses please watch this video:
It is easy to get excited when inspiration strikes us, and we want to get things done quickly, but by not avoiding these 5 common Mistakes To Avoid When Cutting Fabric, you will only be sabotaging your own efforts and creativity. Taking the time to prepare your fabric may sound boring but it is essential for a good sewing outcome.
Thank you for reading, and Until Next Time, Happy Sewing!


I got daring and decided to make a plaid shirt dress. I knew I would need extra fabric for matching and thought I had figured it out. Unfortunately, I did not notice that there was a flaw in the plaid when I cut my fabric. Where the back seams met, across the widest part of my rear end, the plaid narrowed in one spot on half of the skirt back. I went back to see if they still had the fabric, but they didn’t, so I shrugged my shoulders, and chalked it up to a learning experience. Months later, I was at the same store and happened to see a remnant of the same fabric. It was more than I needed to cut a new back piece and finish my dress, which I still have over 35 years later. I will never discard it, since it was my first attempt and a successful one. ALWAYS buy extra fabric in case you have a mistake occur.
Very interesting post…lots of good advice sharing. I have been sewing for about 65 years and can fondly remember when all patterned fabrics were true and when paper patterns provided sufficient information so that a new sewer could produce a decent garment. I also recall that, if you found a knot in a ball of yarn, you returned it to the store for a new one! Progress is a two-edged sword.
Indeed, not always for the better. Remember when we were able to have a picnic in a park and go to the movies? You could leave your door without locking and did not have to roll the windows of your car? I miss those days!
Those days will be back again, have faith. Thank you for all your work and the way your share with others. Blessings from Texas, USA.
I started sewing about 20 years ago I took a long break and now I am wanting to start sewing again making quilts etc. and all these tips I have never even heard of pulling a piece of thread to show me witch way the grain goes ,, so helpful. I didn’t even know how important that it was to prewash my fabric or how to square it up the way you explained it that’s sad but it’s true..Thank you for all the encouragement and tips they are even more helpful than you could ever imagine very greatly appreciated and helpful..? TACEY 2020
Welcome back Tacey, hope you stay in the wonderful world of sew. Anything you need just have to ask, I am here to help…:)
I’ve been sewing for 60+ years and I ALWAYS wash fabric before making a garment or a quilt, plus I edge-stitch the raw edges first to prevent raveling. I also wash knits because then I know I’m working with a fresh, clean fabric. To make sure my grain is straight I mostly use the “pull a thread” technique. If you snip a very narrow slice from the cut edge first it’s much quicker and easier. I can almost guarantee you’ll need to cut another slice as you get toward the middle, so start pulling again from there. And yes, you’ll probably have to do it once or twice more as your pulling takes you toward the opposite selvage. But you’ll have a “guide” each time – the place where the thread begins to pucker is where you make your next cut. It’s takes a few minutes but it’s not that bad or difficult. Now you have a close to perfect straight edge. Next, fold your fabric in half lengthwise, matching selvages and the newly cut edge. Pinch the selvages together with hopefully almost a yard between your hands and hold it up. If you see any twists in the fold at the bottom, your edge is not straight, so slide the selvages right or left between your fingers until the twists disappear. Now your grain is straight. Lay it down, pin the selvages together and you’re good to go.
This took me A LOT longer to write than it will take you to do. Don’t be intimidated, it’s quite easy and you’ll get better results with your sewing.
Pre washing is something that I’ve started to do formy sewing fabrics. I try to make it a habit with all my new purchases so that i dont have to wonder if my stash fabri is ready to go. I only wSh quilting fabric if it is a dark blue red or black. I use wRm water and colour catchers. I use retayne for stubborn fabrics that are still bleeding after the first wash.
As a longarmer, i have learned to tear wide back fabric because it comes off the roll so far off grain its unmanageable. I check my tearing by ppulling a thread on each side to check the grain. The finished quilt sits much better after this.
what is retayne? I could not find it in the dictionary. where do you get it?
Thanks.
I googled retayne, it’s a colour fixative.
Retayne is a product sold in most quilt shops. It’s purpose is to set the any extra dye in the fabric so it will not bleed into you other fabrics. Most dark or strong colours have unset dye in them that will turn your other fabrics into colours you do not want. eg. reds, blacks, darker blues or greens, etc. can ruin your lighter colours.
I always wash my fabric as soon as it comes home, then I know it’s done. I used not to do this and never knew what was washed and what was not. I’ve never tried vinegar, but a friend told me that salt does not “set” the colour as I thought, but releases any loose dye. So now I soak everything, in separated colours, in hot salty water, then wash it with my normal wash (cold). This deals with colour bleeding and shrinkage, so there should never be a problem later with washing a quilt or anything else. I do the same with precuts, washing everything in bags to cut down on fraying. My batting is soaked in hot water to preshrink it. I don’t normally pre-wash dress fabrics, only if I think they will shrink badly to the point of changing the fit.
Rather than the extra step of a hot-water-soak, perhaps you might consider buying a box of Color Catchers, putting a couple of them in the washer with your dark fabrics and run them through a normal cycle. Color Catchers are not very expensive and they work VERY well. I’ve done this for years and never had a problem, plus it uses less energy, less water and is less work. Just a thought – you should do what you feel is best, regardless.
Keep on quiltin’ on!
Thank you Myra for these great tips. I already use a couple of them. About truing the fabric, I usually pull a thread as you suggest, but I often wonder if the fabric comes out of the dryer “scroogie” & I make a garment after truing the fabric, will the garment return to “scroogie” after washing & drying?
Hi Sharon, I had to google “scroogie” because I did not know the meaning of this fabric. Could not find it, I will assume is that it wrinkled and shrunk rather badly. and I am also assuming you left the fabric in the dryer until it was really dried. That is the property of the fabric and if you leave it for too long in the dryer it will happened again. Is this linen, cotton or a combination of both? What I do with this type of fabrics is that I remove it from the dryer after 15 minutes of being there and finish drying on a padded hanger. It really makes it for a quicker ironing or none at all. If it is linen, it will continue shrinking and loosening up after wearing. This is a very big topic and one I am going to adsress on a separate article.
What a cute pattern! I’ve never had a scissors pouch, and have never felt that I need one. The pattern is so cool, though, that I now think I must have one 🙂 Thank you♥
My Pleasure Terese 🙂
[…] Now, I want you to notice the picture above, my pattern is upside down. I have placed it like that because I want to cut the fabric on the grain and have the lines of the fabric running up and down on the grain. If you are a beginner you might get confused about this, for further reading I suggest you read Five mistakes to avoid when cutting fabric. […]
When you buy a stack of 5 inch squares, they are usually ‘pinked’. Where is the true edge—outside the pinking or the inside of the pinking? Love all your tidbits of wonderful information!!
If it was well cut it should not matter, it all has to do with quality. The pinking should have been cut on a true grain. Look on the inside to make sure it runs on a straight line.
I used to sew frequently, but have been away for a while. I had never heard of setting dyes with vinegar before. I am assuming is should be white vinegar, if not please let me know. Also, with washing machines being pretty large now, how much vinegar should I use? I will be doing this to all of my dark jeans as the color rubs off on my underclothes and socks. My Mother taught me to sew and she did the thread pull method of making sure the grain line was correct She also used the pull out the opposite corners when us kids were at home. With the price of clothing so expensive, I have decided to go back to making my own. These tips are a great reminder for me. Thank you so much!
HI Peggy, You post very interesting question, and one that is hard to answer since dyes differ so greatly depending on the brand, natural or man made for both fibre content and for the dye. All dyes come with instructions that you can easily follow. Stay tuned because I am going to be covering this subject in more depth, from printing to the final product, It will be al lot of fun. So far we have this two articles for you to start with https://so-sew-easy.com/natural-diy-dye-fabric-yarn/ https://so-sew-easy.com/printing-on-fabric-washing/
Do you prewash trim? I rarely use it but now I have two projects that I’m using cotton eyelet, and a synthetic lace with a metal thread woven in.
I never do, and it is not necessary:)
I didn’t wash the cotton trim I used on a simple cotton tunic, and have seriously regretted it. I had to replace the trim from the neckline because it shrunk and puckered the entire neckline and no longer laid flat. So my advice is to pre-wash natural fiber trim in the manner you’re going to launder the finished garment.
I do prewash trim as it can shrink also. I put my trim in a lingerie bag before putting in the washer and dryer. Works great and it doesn’t get tangled.
Thank you sharing ideas.
I have found that here in RSA Weft is usually not true (distorted) when fabric is rolled and cut in the stores.
When I have extra hands each person takes a warp centre to wiggle it true. When alone, I hang washed fabric over a very taught washing line (to avoid sagging).
The aim is to get centre Wrap along the line (halving the fabric along the length). When the edges hang reasonably level, loosely next to each other, the “wobbles” are easy to see.
I then ease the short edges out of alignment until the warp edges naturally level next to each other. Washing pegs hold fabric while I cut notches to help with realignment after taking fabric off the line.
Back on the cutting mat, I anchor fabric using tins of food and then place pattern pieces.
I use sticky tape to glue pattern to fabric and then cut with a Rotatrim (pizza wheel type cutter. Fiskar also makes these cutters). The lines are very neat and stitching next to a straight edge helps me to stitch in a straight line.
Successful projects start with planning and preparation.
My favourite advisory adage:
-The only thing you can make in a mess is another mess
Wishing all of you many fabulous projects
Ahhh, sound advice! Thank you for sharing!
Thanks, Therese. Fabric didn’t used to be so bad! I had come up with the idea of a clothesline for truing, but hoped not to have to resort to it. It would have to be inside, else birds would perch, squirrels would play, bugs would enjoy as we’re surrounded by Alabama woods! I’ll have to do as you do. I just needed your encouragement.
Mayra, I would recommend that you put the tips about the fabric design not printed on grain, and the ones on how to permanently set dye with your articles that mention choosing and preparing fabric. Some fabrics I’ve encounted are both printed AND dyed so I ALWAYS use the vinegar and salt method. There was a timeframe when I almost dispaired of ever finding a pattern printed on the grain. I used the rip method for decades and it never let me down until the fabric designs started being printed wrong!
I feel your pain, I made a phone wallet and had to choose between doing the right thing or the follow the design I ended cutting it to the grain only to have a nasty woman pointing that out on the video. It was disappointing because the fabric I used was not cheap, but the quality of the print makes it look so. Yes, I should add a few more warnings to this article. Thaks for the suggestions I will take it in.
Another tip for sewers…always iron your patter pieces!
To true up when you are alone. Tye the short end to be stretched to your dining table leg and stand back. Pull gently but firmly on the sides of the material. Work your way down the sides towards the table until you reach the knot. Untie know to finish stretching the material. Or stand on it to pull. That worked for me.
I would just like to add the very valuable advice already provided by so many of you that after going to all the trouble of pre-washing, truing etc and fully preparing your fabric, my advice would be to make a toile (test garment) out of calico or a fabric similar to that you intend to use on the real garment to get the fitting issues out of they way. Sometimes we prepare our fabric really well only to find that once cut it doesn’t fit so well. Making minor adjustments before you cut your lovely fabric will ensure you are much happier and prouder of the final outcome. Speaking from experience!!
I often pin the paper pattern together and fit that rather than make a toile if pressed for time. Take into account that knit fabrics will stretch and determine how close-fitting you want the garment.
bonjour
je couds depuis pffffffff tres longtemps en pourtant j apprendre pleins de choses en lissant tes articles bravo a bientôt pour le prochain bonne journée
Merci Marie-Laure, cela signifie beaucoup pour moi! a bientôt!
Really great post! One more thing is to use the right kind of straight pins for your fabric. Ball point pins work great for knits. I like either glass head or silk dressmaker pins for fine woven since they don’t leave holes and can be pressed.
Thank you, Andrea, great tips!
Regarding pulling threads in fabric, I often have great difficulty if the fabric is tightly woven and the threads are fine. Even if I grab several threads to pull, they still break. Any suggestions?
Sadly you need to go very slowly, it is a pain but in the case of georgette or silk it is a must. If you cut them out of the grain it will show a mile away.
It’s a pita, but pull a short chunk, and when you have a couple of inches of thread pulled, hold the fabric really tight where it has gathered up and smooth it out toward the other selvage.
This often leaves a disturbance in the force, or threads, that you can use as a cutting guide.
Repeat as needed.
I LOVE this website. I look forward to your E-mails and free patterns. I will be making your oven mitts pattern today. I am an experienced sewer but these look a little complicated. I’m hoping that when I start the actual construction it all comes together.
HI Barbara, they are not difficult but as always you can drop me an email and I will be happy to help you. Kind Regards,
Me parece muy interesante el artículo, pero leyendo los comentarios me perdí un poco, entonces debe lavarse la tela previamente o no?
Hola Milagros, si debes lavar la tela, especialmente si estas haciendo ropa para ti o algun cliente. Si es para vender en un mercado o tienda no es necesario.
Great reminders for those of us who sewed years ago and are getting back into sewing. As a fairly new quilter myself, I will say the prewash vs no wash for fabric seems to be divided per your preference. Never prewash the precut fabrics ex, jellyrolls, fat quarters, charm squares. They will ravel something fierce. If you take any classes or watch youtube they always have you straighten your fabric or true it up. If you do not your work will not come out the way you want because it will distort the same way it would on apparel. Watch some tutorials on beginning quilting, cutting and everything inbetween on youtube. Check out Jenny Doan on Missouri Star Quilt. She is excellent. Quilty classes are also excellent. Too many to mention.
If you don’t mind. I would like to ask about the solution that Tanya uses. Are there any of those solutions that will work with cold water? I have found that even though I use cold water, there is still some kind of bleeding that occurs with some fabric. Thank you so much.
Regarding bleeding of fabric: do not use fabric softener in the rinse water, use 1/2 cup white vinegar instead of soap in the wash water instead. Always prewash in cold water.
I learned overseas that you should always soak fabric in vinegar & hot water with a tsp of salt. It will make the colors permanent, so you never have to worry about colors bleeding again. I usually do it in the sink. It works so quickly, even seconds, that fabrics you normally shouldn’t expose to hot water aren’t affected.
There is only one thing I learned was to not wash my quilting fabric before using. Once you finish your quilt and wash it, you’ll probably find that there is shrinking in the batting but not in the fabric you preshrunk. Of course I found this out after the quilt was finished and I took it to the laundromat because of the size, but I always wash with cold water and dry on low. All of my clothes that I launder in this manner seem to last forever and the colors stay true. However, there is one drawback to this. After 5 to 6 years, the clothes have a great look, but I’m really tired of them. Most of them still look good for 10 or so years. Arrrgh. One thing that works, is when you want to crease or pleat something that will last, just add a little bit of vinegar to the water in your iron, and the crease, etc.,should last a good while. Have a great day, all.
Hi there, Actually I know to prewash the fabric, to buy enough to match the design and all other stuff. One thing I am not fond of is the truing. I always do only a little or now truing and squaring the fabric. If, then only with plaid. In my experience the fabric will fall back to the original form after a while and it will be hard or impossible to iron it to the “correct” sewed form. The fabric seems to have its own will.
That is the permanent press the manufacturer puts in the fabric. It is what keeps the fabric from wrinkling so much.
I was looking at the hoodie pattern instructions and went to this page to read about truing fabric. Is there a way to true fleece? You couldn’t rip that could you?
HI Jana, in fleece the important bit is to cut the fabric following the nap, if you brush your hand on the fabric you will notice, the nap will lay at an angle which make the colors richer or duller to either side. You need to decide what way to cut the nap and stick with that direction for all pieces of the pattern. Use the selvage as a guide to place the pattern pieces at a right angle. If the fabric is distorted with the help of someone pull gently on the corners to get it back in shape. Let me know how it turns out. Kind Regards, Mayra
I use a Wonderful product called called Retayne and it’s used in the washer in lieu of soap when I do my preshrink and what it does is set your colors and then your fabric will Never bleed into the wash. I use this stuff when I buy new colorful clothes/scarves… and then I get to keep the Same color my item was when I bought it wash after wash. Never again do I need to worry about pink laundry accidents. I get mine at Dharma Trading Co on line and you only use a tsp per yard of fabric and it works just as well in warm water as it does in the hot water the label instructions give.
Thank you Tanya, have you tried it with dyed fabric?
Yes I use it when I do my Shibori indigo fabrics. Great stuff.
Thanks for the tip!
Thank you for the tip, Tanya!
I am glad i read this because i have newer done this to the material.. Just started sewing things with patterns.. I have never seen a place that cuts fabric start the cut then tear it should i start cutting mine then tear and is that just to find the grain? I have always washed my fabric before using because i know it shrinks.
A VERY easy way to square fabric: Fold the fabric in half, selvage to selvage. Place one of your hands on the left of the fabric, and one on the right. Move your hands & arms left and right a few times, then give the fabric two or three shakes, Repeat this a few times. Then, lie your fabric on your table/work surface and cut off the uneven edge. I read this or watched a video of it on another web site and tried it, and it works!! She wasn’t sure why it works, but it does.
Article was very good. However, when I am working with a cotton, poly or mix of both, I always tear a strip to get the correct grain. Some fabrics leave an edge that is kind of ruffled, but a quick ironing will straighten the edge. I do this before I wash my fabric. Then I serge the edges so I don’t loose any more fabric to squaring it. Recently I tore on piece of fabric to straighten the cut.. It was a plisse, known as the Tutti Fruitti group of fabrics. It is a cotton poly mix and actually looks like seersucker. It started to tear sideways when I was 2/3 down into the tear. But it is the first fabric that has done this to me in over 50 years. I have torn other pieces of this same line as well as other brands of seersucker to find the grain. So occasionally it may not work, but for me, I find it a faster than trying to pull a strand or 2 of very very fine thread to get the grain. I learned it from stores that did that back in the ‘day’ such as the fabric department at J. C. Penney’s and elsewhere. They only started a cut with scissors, then tore the piece. Each and every time.
Hi Maureen, thanks for sharing that. Yes, you’re right that tearing will work well for certain kinds of fabrics. It probably helps to have seen it done back in the ‘day’ as you say as I think some of the new sewers would be surprised, maybe even shocked, by how that works. Great comment and thanks again.
I remember the clerks would give a couple of extra inches when they knew the fabric was really off grain.
I often tear to get the straight grain also. I have never (in many years of sewing) had a fabric that didn’t tear right on the grain. Very strong fabrics may resist tearing, but they do tear right on the grain. If it’s easy to pull a weft thread, I do that, to avoid the “ruffle” that someone mentioned above. But it’s certainly easy enough to press the edges smooth.
Brilliant refresher . Its sometimes to easy to get caught up in the excitement of a new project to forget the basics. am returning to sewing after a long break, so this article is really useful to help bring it all back
Hi Nina, glad you found it helpful. Welcome back!
why are quilters not washing fabrics and not using grain, but cutting by fabric pattern? Also fabrics are no longer printed on grain anymore it is almost impossible to match a pattern and keep fabrics on grain. Very few fabrics are woven anymore.
No, fabrics are still woven on grain, but it is the print that does not conform to the grain! I have found with some of the newer fabrics, no matter how many threads I pull to find the true grain, the print will not be on grain. But as to quilters not washing their fabrics – that is a hot debate among quilters. I always wash my fabrics, even pre-cuts, because of bleeding and shrinkage. I don’t want that happening to a finished quilt! The color catchers in the wash are very helpful also, plus is Retayne.
I must admit to being a bit envious of all the folks who learned to do these things at an early point in their sewing experience. I am entirely self-taught and I do not always see the problems I have caused until much later. I truly appreciate the effort it must take for you to run the blog and websites and want you to know how helpful this is to me. Thank you!!
Hi Yvonne, I’m glad you found the article helpful and thank you for your kind comments. We plan to have much, much more similar content in the future so please stay tuned!
Great tips!
I made every one of these mistakes when I started sewing. The tips I would add are don’t rush, don’t sew/cut when you are super tired, and don’t start a clothing item 2 hours before you need it.
Those are indeed worth adding to the list! Thanks for sharing.
I get so nervous when it comes time to actually cut the fabric!!! and you are so correct most sites/stores today forget to tell sewers you should always wash & iron all washable fabrics prior to cutting out patterns. My mother and my grand mom always told me to do this. I’ve taken some sewing classes where fabric was provided as part of the class and I had no choice but to cut out the pattern then and there and fabrics hadn’t been washed, very disappointed in teachers today around my area.
I wish I learned this stuff years ago when I started sewing!
Absolutely the best, most clear explanation for new or returning sewists. Many thanks!
This is a great article, thank you for explaining how to square fabric! I’ve always had trouble in this area and look forward to trying your method!