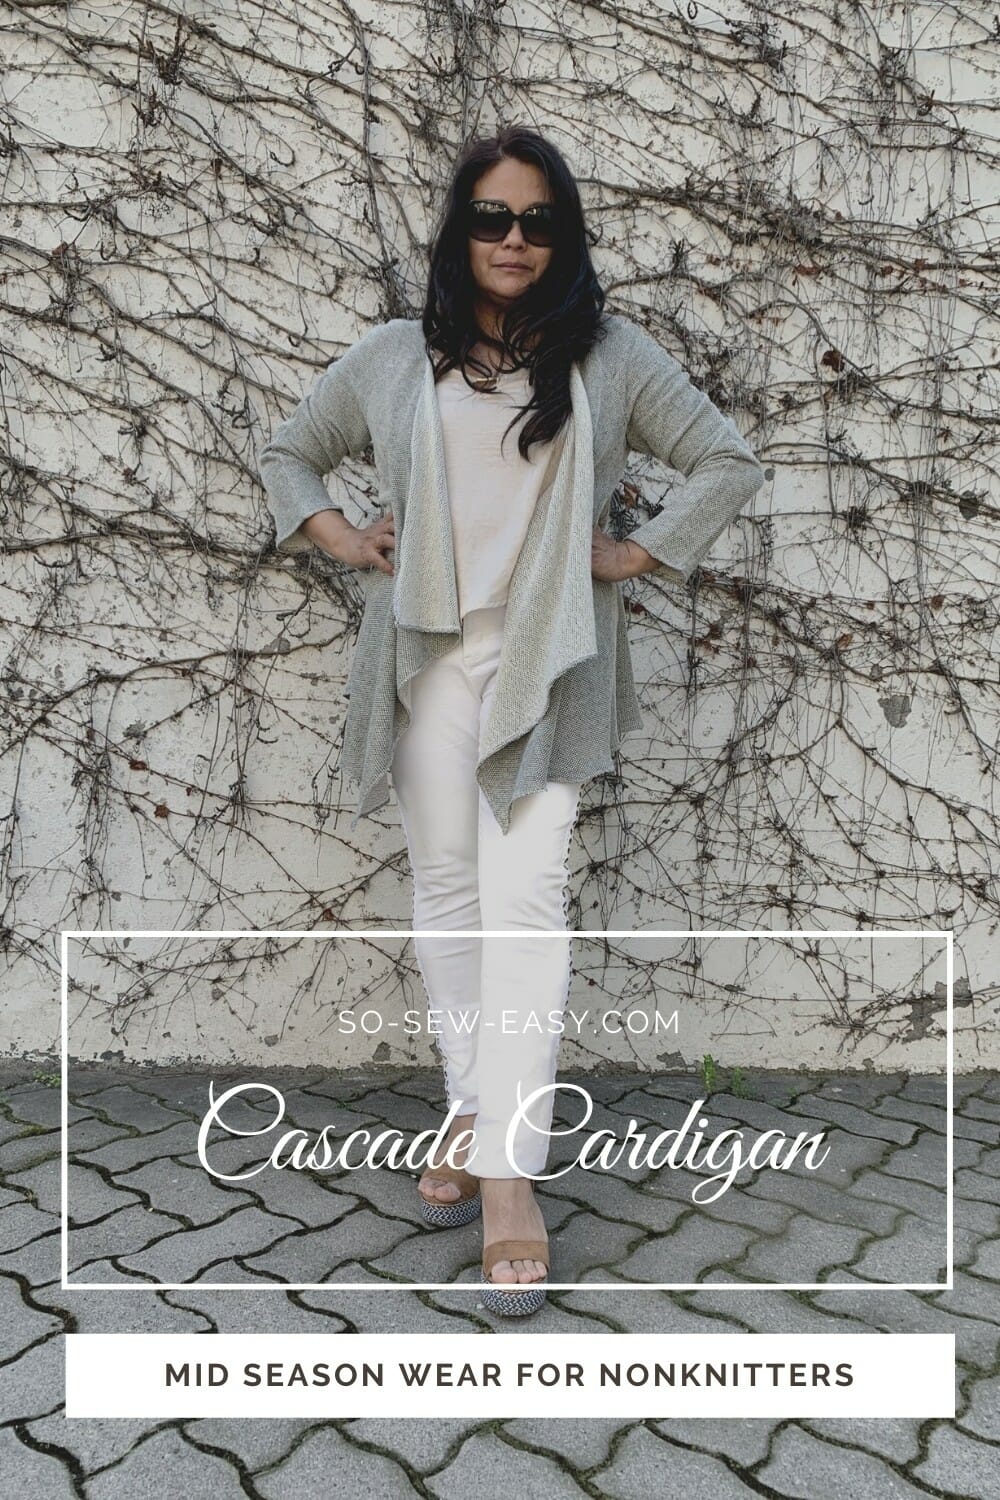
In both the Northern and Southern hemispheres, the change of seasons seems to have come on a little late. Down here we’ve only just had our first few days of somewhat warm weather. Personally, can’t wait for the warmth to come back for good. For all you in the Northern hemisphere the cool Autumn nights and chilly mornings may already be here, depending on where you are. I wanted to put together a simple, quick, and great-looking pattern for mid-season wear, which led to this cascade cardigan pattern named ACE.
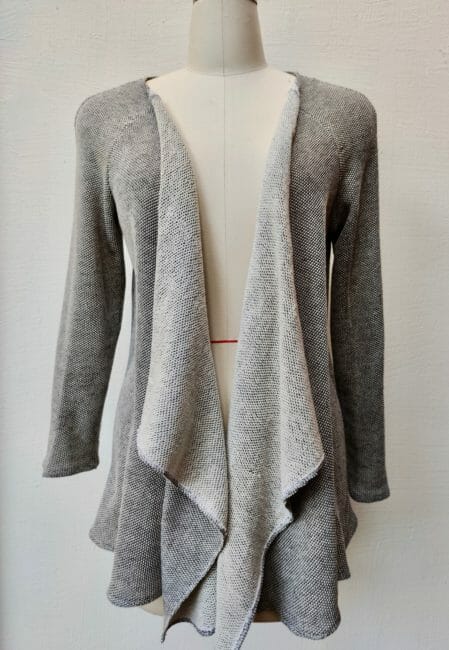

I've called this cardigan ACE because it's one of those pieces of clothing that are so versatile, valuable, and adaptable, that everyone, in any shape, can wear it. While still being able to dress it up or down depending on the occasion. We all know that the unpredictable temperatures of Spring and Autumn call for easy to work with layers — cardigans, sweaters, jackets, and so on, which can be easily put on and taken off without a hassle. I also wanted to do a project with the knitted look, but without the time investment needed by knitting yourself.
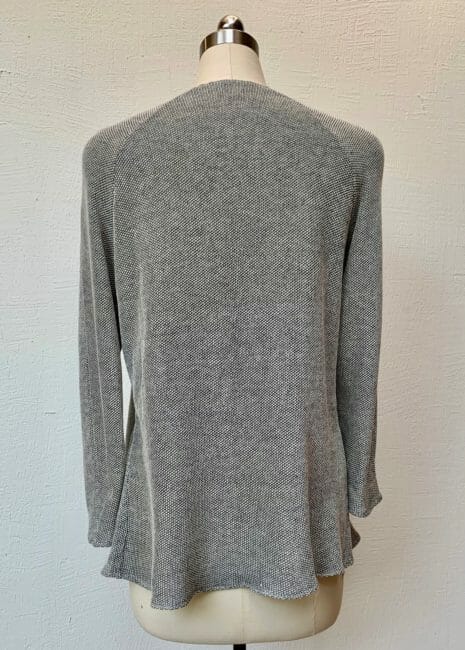

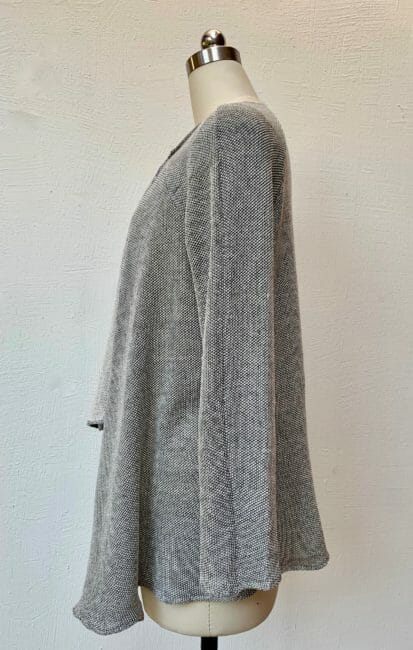

This cascade cardigan pattern will be an excellent addition to your wardrobe for practically any occasion. But, it will be particularly useful if you want to hide the fact that you may have put a few extra pounds, have a growing baby belly, or just need an elegant finish to complement a plain t-shirt and jeans.

This is a beginner's project, however, you will need to understand the importance of the grainline and know how to work with knits fabrics. Below are two resources that you will need to familiarise yourself with to be successful in this project.
And,
Materials
- 1.8 yards of Jersey Knit or Jacquard knit
- Ballpoint or jersey needle
- Thread to match
Tools
- Rotary cutter
- Dressmakers pins
- Sewing machine or serger/overlocker
Sewing Level: Advanced Beginner
This is an easy project, however, due to the limitations of a pictorial tutorial if you do not understand the instructions I suggest you wait for a video before starting this project.
Fabric Suggestions From Fabric.com
How To Download a PDF Pattern
We're going to continue to use the new PayHip Webstore to distribute our patterns. As most readers know, Craftsy (Bluprint now) is closing and they have stopped designers like us from publishing new patterns on their site, so we've had to move to another service.
Our patterns are still free, but now you now have the option of making a small contribution if you like our work! We'd really appreciate it and it will help is keep going with new and fun designs like this. Even a dollar or two really goes a long way. Maybe you don't know it takes an average of 26 hours of work to make a post and that does not include a video.
Thanks so much in advance for helping us out. You can use any credit card and you don't need to have a PayPal account, although you can certainly use one if you have one.
The instructions are free on this site and will be for as long as we can remain online. So I thank you for your support over on KoFi, your kind donations mean the world to me.
Cascade Cardigan Pattern Download
Pattern Layout
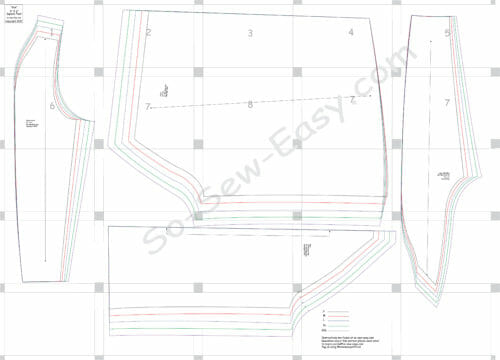
Body Measurements
| Bust | Length | |
| S | 36-38″ | 25 1/2″ |
| M | 38-40″ | 26″ |
| L | 40-42″ | 26 1/2″ |
| XL | 42-44″ | 27″ |
| 2XL | 44-46″ | 27 1/2″ |
How To Sew Your Cascade Cardigan
This cascade cardigan pattern has the seam allowance included, it is 1/4″. The entire cardigan can be made using your serger. There is a 1″ allowance for the wrists hem and the bottom hem.
Note: If you do not have a serger use a three-step medium zigzag in all seams including the edges.
Step One:
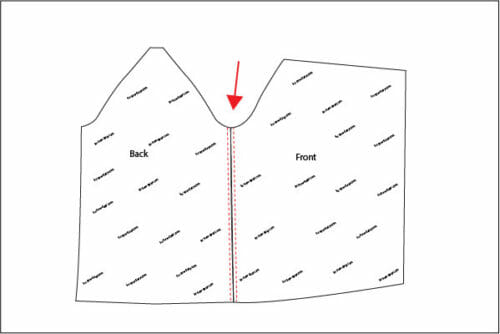
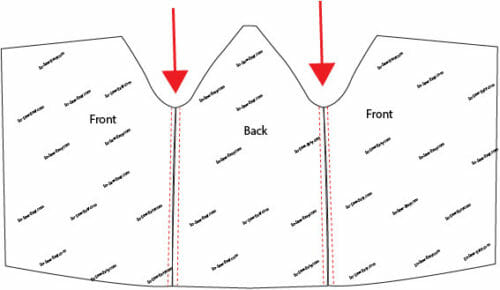
Join the back and the front of the cardigan at the side seams.


Step Two:
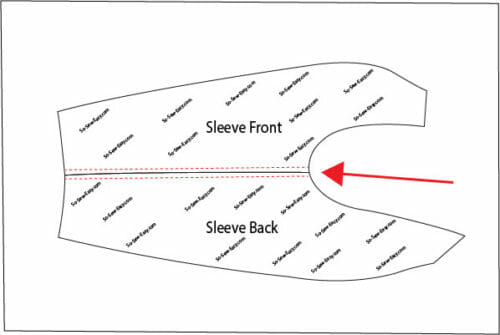
This cardigan has raglan sleeves, sew the sleeves along the underarm, starting at the armhole ending at the wrist.

Step Three:
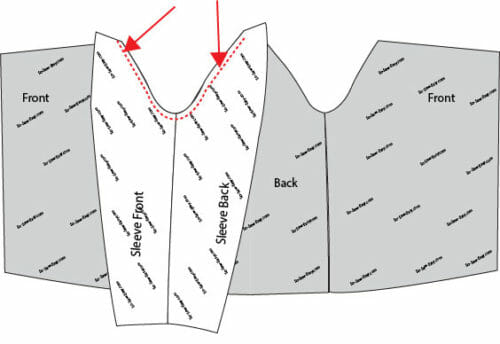
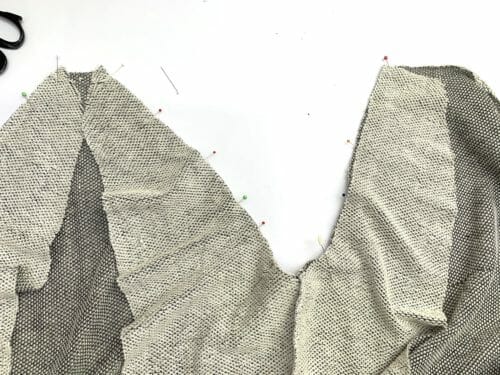
Join the sleeves to the body of the cardigan. Print sides together join the back of the sleeves to the back of the cardigan. Pin the front of the sleeve to the front of the cardigan. Sew around the armhole.


Step Four:
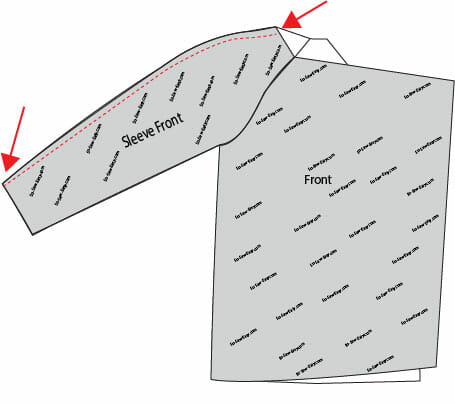
Sew the sleeve from the shoulder to the wrist.

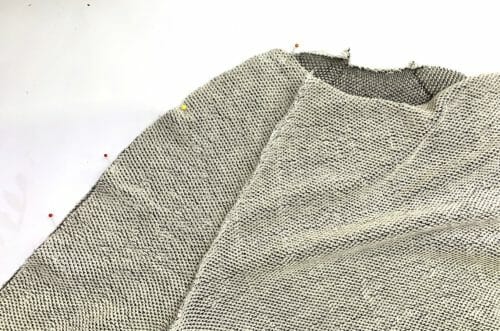

Step Five:
Zigzag or serge all the edges.
And that's all!
This is definitely one of our most simple projects on the site. But, don't underestimate the final product, once you see it for yourself you and your friends will be astounded how elegant it is despite the amount of work that went into it.
Let me know if you enjoyed this easy cascade cardigan pattern for non-knitters. And, Until Next Time, Happy Sewing!
P.S.
Want to know who's my favorite knit designer in New York City? Check out her shop, there are oh-so-many beautiful things, too many for me to pick out even!. Please visit Ojolly.net
If You'd Like To Support Our Site
If you want to help us continue to bring you a wide selection of free sewing patterns and projects, please consider buying us a coffee. We'd really, really appreciate it.


In the pattern instructions, you suggest waiting for a video before starting this project. Is there a video for the Cascade Cardigan? If so, can you give me a link? If not, will there be one?
I am a little confused on the back piece, it says cut one on fold, which I know will be the back portion. The part I don’t get is am I cutting straight across to the colored lines for sizing? on the page labelled 19? Does this make sense? anyone one else confused?
Rookie mistake – my first ever projector pattern attempt- everything looks great but the sleeves are skin tight – my knit was a double knit without stretch. Next time I will search out the expected percentage stretch…
I cannot figure out how to assemble the Tina top pattern. Help!
I would LOVE this elongated with a lacy knit (maybe black) with crystals or sequins longer. Sorry, second reply but I think this is gorgeous!
Hope you make it and share it with me, now I am curious…if you make it would you share a picture I would add it to this article and of course give you credit. Kind Regards,
This is absolutely LOVELY! I love how you did the sleeves and back. Have seen similar garments but you sleeve and back seams knock this out of the park! BEAUTIFUL!
Thank you, Vicky, love your enthusiasm!
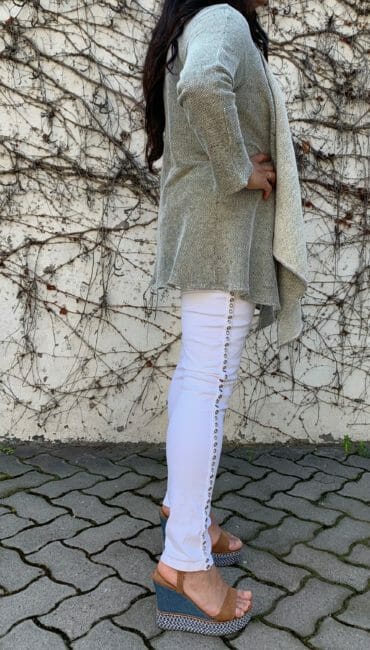
Is there a pattern available for the jeans showed on the cover of the Cascade Cardigan pattern?
I do have it from sizes 4 to 22. I have not shared it nor have I made a tutorial for them. The pattern is old as my jeans 20 years I think from the time I made clothes with my label and sold them at markets and pop stores,
Thank you for another fabulous pattern.
My pleasure!
Hello,
I just got your pattern for the cascade cardigan and I am really struggling with putting it together. Only a few pages in your diagram have numbers , the rest just show a position. Have you upgraded the pattern to show all page numbers in your diagram?
Hi Rebecca, I found the same with some of the pieces but found it easier by laying on the floor the pieces I had temporarily put together (with little bits of sellotape). I also printed off the pattern layout and then could work out where pieces went. Hope this helps.
Back again! Purchased a black and gray knit this time. Made a total of 18 cardigans. Gave them all away.Everyone loved them..
I am having trouble with lines of pattern lining up (even though printed out so 2″x2″ square is perfect size). When the grey boxes are lined (up on top of each other), the lines of the pattern are off on some pieces. Do you advise that I line up pattern lines or grey boxes when they disagree?
Also, are we supposed to trim pattern sheets prior to fitting together? (I scanned instructions and did not find info about this, sorry to bug you!)
Thanks
Hi RObin, you need to tape the pages from 1-5 then 6-10 always left to right. When you have taped all 5 rows tape the first row to the second, second to thrid and so on. The line and squares are there to help you align the pages. The small grey squares are 1″ and the thin lines between pages is also 1 inch apart. Hope that helps.
Wish I’d read this first as I was going top to bottom not left to right. But managed to figure it out after looking at the pattern layout 😁
I do have page 21 left over but no gaps in the pattern 🤔
I have ordered special fabric to try this and I can’t wait. Perfect project for winter days here. I just love your website and patterns and tips. Thank you so very much.
My pleasure Mary! hope to see a picture someday!
I downloaded this pattern and lucked out at my LFS to find a french terry just like the picture. Cut the back 2XL and the front XL to accommodate rounded shoulders – the fit is great, everything went together fine once I got the little grey boxes sorted. Wonderful pattern – well worth paying for, which I am just about to do.
Very happy it suited you, congratulations on knowing your body accommodate a pattern. Fitting is half the struggle with sewing.
thank you. great pattern, easy to put together.
Indeed it is, thank you for your feedback.
Wondering if you had challenges with pattern lining up? I checked 2″x2″ test, it is good. But when grey boxes overlap…lines of pattern pieces do not (esp 1 to 6; 7 to 12). Did you have this problem?
Thanks
R
Boxes should not overlap. Please tape by row then one over the other making the grey boxes 1″ in diameter.
I bought the pattern and the same knit pictured. I just made the first one in an hour. Love it! I used the serger for the entire cardigan.I left the hem as is and didn’t fold up the inch. It was so helpful that you gave the infor for the type of material you used, recommended and where to buy it . I just clicked on the site and purchased the last 12 yards. The material arrived pretty quick, neatly rolled and covered in plastic It’s great that I didn’t have to leave my house.The hardest part of this project was untangling the material after I prewashed it. I am making these for Christmas gifts but might keep one for myself! Your pictures and directions were great. Thank you!
Thank you for your feedback, you indeed bought the last of the fabric I clicked on the link and there is not more. I will have to find a replacement link. Very happy you found the patterns and instructions easy.
Please can you help? No matter what I try the grey squares don’t print and I cant line up the pieces. have bought fabric, it’s so frustrating would be grateful for any help! Thank you Jane
Hi Jane, I will write a post about this but for now, check your email I will send you the tips on how to do it.
I am having same issue!!! Very frustrating
Very easy pattern. I live in the southern hemisphere so for summer I have made it in a very light (almost like netting) knit – looks very preety and hangs well
Yes, that is a great alternative, I have found an open weave linen knit fabric and am planning to make one will update on Instagram. I am also in the southern hemisphere at the moment.
Thank you for this very useful pattern. Is there any other way to finish the fronts? I am happy to hem the sleeves and bottom edge. I don’t have a serger and I would like something more attractive for the front edges as the reverse side can be seen.
Thank you.
Simple machines have stretchy stitching that looks like a zigzag you can sew the edge then turn it. I did this with my serger.
so excited to make this!
Thank you……good looking garment. It appears that you have a1/4″ hem all round but there is no mention of a hem in directions. Perhaps an oversight?
I used the serger all around the edge, then turned only the serged edge then ironed. The knit I used ravels badly.
I can’t wait to try this!
Let me know how it goes for you!
Where do you get your fabric? My fabric store only sells cotton.
Hi Glenda, there are a couple of recommendations in the article from Fabric.com. Give these a try.
Hi, I love your fabric choice and the different color on the inside it looks great.
Any chance you you would up date your fabric store list it is very out of date.
I checked fabric.com and their offerings were so so any suggestions?
Hi Laura, indeed an update is due especially now that so many businesses have been closed due to the lack of supplies. This is worldwide. I just came back from Spain and normally I would have found many stores and suppliers and this time I could find but a handful, Very sad…
keep up your great pattern work! I have found your patterns to be reliable for fit, reasonable for assembly and great directions. Also thank you for your quick reply to comments
It is my pleasure Laura, thank you for your feedback! You made my day!