So you have a new serger and if you are lucky, like mine, it came pre-threaded and tested and ready to use. You are keen to give it a whirl, get practicing with your sergering, but again, like me, you might be nervous about taking out those threads just in case you can't rethread it again and then you are stuck.
Or maybe you just want a quick and easy way to rethread and know that it's going to work just fine without starting again from scratch. So let's cheat and rethread our serger the lazy way!
We can simply pull through some new threads without taking out the old ones, and then we'll KNOW that it's still threaded correctly and can just sew away.
Subscribe to the YouTube channel:
Step by step easy color change for the Brother 1034d serger
- Snip your existing threads leaving nice long tails you can work with.
- Tie on your new threads securely with a square knot – a reef knot if you are from the UK. Leave the ends so if the knot slips hopefully it won't come all the way undone and you'll catch it.
- Open up your tension disks by changing them to the lowest/loosest setting. Don't forget to make a note of what the correct settings were before so you can go back to them.
- Option 1 – just sew away and watch the new threads come through. Stop the knots before they go through the needles. The loopers will come through first, the needles use less thread so will come later.
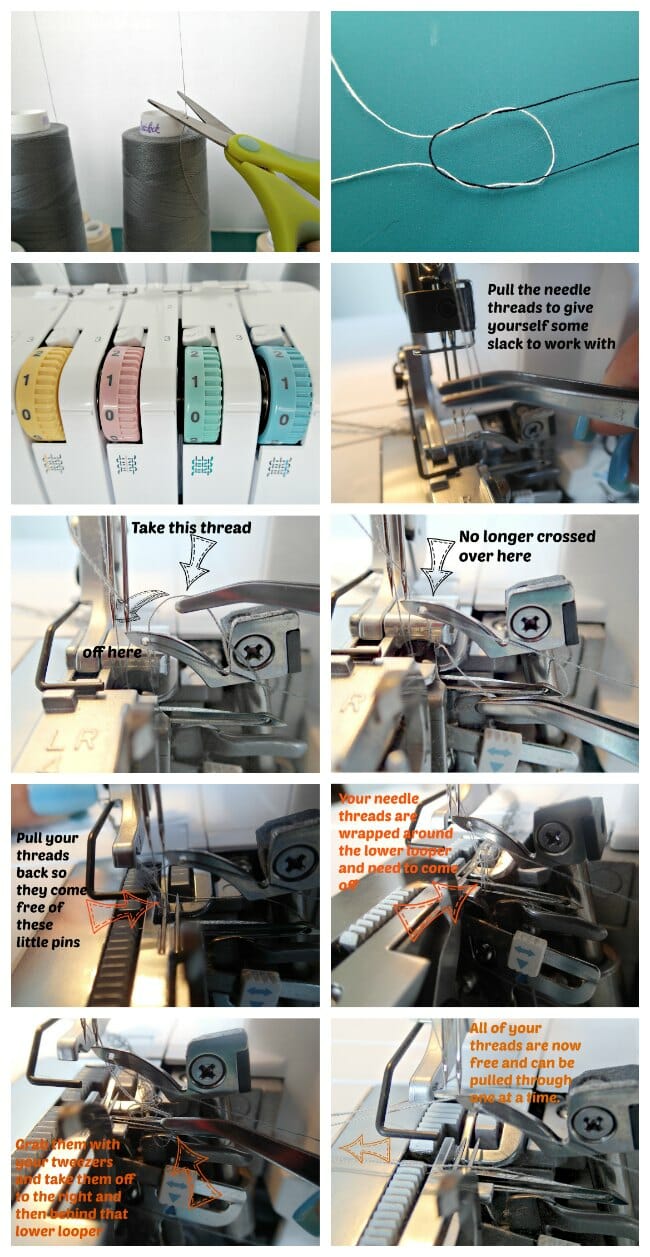
- Option 2 – unloop your needle threads from around your lower looper and then pull the threads through manually, one at a time, again stopping before the knot reaches the eye of the needle. (See the video or the photos before for how to unloop all of your threads so the individual threads will pull through.)
- Manually rethread the needles. Reset the tension disks.
- Done. Your thread color is changed and the serger is still threaded correctly.


I’ve been threading all my machines this way for years
Thanks Deby! A great time saver.
Hi Deby, I have just been sewing since 2013 and the free tutorial have helped me a great deal. I am now the owner of a brother 1034D serger and I’m nervous about using it fearing having to rethread.
Thank you for this short cut version, as for the second part it’s a little overwhelming for now.
Thanks again!
Only half of the video play and then goes blank – this happens when watching both serger videos (?)
They all seem to work OK for me Janet and you are the first person to say this from the thousands who have watched them. Sorry to say I think it must be somethign at your end. do keep trying, sorry.
It takes me ages to re-thread my overlocker, so I do it this way, too.
so far I have never had any problem threading my Brother serger the regular way but thanks . If I remember I may try it this way.
Such a comprehensive video. Great camera work and instructions. Thanks, Deby. I appreciate the amount of work you have done to provide both videos and photo directions. It is much appreciated. I have the same serger. Just a warning. I missed a pin when I was serging a seam, and it broke my knife. It flew off. Please everyone, triple check your work before serging.
Tried to watch the video but says it is private. I get the gist of how to do though.
Hmm, I think that was a YouTube glitch. It seems to be OK now. Can you give it another try?
My favorite (only) way to change my serger threads! When it actually comes unthreaded, I have to have my husband do it for me. I’ve got a post scheduled for this evening that links to your tutorial:
http://sewing.craftgossip.com/tutorial-change-colors-on-your-serger-without-rethreading/2015/02/17/
–Anne
Deby, this is how I change my thread colors too. So much easier than re-threading all of the threads!