


Get the printable PDF
Skip the on-screen scrolling and get the proper printable pattern from our shop. Pay What You Want, and yes, you can choose $0.
Get the Makeup Bag Pattern →
This free makeup bag pattern makes a flat bottomed zippered pouch that takes about half an hour, from printing the pattern to snipping the last thread. It uses roughly two thirds of a fat quarter, so it is the pattern to reach for when you want to use up one pretty scrap and end up with something you will actually carry.
It is a beginner project. There are no inside pockets to fiddle with, nothing to slipstitch closed by hand, and only one zipper. If you have never put a zipper in anything, this is a good first one, because the zipper goes in flat before the bag is assembled and there is nothing to fight with.
The PDF is free, there is a full video tutorial further down, and you can sew these to sell with no credit and no restrictions.
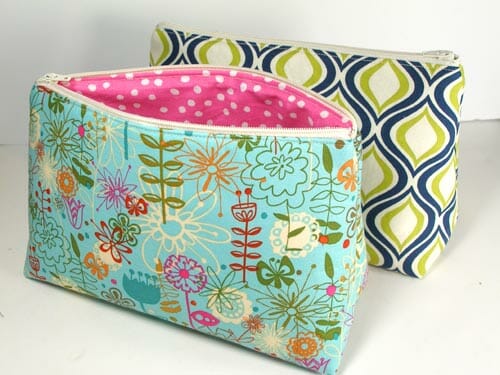
The finished bag is a little roomier than a shop bought makeup bag. It swallows a full set of brushes, or a couple of travel bottles of shampoo and shower gel, or all the pens that live loose in the bottom of a work bag. Plenty of people sew it as a toiletry bag, a first aid kit for the car, or a pencil case for a school bag, and the pattern does not change.
What You Need To Sew A Makeup Bag
- Outer fabric, 14 x 18 inches
- Lining fabric, the same 14 x 18 inches
- One 9 inch zipper
- Fusible fleece or interfacing of your choice, 14 x 18 inches
- Matching thread, and a zipper foot if your machine takes one
A fat quarter measures 18 x 22 inches, so one fat quarter covers the outer piece and still leaves you a useful offcut. Cutting from yardage, a quarter yard is plenty.
Fabric And Notions From Amazon.com


How To Sew The Makeup Bag, Step By Step
The printable PDF carries the pattern piece and the fabric layout. Here is the short version, so you can see exactly what you are in for before you download anything.
- Print the pattern at 100 percent and check the test square before you cut. Cut one outer, one lining and one piece of fusible fleece.
- Fuse the fleece to the wrong side of the outer piece and press it flat. Let it cool completely before you move it, or it will bubble.
- Lay the zipper face down along the top edge of the outer, right sides together. Put the lining on top, right side down, so the zipper is sandwiched between them. Clip through all three layers.
- Stitch that edge with a zipper foot. Fold both fabrics away from the zipper teeth, press, and topstitch close to the fold. That topstitching is what stops the lining catching in the zipper every time you open the bag.
- Repeat on the other side of the zipper with the opposite ends of the outer and the lining, so you finish with a tube that has the zipper running through the middle of it.
- Open the zipper at least halfway. This is the step everyone forgets, and you cannot turn the bag right side out without it.
- Lay the tube flat with outer against outer and lining against lining. Sew down both sides, leaving a gap of about four inches in the bottom of the lining.
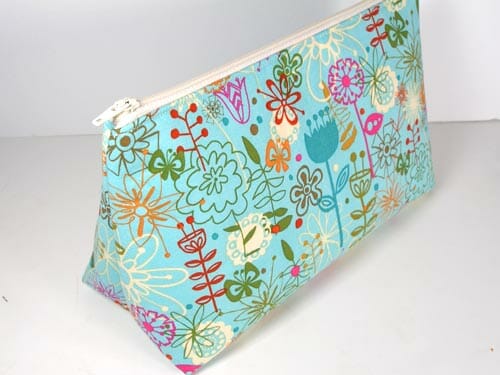
- Box the corners. Flatten each corner into a triangle so the side seam sits directly on top of the bottom seam, measure in from the point and stitch straight across. That is what gives the bag its flat base so it stands up on a shelf instead of flopping over.
- Turn it all right side out through the gap in the lining, close the gap, push the lining down inside the bag and press.
Choosing Fabric For A Makeup Bag
Quilting cotton is the easy answer and the one most people reach for. It presses well, it is cheap enough that a mistake does not hurt, and there is a print out there for everyone.
If you want the bag to survive a foundation bottle leaking inside it, use a cotton canvas or duck for the outer and a laminated cotton or ripstop for the lining. A wipe clean lining is the single upgrade that makes the biggest difference to how long a makeup bag stays presentable.
Whatever you pick, prewash cotton before you cut. A bag that shrinks around its own zipper looks like a mistake rather than a design.
How To Make A Quilted Makeup Bag
Quilting the outer is the easiest way to make this pattern look like something you bought rather than something you ran up on a Sunday. Cut your outer fabric an inch bigger all round, layer it over cotton batting, quilt straight lines at an angle or a simple grid, then trim it back to 14 x 18 inches. Quilting draws the fabric in slightly, which is exactly why you cut big and trim afterwards.
Skip the fusible fleece if you quilt, because the batting is already doing that job. Two layers of loft makes the corners too thick to box neatly.
Make It A Toiletry Bag Or A Wash Bag
The same construction scales up and down. For a wash bag, cut the outer and the lining at 16 x 22 inches and use a 12 inch zipper. For a slim pencil case, cut 9 x 12 inches and use a 7 inch zipper. The rule is simple: the zipper wants to be about an inch shorter than the finished top edge, and the boxed corner can grow or shrink with the bag.
The printable pattern piece itself stays at its original size. Those are cut sizes for plain rectangles, for when you want a matching set in three sizes.
Zipper Tips For Beginners
- Use a zipper foot. A standard foot cannot get close enough to the teeth, and the fabric ends up standing away from the zipper in a way you will notice every time you look at it.
- A nylon coil zipper is far easier than a metal one on this bag, and you can shorten one by stitching a new stop across the teeth and cutting the tail off.
- If your stitching drifts, move the needle position rather than shoving the fabric.
- Open the zipper before you sew the sides shut. Always.
Full Video Tutorial

Sew Them As Gifts
This is the pattern that gets sewn in batches in November. It costs almost nothing in fabric, it finishes in half an hour, and it suits the people on the list who are hardest to buy for. Put something small inside it and it stops looking like a homemade bag and starts looking like wrapping.
You can use this pattern to make bags to sell without restriction and without credit. Plenty of people run a market stall on this one.
Questions People Ask
What size is the finished makeup bag?
It finishes at roughly 9 inches along the zipper with a boxed base, which is a little larger than a typical shop bought makeup bag.
Do I need a serger or overlocker?
No. Every raw edge is enclosed by the lining, so nothing is ever on show.
Can I sew it without interfacing?
You can, but the bag will slump. The fusible fleece is what makes it hold its shape and stand up on its own base.
How much fabric does it take?
About two thirds of a fat quarter for the outer, and the same again for the lining.
Is the pattern really free?
Yes. It is Pay What You Want, and $0 is a valid choice. Pay something only if you want to.
Drop into the sewing chat group any time and ask a question, share a project you are working on, or just chat with the other sewers.
You can get this pattern free from So Sew Easy. Choose whatever you would like to pay, including free.
Go to the Makeup Bag patternIf You’d Like To Support Our Site
If you want to help us continue to bring you a wide selection of free sewing patterns and projects, please consider buying us a coffee. We’d really, really appreciate it.
Want more bags to sew?
Check out some of these other projects, patterns, and ideas below.


Subscribe to the So Sew Easy YouTube Channel
Some links on this page are affiliate links. As an Amazon Associate, So Sew Easy earns from qualifying purchases, at no extra cost to you.
Love this pattern. Have four made all ready!
I can’t find the pattern?
Bag is almost done but when I put together the bottom corners of the outside of my bag, there are points on both pieces of fabric. It looks like ONE of yours is straight. How do I get a straight seam when both are curved/pointed?
Hi I am trying to download this pattern and can’t seem to get it.
There are SO many ads on this site that I cannot find the pattern to print!
Thank you for this pattern and the instructions.