


Looking again today at how to get a nice neat finish on the inside of your projects. This isn't one technique that might immediately spring to mind and it's certainly not right for every project, but if you look closely you'll be surprised how often you might find it on your store-bought clothes.
How can we use the Flat Felled Seam?
The places you'll find the seam give clues to its features. Looking down right now, I'm wearing a pair of board shorts and the side seams and the central seam running front to back between the legs are both flat-felled seams. It's generally used on heavyweight fabrics such as jeans and on seams where extra strength is needed.
You can often also find it on children's wear where the seams might undergo a bit more stress as they rough and tumble. However, it does create a double line of stitching on the outside of the garment and is therefore not suitable for every application, but it can give a very professional looking finish if you can sew it accurately. Let's have a go at creating a neat flat felled seam.
How to sew a flat felled seam
The flat felled seam can be sewn from either the inside or outside. There's not much difference in techniques but which way you do it determines where the bulk of the seam will fall. For jeans, tote bags etc, you might have this on the outside, but for another garment sewing it might fall inside.
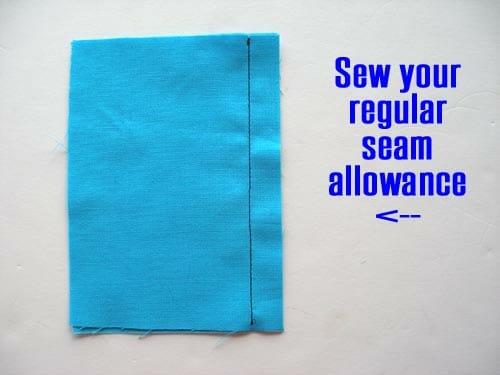
I'll be creating an ‘inside' flat felled seam in this example. Sew your seam as usual with your regular seam allowance.
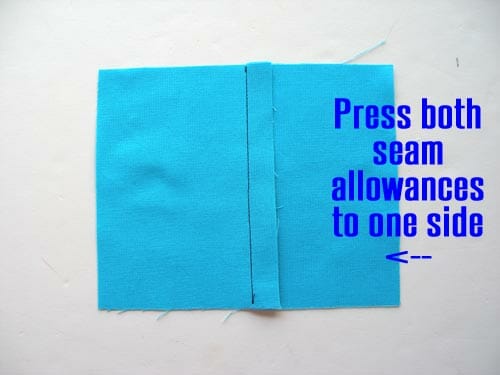
Press both seam allowances over to one side.
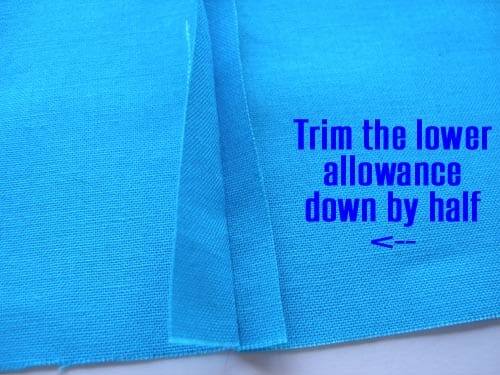
Then trim down the bottom seam allowance to half its previous width. Trimming accurately is important so if you have one, use a rotary cutter and mat rather than your scissors.
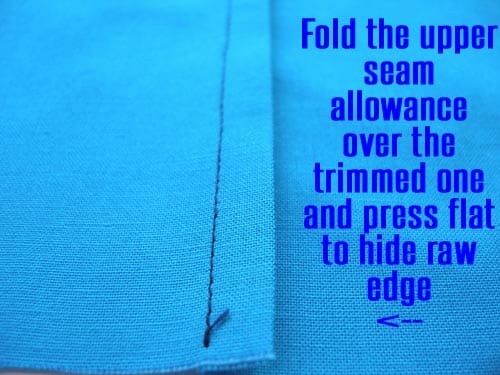
Fold the larger seam allowance up and over the smaller one, all the way nearly to the seam line stitched earlier. Press this in place. Again, accuracy is important, so fold and press carefully and use a seam gauge to get an even fold. Then fold the whole seam over on itself to the other side so that the raw edge is now hidden and press again.
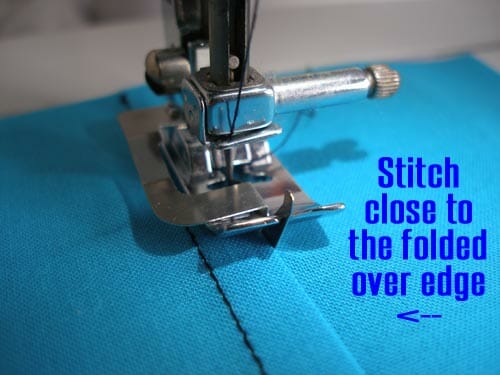
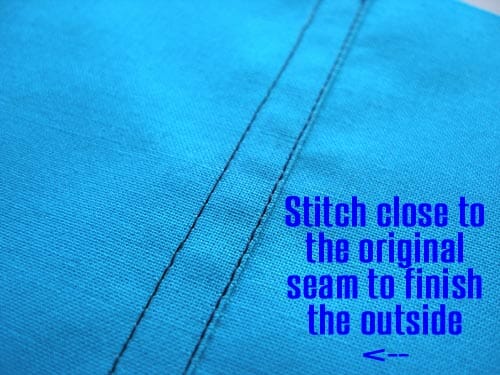
Return to the machine and edge stitch close to the free edge, trying to keep an even distance from the original seam line. If you have an edge stitching foot, or even a blind hem foot, this will help you stitch closely and evenly to that fold.
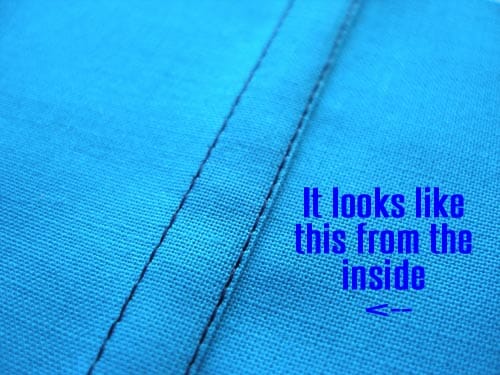
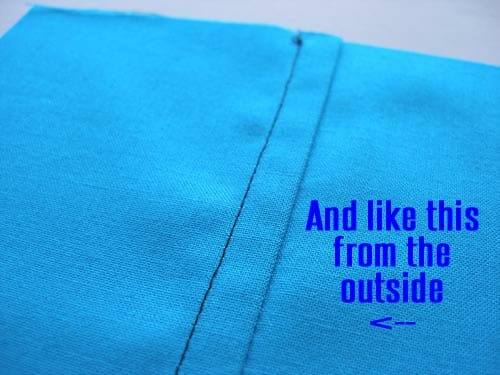
Here's how it looks from the inside, and the outside.
You may want to finish off from the outside by top stitching a third line of stitching just inside the original seam allowance for extra strength and decorative effect.
Many flat-felled seams are finished with specialty threads for more prominent stitching lines or you can use decorative and metallic threads for a fun look too. Of course, the iconic look of the yellow thread on denim is used in the seams on jeans everywhere.
Flat felled seaming for curves such as armholes is an advanced technique best left to the experts!
Next in the series – the French Seam.
Looking for previous seam finishes? Part 1 – the Zig-Zag Seam Finish


Wonderful article!
Thank you very much and Happy New Year!
I appreciate my emails from you. Very informative and interesting. Thank you.
[…] Part 2 – the flat-felled seam […]
Great tutorial, very easy to follow. I love all your tutorials. Thankyou.
[…] Part 2 – the Flat Felled Seam […]
Thank you. Trying to whip us an unlined linen jacket today and needed instruction. You saved me!!
As always, a very helpful tutorial. Thank you for taking the time to make tutorials for us.
I love your story about the Hong Kong finish. Your written and instructions and visuals are concise and clear.
I learned these seam finishes (including French seams) when I started sewing in the ’50s. My mother believed that a garment should look as finished on the inside as it does on the outside, and I still strive to achieve that goal.
These seam finishes are aesthetically pleasing, and extend the life of the garment by protecting raw edges. More importantly, perhaps, they help hold its shape.
Could not be put in better words, this is exactly why it is so much worth the time and effort to learn, master it and use it. No one will think you make the garment yourself when you use this type of finish.
Than you! I recently made my first flat-felled seams after learning how from a good sewing book, and your tutorial has provided some excellent reinforcement. I like the idea of that third line of stitching.
Very nice! And it looks nice as well. I learned a lot from this one too!
This is great! As I mentioned with the French seam comment, will try this as well! Thank you for posting!
Nicely done and explained. It can be tricky for inexperienced sewers without good pictures and instructions.
I love your tutorials, thank you so much! It seems to me that if you sewed the seam the other way round, you wouldn’t need to sew the third line of stitching for the outside, as the two lines of stitching would be visible on the outside. Would that be right? So, you would sew the seam on the outside? Does that make sense?
Why did you not put the folded seam on the right side? That is how I was taught to do it.
Love it. TY
I wonder why anyone bothers with flat felled seams when french seams are so straight forward and finish the seams nicely.
Flat felled seams are best when working with think fabrics such as jeans and corduroy where french seams would make the sides too bulky.
A French seam works well for drapes, but a flat seam would work better for a garment (like shirts) when the wearer prefers a planar finish.
Wonderful! Thank you!
Best flat felled seam instructions. They were exceptionally well written and very easy to comprehend. I feel well encouraged to try my hand at it now. Thank you kindly.
Very clear instructions. Just in time too! Getting ready to tackle my first pair of jeans. That is the side seam I would like to use. Thank you very much!
Thank you, Mayra! I live way up in the woods where everything is a ways to get to (like sewing classes), so I LOVE these tutorials!
You are most welcome Olivia, Sound like paradise to me. Are you able to get things delivered to you or do you have to make a huge list to be able to make a few projects?
Hello. Great tutorial and thank you. I have a question though. Is it possible to sew a single seam down a sleeve like a sweatshirt ( but running on top ) using a flat felled seam ? I’m under the impression it can’t unless done by hand. It’s for a kayaking dry top, waterproof material and I plan of Shoe Goo’ing the fold of the seam if it can be done. Thank you in advance.
Hi Ronnie, my concern would be the width of the sleeve to be able to finish the sleeve using a machine. Can you send me a photo mayra@so-sew-easy.com I will be able to help you better if I can see.
I think doing the flat fell seam on the outside is more comfortable for clothing as you don’t have the folded edge rubbing against your skin.
Thanks for the great instructions.. It’s so important for beginner sewers or sewers who may not have done a certain technique to have clear instructions like yours!
These instructions were very easy to understand. Of course now I’m curious to see what type of machine is used to do the hem-to-cuff felled seam used on men’s shirts.
Best flat felled seam creation instructions, ever. Great job. You have a talent for writing clearly and concisely, without leaving potentially important steps out.
Thanks Maureen. Much appreciated!
[…] How to sew flate-felled seams – by So Sew Easy […]
Nice idiaa!great..
great tutorial! very easy to understand!
great tutorial,thank you!
thank you for evry thing