


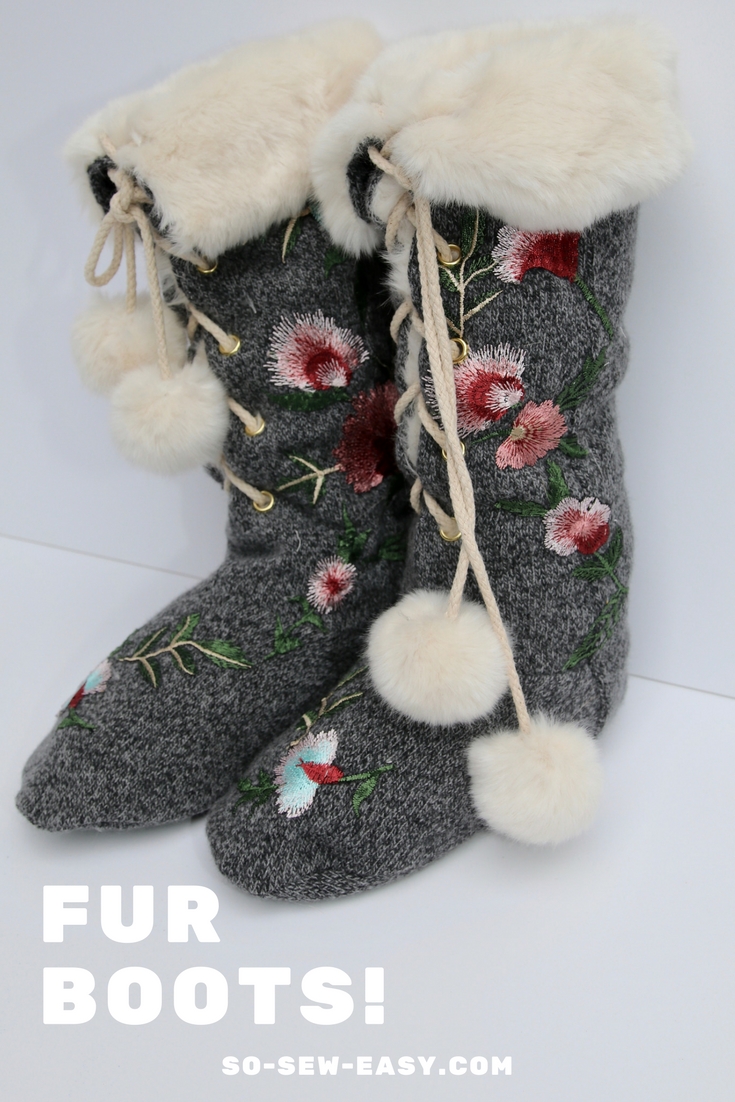
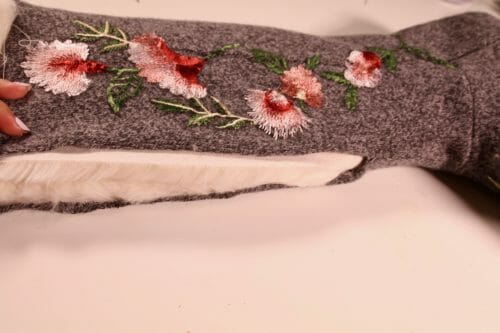
These fur boots are not meant for walking, but rather for sitting pretty by the window while you watch the snow fall — or at least, this is how I picture it. I imagine you sitting by the window with your favorite book or your new iPad (hopefully reading this blog post). I picture your mom, daughter or granddaughter drinking tea with a beautiful pair of these fur boots, perhaps it was a birthday or Christmas gift.
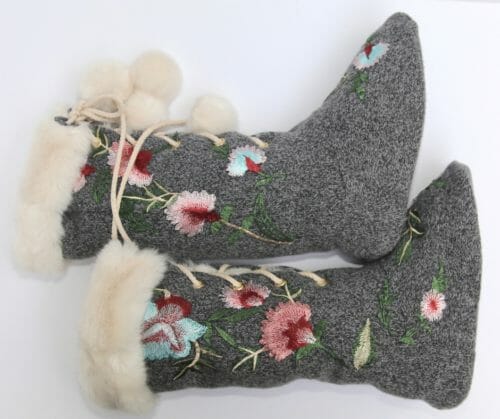
Fur boots like these are perfect for keeping your feet warm and your carpets clean. They are knee-high to cover more of your leg so you can wear leggings or just a short dress and still keep you warm around the house.
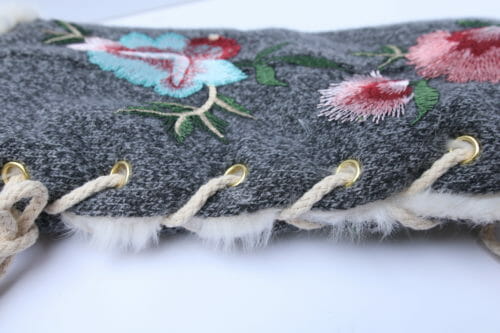
For this project, I am using grommets to lace the boots. I will be recycling an old ugly sweater I haven't touched for years, I recently found it in the back of my closet. We all have one lying around, so don't be afraid to put it to better use.
I will also be using the leftover faux fur I got from making the scarf with the pompoms last winter and the faux fur mini tote bag.
Materials
- Faux Fur
- An old sweater
- 4 yards of 3/8″ cotton rope
- 24 Grommets3/8″ in diameter
- Embroidered patches
Tools
- Kam Tool
- Sharp pointy scissors (preferable), craft knife or blade (Optional)
- Jersey Needle #14
- Walking Foot (Optional)
- Hole Puncher
How to sew these fur boots in No Time
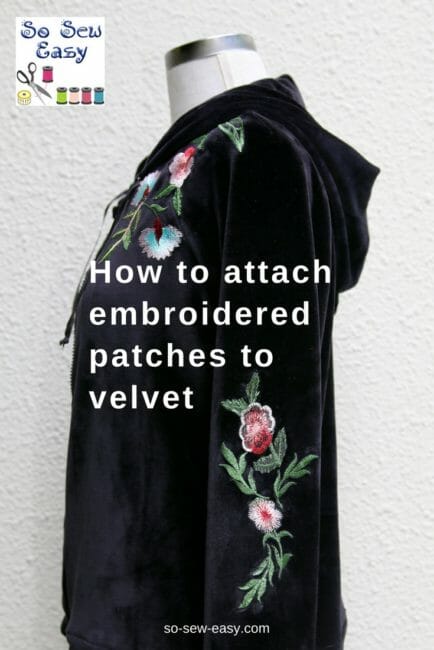
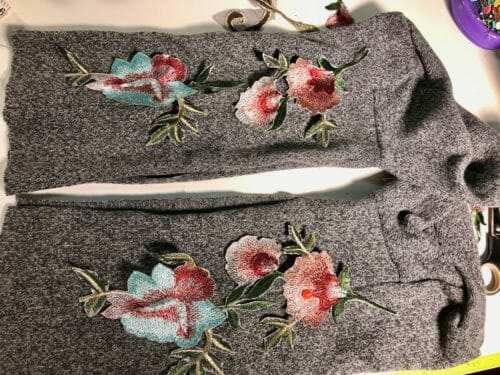
Before you start, I really suggest you review this article called Tips for Sewing with Fur that Every Beginner Should Know. This article will really help you to successfully accomplish this project. In my instructions below, I will assume that you know what I am talking about when I ask you to cut and sew the fur. If you want to decorate the fur boots on the outside as in my picture, follow the same technique I use when making and attaching the embroidered patches on velvet in this article.
How to download the pattern
Use Adobe Reader. Print on Landscape and on Actual Size. Never scale the pattern. You will have to cut away the margins of the pages to be able to tape them together correctly.
Pattern Download
You can download the pattern for these Fur Boots from our account at Payhip.
For help downloading and printing PDF patterns, please CLICK HERE.
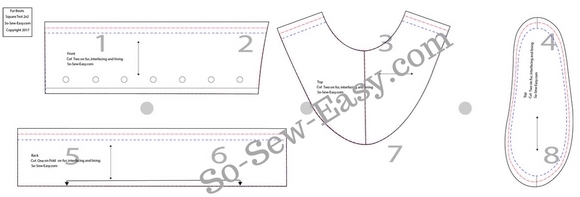
Pattern Layout:
Finished Measurements
These fur boots come in three sizes: S/M, M/L, L/XL and are intended for indoor use.
Height: 18″
Sole Length: 10.5″, 11″, 11.5″
Skill level
The pattern consists of four pieces, and the project is for intermediate sewers with knowledge and experience in sewing with both faux fur and sewing with knits. Please read this article on how to work with fur before attempting this project.
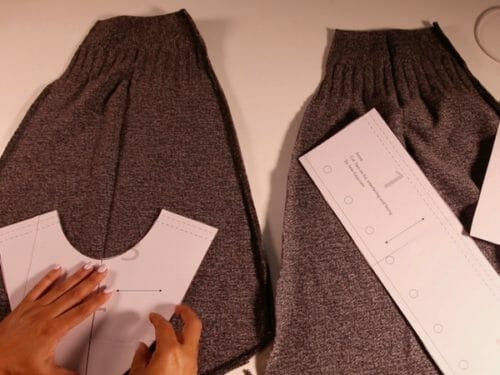
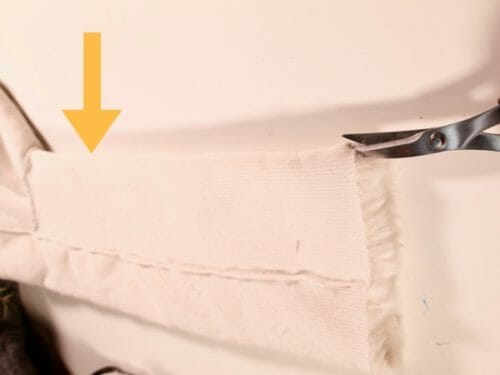
Step One: Cutting the faux fur and the sweater fabric
I can not stress enough the need for you to familiarize yourself with the tips on working with fur before cutting the fur. I don't want to repeat myself, but to be successful at making these fur boots, you need to know how to cut and sew fur.
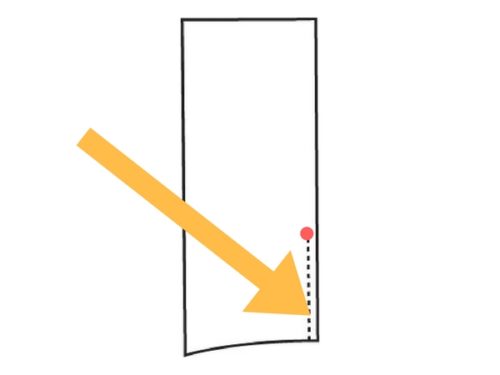
Trace all the pieces of the pattern I have given you on a new piece of paper. Take 1/4″ out from all seam allowances (except the sole). The seam allowance is 1/8″ (1cm) now. Please notice that the pattern says to cut on a fold, but you will soon realize that this is not possible when cutting fur. So retrace the other side of the fur, then cut. Since you have taken out 1/4″ off the seam allowance you will have to use a zigzag that is no bigger than 1/8″.
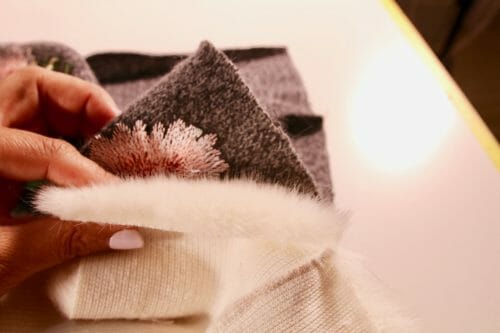
Use the original pattern to cut the sweater fabric. The fur fabric is cut smaller than the sweater fabric because the fur is bulky.
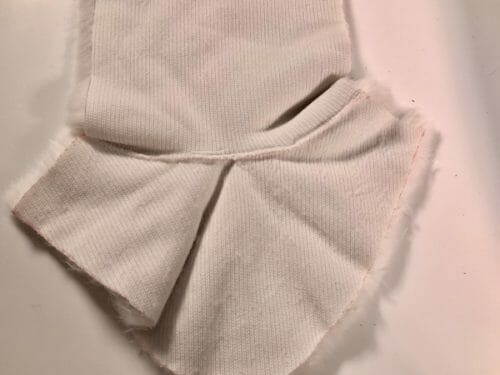
Step Two: Sewing the sweater fabric
Sew the two sides of the front, shown with grommets, 2″ on the curve side (bottom). This is the side that will be sewn to the top of the fur boot.
Place the top and front piece print-side up. Align the curved side of the front piece with the small curve of the top piece.
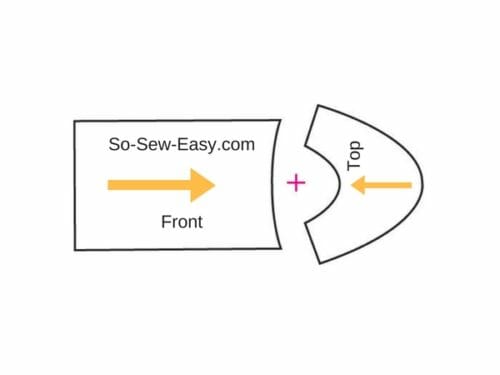
Sew at 3/8″ using a very small zigzag and then serge. This has become the front of the boot.

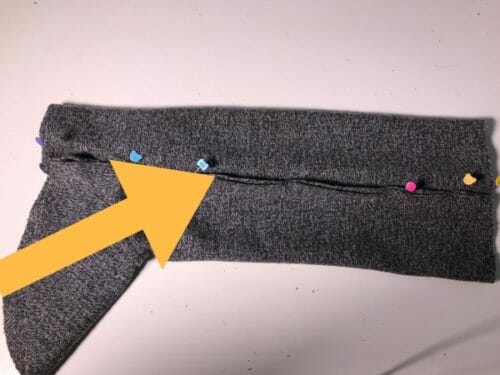
Pin the back piece to the front of the boot. Sew at 3/8 and then use your serger to prevent the seam allowances from unraveling. If you do not have a serger use a large zigzag. This stitching will not be seen since it will be covered by fur.
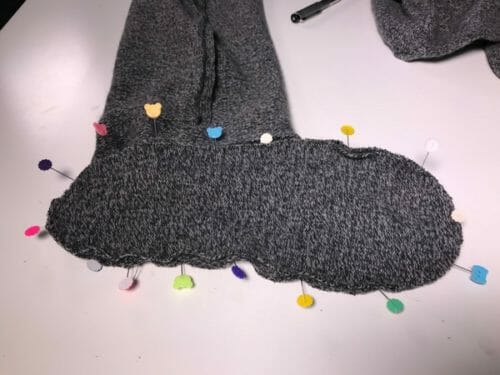
Now it is time to sew the sole to the boot. Pin all around you might have to stretch the sole a bit to be able to fit it in. Sew at 3/8″.
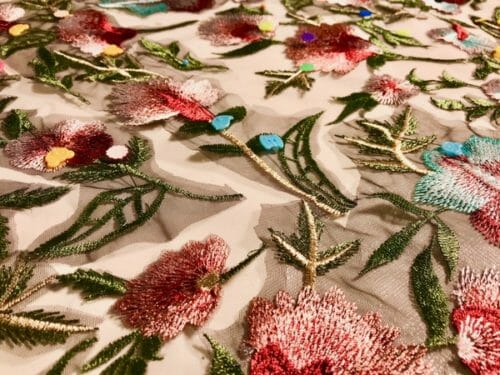
I have added some embroidered patches the same way I have done in this post about the floral embroidered hoodie. I am even using the same tulle fabric that I used in that article.
Step Three: Sewing the fur
Follow the same exact instructions on how to sew the sweater fabric. Sew the top to the front but remember to change the seam allowance to 1/8″.
Attaching the sole will be a little tricky. You will have to stretch it a bit to fit the rest of the boot.
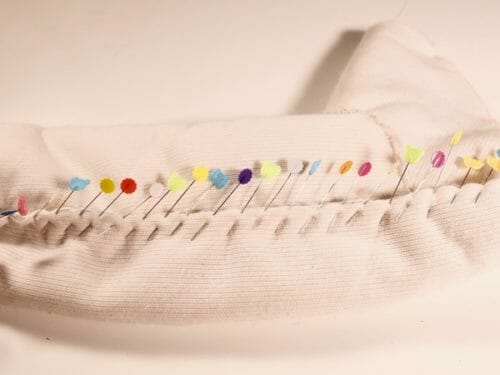
Step Four: Sewing the fur and sweater fabric together
Optional Step: You could add a layer of flexy foam to make the sleepers stand up. I have not added this and I wished I did.
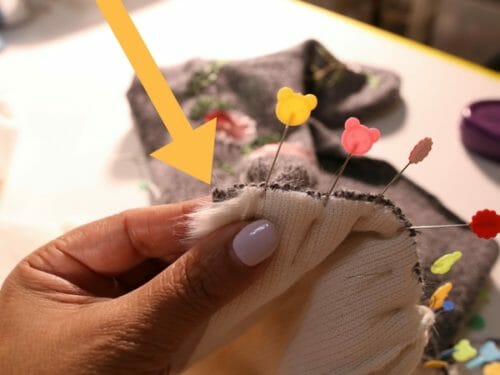
Before we can attach the fur and the sweater sides together you will notice the fur part is closed while the sweater is open. You will have to open the fur by cutting in the front except for 2″ at the ankle.
Pin the right sides together. The right side of the sweater fabric with the embroidered patches and the fur side of the fur layer together.
Pin at the top leaving 1/4″ of the sweater layer beyond the fur. This will be easy to notice since you have reduced the seam allowance of the fur.
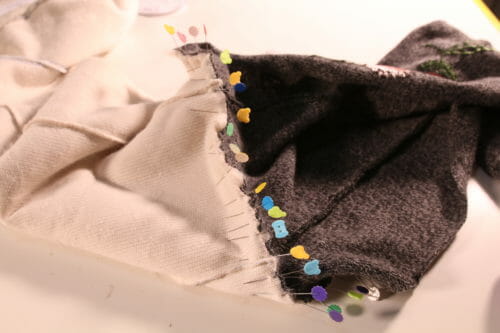
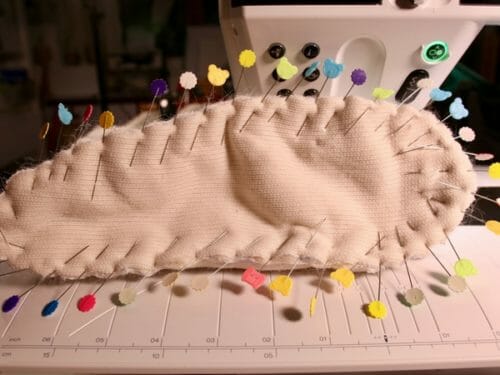
Stitch using a zigzag, I am using a size 3 and a length of 1.5.
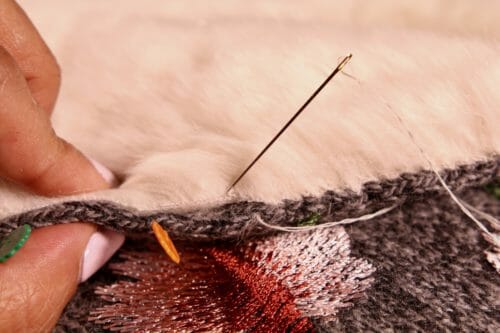
Turn the fur side into the boot.
Fold the edge of the sweater fabric and sew using a hand needle and a running stitch.
Finally, attach the grommets and lace the boots.
In another post, I will be showing you how to make these fur boots anti-slippery and how to make decorative fur pompoms.
I hope this winter moves on quickly, but I think these fur boots will help you make it through to spring. Let me know what you thought in the comments below, and let me know if you'd like to see different types of footwear too. Until Next Time, Happy Sewing!


not bad
Thank you so much. You brighten my day so many times during the week. My husband is under hospice care here at home and being his caretaker I can get tired and frustrated. I look forward to your emails and even if I do not have the talent to do some of your beautiful projects I enjoy seeing them and reading your posts. I have downloaded a few that I hope to try to make when I have a little more time for me.
Again Thank you as you bring much joy to my days.
Deartes Penny, Hang in there; I can imagine your exhaustion and frustration. How unselfish and loyal you are; I hope you continue having energy, health, and time to get creative. Wishing you al the best; you have touched my heart with your comment.
Beautiful pattern
Thank you!
if i wanted to print this pattern in a kid’s shoe size, what percentage should i print it at? thanks!
You will have to work that out with your printer since it will change according to the size of the kid.
They are just beautiful! Thank you for the instructions and pattern. I would have to get up some nerve to attempt this project. My feet get cold really easy and sometimes in bed, I just can’t get them warm. This might be the solution!
I live in a house with terrible insulation, single panes in the windows and gaps around the doors. So yes this is part of my winter attire and using fur inside keeps your feet the right temperature.
It is funny, BUT. Take a bath towel to bed to tuck around your feet. It is my faithful standby for me. My cement floors are icy! Don’t be afraid to try this project. Just follow the instructions bit by bit an you’ll have it !!!
Hello! Love this pattern! I need help though. I made the boots a small medium. I’m a size UK size 4. After realising that I traced the pattern and didn’t add any seam allowances ????????♀️ So they are dinky boots and don’t fit me. I am a bit concussed as to how much seam allowance to add to the pattern.
Hi Joan e, what you mean you traced the pattern? Did you not downloaded the pattern?
Yea I downloaded and printed out, and then traced onto Freeze paper. I have realised now that I didn’t print at 100%. After realising my error, I have now reprinted, traced and from instructions saying to take out all seam allowances 1/4”, I thought that meant to add, so made again and they are really big! So then I have redone them and taken off 1/4 of the pattern around all seam allowances, except the sole as instructions, and they fit, but the fabric does not meetin the middle and has a big gap where the lace up goes. So confused ????????♀️
What fabric did you use? You need to use a sweater knit only. The fur side is the only one that should be cut smaller since it is very bulky. Perhaps this is not clear in my instructions.
is there a video of this fur boots please, as I can’t seem to understand the pictures exactly!?!
What a beautiful set of boots. Wouldn’t that be a cute christmas present with a matching hoodie!
Did you know that a Russian version of Cinderella has fur boots instead of glass slippers? So much more practical in Siberia, but I don’t think yours would fall off while running!
[…] the best ones with you. I'll also link you to a project we did last year making some really nice fur boots. I think you'll really love […]
Where are the instructions for the pom poms and for making these non slip on the bottom? I’m planning to make some for myself, but was looking for those other instructions before I start. Thanks for the cute project.
Hello Lucinda, here is the tutorial, the instructions are the same just substitute the chain for the cord. Make a knot at the end of the cord and insert it inside the pompom, then sew. Enjoy the project:)https://so-sew-easy.com/make-fur-pompom-earrings-easy-tutorial/
Thank you for the fabulous pattern! I’m also curious about making a non-slip sole. Would running thin ribbons of E-6000 flexible glue on the bottom of the sole work? It should bind to the sweater fabric (at least in theory).
I used this glue for my children’s socks and handmade carpets. The glue works very well for me.
My friend’s Russian grandmother made similar boots for house wear. She would take worn out wool coats and skirts and embroider designs before cutting out. She sewed leather on the soles and often lined them with rabbit fur. I so loved watching her embroider such bright flowers using her ancient treadle sewing machine. She would chatter away to me in Russian never giving me a chance to answer when I did understand.
Time to dust off my treadle sewing machine and practice my embroidery; I just happen an old wool coat. Thanks so much for this project and the memories.
HI Zuzannah, I find when we find a memory that inspires us to create is like coming back home. I really would love to see your treadle machine. If you can embroider in a treadle machine, in my book you are a goddess.
Gorgeous! I thought I was done with Christmas presents, but I guess not.. 🙂 Have to make these for my daughter and granddaughter!
One more question, how did you attach the fur pompous?
Hi Myra, love these boots, however I have a question, what are the red and blue lines for? Different sizes? Thanks so much!
These are so very pretty! I plan on making these for my girls.
Thank you! These are so very pretty! I plan on making these for my girls.
This will be my Christmas gifts to my sisters. I know the ones in the cold weather will really enjoy them. I can’t wait for my foot to heal to start this project. Thanks Mayra. Your are so talented. I will stay tune for part 2, also
Load a picture Tea, I would love to see them before you ship them out.
Those boots are absolutely *gorgeous* Mayra! If they are a gift for your daughter, she will love them! Your talent never ceases to amaze me. Thank you as always for sharing these beautiful projects with us.
Thank you, Kimberly, you are so sweet 🙂
Hi!
I love these fur slipper boots. I dont have the time to sew this, I wonder if you have an etsy shop where I could buy a pair from you??
Thanks!
Ann
Hi Ann, I do have an Etsy shop. https://www.etsy.com/sg-en/shop/PrintOrPlain The boots are not there yet.
1/8 inch is about 1/3 cm. If you cut a full cm off, it will be too small..
So cut .3 cm off the fur seams(3 mm)
I can see why you would hesitate following my instructions. I have to take into consideration the thickness of the fabric I am using and the finishing of the item. If you only reduce the sides by .3mm how would you finish the front lace? folding .3mm on a sweater fabric? That is hardly enough considering that the fabric raveled a bit while being handled. Folding both fabric and fur? In my case, I can not since both fur and fabric are very thick. There are 4 possible scenarios I can think off, I went with what I thought would be the Easiest way to make and write a tutorial. I know some of you are fabulous seamstresses so please know that our comments section allows you to load pictures of your project, many will benefit from another point of view. As always I am very grateful for your comments.