


We can all agree that there is always more than one way to do things, especially in sewing. The method I am going to show you to gather fabric and add ruffles properly is slightly more time consuming than you may be used to, but it will give you the best result.
Some lucky people have the use of a gathering foot for light fabric and the ruffler foot for medium to heavy fabrics. Others would much rather use the very handy dental floss gathering technique if pressed for time or are left with no other choice. I'm going to show you yet another, and I think better, technique.
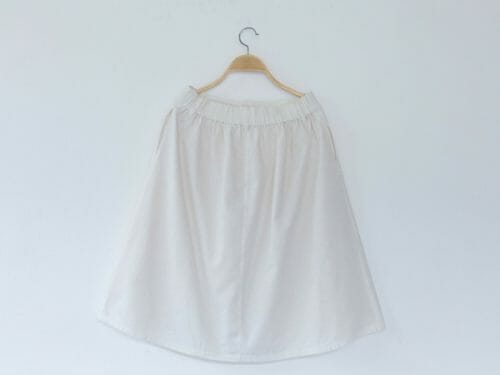
I use this technique to add ruffles properly when I am spending a lot of money on the fabric. The best example I could give you on when to use this technique would be a wedding dress or a dress that will be on stage for many eyes to see.
Step One: Change the Settings on Your Sewing Machine
The first thing you have to do is to make sure you have a good needle with the proper size according to the fabric. I am using 100% quilting cotton and will be using a size 80 universal needle.
Then, clean the bobbin area and make sure the bobbin is full. You do not want to run out of thread in the middle of the gathering.
Set your sewing machines stitches to the biggest sizes. In my case, it is the #4 size. Test the stitches on a scrap of fabric first.
Step Two: Gathering the Fabric
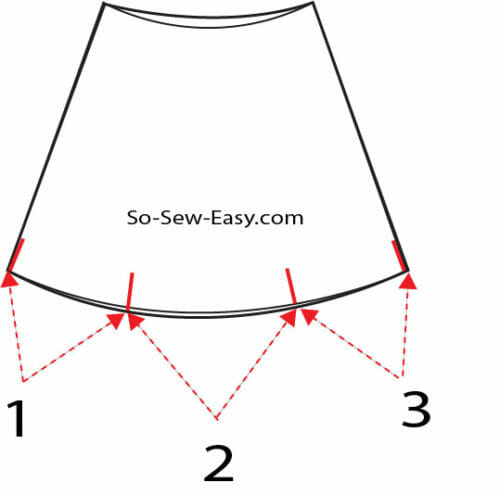
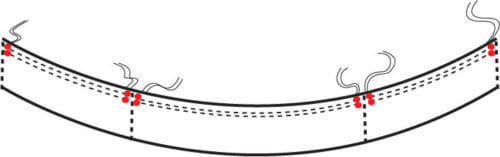
Whether you are making a slightly gathered skirt or a full gathered skirt, the principle is the same. Sew two rows of stitches, 1/8″ apart. The first row will start 1/4″ from the edge.
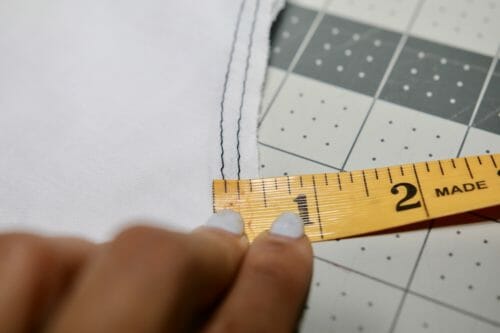
Both rows will run parallel to each other and progress from the front side seam to the other (from left to right in the photo).
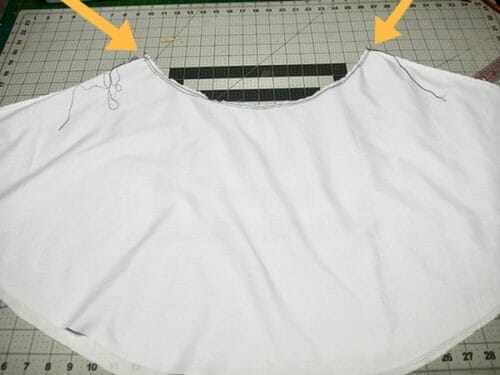
You should have four threads on either side of the seams. Tie a knot on one top thread. Pull on the thread underneath or pull the bobbin thread (if you are using one).
Using a measuring tape gather the skirt to the exact amount you need.
Step Three: How to add Ruffles Properly
The above instructions on how to gather fabric properly are going to be needed in order to make the ruffle.
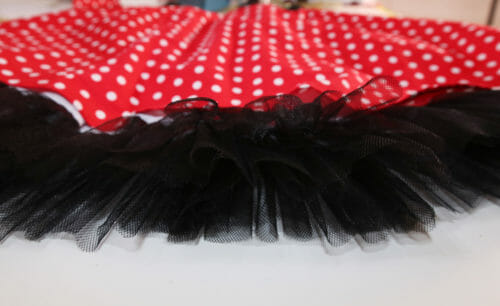
How much fabric is best to use when adding a ruffle to a garment? The industry standard is the width of the skirt times six. In my example, I am using a skirt. This means the skirt will be divided into three equal parts in the front and on the back. The picture below is the front so the same at the back.
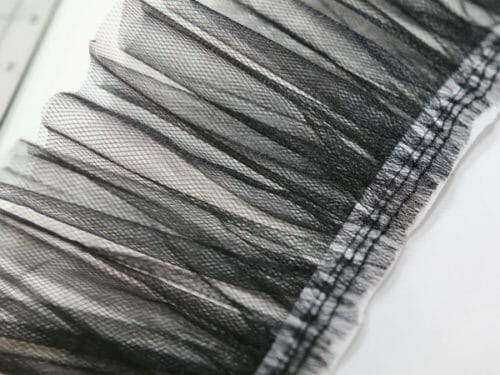
In my example, I have a skirt that at the hem, is 52″ in width per side. I will make the tulle ruffles six times that width, so I cut 6 pieces of 50″ with each X 4″ wide. It might seem like this is a lot of fabric, but don't worry, it is just the right amount needed to add ruffles properly.
Back view.
Front View.
Both sides, one on top of each other.
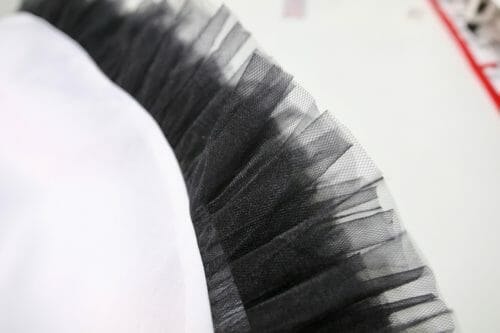
If you are wondering where does the 50″ comes from, it is from the width of the tulle I am using. Some tulles are much wider than that so you will need to keep the equation in your mind. The width of the skirt times six.
Next, sew all the pieces together at 3/8″ to make a really long strip of fabric.
There will be no need to use a serger if you are using tulle. If you are using cotton, or the ruffle is going to be seen, use a french seam to hide the seams.
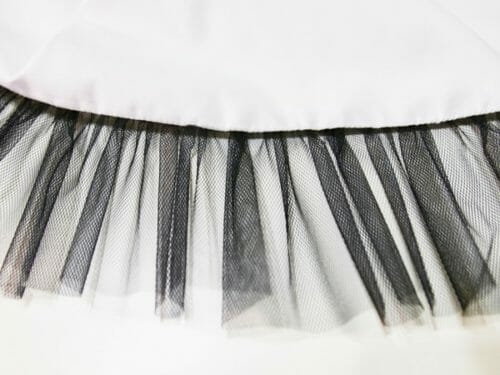
Sew two rows of stitches 1/8″ apart. Stop the stitching at every joining seam.
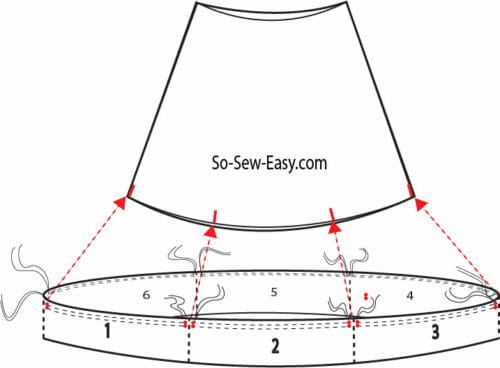
Pin the seams to the skirt marks you have made previously. Pull the threads until the ruffles match the width of the hemline.
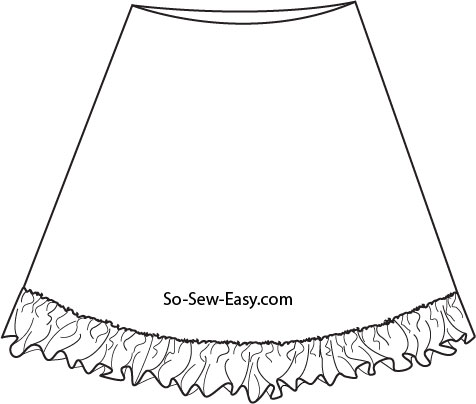
Hope you found this tutorial easy to follow. Adding ruffles to a skirt is a great way to make a garment longer and prettier.
As always, let me know in the comments below if you have any questions. And don't forget to use your phone to load a sample photo of your project. Cheers, and happy sewing!


I’ll just start out by mentioning that I use a Bernina Sewing Machine for sewing.
I have 2 Bernina machines. I also have a Juki Serger.
My 2 Bernina sewing machines have an attachment that will “gather” fabric without the necessity to “pull threads”. I use the term “gather” somewhat loosely as it is more like a pleat for each stitch. So how closely it resembles a gather depends on how short the stitch length.
The Juki Serger can also be used to make gathered fabric, although it is more difficult as it involves pulling 2 threads instead of just one. Nonetheless, the Juki Serger is the one I usually use to gather fabric because the straight stitches are automatically an excellent distance apart for gathering and the raw edge of the fabric is sealed by the overcast of the serger.
(I will admit it’s sometimes hard to determine which 2 of the 4 threads to pull!!!)
I think it’s a great tutorial but being a beginner boy am I having problems trying to get this gathering down. Practice makes perfect, till I run out of fabric.
The key is to sew the two gathering line evenly use the marks in your machine to stay straight and go slow. Even I go slow and I have been sewing nearly all my life.
I’m not a ruffles type of gal, so when my class was going to make a ruffled shirt, I was not terribly pleased. I reminded myself that it wasn’t the final product but the technique I was doing and I’ve used it in other instances. I also found using a different color thread on the bobbin helped it pulling the correct thread.
You say skirt is 52 wide so hem total is 104 and you say cut 6 of 50 which is 300. That is as I always understood, 3 times the length you are sewing the ruffle onto. This width of the hem is confusing to the UK because all our sewing patterns give the hem width as the total measurement all round.
Great tutorial. Always had a little trouble getting the ruffles equally spaced but getting better. Thank you.
Glad it helped, I use a stitching awl to move the fabric around without pulling the thread.
[…] did a tutorial a while back on how to gather fabric and add ruffles properly. If you like ruffles sewing patterns too, you may want to review this tutorial before undertaking […]
I used to use your method for gathering for years until discovering an easier way (at least I think it is easier). Laying a piece of yarn on the fabric where it is to be gathered, use a wide zig zag stitch over top of the yarn not allowing the needle to touch the yarn. Secure one end of the fabric and yarn with a pin. Now you are ready to gather the fabric. It is easy to make adjustments. After it is sewn pull out the yarn. Give this a try.
This is the method my grandmother and my mother taught me 45 years ago when I started sewing! It’s the only method I use, I suppose I’m too old to be taught new tricks because this works and if it isn’t broke, I’m not changing it! Thank you for the tutorial validating that this method is still great!
I always use my overlocker to gather no matter what material I am working on. Overlocker/server.
I do the double line of gathering stitch slightly deeper into the skirt. When the waistband is then stitched on it is stitched between the two lines of gathering thread – perfect gathers that lay flat. lovely tutorial well done
I also do this.
Do you then pull out the 2nd row of gathering stitches? Dumb question…
Hi Lor! yes you do. The second row will help the ruffle be shaped and lay gracefully. It is not a dumb question.
Thanks for sharing. I have never made ruffles this way but will sure give it a try when I make this cute apron for a friend.
I agree with Merav! It is a zillion times easier to pull the bobbin thread, or bottom thread. The technical reason is when the needle goes through the fabric it draws the thread below and the bobbin race pulls the bobbin thread through the loop of upper thread that is formed below the fabric. When the needle returns to the top of the fabric, the bobbin thread is in a slightly tighten loop of upper thread on the under side of the fabric. (WOW! All of this in a blink of an eye!) If you gather by just pulling the lower or bobbin thread, you are actually just pulling the thread through the simple loop formed by the needle. If you are trying to gather by pulling on the upper thread, you are actually pulling the loop and the bobbin thread back through the fabric, tightening the loop with every pull on a stitch. This is how the thread often snaps. Save the aggravation and just pull the bobbin thread!
Thank you so much.ive tried so many times to do ruffles but unknowingly been pulling the wrong thread,as I’ve always just pulled the upper(I’ve never been told how to do it or how it works)the threads nearly always snap just before I accomplish it.so frustrating. Now you have not just said to use the bottom thread but explained the why and how of doing so makes it sound more do-able.thanks again.
This is still how I prefer to gather fabric for ruffles; however, I don’t lengthen my stitches. I loosen off the tension of my bobbin. It gives smaller, prettier gathers.
This is the method I used back in the day when I sewed all my daughter’s clothes. I added a third row of stitches though. It helped eliminate little tucks and was a little insurance if a thread broke when pulling them to gather.
This is the method my mother showed me 50 yrs ago, and I still use it today, even tho I have a ruffler foot! Works like a charm and gives beautiful ruffles 🙂
i have used your method for the gathering of fabric for years and it makes it so much easier and when you do the stitching it doesn’t push the gathered fabric out place.
I also loosen up the tension on the top only a little bit, this makes pulling the thread a little easer and prevents it from breaking while you pull on it to gather the fabric. When you loosen the top tension the thread at the bottom should be pulled on for the gathering. When you do it you will know why.