


 How to sew a corset – the basics of corset sewing
In this tutorial I'll show you how to sew a basic simple corset. If you are a beginner in corset tailoring, this lessons will be perfect for you to understand the basics and dive deeper into the world of corset creation!
This are the video tutorials, and also for the first time I publish a workbook of the process.
I hope you enjoy it and find it helpful!
If so, don't just keep it to yourself – share it with your friends! Visit me at the Corset Academy for more, I've got SO much more to show you there.
Part 1:
Part 2:
CLICK HERE TO DOWNLOAD FREE CORSET PATTERNS:

Tools and Materials Required for Corset Tailoring.

You will need the following:
- – strong fabric, for example denim (you can use 2-way stretch fabric);
- – sewing thread;
- – thread for decorative seams;
- – “Rigilene” bones: both wide (0.5″) and narrow (0.3”);
- – plastic or spiral bones;
- – 0.8” wide bias tape;
- – masking tape;
- – pressing moulds;
- – pruner.
Corset Cutting.
This model is sewn of 2-way stretch denim fabric. No additional fusing of pieces is needed.
I will use the same fabric both for the face and the lining of the corset to ensure that the material is equally dense and stretched on the face and the lining.
Corset patterns should be prepared with seam allowances accounted for (in my case, 0.5”).
I fold the material four times evening out the fabric crease.
I place the pattern pieces in such a way that their waistline notches are parallel to the shoot and the central cut of the back is parallel to the lengthwise thread.
In my case the fabric stretches along the lengthwise thread.
If your fabric stretches along the shoot, then you should lay out your pattern pieces the other way round: the fabric should not stretch along the waistline.
I trace all corset pieces marking notches. Then I secure everything with pins.

And I cut out all patterns.
It is necessary to make notches: on the waistline, along the bust-line and under the bust.

Then I remove the pins and separate the pieces. I put the face pieces of the corset aside.
I take the central piece of the lining front and 2 medium pieces of the front.

I draw horizontal lines along the back of the fabric connecting bust-line notches.
I join the bust curves of the lining using a 0.5” seam allowance.

Then I make a machine stitch going along the straight cuts of the central pieces of the back at a distance of the seam allowance (0.5”).

Now I join the curves of the back pieces.

I trim corners at the ends of the seam allowances along the top and bottom of the garment.
This is done in order to minimize the thickness of the seams when joining the horizontal cuts.

I join the side piece of the front with the back along the side seam. The seam allowance is 0.5”.

Now I press open all seam allowances.

I press the bust curves using a cup pressing mould. I press the bottom of the front piece curves on the pressboard surface.

This is what the front of the lining looks like after pressing.

I trim the seam allowances at the level of the corset cups.

Now I take a narrow (0.3”) “Rigilene” bone, tape its edge over with some masking tape and place it at the previously marked bust-line at the front, 0.8-1 inches from the edge of the garment. I make bar tacks at the starting and finishing points.
The “Rigilene” bone should be stitched-on by 2 parallel stitches going along the edges.

I join the pieces of the corset along the curve of the side piece of the front using a 0.5” seam allowance. In other words, I join all lining pieces into one whole piece. All seams should be carefully pressed open.

I make a stay-stitch going along the top and bottom of the lining.
Stay-stitch is a supporting machine stitch sewn at the distance of the seam allowance (0.5”) from the edge. On the one hand it prevents the piece from getting stretched and on the other hand – serves as a guiding line for marking the location of “Rigilene” bones.

I take a wide (0.5”) “Rigilene” bone and place it at the middle of the back (where the lacing will be located) 1mm from the stay-stitch. I sew it on with 2 machine stitches.
Then I sew on 2 more parallel bones, one by one. I tape their edges over with a masking tape. I leave 2mm space from the stay-stitch at the top and down the bottom.

I take a narrow (0.3”) “Rigilene” bone and stitch it onto the upper edge of the corset stepping 1mm from the stay-stitch. I tape the edge of the bone with a masking tape.

The fabric on the side pieces of the front, from the underarm to the bust curve, should be slightly eased-in to ensure good fitting of the corset top. I finish sewing-on the bone with the second stitch going along its inner side.
From the face side of the lining these attached “Rigilene” bones look like this.

Covering Cups with Padding Polyester.
I take a flock of padding polyester. It is recommended to rumple it along the edges. I place it over the horizontal bone on the bust and secure it with pins. Then I stitch it on over the face of the lining along the seams attaching the bone.

Joining the Face Pieces. Attaching “Rigilene” Bones.
I take all the pieces of the face part of the corset.

I join the vertical curves of the back with a 0.5” seam allowance and then press the seams open.

I make markings stepping 0.6” down from the top and bottom edge.

I stitch-on wide (0.5”) “Rigilene” bones along the curves leaving 0.5” space from the edges of the garment and looking to the markings.
The edges of the bones should be taped over. I start sewing bone-attaching seams from the very edge of the garment and make no bar tacks!

Please note! I try to match the edge of the bone with the seam that joins the pieces. The seam allowance is fully covered by the bone so that its attaching seam goes along the edge of the allowance and secures it. These bones will later be used as tunnels for inserting supporting metal (spiral) or plastic bones; which means the seam allowance should not be wrinkled inside the tunnel.

I join the front curves with a 0.5” seam allowance.

Now I take a cup pressing mould. I place the bust curve over it. I carefully shape the cup by a circular motion of the iron until it looks beautiful and embossed. Other curves are pressed open on the surface.

I make a 0.6” mark from the top and bottom of each curve.

And I stitch on wide (0.5”) “Rigilene” bones the same way I did for the back curves.
I leave 0.5” space from the edges of the garment looking to the markings. I tape over the edges of the bones with some masking tape. I start sewing bone-attaching seams from the very edge of the garment and make no bar tacks!

The seam allowance is fully covered by the bone so that its attaching seam goes along the edge of the allowance and secures it. Let me remind you that it’s a very important detail!

From the face side the curves with bones look like this.

I have put a white thread into the bobbin for decorative stitching.

I sew together the side seams. The allowances can be cut through at the waistline level.

I press open the side seam using a special pear-shaped mould.

I stitch-on 2 parallel wide (0.5”) “Rigilene” bones looking to the markings at the top and down the bottom at a 0.5” distance from the edge. I tape over the edges of the bones with some masking tape.

Joining the Face and the Lining.
I take the lining and the face (the face is on top) and match them face-to-face along the neckline. I match their corners, cuts and curve seams. Then I pin them together.

I join them along the vertical cuts of the back.
I add pins in a gliding motion catching only the lining fabric without piercing through the horizontal bone. If you turn it lining-upwards there should be no puncture marks left by the pins.
I switch to a one-sided presser foot. I join the pieces along the supporting stay-stitch from the lining side.

I check the quality of the seam from the face part of the corset.
I make sure that no curve bones get in the way of the joining seam.
It works best when the seam is made 1-2mm away from these bones.
Please note! You cannot turn the garment around on the needle!
Each seam begins at the edge of the garment and then I make a bar tack at the point of their intersection.
In the picture below you can see the location of bar tacks at the intersection of the seams.

Then I trim the seam allowances down to 0.2 inches. And I trim their corners, too.
I turn the garment out and press it slightly along the top and center of the back.

I stitch a narrow (0.3”) “Rigilene” bone onto the bottom of the lining.

Then I pin together the face and the lining along the bottom of the corset.

I make machine stitches going along the bones at the lacing area and joining the lining with the face. Now there are ready tunnels for inserting spiral or plastic bones.

At this point the corset looks like this.
Inserting Plastic Bones.
I take some plastic bones. Instead of these you can also use spiral metal bones.

I insert a plastic bone into the tunnel underneath each “Rigilene” bone, on each curve.
You can push 2 parallel bones into the side seam and the back curve.

This is what the garment looks like from the lining side.

Finishing the Bottom of the Corset.
I make a machine stitch at a presser-foot distance from the stitched-on horizontal bone that goes along the bottom.

I take a 0.8” wide bias tape.
I leave a 0.8-1.2” end and stitch the tape along the bottom of the corset from the face side. I place the tape in such a way that it overlaps the joining seam by 1mm. At the same time, the machine seam going over the tape matches the joining seam perfectly. These seams coincide if you look from the underside.

I bend the tape inwards, secure it with pins and hand-stitch it with a blind stitch. Then I carefully press the bottom of the corset.

The corset is basically finished!
If you don’t want any plastic or spiral bone going along the whole bust curve – you should make bar tacks under the bust. These tacks will restrict the tunnel along the curve.

Finishing Touches.
Punching Grommets.
I have punched grommets at the lacing area.
Ideally, the distance between the grommets should be 1.2-1.6 inches. The diameter of a grommet is 0.2”.

Sewing a Flap.
I have sewn a flap and attached it to the middle of the back underneath the lacing.

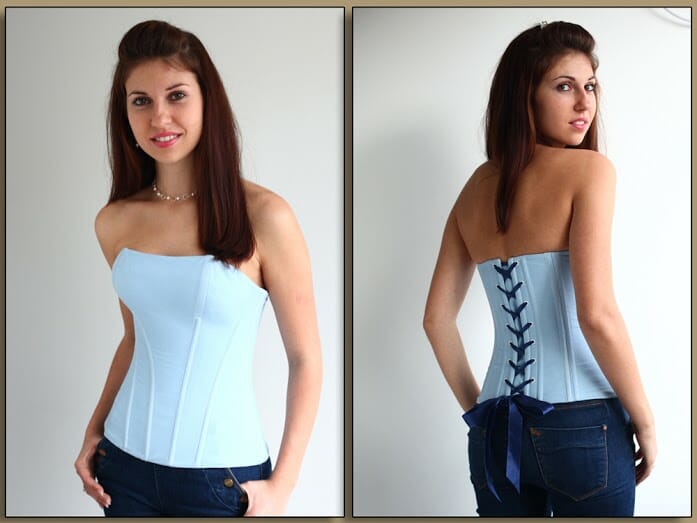
Pictures of a Finished Corset.
Summary.
Workshop: Sewing a Simple Corset.
Author: Tatyana Kozorovitskaya
Founder of the Corset Academy Internet-project www.CorsetAcademy.net
Tutor of the Corset Garment Tailoring and Decoration courses.
Author of multiple DVD-courses on tailoring corset-based wedding dresses and evening gowns.
See more of my corset and gown sewing tutorials at the Corset Academy.


Super goede uitleg met de foto,s erbij dank je wel
Thank you for publishing such a detailed tutorial!
I don’t have that much experience wearing corsets (apart from my wedding dress that had a built-in bra) does one need to wear a bra underneath a corset, or is the flock of padding polyester that was attached kind of serves the bra purpose here?
You do not need to wear a bra under a corset.
for Pattern 2, r those numbers, measurements in inches?
This lesson is quite timely for me. Am planning on making a corset for myself. Please where can I buy the cup mold and padding polyester from?
Thanks
There are full details on the Corset Academy site about all the materials and tools you will need and how/where to get them. Check out the free lessons, there is one there on tools and equipment.
I really wish I had known about this tutorial before spending $50 on a corset that I don’t really even wear that much.