


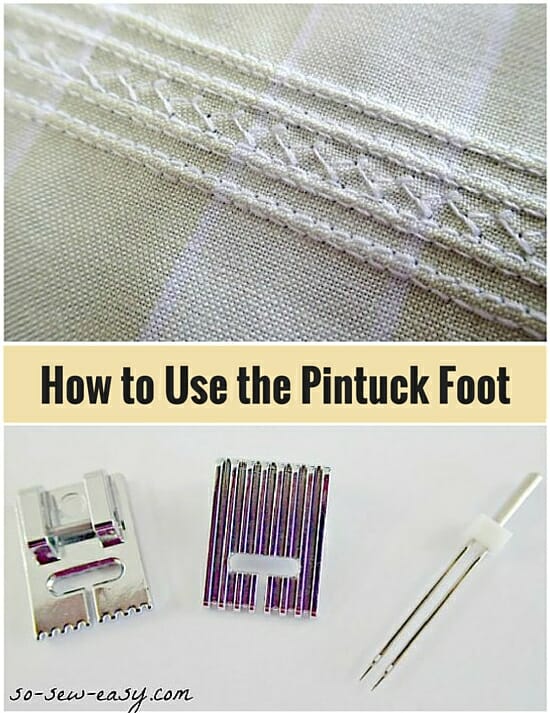
I've been learning more about the different sewing machine feet in my mega-box of presser feet that I bought. This week, the pintuck foot has been intriguing and delighting me. Accurate sewing has never been a strong point of mine so the prospect of sewing lines and lines of neat and accurate little pin tucks – well, that would fill me with horror!
Bring it on now that I have the pintuck foot. Accurate and straight sewing has never been easier with this simple addition to the machine. Often seen in heirloom sewing mixed in with other decorative stitching, pin tucks are pretty and give dimension and structure to your sewing. They can be used purely as a decorative addition, but with some clever thinking, they can also be used to give shaping to garments in place of pleats and darts too. Imagine a nice crisp white cotton shirt pulled in at the waist with an evenly spaced row of neat pin tucks – adorable. I had a shirt just like it back in the 90's! Maybe I could recreate that now I've been practicing.
All about the pintuck foot
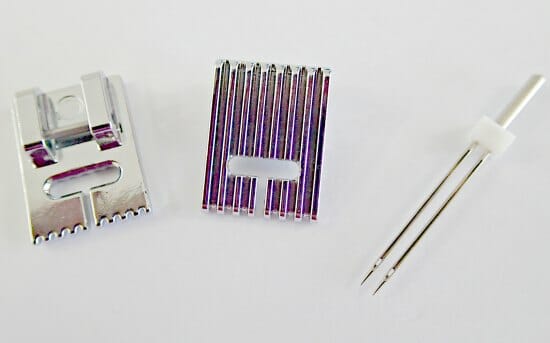
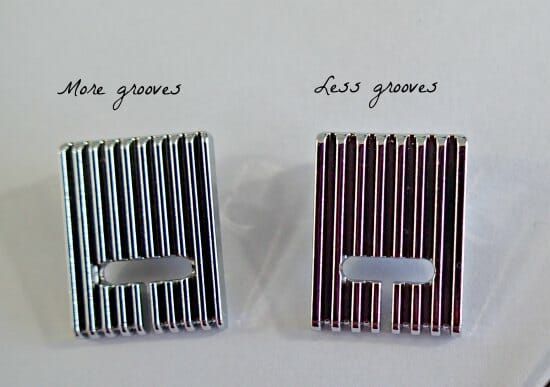
The pintuck foot has evenly spaced grooves on the bottom and is designed to be used in conjunction with a twin needle to create evenly spaced raised tucks of fabric. Typically found with 3, 5, 7, or 9 grooves on the bottom, the feet vary according to the weight of the fabric being sewn. Usually the finer the fabric, the smaller the pin tucks and the more grooves you would have on the bottom of the foot to accommodate that.
You can make both corded and un-corded pin tucks. With the corded pintucks, a thin cord is sewn into the tuck to give it more dimension. Usually, you will use a separate attachment or a special bobbin cover to exactly line up the cord with the twin needle as you sew and then the cord is caught by the zig-zag of the bobbin thread on the reverse side. I'll just be making the un-corded pin tucks today.
Choosing your double needle
First I recommend that you check out the earlier article about how to sew with a twin needle. This will give you plenty of tips on threading the machine and the needles. Hint – get yourself a good needle threader because your automatic threader on the machine won't work with a twin needle.

Now you need to match the size of the needle to the size of the pintuck foot. You can generally get twin needles anywhere from size 1.6 to 6.0, which is the distance in millimeters between the points. The needle has to match the foot, so the more grooves you have the smaller the needle distance needs to be because the needles have to match the grooves in the foot.
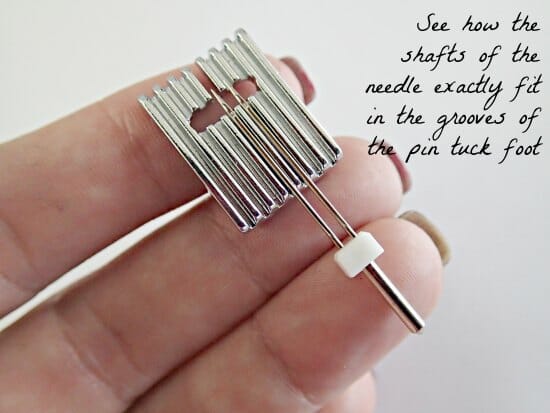
See how the needles here lie along the grooves in the foot I'm using. If the distance between the grooves matches the distance between the needles, you have a good match.
Twin needle sizes (being the distance between the needle points in mm)
- 1.6 (use with 9 groove foot)
- 2.0 (use with 7 groove foot)
- 2.5, or 3.0 (use with 5 groove foot)
- 4.0 (use with 3 groove foot)
Use these needle sizes as a guideline as some feet might vary. Always test your needle again the grooves before sewing.
Setting your tension
If you have ever used a twin needle to create a hem on a knit garment, then you'll probably have realized that setting a higher tension causes the fabric to ‘tunnel' between the needles and lift up off the surface of the fabric. On a garment hemline, you don't want that to happen and so will usually loosen the tension to make the double line of stitching lie nice and flat. When using a pintuck foot you DO want that to happen to give your tucks lift off the surface of the fabric. How much lift is up to you. The higher you set your tension the higher the lift in the pintuck.
I tried 3 different tension settings, and of course, all machines will vary so you'll need to experiment to see what works best for you. The set of pintucks at the higher 6.0 tension brought the fabric in more and created more height in the tuck, but when I went really high to 7.5 it actually bunched up too much and caused puckers so dropping it back to 6.0 gave the best result for me. In contrast, leaving it at the regular 4.0 tension made them pretty flat and it was hard to exactly follow the previous tuck so those came out a little uneven.
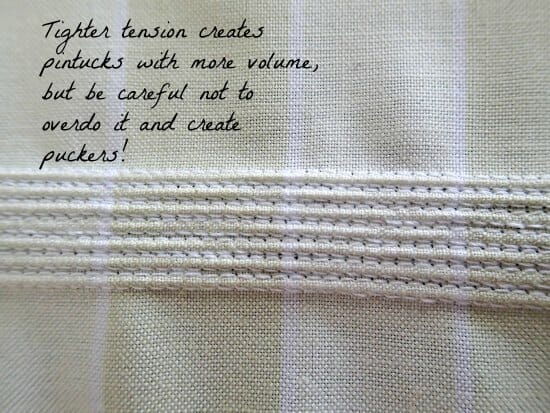
Use some scraps of fabric and be prepared to try out different settings to see which gives you the neatest finish and the best dimension without over-puckering.
How to sew with the pintuck foot
Starting out with a nice straight line is going to be key to making all the other lines straight too. Use your favorite marking tool and draw your starting line. It will need to be on the right side of your fabric so you can follow it, so make sure it's a marker that will wash out/erase with heat/water etc. You can add your pin tucks in either direction so it's up to you if you start your first tuck in the center or at one edge.
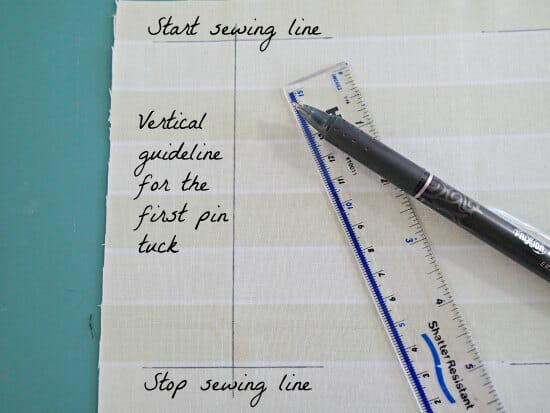
TIP – creating pin tucks will pull in and shrink up your fabric. Therefore give yourself plenty of space and create your pin tucks before cutting your fabric to size for your garment or project.
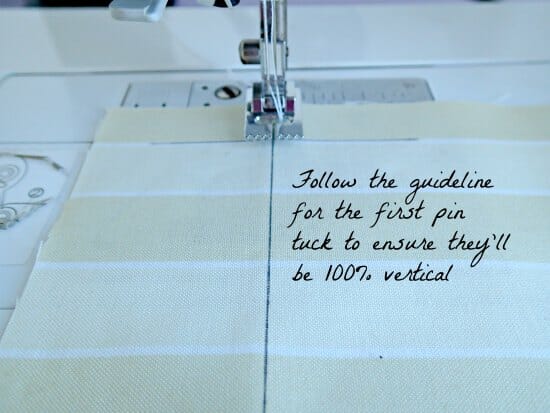
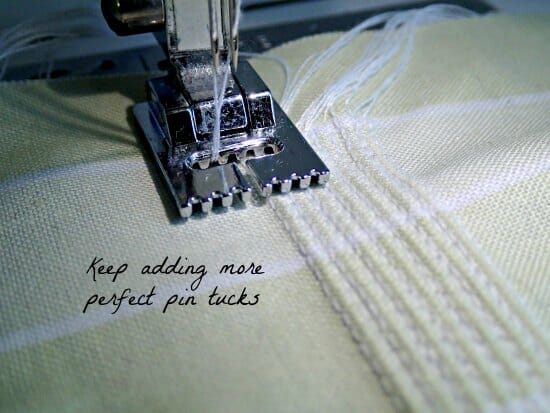
Add and thread your twin needle and snap on your pintuck foot. Best to test your tension on a scrap of fabric first to make sure you get the size of tuck you are looking for. When you are ready to go, simply drop the foot and follow the line you created, keeping it centered on the middle of the foot and between the needles. Ta-dah – magic, one beautiful pintuck completed.
Now decide on your spacing. You can have your pin tucks spaced right next to each other or you can use the grooves in the bottom of the foot to space them further apart. If you want them closely spaced, then move your fabric over just slightly, left or right, until the tuck you just sewed is now directly in line with the next groove. Follow that line as you sew the next tuck, keeping the groove in the foot nicely following along that pintuck, and there you have it – beautifully even pintucks.
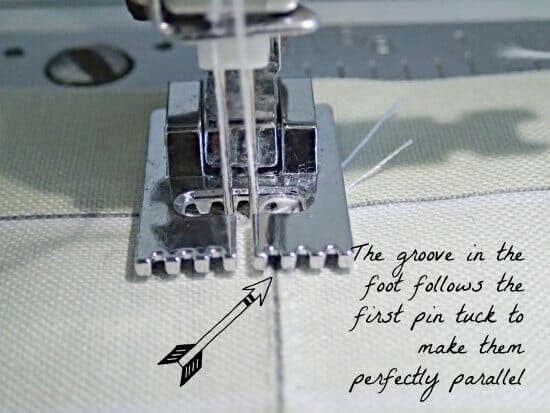
Follow that line as you sew the next tuck, keeping the groove in the foot nicely following along that pintuck and there you have it – beautifully even pintucks.
Just keep repeating these steps, moving across the fabric, following the previous tuck, and sewing a new one, until you have the number that you want. For some reason, as in nature, an odd number of tucks always seems to be a little more balanced so go for 3, 5, 7 or 9 for best results.
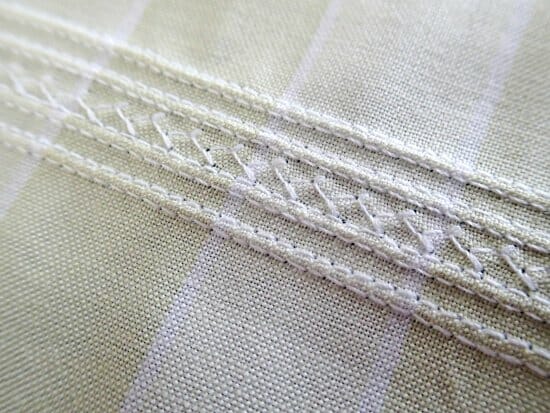
If you want them spread further apart, then the process is exactly the same but instead of following the closest groove, skip one or two and keep the original tuck in that further groove – your next tucks are now further apart and you can leave them like that or go for the heirloom look with the embroidery in the channels.

In this example, I've made a very pretty but subtle decoration by spacing the pin tucks widely and then adding a line of decorative stitching down the center. You can still use your pin tucks foot at this stage to make sure your decorative stitching is running directly down the center, or switch to your regular foot.
Pin tucks have always been a more traditional and subtle way to add shaping, definition, and decoration to your projects. They are usually sewn as in these examples with a thread in a similar color to the underlying fabrics. For more definition or perhaps a more modern look, consider using contrasting threads, and maybe even a line of decorative beadwork on sequins to break up the tucks.
Bonus Tip – lost your zipper foot or invisible zipper foot? You could always use your pintuck foot in it's place!
Many readers have asked where they can get a good pintuck presser foot without buying a whole set. This one should work on most machines and is quite reasonably priced.


Hi. Thank you for a very informative article. I always turn to your website if I need information with anything.
Thank you so much for the Pin Tuck demonstration, I am thinking of trying this myself and have a question – if I sew vertical tucks to a bodice front – how should I prepare the fabric for cutting out? For example around the neck line – do I need to sew a basting stitch to stop the lines of tucks coming undone top and bottom? Or do the tucks not unravel when the fabric is cut?
Many thanks
Jayne
Tricky question, if you use a small enough stitch size you the tucks will not unravel but it will also depend on the type of fabric. If you find they do stay stitch around the collar so you do not lose the shape in that area and find the collar will not match.
You could mark your cutting lines on the fabric (after doing the pin tucks), then baste/staystitch just inside the stitching line before you cut out the pattern piece, to ensure that the pintuck stitching doesn’t come undone.
Now, I want to pull out my pintuck foot and try it. I’ve never used a twin needle either so this will be a learning experience all the way around. Thank you for the tips and inspiration!
I love pintuck feet. Ricky Timms uses the 7-groove foot for piping on the edge of a quilt binding, and years and years ago Threads Magazine had an article on using pintucks with velvet or fleece. I have used pintucks (4mm) with a gimp cord on a fleece jacket in a wavy pattern. Your article is excellent with tips for using these wonderful feet!
Thanks, this has taken a lot of confusion and mystery out of pin tucks as well as twin needles. I have been sewing for decades and have never thought about pin tucks as shaping, they were always used for decorations.
Best article . Lot of information. So detailed. Thank you so much . I will definitely post the picture when I done with my project.
Hi Deb
I loved your lesson on pin tucks, I must have bought the same kit of feet you did. It’s great fun. Just a hint for future tutorials. They haven’t taught cursive writing in Ontario, Canada, for years. So you may want to stick to type face for the younger sewing enthusiasts. Cursive writing here is used as a secret code for seniors.
I grew up in NZ and learned to sew from my mother who was a dressmaker and tailoress, and my older sister. The way we made pintucks was to fold the fabric wrong sides together (and I think press it), and stitch close to the fold. This took a bit of practice but gave a very sharp neat edge and we could create very fine pintucks. I think the modern version is quite nice and probably easier, but I prefer the look of the old-fashioned method and think the result is worth the extra effort. Also it doesn’t need special equipment, and can even be sewn by hand.
Thanks for the tutorial on the pintuck foot. Like you, I have a big box of different presser feet. I don’t know what to do with all of them. Now I know more about this foot. Putting in a row of decorative stitching between rows of pintucks was a good one.
Can you make the insrtuctions in a printable form. There is really a lot of great info here. Thanks
Hi Pamela, use the sharing buttons on the left side of the page, choose the three dots to expand the options, select “printfriendly” which will make a nice, printable pdf of the article for you.
Thanks so much for this tutorial. I have been wanting to learn more about using this foot. I knew some of this, but you showed me more that I really needed to know. Again, thanks so much for sharing.
Very well explained, so I have read that nowhere, not even in a manual of my sewing machine. Thanks a lot for this.
Fantastic. Wish I’d seen this BEFORE I made a Christening Gown for a special family member !!!! Thank you for making it all make sense !!!
I bought one of those sets…. have yet to try it but it looks interesting and for sure I could never justify buying all those sewing machine feet at regular prices.
Many thanks for the bonus tip
I am seventy years young and I’ve been sewing for fifty years. Scared to death to try anything but straight sewing. This lesson amazed me and you made it sew simple, to understand. I can’t thank you enough for this extremely informative lesson, Off to my sewing machine to try pintucks!!!!!!!!!!!!!
Any advice for doing pin tucks around a hem? Should I do them before closing the side seams or after? I’m working on a few custom christening gowns and would like to add them between some rows of insertion lace. Thanks!
Either way, but I would do them before, mind you matching pintucks is very hard.
Hi Modena, this is a tricky question because the method you choose will depend on your skill as a seamstress. If you are very experienced you can do the tucks before you finish the sides but if you prefer to be accurate is to close the sides then make the tucks assuming you are talking about horizontal ones.
Had been looking at various pin-tuck videos on you tube and have been very disappointed. I get obsessive about techniques with these feet I bought years ago. I’ve been wanting to add pin-tucks to dress shirt for my grand-son, who is 2 1/2 years old and is my favorite model . Now, all I need do is practice, practice. Thanks for the grand tutorial.
You are welcome Gwen.
If you have a 7 groove pintuck foot can use a different size needle other than a 2.0. Could you use a 4.0?
A 4.0 will make the distance far apart and won’t fit between the grooves.
Great tutorial! I want to buy the foot but I think the link is removed from the bottom of the article. Do you have another link?
Hi Donna, you can try this link, this set works for Brother and Singer, do not recommend for Husqvarna nor Pfaff.
The pin tuck feet (3, 5, 7, 9 grooves) are wonderful for couching thread to fabric. Use a single needle. Just be sure the thread sits snuggly in the foot’s groove, use a zig zag stitch that is wide enough to encase the cord, and make your top thread match the cord color as closely as possible. Curves are possible too.
Also, faux tucks are possible with a single needle, a cord underneath, and a narrow zig zag stitch just wide enough to bridge the cords thickness. It creates a neat texture on the fabric surface.
I didn’t have to use a stabilizer on cotton quilting fabric to couch yarn, but that is an option if the base fabric is light weight. I have cord couching feet too, but I thought I got a cleaner result from my pin tuck feet. (Aug 6, 2017).
looks awesome. but i dont hv this foot. I hv a Jenomi machine. U think I cn buy this and from where.. Tks
Hi Lilani, I have put a link to a Pintuck foot on Amazon that should fit your machine. You’ll find it at the end of the article. Kind regards and happy sewing.
Thank you so much for your tutorials-I love your site. Can you please put up another link for the Pintuck foot-the links are not working-thank you
Thank you Patricia for your comment, I will.
Very interesting tutorial thank you.
Thank you for the tutorial – I have wanted to learn pintucking but always put it off because I was afraid it was too difficult – your tutorial helps inspire me to include this technique in my next project! What is the box of feet you purchased? I think I may want a treasure box too!!!
This is a great article. I have always wanted to try this but could never find clear and precise instructions. I think this is it and I know exactly what my first project will be. Thank you.
I’ve been wanting to try pin tucking, but lacked the confidence, now I’m excited to try it after this little tutorial. I do have one question though: Since pin tucking gathers up fabric, how do I accommodate (or do I need to) size difference? For example: if I add x number of pintucks, do I need to add y number of inches to my pattern to ensure it still will fit?
Excellent article – thank you so much. Yes, I learned a lot about use of all of the grooves, and hadn’t thought about the embroidery aspect. Very good. Will look forward to more of your educational articles, your illustrations are great! 🙂
60 year seamstress here, and this is the best tutorial on pin tucking, I have ever seen. I just went through the sewing tips, saved on my computer, and deleted all the other tutorials on pin tucking that I saved over the years. When you hit on one that explains absolutelyutely everything in such detail, you don’t have to look further.
Thanks.
Awesome! Im about ready to sew some baby clothes. I will be using this foot. Thank you for the information.
How do you tie-off/secure the long threads at the beginning of each pintuck? Do they have to be enclosed in a seam to be stable?
I bought the box o’ feet but haven’t tried them yet. Makes me sooo mad, I never seem to have enuff time to quilt and create. I know I can find a use for these pin tucks.
I just wanted to thank you for your wonderful site. I’ve used both your free and purchased patterns and love them. Some of your tutorials and ideas have helped me learn so much (at 75 it’s old dog and new tricks).
I struggle with some of your clothing patterns because you are much more shapely than me and also, cap sleeves and sleeveless don’t work either.
Best wishes from Helen Semrau in Manahawkin NJ. USA
helenjane@comcast.net
I found that if you put a floss or light weight wool into the groove at the back of your work it is encased by the bobbin thread and creates a more heirloom look to the pintucks. I use it all the time on doll clothes for antique sewing.
Terrific idea Denise. Thanks for sharing!
Ótimo tutorial!! Muito obrigada.
I’m interested! I have always loved pintuck shirt fronts. Now, I have to try. Thanks for helping me to understand the process.
Brilliant tutorial, thank you ?
Wonderful tutorial! I am inspired to give it a try!!
Thanks. ?
Love this! Thank you so much! Not only do I have my set of sewing feet all labeled, but I also now have a wonderful idea for some beautiful long beach dresses for my grand princesses. Now I just need instructions on all those other feet☺️!!
Just proof read this before posting — don’t know why “my Hair” came up. But, thank you so much!
No worries. Have made the correction. Thanks for your feedback and glad you found it useful. Yes, we’re working our way through the box of feet. May do something soon about the Walking Foot I think. Please stay tuned!
Mayra, I have always wondered why my pintuck foot had grooves on both sides of the needle… But of course! It is for sewing the embroidery evenly down in the valleys of the pintucks. I didn’t know you could do this! So glad you shared this little tutorial.
Hi Lynda, glad you found the tutorial useful. Kind regards.
Debbie are you going to show us how to use all the sewing feet that was in that
box you talked us into getting? LOL. I love mine and I am so glad you said what a great buy it was. I saved a bunch and I still like trying them out. Thanks.Barbara
Have you tried sewing pintucks in a curve?
Hi Debra, I have not tried to do this. I imagine it would be quite difficult as the foot grooves are in a straight line so it follows the ridges in a straight line. Let’s put that out there to the community and see if anyone has any experience in sewing pintucks in a curve. Perhaps they can comment?
I thought it might be too difficult too, but love the look; thought it might be a nice decoration around a neckline, for instance. But I think you’re right – might have to think of something else.
I wonder if you could use the circular attachment and do this. Part of the time it would be on the bias and might cause a problem. I haven’t tried it, but I might. Thanks for the tutorial. I enjoyed it,
Hi Ruth, do try and post your finding here so other can learn from you, thank you for your comment.