


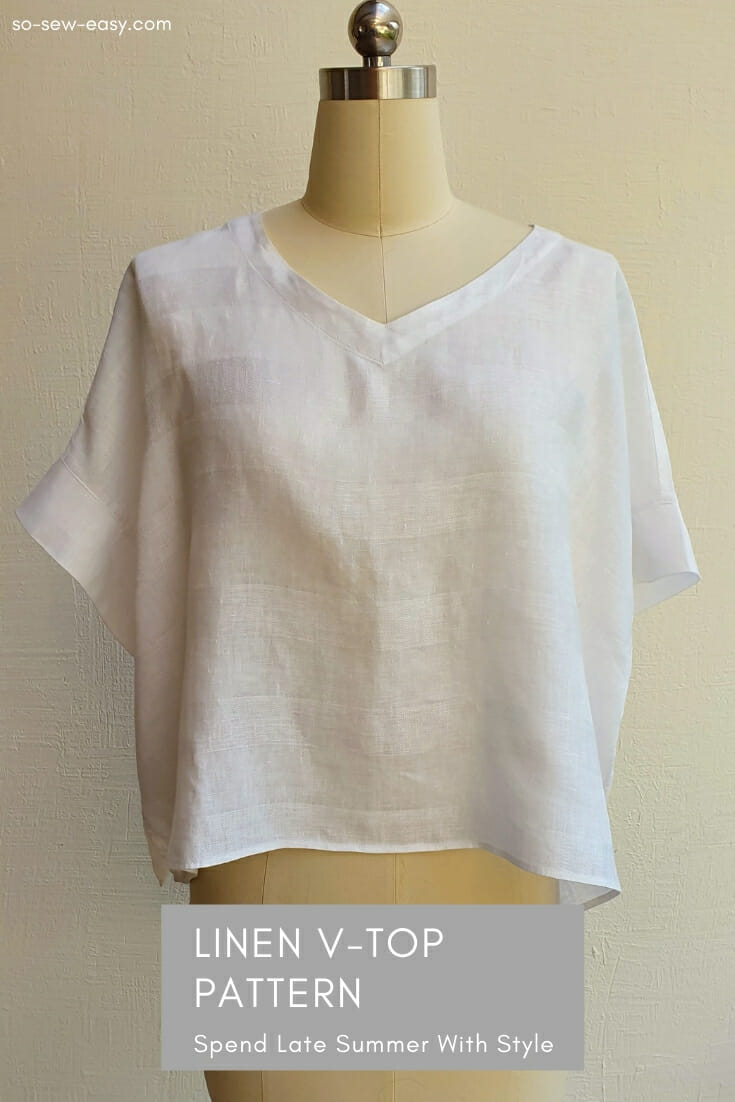
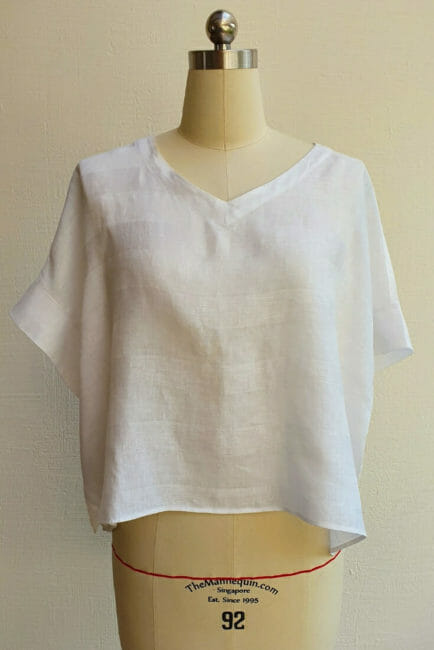
This late summer Linen V-Top pattern is my free and easy pattern for this weekend. Last week I shared with you my fabric hunting trip in Rome. So I thought I'd begin to use the fabric before it becomes just another memory in my stash of fabric (plus, the sooner I use it the sooner I can make the excuse to go somewhere to get more fabric).
The linen I purchased at The Azienda Tessile Romana is very delicate with a patchwork woven pattern. It changes the texture slightly and makes it look more luxurious. The weave is loose so this is the perfect fabric for a wide top like this one.
There are a few places in the world where you can find linen of the absolute highest quality. Italy, Ireland, Latvia, and Lithuania are the top producers of the finest quality of linen. Linen from Italy is a thing of the gods, or so the Romans thought. I happen to agree. No other fabric has the capacity to take you through a balmy, sweaty, sticky summer like linen can. The best part is that it lasts for many, many years. The price might seem high, but given that the fabric will give you many years I think it's worth the investment.
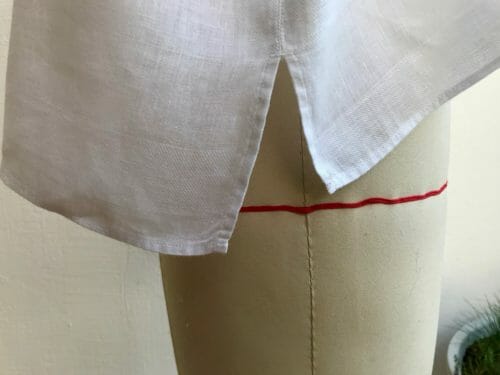
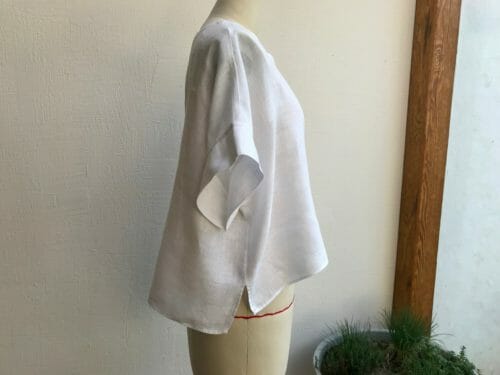
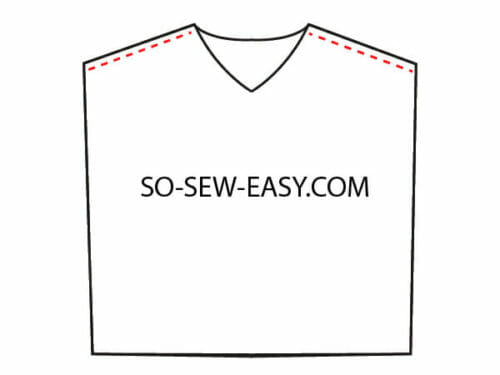
This Linen V-top Pattern is for leggings, shorts, long skirts, pencil skirts, and jeans. It is loose-fitting allowing you lots of room to move. It has a V-neck to lengthen the neckline and slim a girl with a large chest. The front is higher than the back with vents to accommodate larger hips.
Skill Level: Confident beginner
Please, read all the instructions before starting this project.
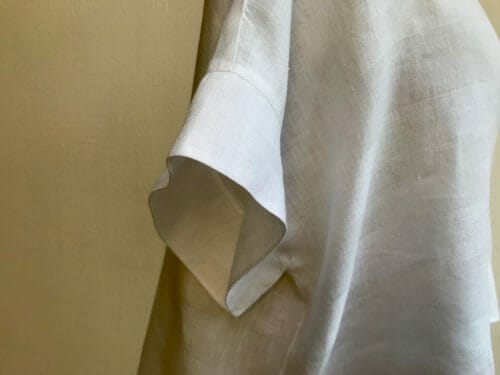
In this Linen V-Top pattern tutorial you will be able to practice sewing a neck facing, understitching, and sewing a casual inserted sleeve, it is the same type of sleeve that you can see on the Kimono Top I shared with you before.
I recommend washing and drying the linen before using it so there is no surprise shrinkage once you sew the fabric. If you have 2 yards expect shrinkage of 4 to 6″s depending on how tight the weave is.
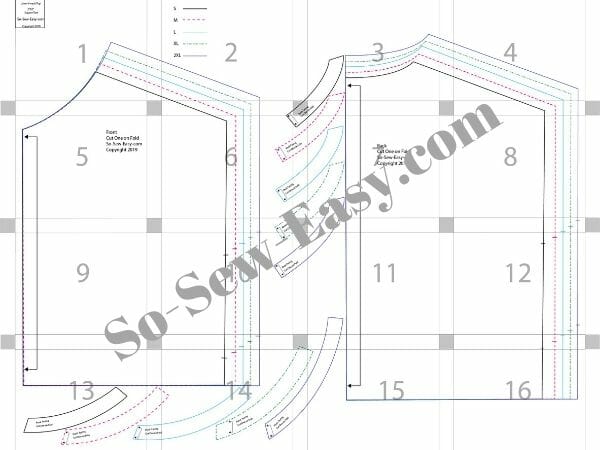
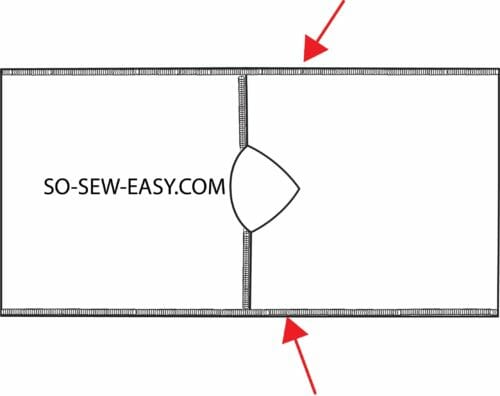
Pattern Layout
Fabric Suggestions from Amazon.com
Materials
- 1 1/2 yards of white or solid colored linen
- thread to match
- fusible interfacing (just enough for the facing)
Tools
- sewing machine
- scissors
- iron with steam
- erasable ink or tailor's chalk (this is my preference)
How To Download Your Linen V-top Pattern
Use the latest free version of Adobe Reader, use “Actual Size” and “Landscape” format.
Pattern Download
We're going to continue to use the new Payhip webstore to distribute our patterns.
Our patterns are still free, but now you now have the option of making a small contribution if you like our work! We'd really appreciate it and it will help is keep going with new and fun designs like this. Even a dollar or two really goes a long way.
Thanks so much in advance for helping us out. You can use any credit card and you don't need a Paypal account, although you can use one if you have one.
Sizes: S to 2XL
As I mentioned before this is a very loose top, so the use of a loose weave fabric is essential so it will drape around and not make it look as if you were wearing a tent.
It is a boxy pattern so the bust measurement is the only measurement you will need
Body Size Measurements
| Size | S | M | L | XL | 2XL |
| Bust | 32 1/2″ – 34″ | 36″ – 39″ | 40″ – 43″ | 44″ – 45 3/4″ | 46″ – 48″ |
How To Sew Your Linen V-Top
The seam allowance is included; it's 1/2″ on the sides and armbands, and 1/4″ on the neckline.
NOTE: I want to say thank you to Carie who kindly pointed out that I have forgotten to add the seam allowance to the pattern, please do so.
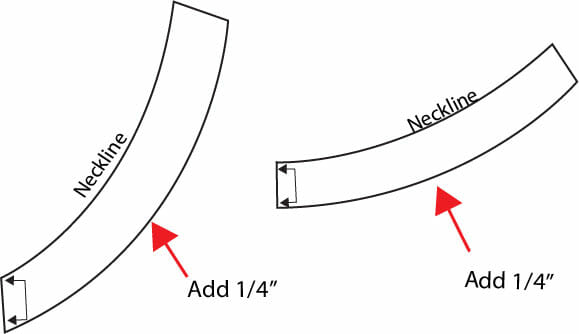
The facings do not have seam allowance so please add a 1/4″ to make them 1″ wide after you have attached it to the neckline.
The best and fastest way will be to use your overlocker. This time I am using the Brother 1034D. It's one of the most popular overlockers globally and the easiest to use. We even have a video to help you thread the machine, check it out here: https://www.youtube.com/watch?v=5q0z0QiNVQM
Apply fusible interfacing to a rectangle large enough to accommodate the facing. Cut the facing and put it aside, we will sew the shoulders first.
Subscribe to the YouTube channel:
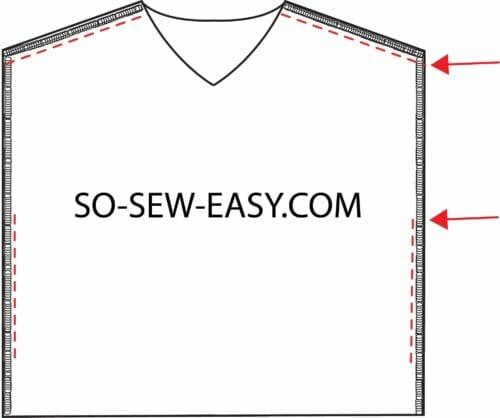
Step One: Sew The Shoulders
Using your tailor's chalk mark the vents end the sleeves.
Sew the shoulders at 1/2″ then using your overlocker reduce the seam allowance to 3/8″.
Iron the seam towards the back.
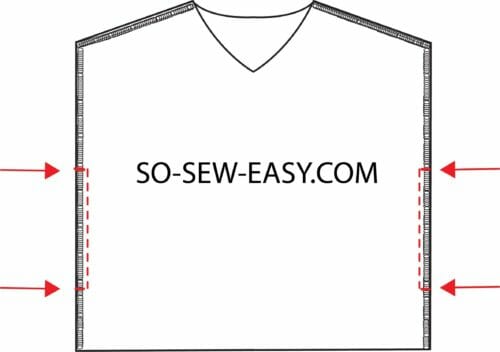
Step Two: Sew The Sides
Flatten the top of your work area then, using your overlocker, sew the sides without cutting the fabric.
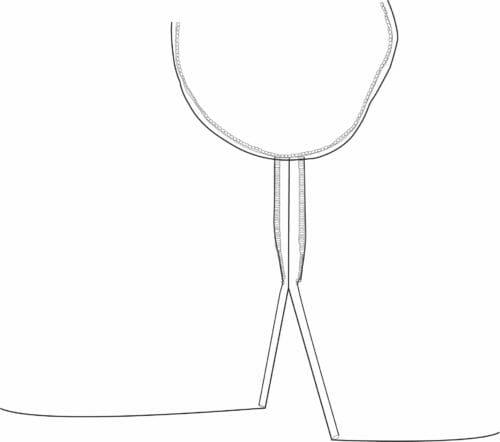
Right sides facing each other sew the top from the armhole mark to the vent. Iron the seam allowance OPEN. *THIS IS AN IMPORTANT STEP* Later, the seam allowance will become the vent and the hem.
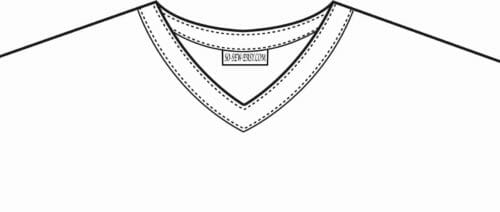
Step Three: Sewing The Facing
Right sides together sew the facing on the sides. Iron the seam allowance open.
Match the seam allowances of both the top and the facing with right sides facing each other. Pin the facing to the neckline and sew at 3/8″.
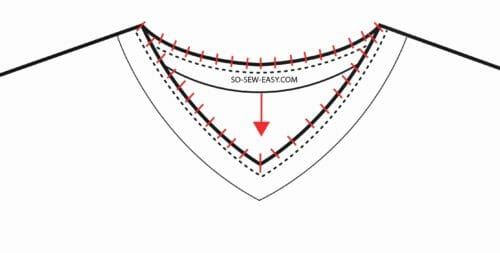
Snip the seam allowance every 3/8″, stopping 1/8″ before the stitching. The most important cut is going to be at the front where the V is located. Cut to but not through stopping at about 1/8″. Turn the facing inside out. Iron the facing, turning the hem 1/8″, or use your serger to clean the edges. Understitch the facing, make sure the seam allowance is with the facing away from the blouse.
If you have a hard time understanding this step please have a read at the following tutorial, it describes in detail how and why to understitch.
Sew the facing down using a small stitch.
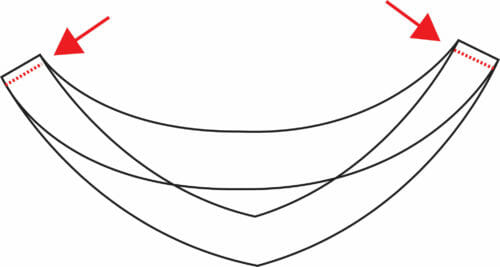
Step Four: Sewing The Sleeves Band
Measure from the shoulder seam to the side seam.
For example if your measurement is 9″ + seam allowance = 9 3/8″. You will multiply this by 2 (9 3/8″ X 2) = 18 3/4″. This is the length of the armband. The width is 6″.
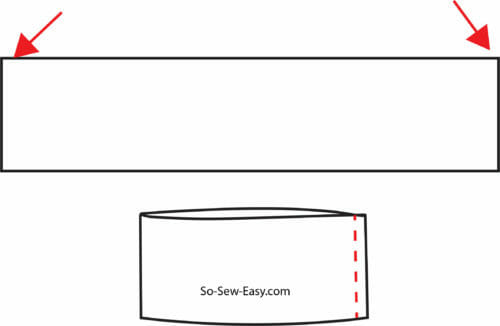
Fold the armband lengthwise. Right side together.
Sew at 3/8″. Iron the seam open.
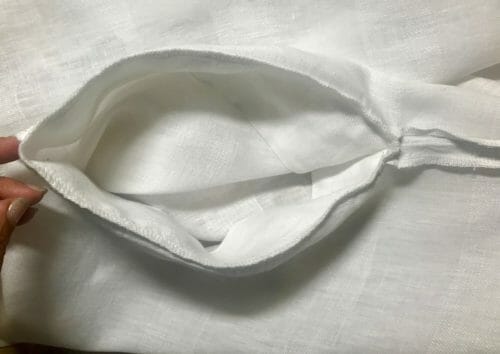
Fold the arm band width wise, wrong sides touching each other, the seams should be facing each other and right side will be outside.
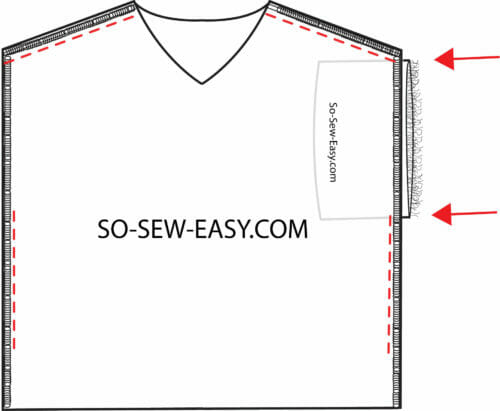
Insert the band in the sleeve. Sew the armband to the blouse at 1/2″, matching the side seam. Then using your overlocker, reduce the seam allowance to 3/8″. Please notice: the picture below is for illustration purposes, you need to align the raw edge of the band with the serged edge of the armhole.
Use your overlocker to reduce the seam allowance to 3/8″.
Step Five: Making The Vent And Hemming The Top
Start by turning under the seam allowance 1″ above the vent.
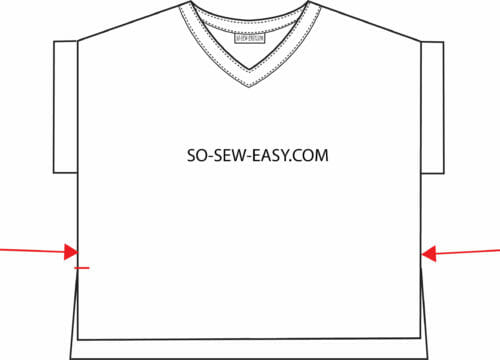
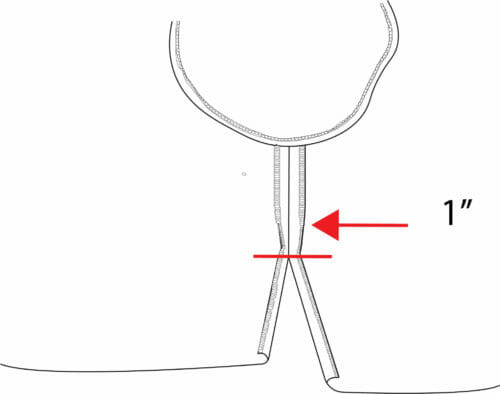
When you reach the vent make sure you have turned under 1/4″.
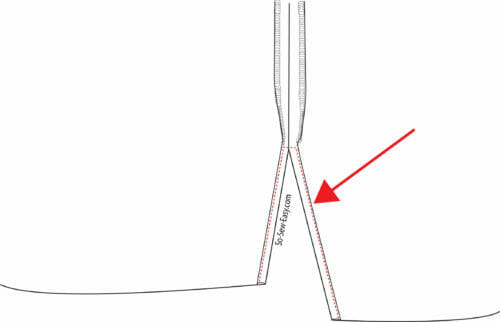
Continue turning the vent 1/4″ until the hemline. Top Stitch the vent using a small stitch very close to the edge.
Now it is time to hem the V-neck top. Fold the hem 1/4″. Iron. Then, for the hem another 1/4″. Sew the hem using a small stitch.
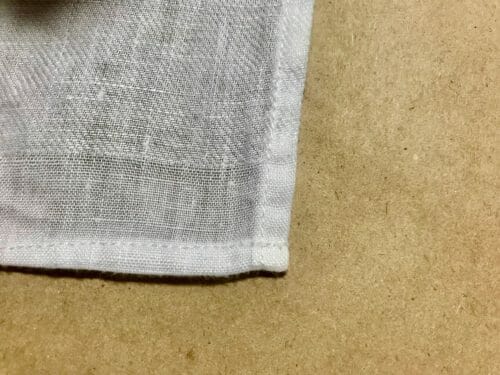
Lastly, using a very small zigzag tack the vent opening to avoid it from ripping after wear and washing.

Now you are ready to iron the top and wear it with your favorite shorts, skirt or jeans. This is how I'm planning to wear this top. What do you think?
I wanted to take a few lines to thank all the people that have been donating to the blog. It really helps me keep going and offering the patterns every week. I do read all the names and place you in my VIP list. Come Christmas you will get a special gift from me.
I hope you enjoyed this Linen V-Top Pattern and tutorial, join me next week when I'll be showing you how to paint some flowers to this top with a product I found that has got me very excited. Can you try and guess what it is?
Don't forget to comment or ask your questions in the space below.
Until next week, happy sewing!


I am contemplating making the linen top… I have sewn a lot in my lifetime but fitting myself is difficult. I am wondering what size would be best. I am 5′ feet tall, 125 lbs. and considered average in size. I wear a size 8 in bought clothing. This style appears to be very generous… an that is o.k. but I do not want it to overpower me. Any feedback and suggestions for size. Thank you so much for providing this.
Fitting is always the key, depends on your bust if you are 34B and light at the shoulders I think Medium is fine. Also if you choose a fabric with an open weave therefore more drape then Large is ok. Hope that answers your question.
I have been looking for something similar to this pattern. Thank you!
My pleasure!
Dear Maya, I too love your patterns and have made several. I am looking forward to making this linen shirt.
I do have a suggestion about donations/vs pricing. And a suggestion, there is a Facebook group called “Quilt Pattern Designers” that I have found to be invaluable and not just as “Quilt” group designers but as all kinds of fabric construction designers. Recently they had a big discussion about free vs paid patterns and I thought their conclusions to be correct- as much from my own experience as a free pattern collector as a seller. I have been around long enough to accept that free is not always good, but self pricing is not necessarily the best either. Personally, I find that having a “suggested” donation/price is very helpful. My income, as with most of us, is limited and as a crafter I always want to pay enough but worry that overpayment is too easy (at least for me) to do. I have often simply not purchased or taken as a freebie simply because I don’t know what is a fair price. It would just be easier if a suggested donation/ price were offered..
BUT don’t quilt! I love your ideas, blogs, etc. and am sorry that we crafters lost Craftsy- I was a good customer but am not willing to play Bluprint’s game and feel they handled existing crafters a lousy deal when they changed things with little or no warning.
God Bless! Jean
Hi Jean, you are so right! I know I should charge for patterns but I never get around to ask a sample maker to test the patterns. I have to find more hours in a day. I had a group of pattern testers on Facebook I am going to try to revive. Thank you for your kind words. Blessings back to you and your family.
Just downloaded this pattern and going to attempt to make it – it will be my first sewing project since school so wish me luck!! I haven’t got an overlocker, so thinking I can just zigzag raw edges instead and make the seam allowance smaller for the sleeve insert?
You can of course!
Mayra – THANK YOU so much for your patterns and tutorials and pictures. I tried to pay 10$ for this and past patterns when I didn’t have the money and the site would NOT allow my payment. So I will try again with a future pattern. Thank you, Janet
Hi Janet, thanks so much for letting me know and for your attempted payment. I’ll check it out and see if I can find any issues with the site. Kind regards, Mayra
I LIKE THE KIMONO. I HOPE THAT I HAVE ALL INSTRUCTIONS IN ONE DOWNLOAD. I NEVER FOUND A 2ND DOWNLOAD; JUST ONE IN MIDDLE OF EVERYTHING
Hello! Thank you for this pattern. I have been intimidated to try pdf patterns up till now, but this one looked easy enough to assemble, and it was free, so perfect for using as a learning exercise. I have printed it and assembled it and read the instructions on the blog, so I am ready to cut and sew it up. Question, do you recommend tracing the size pattern onto a large sheet of paper before laying it out and cutting? I do this with patterns where I have made a lot of fitting adjustment, but this one is so straight forward I don’t need to make any adjustments. You may have opened up a whole new world of patterns for me!
Hi Reina, you don’t need to print the whole pattern with all the sizes if you do not need to make adjustments, all you need is you size. But, if you have already printed all the sizes you can trace the size you need and use it to cut your pattern.
Hi, I am just assembling the printout and can’t find any armband pattern piece – or indeed any mention of how to cut in the instructions. Is it just me?! Thanks
it is on step Four.
Thank you Mayra. I found them immediately after writing! Just hemming my top, very pleased with it indeed. Thank you.
Thank you for the pattern! I printed it and directions, now to find the time!
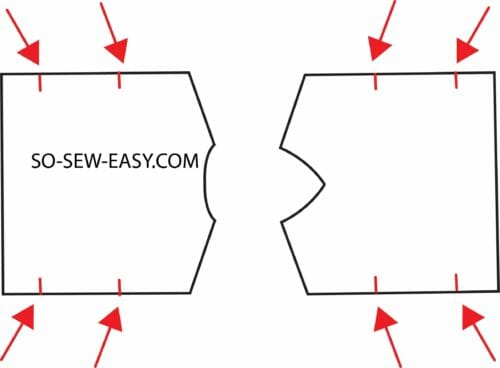
I love the look of this top. I am getting ready to connect the patterns pieces. I have not seen the squares used as the connections before. Silly question but do I place the squares next to each other or on top of each other?
Thank you
The squares measure 1″ depending on our printer settings and paper size they may or may not join exactly. However to measure them and they should measure 1″.
Love this, would it work with muslin
yes it would, be best if it is printed since muslin can be rather transparent.
Hi Mayra, love this pattern. Printed it up and am putting the pattern pieces together. But the pattern units don’t line up with the grey guides. I have to shift the paper up to match the actual pattern. It printed from PDF, landscape, actual size as directed. What is up here? Thanks for your time and I donated to your pattern service . Thanks
HI Maribeth, not sure what is the problem I have printed it as I try myself and it is lining up. Sometime the pages moves in the feeder in your machine and messes things up. I know this because I make this mistake often. Make sure the pattern lines are straight. Thankfully the pattern is boxy so this is easy to achieve. I did see your email on the paypal account I have to say thank you for your kind donation. You have become part of the VIP list.
Thank you so much, I figured that the most important thing was to aline the front and back pieces. Thanks for your reply. Happy sewing
I am trying to line up my pattern pieces. (paper) Do I overlap the gray squares? Doing that the edges of paper are off. Which one should I worry about. Love the pattern.
Do not overlap the grey squares. This are just extra guides, the squares are 1″ in diameter.
Love the possibilities. I’ve downloaded the pattern but I would also like to print the instructions but don’t see how to do that. Am I missing something?
There are no instructions with the pattern, the pattern is free to download the instructions are on the site for free that is how I can make a bit of money so I can continue sharing 4 patterns a months for free. Hope you understand.
Hi Mayra, thanks for the beautiful pattern! I`d like to sew it. But I have the same problem as Kathleen A Grom wrote on August 25 2019 at 3:38 pm: I cannot get the pattern to print correctly. What can be the reason for? Can you help please?
Kind regards, Elfi.
Hi Elfi, no idea what is the problem other than at the time you were trying there were close to 20000 people on the site. My server can handle it but others might not. Also, you get only 3 tries to download for free after that it will not let you.
Very helpful and interesting blog! Have downloaded this pattern for the future! Really appreciated your thoughts on fabric shopping in Rome as we are there often and I already knew some, but not all of the shops you mentioned. What are your favorited in NYC?
Hi Katia, I will be writing very soon with detail about this topic, planning a trip either this October or next February. As a student there my favorite shop was http://www.mendelgoldbergfabrics.com at that time a family own business with the most exquisite european fabrics, haute couture off cuts, organzas, tulle and lovely cashmeres. It is an alibaba’s cave not sure how it run today so it is worth a look. If you do let me know if it is worth going back there. Kind Regards,
We are in Rome in early October and NYC in late February 2020. Most of my favorite NYC fabric shops from 15-20 years ago have changed or closed. Thank you for any suggestions!
I love LOVE your patterns and tutorials. They are easy to sew and understand. Thank you so much for sharing your talents and time with us.
Hi Janet, It is truly my pleasure. You have commented 19 times in this blog, I do notice, it is I who have to thank you for your time there is so much out there on the net yet you are here. I am honored:)Kind regards,
I have been receiving your emails for a long time and love so many of your projects and was discouraged that I could no longer access them unless I joined Blueprint, which is all videos which I am not good at. Thank you for moving them.
Bernadette
Hi Bernadette, we have all been hit hard by the Bluprint business model, i can not longer access the pattern or I can help anyone who needs help or have a question. i keep getting so many bad reviews because of that. So yes slowly moving out of Bluprint.
I see many fun variations on this pattern. I want mine much longer, tunic length, to wear with tights. I see it with a seam down front and back center with stripes going vertical on one half and horizontal on the other. Maybe two colors. Thanks for the fun basic pattern!
I see you are very creative Sharon, such a pleasure to read your comment…:)
Love the top, not least because I have recently gained a lot of weight and it looks comfortable and a little bit flattering for us bigger girls. However, I do not have an overlocker. Please can you find a few minutes to guide me in how I could proceed with just a basic sewing machine? I am sure there must be other admirers of yours in a similar position. Thanks for all your help and inspiration.
The perfect stitching for this type of blouse and fabric is the turn under seam finish here is the tutorial. https://so-sew-easy.com/turned-under-seam-finish/
I like this pattern but I don’t understand why the instructions say to join the neckline facing seams with WRONG Sides together
(Quote: –
Step Three: Sewing The Facing
Wrong sides together sew the facing on the sides. Iron the seam allowance open.)
I have been sewing and making clothes for many years and have never made facings this way. Do you have an explanation, please?
Thanks for letting me know, I have updated the steps. Yes it was a mistake on my part.
I don’t understand this direction on step 3
“Wrong sides together sew the facing on the sides. Iron the seam allowance open.”
Then it appears you are sewing the facing to the neckline, RST, and turn it to the inside- normal for any facing. But the raw, pressed open facing seams would be showing on the inside? I don’t get it.
Unless you are sewing the facing right side to wrong side of the neckline, and flipping the facing to the outside? And what about the long edges of the facing? Certainly they would need an edge finish. Please help me understand why the instruction to sew the shoulder seams wrong sides together. Thanks for the pattern!
Hi Amy, it was my mistake, right sides together…
Myra – Love the pattern. Being large busted and older I look better with a longer sleeve. Is there a way you would suggest to make a longer sleeve?
Hi Densie, as it is the sleeve will fall around two inches above your elbows. I worry due to proportion a longer sleeve would not look very attractive in this style since the pattern is rather boxy. But, I am always looking forward to be proven wrong.
Cannot get the pattern to print correctly. I am not new to saving the PDF to the computer and printing. Any suggestions? Others on the FB group are having the same problem.
I really like the look of this top. I usually have to lengthen patterns. Where does the hem land? Do you think gauze would work well with this?
Hi Marcia, this top will land half way your bottom. So, it is easily lengthen.
Love this pattern!! Last week I made the T-shirt dress you put out a couple weeks ago. It is quite possibly my favorite dress. Also, I finally Pulled out my surger. It sat in the box for over year and I look forward to Making this shirt.
I am an American but Live in the Middle East. My concern is with the length. How easy would it be to make this blouse slightly longer?
Hi Wendy, thank you for your feedback and am very happy the dress has worked out for you. Please follow this instructions they are the same. https://so-sew-easy.com/lengthen-sewing-pattern/
I have become addicted to linen so I really appreciate this pattern!!
Yep! I totally understand your obsession…
I love the look! Seems to be a very sewable pattern. Thank you.
yes it is!
Love the top, but really dislike linen because it wrinkles so badly. Any tips to keep linen clothing looking neat instead of wrinkled?
HI Kathy, there is no natural way to keep linen from wrinkling this is why the pattern needs to be casual and flowy, to give you that understate wealthy look that the Italians in Capri flaunt so well.
Thank you for this pattern, I love the simplicity of the top. I can see it for other fabrics also.
Yes any fabric with a good drape.
Thank you. I have learned so much from you and enjoy reading your postings.
It is my pleasure Barbara, kind Regards,
Thanks so much for the linen top pattern. I’ve been sewing for years, but just getting into making some garments for myself. This is completely doable for me. thanks again…
Do let me know how you go with the top.
Looks like a great cool late summer top. Thank you for sharing.
It is absolutely my pleasure.
I would love this pattern but my printer won’t work with me waiting for my brother to come and see if he can fix it fingers crossed
Ah…electronic they don’t make them like they used to.
It is a beautiful blouse. I love
Hope you get to make it Migdalia. Kind Regards,
Just love this V-neck pattern. Have been looking for such as this. Didn’t mind paying you a little for you offering this. Looking forward begin sewing this. Thank you so much. Courtney
HI Courtney, thank you for your kindness, it is greatly appreciated.
I have been looking for a blouse like this for a long time. Thank you.
My pleasure!
Thank you so much for the patters your generousity makes it possible for those on a limited income to have access to wonderful patterns. I live near a fabric place that sells buy outs from various garment makers, name brand designer fabrics for CHEAP so usually have beautiful fabric to work with. I have just the perfect linen for this pattern in natural color. Thank you again for this lovely pattern.
Many blessings,
Suzann
WOW, I love those type of fabric shops, they are like a treasure hunt. You are very lucky. I once was broke and someone showed me kindness that literally changed my life, I am simply paying it forward.
Love it!
Very happy you do so.
Nice, nut I would not make the front shorter than the back. Why did you choose to do so?
Purely because of proportion, but this is easily changed before you cut the fabric elongate the front to end up as the same length as the back.
I just discovered this site, thank u so much for the pattern. I appreciate your hard work.
Welcome Aubrey, we have close to 200 free sewing patterns and 75 for sale. There are more tutorial than you have time for and a Youtube channel. This blog was started in late 2013, I bought it in late 2015 and I am still here working in my pajamas when not doing it from a far away location…Planning to stick around for a long time still…so hope you stay awhile.:)
It’s cute! Can’t wait to see with some linen I have washed and pressed. Can I use a striped linen?
Hi Lauren, yes you can just match the strip at the shoulder in they will run vertically.