


With 3 friends expecting happy events shortly, I'm concentrating some of my sewing time for sewing for the little ones. Today, making handmade baby toys. Don't we always joke that if you buy a child a toy, it spends more time playing with the box than with what's inside. Somewhere along the line, moms started to notice that babies enjoyed the feel of the labels on their toys, and the ribbons, and so those started to become a feature of the toy itself. Such as the satin binding on the comfort-blanket.
 As we get older, what feels good to us changes. Right now, good feels like a big creamy latte and a Danish pastry.
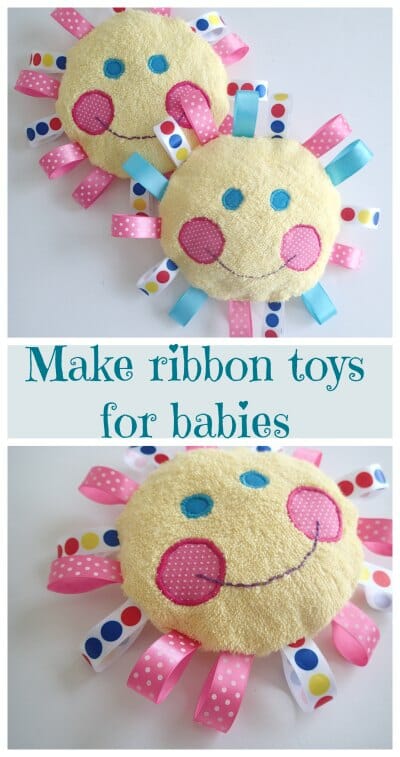
But back to the sewing, and a quick and easy toy for a new baby with plenty of snuggle and feel-good factor.
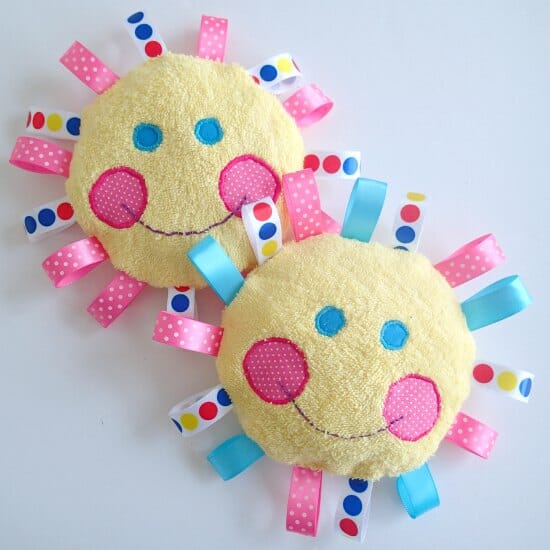
Bring a little sunshine
For making this sunshine ribbon toy:
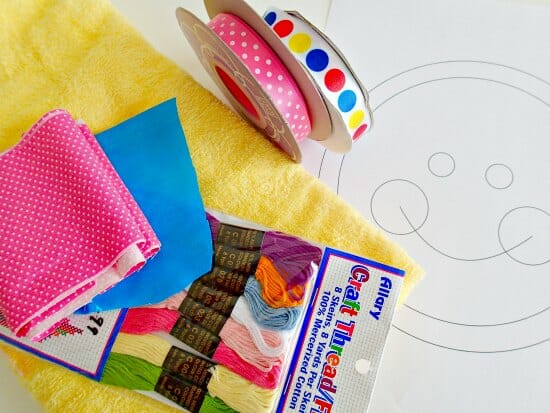
Materials:
- Fabric – I used yellow terry toweling. You could use a regular cotton fabric, minky, or cut up an old towel or face cloth.
- Ribbon in a variety of colors
- Small scraps for the eyes and cheeks, and matching threads
- Heat N Bond fusible web
- Filling
- Embroidery floss
- Fabric marker
- Template or pattern, draw your own or download at the bottom of this article
You can download the template and instructions for the Sunshine Ribbon Toy from my design account at Payhip. It's a PDF file containing both instructions and pattern pieces all in the same file. Enjoy!
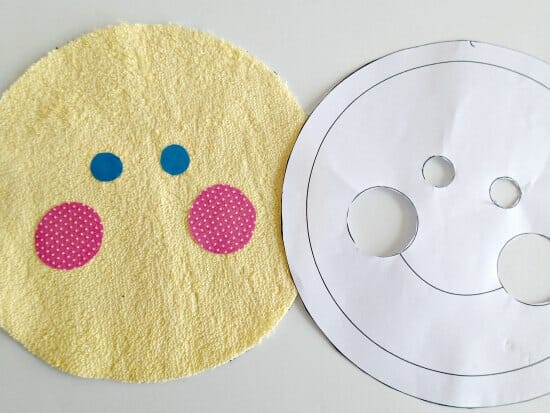
Gather together all of your supplies, and download or draw yourself a template for the face. Transfer your design for the eyes and cheeks onto Heat N Bond Lite fusible web, and iron it to your fabric.

Cut out your design and fuse it to your main fabric. I cut through the eyes and cheeks on my template to make sure I was getting my pieces in the right place.
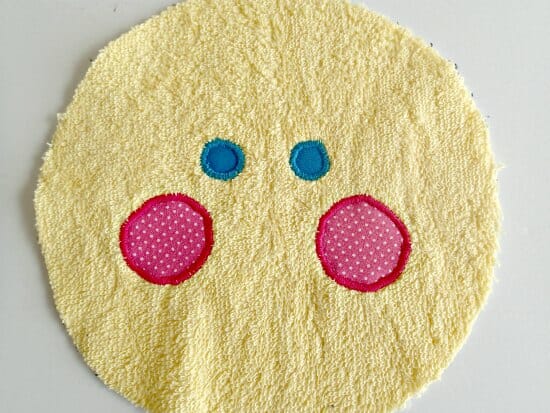
Applique your pieces in place with a satin stitch or stitch of your choice. I found my terry didn't go through the machine as smoothly as I would like so I put a regular piece of computer paper underneath as I sewed the applique and it as much easier to turn around the circles.
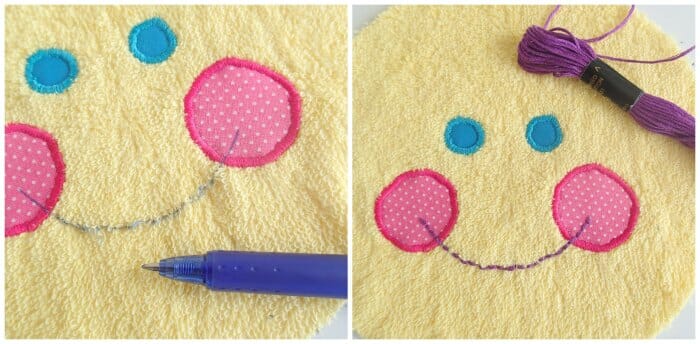
Then transfer the line for the mouth onto your fabric. I've recently started using these Frixion pens, because they write like regular pens so you can draw and mark all over your fabric but then they simply disappear with heat – pass your iron over it and its gone. Draw on your mouth following your template and stitch using your embroidery floss. I'm not a hand-sewing fan and don't know many stitches so I used a simple back-stitch. It looked just fine.
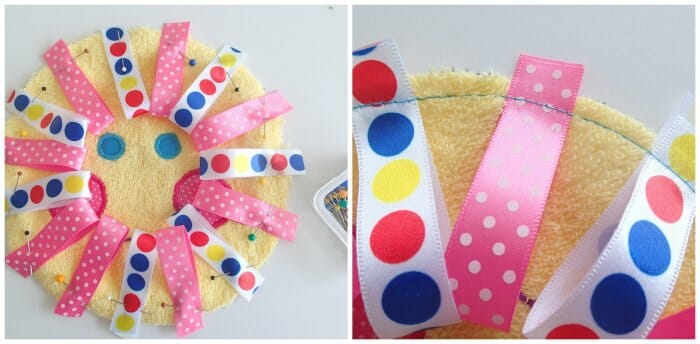
Time to add the ribbons. I cut mine 5 inches long and folded them in half with the shiny or more satin side on the outside. I pinned around the edges, making sure they were going to be well held inside, leaving about an inch between each. I used 15 pieces. Next you'll need to baste them in place, about 1/4 inch from the edge so you can remove the pins and they will stay put while you sew.
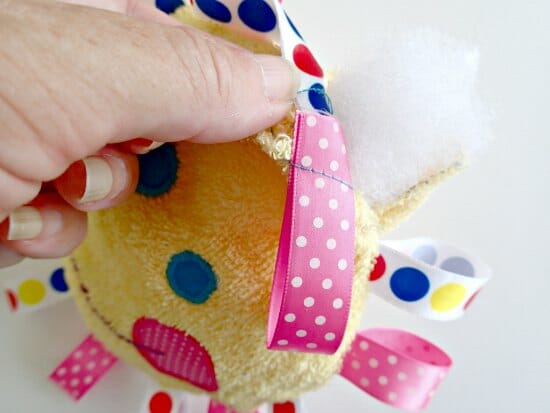
Cut yourself another big circle for the back. If you like, add a face to this side too, then layer them right sides together. Stitch around the outside, with a 1/2 inch seam allowance leaving a gap of 2 or 3 inches for stuffing.

Turn the right side out and stuff lightly. It's for small hands so no need to stuff it so much it comes out like a ball! Carefully hand-stitch the opening closed, give him a squish to even out the filling and you are done.
I made two in very quick time.
You can download the template and instructions for the Sunshine Ribbon Toy from my design account at Payhip. It's a PDF file containing both instructions and pattern pieces all in the same file. Enjoy!
TOY SAFETY
Please note, you should always give extra thought when sewing for babies and small children. This toy would look really cute with a button nose, but buttons and eyes etc can become loose and be choking hazards. With this toy for example, don't make the ribbon loops too long where they could get caught around a babies wrist and get pulled tight. Please use your own judgement as to whether this toy or any you make and design yourself are suitable for your child as they will not have undergone the usual vigorous safety testing applied to toys you buy in the shops. Please supervise babes and young children at all times when playing with home-made toys. [End of Public Service Announcement :-)]
PIN ME FOR LATER
Want to sew more softies for babies? Head on over to my guest post at Little House Living on making a cuddle blanket or soother in a similar way.


I’m having trouble downloading the pattern. No matter what I do it is printing too large. Could someone please let me know the size (diameter) of the circle so I can adjust the pattern.
Thanks!
I just downloaded the pattern. I didn’t have a setting to choose “actual” for the size. When it printed, the circle is 7 inches, which looks much too big. Please let me know what the size of the circle should be so I can adjust the pattern. Thanks! It’s so cute. I look forward to making it.
Thank you so much for this pattern, I have 4 in the making for 4 new babies…can’t wait to finish them, they are just Adorable!!
I just have to say THANK YOU!!! SO MUCH!!!! One of my best friends is becoming a grandma to twins in 4 days! I had been inspired to get out my sewing machine again, and this morning your link was in one of my emails. I have no reason to procrastinate about making my own patterns now for the Crinkle Ribbon Toy, and many others. So again, thank you so much for sharing your knowledge and patterns!
Lovely ideas! I plan to add crinkle noises to this adorable toy. And I think I’ll use minky cloth and terry cloth. This idea is so creative!
Great post for baby product .!!!
This is SO cute! I had attempted to make one for my son a couple of years ago and I made the ribbons too short and overtime he tore them all out. I have a 10 month old little girl now and I want to make one for her too. One that’s baby proof. 😉 Thanks for sharing this, it’s adorable!
You are welcome, enjoy 😉
[…] Another useful craft is making baby toys, especially if you have many friends having babies! This one is from So Sew Easy! […]
[…] (Full tutorial in So Sew Easy) […]
[…] Another useful craft is making baby toys, especially if you have many friends having babies! This one is from So Sew Easy! […]
My daughter LOVED her little taggy blanket (the ribbons are all about 1″ wide, so they were too wide to easily get twisted, but she liked being able to grab them)
Precious idea! Thank you!!
Love your patterns,Deby. On the ribbons, why not run a line of stitches down the centers of the ribbon, thus baby unable to stick finger through the ribbon; just a thought….no charge for my thoughts 🙂 I think I have made 50 of the burp cloths already, so easy and cute. Today I will try your sunshine tag toy. Thank you.
Good idea Donna for those who are concerned about the safety of having small loops. And wow, 50 burp cloths – moms (and babies) love them don’t they!
I love the toy you have made. However, I made a softie for my granddaughter and put on ribbon loops. Several days later my daughter-in-law called and said that she had to cut the ribbon loops. It seems that the loops became twisted around one of my granddaughters fingers and was quite tight and difficult to remove. In the future any ribbons on toys that I make will be single ribbon pieces, not loops. I hope this information will be useful to other crafters in the future.
I love it. Several years ago I made a similar baby toy. I used fleece squares and used different designs and colors of fleece depending on if it was for a boy or a girl. I plan to make several of these round ones for a baby shower our church is having that will benefit our local crisis pregnancy center. I think the mom’s who decide to have their babies will like them too.
That’s a lovely idea Marilyn.
This is really cute! My niece is having a baby in August, plenty of time to make some of these up 🙂
These are so cute. I may have to try to make this for an Operation Christmas Child shoebox, 2-4 year old age group. Thanks.
PS You’re the first person I’ve seen that spells her name like I do. DEBY
I love it I will try it♥
The comments on safty is great.
Love taggy toys. I made some monsters taggies for our School fete.
I love it Deb, Very awesome!!! – Mr. Suave
I can’t wait to make this! I was thinking of maybe adding some bells inside to give it some noise too. Do you think the bells would work with the stuffing around it? Such a cute little gift
Yes that would be nice, but I would advise caution if you are adding anything that could (in theory), fall out and get swallowed if your stitching came undone. I know its unlikely. Maybe one large bell rather than several small ones?
Respectfully, I suggest you cut the ribbon loops open. It leaves the silky feel intact, and the look will be the same, but provides an extra measure of safety. My son had a toy bear with a ribbon loop which he twisted around his finger–and one day his finger turned blue! Fortunately we were there; my husband immediately cut the loops on all his toys. Better safe than sorry.
Good advice and one of the very reasons why I include the safety announcement. Little ones should be supervised at all times whether playing with home made or commercially available toys for just this sort of reason.
Babies will be attracted to the face, Deby – clever idea. It’s lovely and soft, too, made from terry towelling. Good points mentioned in the toy safety paragraph. I like to triple stitch things such as ribbons for babies and toddlers.
You are so talented 🙂
Well, that’s very nice of you, but I like to think of it as endlessly hardworking rather than any actual talent!
Great idea, Deby! I’ve got two babies scheduled to be born into the family soon, so these will be a great little toy to sew up for each of them. Thanks!