


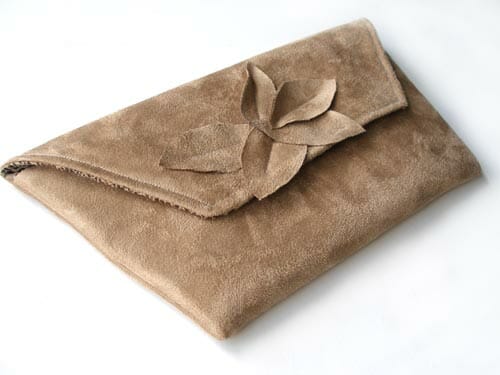
A simple one piece only pattern that folds ingeniously while sewn to create a basic clutch purse. Pattern available in two slightly different sizes. Make the purse plain with some top stitching around the flap, add some piping, add decorations, ribbon, flowers or embroidery to the flap or body of the bag. Add internal pockets or a strap. It’s all up to you – make the bag and then Make it Yours with this free clutch bag pattern!
The ‘Make it Yours' Sewing Contest is also launched today. Find out more at the bottom of this post about how you can win some great prizes just for sewing this bag!
Features:
- Uses just one pattern piece
- Super quick to sew
- Simple design
- Two sizes
- Magnetic snap closure
- Make it yours – add your own design features
Bag sizing – The small pattern makes a finished bag approximately 8 inches wide across the bottom and 5.5 inches deep. The larger pattern makes a finished bag approximately 9 inches across the bottom and 6.5 inches deep.
Skill level – Beginner for the basic bag. Instructions for adding your own design elements, pockets, straps, embroidery etc are not included. Let your imagination go wild!
Useful tutorials
You can find a range of useful sewing tutorials and videos at So Sew Easy – tutorials page.
Pattern pieces and printing.
One pattern piece only, in two sizes. Follow the instructions in the downloaded instruction sheet for how to print and put together the PDF pattern. Don't worry – it's easy!
Materials needed
- Outer fabric – I used a sturdy faux suede
- Inner lining fabric
- Firm Interfacing such as Pellon Decor Bond
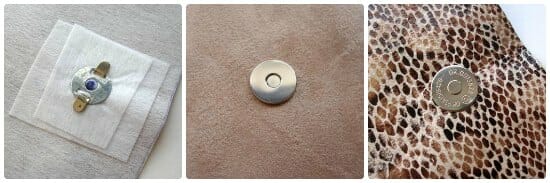
- Magnetic snap, or design your own closure
- Optional – piping cord, extras for your design features or pockets, straps etc
Sew the 'Make it Yours' Clutch Bag. Easy to sew and a great base pattern for your own designs and customization.
Directions for sewing the ‘Make it Yours' Clutch Bag Pattern
Full sewing instructions are also supplied with the pattern download.
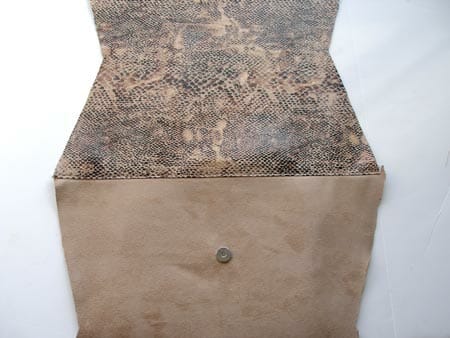
1. Cut your fabric as follows:
- Outer fabric x 1
- Lining fabric x 1
- Firm fusible interfacing x 2
- Optional – pocket, piping, your design features
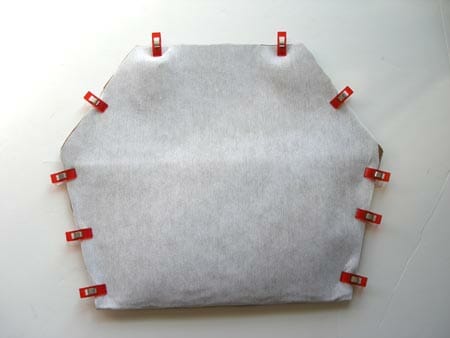
2. Fuse your interfacing to the reverse of your outer and lining fabrics. Mark on the interfacing where the magnetic snap should go for each piece, and reinforce that area with extra interfacing, transferring the placement mark to the top.
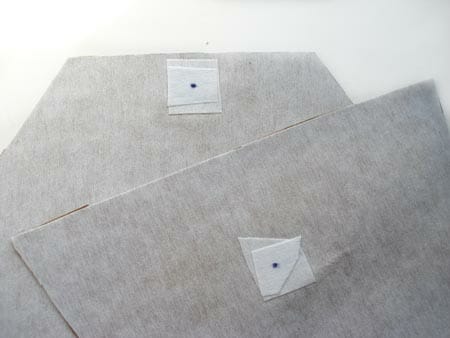
3. Check that your markings are centered and then install magnetic snaps. IMPORTANT – take note that placement for the outer fabric and lining fabric is in different places. See pattern piece for details.
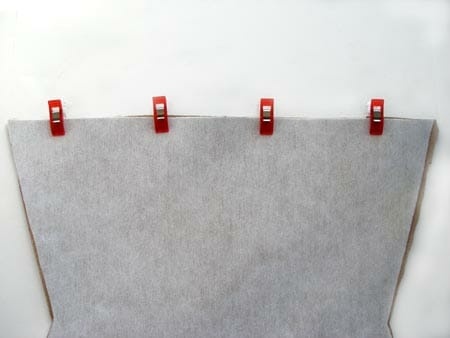
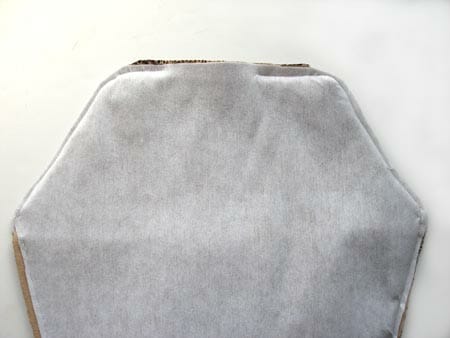
4. With right sides together, sew together the bottom seam with a 1/2 inch seam allowance.
If you wish to add any internal pocket, do this now to the lining piece.
5. Open out the bag flat, press seam allowances towards the lining and with the right side up, understitch on the lining side, close to the seam line. See this tutorial on understitching for more details.
6. Place the bag flat on your work surface, right sides up with the outer fabric at the bottom.
Bring up the bottom seam line and line up the side seams as shown. Fold down the lining flap and close the magnetic snap.

Adjust the placement until you are happy and open up the flap and pin the side seams in place.
7. Bring up the outer fabric and match it to the fabric at the top and pin in place all the way round, moving side seam pins to the top of the fabric sandwich .
8. OPTIONAL – if you wish to add piping around the top flap of your bag, make and insert this now. You will need approx. 18 inches of piping. Layer it in between the inner and outer layers of the top flap, bringing the piping out of the seams just above the corners at the fold line.

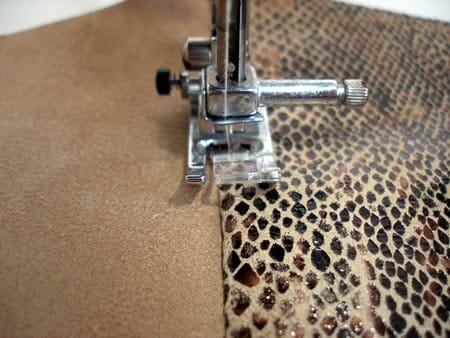
9. Stitch the side seams on each side and across the top, leaving a gap in your stitching of about 4 inches in the center of the top flap for turning the bag.
10. Snip close to the corners and trim the seams to reduce bulk, especially around the flap of the bag.
11. Turn the bag the right side out. Use a blunt tool to push out the corners.
12. Top stitch around the flap evenly for decorative effect and to close the gap left for turning. If you have added piping, you may choose to hand-stitch the gap closed and leave off the top stitching – it’s up to you!
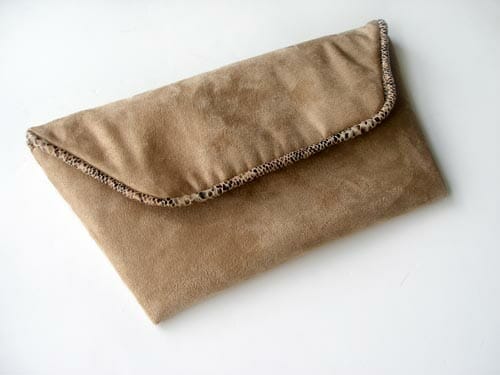
13. Add any decoration to your flap, taking care if you stitch through, not to hit the magnetic snap on the inside. I left one of my bags plain, just with the top stitching, and on another I added some suede leaves, and then made one more in the larger size with piping. How about adding a cute bow, a wrist strap or a long thin shoulder strap. Scrappy or felt flowers could also look great depending on your choice of fabrics.
12. Go out, take your new purse, and enjoy yourself!
Sew the 'Make it Yours' Clutch Bag. Easy to sew and a great base pattern for your own designs and customization.
The Make it Yours Sewing Contest
![]()
I love to see what you sew from my patterns so I've decided to run a contest which anyone and everyone can enter. There will be 3 categories for prizes and it's open to anyone Worldwide.
Just briefly, to enter, you'll use this pattern to sew your own bag, but you'll need to ‘Make it Yours' with your own design elements and ideas. Full details of the contest will be posted on the 4th, or can also be found in the download.
The contest is now open – read more about it here.
Last day to accept entries is 30th May and voting begins on 1st June, throughout June until 30th. There will be two winners, chosen by you, and you will also get an entry into a prize draw just for voting!
I'm so looking forward to it. I hope you will enter.
Authored by: Deby at So Sew Easy


Hi Deby thanks for the pattern and tutorial but is is coming up with an error message when I click any of the links..is it still available on Craftsy? thanks Zoe
I just checked the link and it worked OK for me. Not sure why you are getting an error. Are you using Kapersky on your computer by any chance? That can block certain redirections. If so I’ll let you know the setting you have to change to get it. You can find the pattern in my design account page on Craftsy too if you can’t get their direct. That is https://so-sew-easy.com/Craftsy-patterns
Hi Deby, I know it’s rather late in the day but I’ve only just joined your mailing page and recently your FB page, so today I’m taking a couple of hours to browse. I love this clutch and just wonder if you have posted anything on the winning bag or pics of the entries. I’ve looked but can’t find anything, would love to see what others have done. I’m hoping to sew one of these in red velvet and silk, bit ambitious for me, but if you don’t try……………………………………LOL
Thanks Kathleen
Yes Kathleen, sorry you couldn’t find it. Here is the link to the two categories for all of the entries so you can see them all. An amazing variety and very inspiring. Blogger catgeory – https://so-sew-easy.com/make-contest-time-vote-blogger/
Reader category – https://so-sew-easy.com/make-contest-time-vote-readers-entries/
Thanks for the links Deby, aren’t they all gorgeous? so many wonderful ideas that have got me thinking on what to do to my bag. Oh my this may take some time LOL thanks again.
Now you’ll have to make several, 5 at least! I liked the Wonder Woman bag – I could certainly see myself using this one.
The wonder bag is fun but I can’t quite see me using that on my honeymoon, then again why not 😉 LOL
It’s a lovely clutch, I made mine yesterday, hopefully it was uplifted for the competition. Where can I check to confirm please. Thank you .
I got it Janet, thank you. I did send an acknowledgement email first thing this morning but it looks like it didn’t reach you – sorry about that. The modern equivalent of lost in the mail! Good luck for the contest and thank you very much for entering.
Yes, I sent yesterday my a photo
Wow, completely different to the other entries and perfect. Looks just like the sort of thing I would buy. I might ‘copy you’ and make one of my own like that! Thanks so much for entering.
awe Thank you, means a lot to me that you like it, make me so proud
I love it. THank you for the pattern I made 3 in two days.
That’s awesome Lorena. Are you going to enter them into the Make it Yours contest and try to win some prizes? You can enter as many bags as you like. I’d love to see what you made and its as easy as uploading a photo. See here for the entry form – https://so-sew-easy.com/make-bag-entry-form/
What a lovely, not too complicated, bag pattern. Now you mention it I think I do NEED a lovely new bag so I really want to give this a try. Whether I can fit it in by end May I don’t know (time flies and all that) but I’m already thinking of embellishment ideas! Thanks for the lovely pattern
I really hope you’ll be able to enter Julie. And good luck on the launch of your new website.
What are the three categories for the contest?
Hi Jan, the three prize categories are: Bloggers, Readers and even a prize just for voting. You can read more about all the details and the prizes here – https://so-sew-easy.com/make-sewing-contest-opens/
This looks like fun but when I open the PDF to print the pattern, both the large and small are the same size (fit on one page). I can’t seem to find anything in adobe to change…help!
You must have the box checked which says to ‘fit to page’ under your print options. Uncheck this box and any other about centering, etc, and print as they are at 100% without any scaling. Then when you print at 100%, they will print out at different sizes. If you still aren’t sure, do let me know.
Hi Deby,
Quick Question. When the pattern is downloaded, does the pattern itself show how much fabric you need? I didn’t see it here on the blog or the pattern page on craftsy. By the dimensions, it seems that 1/4 yard would be plenty, but I just wanted to be sure. It’s OK to buy extra fabric but not buying enough would be bad. 🙂 Thanks!
Ah, I forgot to list this! For the small bag you’ll need a piece of fabric 16×12 inches, plus the same for the lining. For the slightly larger bag, 19×14 inches. I’ll go and list this in the download page now. Thanks for asking.
A nice little easy to make bag! Thanks for sharing it.
Awesome Idea, I’m gonna give it a whirl.
Yes, that makes sense Deby. Thank you :o)
Thank you for this free pattern – can’t wait to try it – I really need one (or maybe more 😉 ) clutch to be able to change from my boring black one…
I really enjoy reading your blog and hopefully this will be my first project after one of your patterns.
Will let you know if it turns out acceptable…
Kind regards
Marina
I’m sure it will be great Marina. Why take not take a few snaps and enter it for the Make It Yours sewing contest. There are some great sewing prizes to be had for the bag that gets the most readers votes. I look forward to seeing how you add your own elements to the design.
What a great fun competition. I already have a few ideas! Deby, is it one entry per person?
You can enter as many times as you like Val, no limit. But you can only win one prize overall, not one prize in each category, if that makes sense.
Deby, I had an event to attend last night and I decided I needed a new bag. I had an hour and a half only and I got it done. I will send a pic soon. Now that I have done it once, I think I can do it a lot faster, however, next time, I may try doing the cording. I did not have time to embellish the first one, but it’s pretty cute just because of the fabric. My Decor Bond doesn’t have directions as to how long to press it. Do you know? And I noticed a little “bubbling” where I guess it didn’t adhere so well. Joe couldn’t believe I had made it, and so quickly. Thanks so much for this pattern. It came just at the right time.
Wow, super quick sewing, and under pressure too knowing it had to be finished for going out. Yes, now you know how it goes together, you’ll be able to sew the next one even quicker. I really like the piping around the front edge. Was a little more tricky to finish with a bit of hand sewing, but worth the extra effort. My decor bond seems to vary, sometimes its stuck sold in 5 seconds, other times I seem to go over and over the same place, especially on the edges, for 30 seconds. I guess it depends on the heat of the iron and the type of fabric. Sometimes I get carried away and ‘iron’ it instead of pressing and I think this stretches the fabric just a little bit, enough to contribute to those bubbles…Glad you liked it.
Thanks, Deby. I’ll try pressing a little longer. I think I was counting to 10. I used a press cloth also as I didn’t want to scorch my cotton fabric.
Gorgeous clutchs!!!
I can’t download the pattern, either. It just comes up with a blank screen. Heading to Craftsy.
Sorry to hear the link isn’t working for you Cheryl. For you and anyone else who can’t get there, here is the direct link – http://www.craftsy.com/pattern/sewing/accessory/make-it-yours-clutch-bag-pattern-/91234?SSAID=682801
I can’t find the link to download the pattern!
It’s on two different places on the page Prerna. Both are orange boxes which include the picture of the bag and also a big bright orange button which says Get Free Pattern Here. The top box is right under the materials list, the bottom box is under step 12. Both will take you to my designer account on Craftsy where you can add the pattern to your cart and checkout for free. I hope this helps.
This is awesome! Thanks!
I’m so looking forward to seeing all the entries, yours included.
What a fun little bag! I’ve linked to your post on Craft Gossip:
http://sewing.craftgossip.com/free-pattern-make-it-yours-clutch-bag/2014/04/04/
–Anne
Thank you so much Anne, I love getting a feature on Craft Gossip.
Beautiful clutchs!!! I love both! Thanks for sharing!
Have a fabulous weekend!
Hugs from Portugal,
Ana Love Craft