


There has been SO much inspiring chat in our sewing chat group in the last few weeks. I admit, I'm now spending far too much time checking out all of the projects and even less time sewing! But one ‘thread' in particular got me to thinking.
One of our members, posted a link to an article about a poor lady who sent off her quilt top to a ‘professional' long-arm quilter and got back an utter disaster! It was horrible and the poor lady was going to have to unpick the whole lot to try to get it redone again.
The article on a quilting blog warned those sewing quilt tops to be very wary about sending their precious tops out to long arm quilters they didn't know – warning that sometimes just because a person owns a long-arm quilting machine, it doesn't make them an expert in using it. Always go with someone you know, or by a trusted personal recommendation.
The article and the examples shown in the photos of the terrible workmanship were interesting in itself, but what was even more interesting to me as a complete novice in quilting, were the comments on the article. There were several comments from long-arm quilters lamenting that sometimes a badly finished project is down to the bad quilt top they had been sent to work with.
Complaints about bad quilt tops referred mostly to mis-shaped tops, uneven seams, lumps at intersections, bad pressing, uneven blocks, and mostly about creases and pleats in the top of the quilt that caught in the needle during the quilting process.
That got me to thinking. What sort of a quilt top would be really challenging to quilt and what sort of a job could my friend Lucy (at Granny Sassy Designs) make if I sent her something challenging to work with? Ha ha, sometimes my husband says I have an evil mind – but I like a challenge and wondered if she would too!
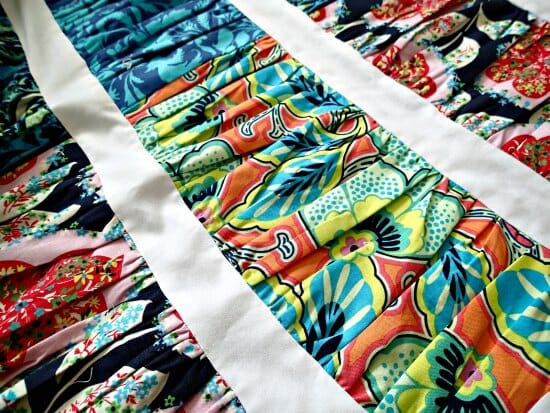
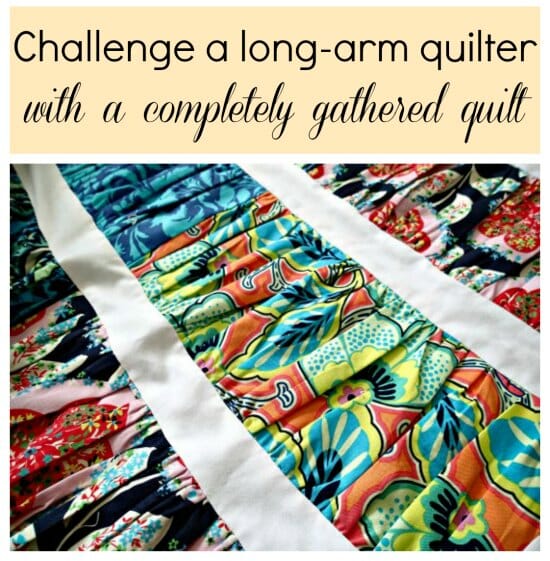
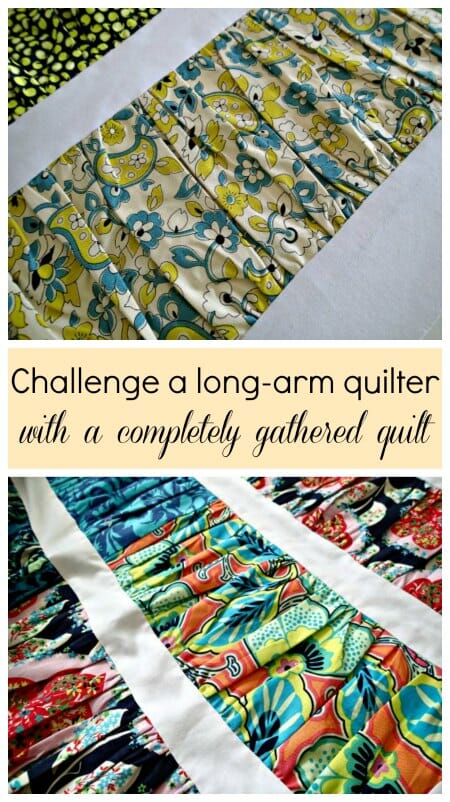
So I got to working on something I thought would be as challenging as possible. A completely gathered quilt top, absolutely covered in creases, pleats, bumps and uneven fabric – how would she cope with that? And would we still be friends when she saw what I sent her ?
Here's how I made my ‘evil' quilt top.
Making a gathered quilt top from fat quarters
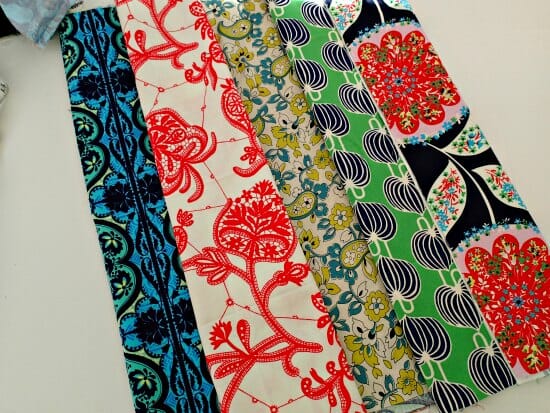
Gather together your supplies:
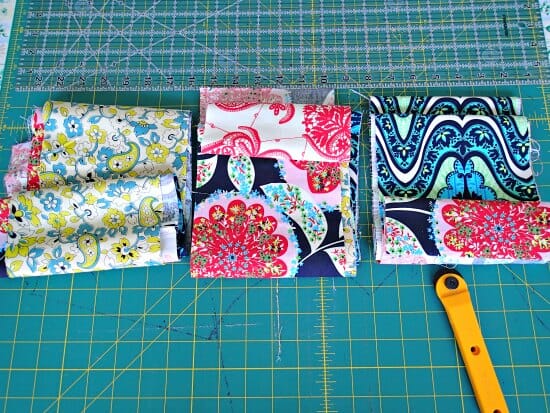
- 10 coordinating fat quarters of fabric
- I used the Lark fabrics from Amy Butler (buy 10 piece FQ bundle here), but substituted a couple of fabrics as I had already used them on another project.
- A jelly roll for your sashing or 2.5 inch wide strips of fabric
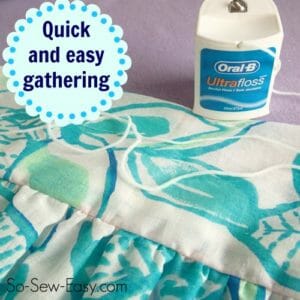
- Dental floss – yes we are going to really need this.
- A long-arm quilter that you want to challenge!

Sew 5 of your fat quarters together along the 18 inch wide side to form a long piece. Mine are shown here folded up afterwards, because it makes a very long piece.
Cut down the length of your long piece to get three 6 inch wide strips. Repeat for your other 5 fat quarters and you'll end up with 6 long strips of joined fabrics.
Now we need to gather them, and with such a lot of gathering to do and such long lengths, using the dental floss method to gather this up is pretty essential I think. No broken threads, quick and easy slippery gathering, and easy to remove the gathering afterward. Check out here for full details on the dental floss gathering miracle!
Work on a few pieces at a time, and zig-zag the dental floss down the entire length of the piece on both long sides, on the wrong side.
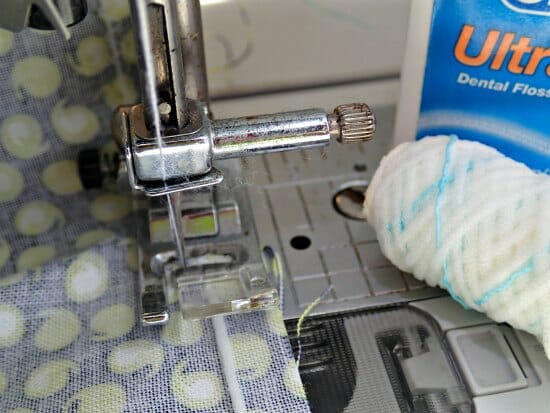
Keep your gathering pretty close to the edge – about a 1/4 inch. Pull up only one side at a time to work on though, it's easier that way.
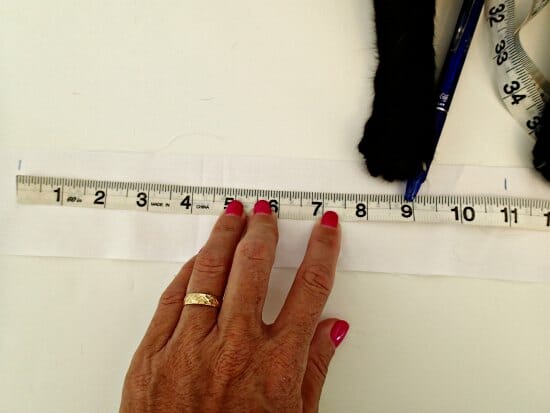
Cut your sashing into 2.5 inch strips or use a jelly roll. You will need lengths 57 inches long so join your strips as needed.
Mark an inch in from each end of your sashing piece and then mark every 11 inches along the length. Get a cat to help if you can – they are very good with a tape. Use an erasable fabric marker such as these frixion pens. The marks disappear when you iron it later.
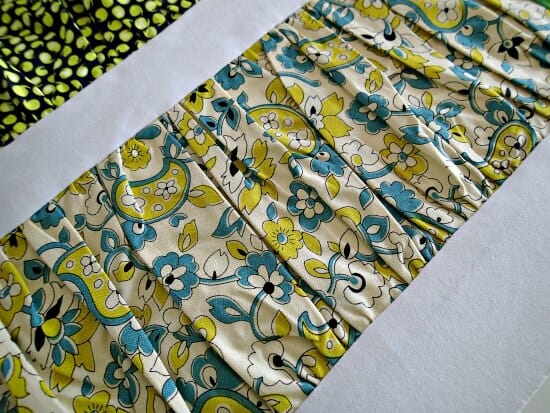
Start gathering your fat quarter strip at the center and match the seams in the strip to the 11 inch marks along the sashing. So each 22 inch length of the FQ strip is being gathered up to fit between the 11 inch marks. Start at the center, pin that one in place first, then work outwards.
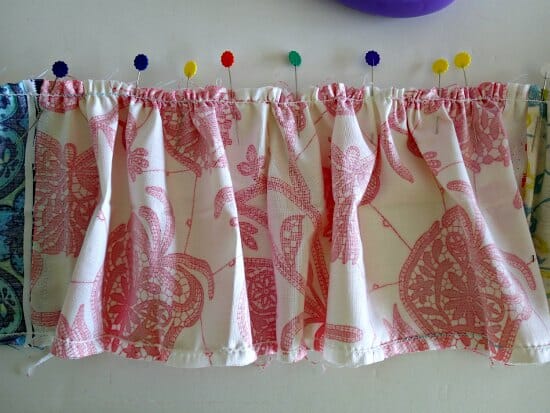
Adjust all of your gathers evenly between the marks and use plenty of pins to keep the whole length in place.
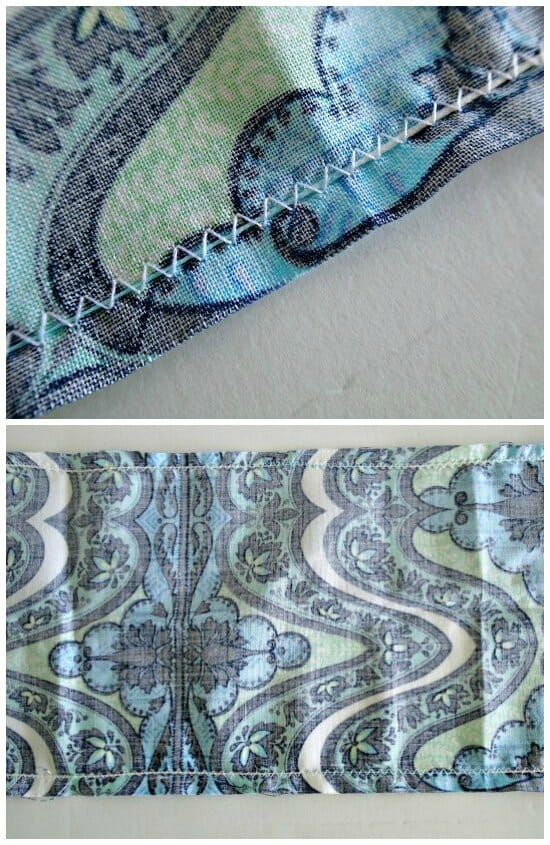
Sew one gathered edge to the sashing with a 0.5 inch seam allowance. Take care not to sew through your dental floss, and keep your zigzag gathering stitches within your seam allowance. Then simply pull out the length of dental floss to use on the next strip.
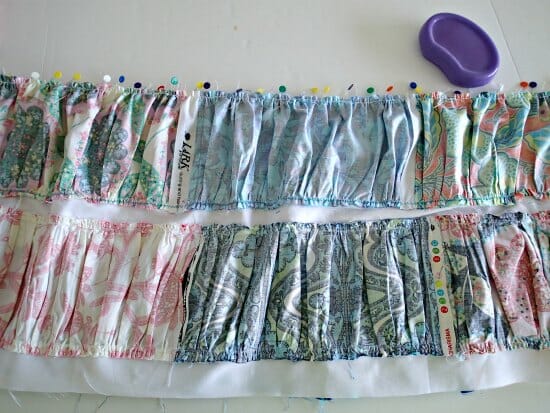
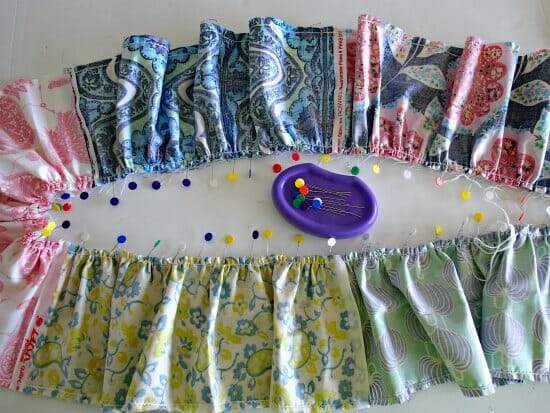
Continue on this way, gathering up the sides and sewing them onto the sashing strips in a way that looks good to you. Alternate the strips or turn them upside down so the colors go the other way – your design choice.
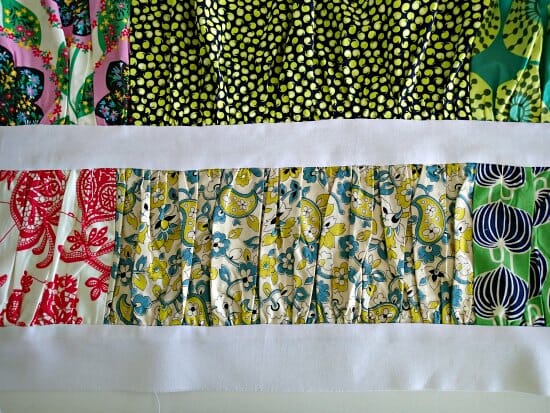
Finish off with two long sashing strips down the outside and phew, all the gathering is now done.
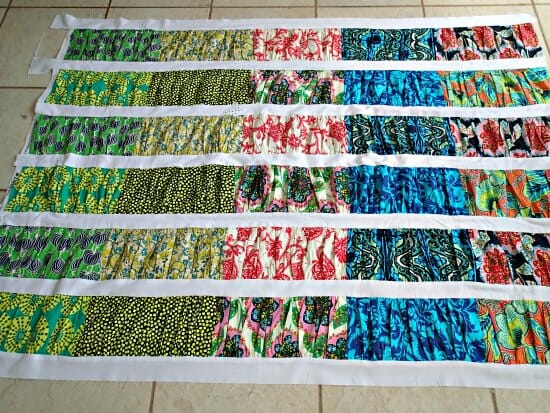
Time to give it a press, as best you can. You'll actually be pressing creases into the fabric. Press your seams as flat as you can.
Now make sure everything is squared up, trim off the 1 inch ends of those sashing strips and add a final piece along each of the top and bottom ends to finish off.
If you like, add a further border around the outside. Or not. Entirely up to you. If you can find one, get a cat to lie all over your quilt as you try to take photos of it.

Final step – package up your entirely creased, bumpy and folded quilt top and send off to your favorite long arm quilter with your love! Mine is already on its way across the seas to my friend Lucy – let's see what she makes of this one! It will be a real challenge for her I'm sure, but if anyone can do it, Lucy can. Let's see what a good long-arm quilter can make from a ‘bad' quilt top!
He he, evil laugh….
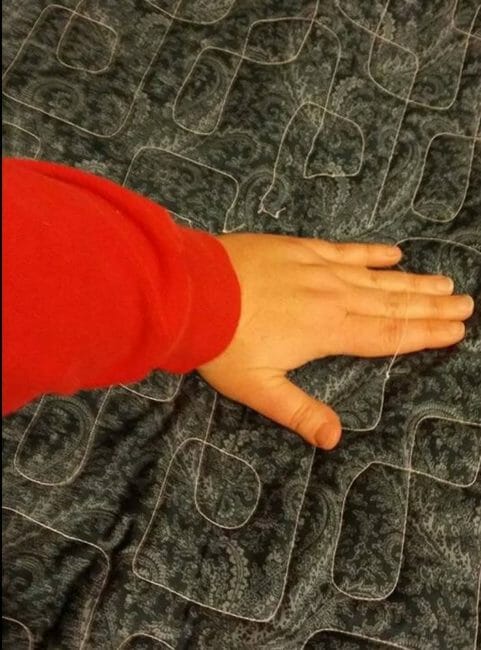
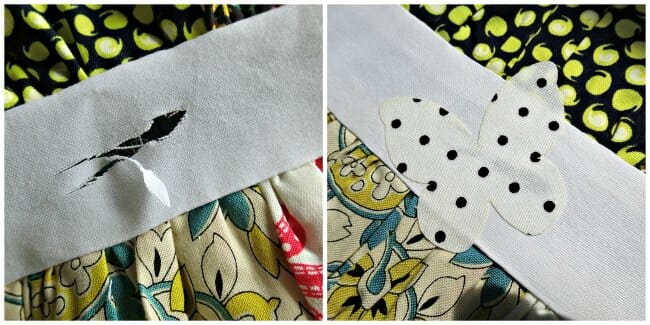
One final word of warning – watch out for Karma. While trimming off threads at the end, make sure this doesn't happen. Or you might have to cover that darned hole you just cut in it with a patch.
I'm sure I'm going to get some comments and discussion on this – I hope so! What do you think? Have you any experiences, good or bad in sending out a quilt top for professional long-arm quilting? Am I being to hard on Lucy and she'll open this up and never speak to me again ? Are you a long-arm quilter – what are your thoughts – any tips for how you would like the ideal quilt to arrive with you, and what you dread to see?
Pin this on your quilting board and let's have some fun with it!


Intriguing idea! I’m not a long arm quilter, but I’m wondering if it’s possible to just quilt with pretty motifs in the white strips and then do a few straight lines (running the same directions as the pleats) every 6 inches or so. Since there’s no date on this article, I’m also wondering how long ago this was and when we might see the result. This cat is very curious.
Unless you tell you long arm quilter your intentions with this challenge, and give them the option to participate in your challenge, you will lose a friend and a talented long arm quilter. I’m sure you only use talented quilters.
But It sounds like your intent was to sneak this into their studio as a test. Please clarify that this was not your intent.
Would a gathering attachment for the sewing machine work for gathering the fabric? Because a gathering attachment ‘gathers’ in a series of tiny i/8″ pleats that face toward the sewer one could gather going one direction on the top of the strip and the opposite direction on the bottom of the strip, giving a sort of twist to the tiny pleats. That might keep Lucy busy! Could be a very interesting quilt!
Going to give this ago, such a great challenge have a few ideas. Great use for using up strips should make a lovely quilt.
Love the pleated quilt! I’ll have to try one. But I’ll quilt it myself, no long armers for me. As someone said on the other blog, I feel like it isn’t my quilt if I don’t quilt it my self. 🙂
I love this idea- I would love to quilt this for you-Brendalouquilts.com
I only do free motion, custom long-arming and I think it gives me an advantage with quilts from new or less careful quilt makers. Obviously longarmers love to get perfectly pressed, very expertly pieced tops but if you are not relying on a robot guided longarm, you are able to adapt to the little issues that present. I have quilted dozens of “first quilts” and brought them from wonky, lumpy, wavy to textured, stable beautiful treasures. We all start somewhere…PS…Shame on the longarmer who sent that mess back to the client. Please ask the client to send it to me- I will fix it …no charge
Having had a long arm business for 10 years as well as teaching long arm quilting over 13 years at a large quilt shop, I have seen some quilts tops that were pieced together in very interesting ways! The quilting on the gathered quilt could be accomplished by using a special foot on the machine that resembles a tiny plastic bowl that glides over the uneven surfaces of the quilt top. The quilter could quilt a leafy meander in the sashings, feathers in the outer borders and also inside the hidden pleats, traveling from pleat to pleat via the seam/ditch. I would also recommend a busy print for the backing fabric since the quilting will look somewhat irregular on the back but not on the front. Definitely a custom quilting job and very doable!
Definitely want to see the finished product after it’s quilted!
I am totally baffled. I cannot imagine this quilt with “quilting”. What does it look like? Please help me understand; a photo would certainly help!! Thank you.
FYI Dogs do a great job shedding, I mean “helping” too. They really like the big quilt tops that have to go on the floor while making the quilt sandwich and pinning.
Looking forward to seeing the finished product,.
That’s evil indeed! But your quilter challenge quilt would actually be easier to quilt than a quilt that’s poorly pieced and wonky and full everywhere. It looks and sounds like you took pains to make it square and the borders lie flat. With those wonky quilts people expect something that’s, though not impossible, a giant headache… with this quilt, a quilter gets to work with the fullness. There’s no expectation of beautiful custom work block by wonky block, stitch in the ditch without a ditch to do it in, or an edge to edge that glides across the quilt top perfectly. Your evil quilt is actually an opportunity to embrace the ruffles and have fun with something unexpected. So though a challenge, it isn’t the same at all.
I longarm for others and the pictures of the bad quilt were heartbreaking. I can’t imagine how the poor customer must have felt! But this, this goes beyond evil and I love it! Please share the finished quilt once you get it back!
I don’t understand why you would want to send this to a long arm quilter ????
I love this idea of gather quilt, will be trying this soon.
My irst thought was to lay a layer of tulle over the whole top and quilt it that way. I see Lucy had a similar idea but used tissue paper. This was definitely a challenge and a very unique quilt.
Deby did you get your long armer to quilt your top? do you have a picture?
Yes, she did an excellent job on the quilt, I was so delighted. I have an article with some pictures for you here – https://so-sew-easy.com/my-evil-gathered-quilt-top-was-she-defeated/
I think I can’t wait to try this. I have a doll bed cover in mind right now. I saw a doll bed made on top of a plastic storage bin (doll and clothes & accessories can live in the bin when not playing with owner) Bed skirt is attached all around the box. Mattress and spread or quilt goes on the lid. So I’m seeing this gathered quilt for the top, with coordinating taggies attached around the sides. It could start out as a child’s blankie and become the doll bed blanket when the doll needed a nap. And of course the bed skirt would have to be a whole section of the quilt top gathered only on one side and attached to the sashing and somehow attached to the bin. Now there’s the challenge–getting that piece to stay on the plastic!!
You are evil.
He hehe heee.
It mite be OK as long skirt with the sides slit up the sides with a wide waste band.
First, I would use the gathering foot on my serger to attach the wider strips to the sashing strips rather than dental floss. The gathering foot automatically gathers one fabric and attaches it to the other fabric at the same time. Super great time saver, although there is a learning curve figuring out how much pressure to set the presser foot at and also how much to let the fabric slide through. Secondly, I would use the new cup foot on my Innova longarm, and I think there wouldn’t be any problem!
I love the idea of having gathered panels in a quilt. I’ve never seen one like this. It’s gorgeous! I would love for you to link up at the Stitch It, Blog It, Share It Link Party going on now at behindtheseamssewing.com.
~Bonnie
Hi Bonnie, I visited your site but its entirely blank, no content at all. I hope something bad hasn’t happened, but it looks like you haven’t yet posted any content.
shirring….. a strip gathered on both sides…. is an heirloom technique…. usually done a little narrower than you did this. As someone else said, depending on the batting maybe just quilt in the sashing (also a heirloom technique) and maybe add ruffles to the binding when you finish it. Lovely for a girl…..
as a long arm quilter I would be tempted to sew straight down the gathers, perhaps between them, parallel to them. I don’t think it would be noticeable and it would nail down the fabric in places. Then you wouldn’t be worried about what it would look like when it was washed. this could also be quilted this way on a domestic machine. Love the gathers idea on the quilt! cute!
Wow, as a long arm quilter myself, the gathered areas would definitely pose a challenge. Shame on you for doing this to Lucy. (just kidding). I love a challenge. I may even be tempted to make a gathered quilt myself and come up with a unique quilting idea for it. Do post the finished quilt after you get it back from Lucy. I’d love to see what she did with it. Thanks for sharing.
Thanks for the dental floss trick. Terrific idea. That one definitely goes in the bank!
This is a different way to do a quilt top. It is is very pretty. I think, depending on how wide the quilted part is, it would look good with a wavy line down the center or maybe a wide zig zag down the gathers and some vines or curly q’s in the sashing.
Oops! I meant to say depending how wide the gathered part is, not the quilted part.
I just love the cat helping. How adorable is that? 😀
My goodness, if only the sashing is quilted then your quilt will look a wrinkled mess after washing. JMHO
On the subject of pro long arm quilters- I would think they don’t have to try and quilt every wonky mess of a top they receive. Some things are just hopeless from the beginning. Again, JMHO.
Wonky Girl, I totally agree. We piecers are all at different levels. A beginner could conceivably want to send off his/her FIRST top to be quilted. And the long arm quilter should ask about that up front. Then offer to receive it on a consultant basis, returning it UN QUILTED with suggestions for improvements, explanations of how they want the top prepped and why, etc. And if it is in really rough shape, offer resources, links to favorite tutorials, contacts for experienced quilters who might agree to take the newbie under their wing, etc.
If a quilter takes on the challenge of doing a wonky top anyway, then they should be worthy of the challenges they will meet, and then meet them.
Quilting a poorly constructed quilt top in a way that shows lack of skill and then blame the shoddy work on the piecer just makes a bad name for this cottage industry.
Is there a “Quilter’s Angie’s List” where we can report such problem?? And then check that list when wondering if we are making a good choice . . .
Yes, I would prefer not to have quilting all over the lovely gathers! Why go to all the trouble otherwise?
I agree on quilting only the sashing, but I preferred the gathers prior to being presses. Now, I KNOW that’s unreasonable. They will certainly become pressed down over time. So HOW would you quilt (method, not patterns or where?) I’m wondering if you could put wash away stabilizer on top of the gathered sections?
Oh you are evil … I hope you supplied a really good quilt batting that you only have to quilt every 10 inches. Would be a good quilt for an older person or a child. Very different and different every time.
I love it! I’ve seen duvet covers made this way. I don’t think I would quilt it, though, except maybe in the ditch along the sashing, because I wouldn’t want to smash down the gathers. It’s so pretty, I think I might need to make one!
(You’re too funny about the cat)
Lucy has suggested a more open style for this very reason and I agree with both you and her, a more open quilting style, not too close together. Let’s see what she comes up with !
Or even, I think, quilt JUST the sashing! That would be so pretty!
Sherry, we think along the same lines. I wrote myself a note to do a doll quilt this way…and I was going to stitch in the ditch along the sashing. I do my own quilting either by hand or machine. Note: My black cat loves to stretch out across my quilts-in-process this very same way.
I’m curious to see how your friend quilts this gathered top. I don’t think I would ever make this top but I am going to try your dental floss gathering technique on other items.
It’s just arrived with her, and yes, she had a few ideas already. Do give the dental floss a try, you may become a convert. Works really well for gathering knits too.
You are so right about the dental floss gathering technique, Deby. I have been using that or twine this way for a long time. A friend suggested tying a button to the beginning end of the floss or twine so that end does not get pulled out accidentally during gathering–a good suggestion, I think.
I enjoy all your great sewing ideas! 🙂