


I'm embarking upon an epic fitting exercise and learning to sew the perfect fit this year, following along with the Craftsy course of the same name and the lovely instructor Lynda Maynard. You can read Part 1 of the series at 2013 is the year of Sew the Perfect Fit and Part 2 at Muslin Bodice Adjustment. Today, more on making a muslin and transferring the bodice adjustments onto the paper pattern.
In the last post I had completed and pinned the adjustments I wanted to my original muslin which had been made up straight from the pattern. Here was the result after much slashing and pinning.
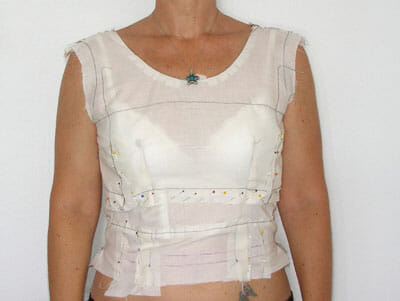
Added length to both the front and back bodice. Marked to lower bust darts on pattern and next trial bodice. Opened from waist to side dart and increased at waist, tapering to nothing at bust.

Added additional length to back bodice to align waist seam with natural waistline. Slashed from waist to shoulder and widened primarily at waistline, tapering to nothing at shoulders.
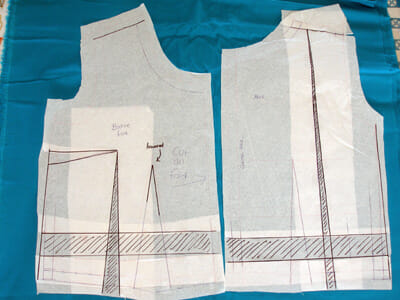
So then it was time to transfer the adjustments made to the pattern pieces. I used my favorite method for tracing patterns, and transferred all pattern marking including seam and stitching lines to medical paper which is much stronger than regular pattern tissue.
 I had expected it to be a little confusing to transfer adjustments made in 3d on the body, into flat adjustments on the pattern pieces. But with Lynda's excellent instructions it was actually easy! I was pleasantly surprised how quickly I was able to alter the pattern and how accurately, based on the muslin adjustments. Lynda runs your through step by step how to transfer each type of adjustment based on her three different fitting models.
I quickly ran up a new muslin (in a more concealing darker fabric) to check the fit. I made another few small adjustments, making a change to the shoulder and also letting out the side seams just a little. Although this might be reversed when I fit the final dress. It's just a bit of ‘fitting insurance'. And here is the revised muslin based on the pattern alterations.
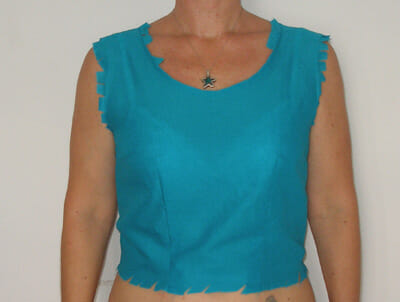

I don't think any expert in sewing would call this a perfect fit just yet, but I am delighted with it. Compared to what I started with, and how much trouble I always have fitting patterns, this is a revelation! There's a little bit of loose fabric just yet. but I'm sure once attached to the skirt, this will hang much better.
Talking of the skirt – I'm not looking forward to that part coming up next. It's not going to be easy getting my bum into a skirt muslin I know is probably 3 sizes too small. But Lynda will see me through it!
Good news for So Sew Easy readers - in return for this class review, Payhip have offered you all an exclusive discount off the Sew the Perfect Fit course - get 20% off using this direct link.
Disclosure – I bought the course myself and am not being compensated in any way from Craftsy for this course review. I really love the Craftsy classes and negotiated this special rate for your benefit. I am an affiliate so will receive a commission if you buy this course using my special discount link.
Authored by: Deby at So Sew Easy


Hurrah! This is what I do. I have been sewing 18th & 19th clothing for 20 years. I started with a ‘Past Patterns’ dress pattern and followed the instructions. I started with a muslin and found that I had to have a corset. so I bought a pattern and made one. Then I could see how the bodice should fit. I couldn’t find help anywhere–no internet yet. Needless to say I still love it. I suppose my largest accomplishment was a Revolutionary War Uniform. I love the research. Most of my friends think it as an odd thing to do.
This is a great tutorial for anyone who sews and needs to fit a bodice piece just right. Thanks so much for linking your post up to the BeBetsy Brag About It party http://bebetsy.com
The best to you!
Sharon and Denise ♥
Wish I know how to sew,great job.
Wow! If I ever get my butt started on sewing, I definitely know where I will be coming for help. Your posts are awesome.
Blush, thank you so much Shannah. I really hope that I inspire others to try their hand at sewing. You really can get very good results following along with the tutorials and patterns available online. I’m working on more tutorials as we speak to try to make the site as useful as possible. As I learn a new skill, I’ll share it.
Hello – I just found your blog via Pinterest! I too have been doing this “Sew the Perfect Fit” course via Craftsy (I have started it and had to put it aside for a bit). Your blue muslin looks FANTASTIC! A hundred times better than mine did! Like I said I should go back and get back into it. In the meantime I started the “Fast Track Fitting” with Joi Mahon. I think for a “challenged” person like me (hard to fit and no fitting “buddy” available) the FTF course is a lot easier. Not to say that Lynda Maynard’s course isn’t super helpful and informative. Do you have someone to help you with the fitting?
Hi Ness, no I didn’t have any fitting help so I basted a zip into the back to help me get it on and off. It was on and off quite a few times for me to get all that pinning and slashing which is why I am satisfied that I won’t call the end result the perfect fit – that’s very hard to achieve without help. But a good fit, I’ll be very happy with. I’m really interested in the Fast Track Fitting course too, but I already have several I’ve signed up for which I really must do first before getting too overwhelmed. There is just SO much to learn still. I shouldn’t complain – I only started to sew about a year ago so I think I’ve come a long way.