


Step Three: Hiding the ends of the bag handles
Method One: Using fabric and a small, self-made pattern
- Take the two small rectangles of fabric and apply fusible interfacing.
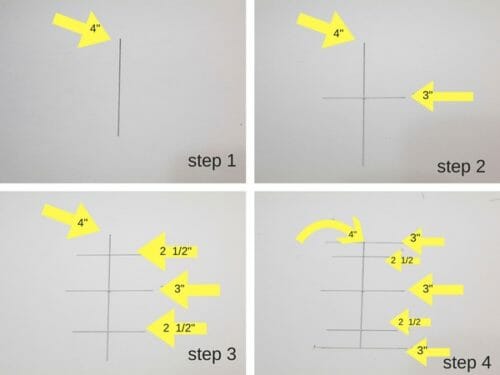
- On a piece of paper, trace a vertical line (Step 1) 4″ in length and mark the middle by tracing a 3″ horizontal line (Step 2).
- Trace a 2 1/2″ horizontal line at 1 1/4″ above and below the center horizontal line (Step 3).
- Trace a 3″ horizontal line 1/2″ above and below the 2″ line (Step 4).
- Join all the outer points together.
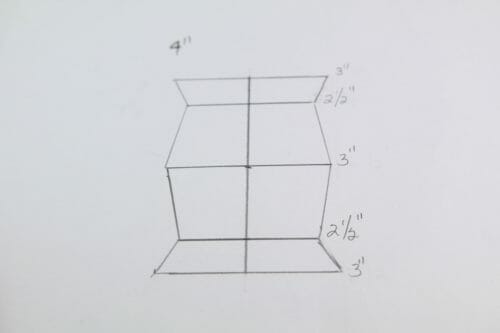
Join all the outer points together, cut out the pattern, and lay it on the fabric that you have prepared with the fusible interfacing. Cut out the fabric and fold the fabric wrong side out in half.
Sew on one the top and on one side and trim the seam allowance by half turn the piece and iron it.
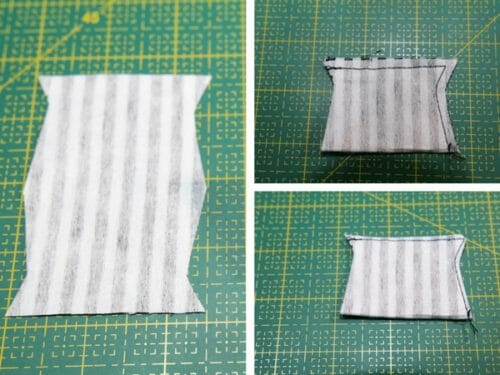
Wrap it around the handle and hand sew with quilting thread if it is too think for your machine.
Method 2: Using waxed cotton cord or thin decorative cord.
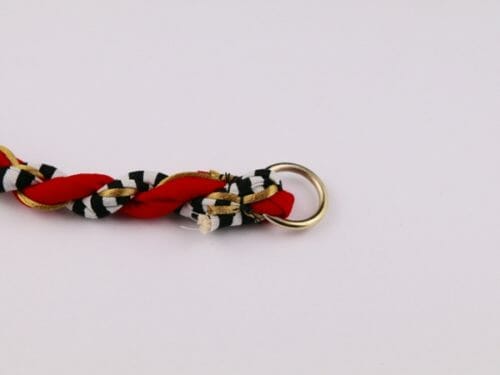
Thread the ring through the twisted bag handle, fold the edge over the ring and stitch it down using your sewing machine or by hand make sure you use a very strong thread, cut the excess fabric.
Take you wax cord, you will need about 10″ per handle side.

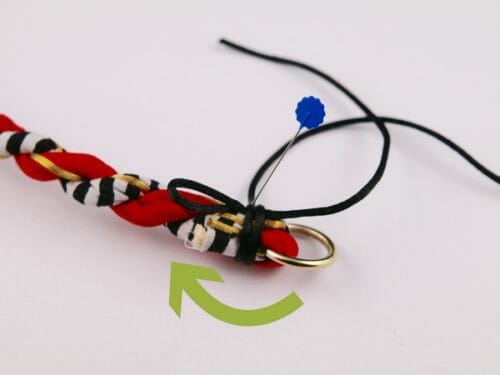
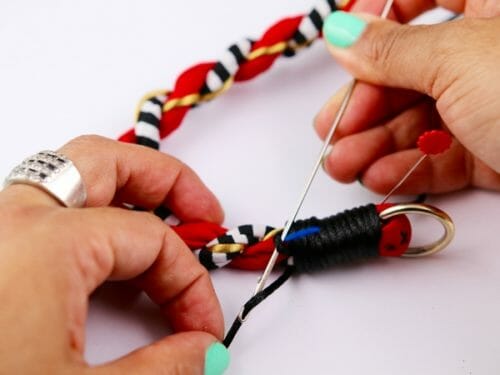
Fold the cord by 4″ and place the fold 1″ from the ring. Start wrapping very tightly from the ring to the loop. With the help of a loop turner pick the cord and threaded through what is now a small loop.
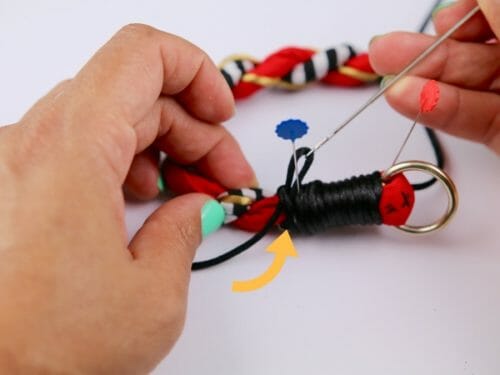
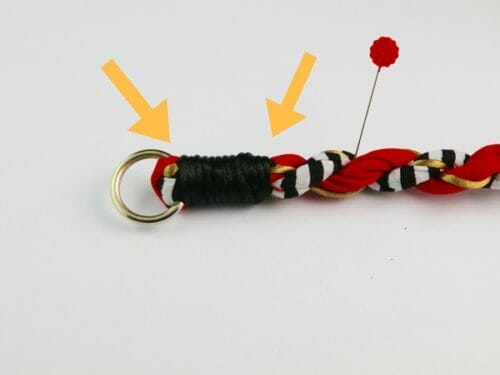
Pull the cord side closest to the ring until you see the other side disappears under the tight loops.
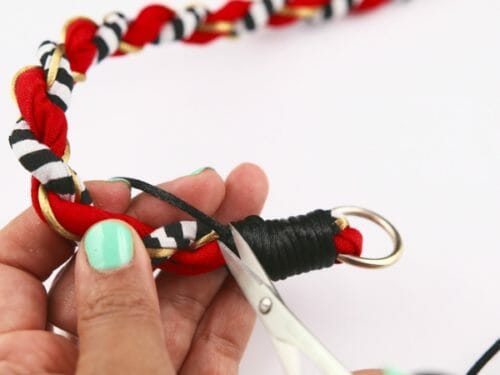
Cut the remaining ends and apply glue to both side.


what a practical and very attractive idea. I am making tote bags for xmas gifts and will definitely try to make some handles for them using this method.
Instead of actual cording, could crocheting a length of heavy yarn be a suitable substitute? That would also be a way to reinforce the inside of a pick pocket handle as it would be very strong and able to be done with a variety of materials.
Is there a PDF pattern for the Making Bag Handles from Twisted Fabric scraps
Sharon,
if your computer/laptop is like mine I have a suggestion. Up in the right hand corner area, right below the X that you would use to close the page you will see three dots in a row vertically. If you click on those dots a drop down will appear. Click on print and change the printer destination to ‘Save as PDF’. You can then save the page as a pdf file where you would like. Hope this help. Have a save and blessed labor day.
Did you ever get an answer…I am having trouble with the sewing instruction to print?? Now I dont know whether the PDF for the pattern is even accurate?
Hi Janice, there’s no PDF required for this one. You can do a simple pattern by hand as per the instructions on the second page of the tutorial. Have fun and happy sewing!
Hi, there’s no PDF required for this one. You can do a simple pattern by hand as per the instructions on the second page of the tutorial. Have fun and happy sewing!
That’s a very cool idea for a change from the flat handles that I am accustomed too. Thanks for sharing, will be trying it soon.
Your are most welcome, post a picture of your bag would love to see it.
There is a wonderful tool for turning tubes, it is called the Fasturn. You can add a cord and turn the tube at the same time!
Hello,
Thank you for the idea of the twisted handles. I’ve made many bags, but never
thought of making such interesting handles. My Christmas presents will be
special this year. Many thanks. Patricia
Your comment makes me very happy 🙂
I have always had a problem with handles – this will be a great thing for my future bag making. Thank you, And I love the twisted look!
Your timing is unreal! I was JUST looking for a tutorial on making twisted bag handles! Thank you Thank you Thank you !!!!
You are most welcome Shirley:)
Great idea! I love the cord wrapped end!
I found a way to make these without the inner cording. Dampen natural fabric (scraps from an old cotton sheet is what I used). Twist the scraps tightly in one direction (clockwise for example) then twist those twists around each other the other direction, makeing sure to keep the original twists tight. Use a hair dryer to dry them and they stay in the twisted shape.
I had wanted to use this actual tutuorial but didn’t have any available cording. I tried doing it dry but it didn’t keep it’s shape. It’s the wetting/heating that made it work.
Then I used it on a tote bag that I gave to a friend.
Thank you for all the tutorials you have for us. They are very much appreciated!
thank you so very much for everything you give to your fans
You are most welcome Donna 🙂 it is a pleasure to share with you!
THOUGHT I WAS THE ONLY DILL WHO SEWS THROUGH THE NIGHT, I LOVE THE NO INTERUPTIONS OF A NIGHT ON THE MACHINES.LOL
Nope girl still burning the candle at night, find it blissful to sit and work when the house is quiet 🙂
top notch for sure
hat is waxed cotton where do I get it?
Hi mary, try google for your region. I am looking for some as well for a park like jacket.
Preciosos todos los trabajos, bendiciones
Mil gracias Flor! Saludos desde Singapore
Thanks Suzan for sharing your method of turning fabric tubes. I always hated pulling the cord through the fabric. it often twisted and took so much time to do. I will definitely give your method a try.
Having lived in Italy for a couple of years, I can sympathize with the fact that the greatest majority of folks are good, honorable people. Sadly, there’s still the chance of becoming a “pickpocket target” virtually wherever we go. One trick popular among purse thieves is to slash handles of purses and take the whole bag on the fly. My question (finally) is: Instead of the cord, would you consider using picture hanging wire, chain, any strong but small diameter metal center support system? It could not be cut, adding to the security of your bag.
Hi Kathy, we’ve actually been working on something like that for a future design. Please stay tuned!
I have not done it (yet), but it occurs to me that using nylon-coated jewellery threading wire (like Beadalon flexible wire) might be a good move alongside the cord – flexible yet almost impossible to cut. Looking forward to making this bag. Thank you for yet another fab pattern. Judy M
Please when you do make it load it in my projects folder at Craftsy, so others can benefit from your idea. Thanks for sharing.
So here’s another question: Wonder what happens when the pickpocket hits your bag? How fast can you punch him?!!! I had a friend who formerly lived in New York City who had her salary grabbed from the inside of a book in her purse as she exited a check cashing booth! She didn’t discover it until she got back to her apartment! While telling her friends, they all sympathized but said it had happened to “everyone” who lived in NYC at some time or another… That’s what scares a little girl from Artesia, New Mexico…
Just a question to suzannprincess, if you’re sewing the whole piece of cording in your fabric tube, don’t you pull it out of the fabric tube while turning the fabric tube right side out? OR… are you only putting a small length inside of fabric, sewing then turning? I’m having a hard time visualizing this. May have to go try it.
use a length of cord twice as long as tube
is there a pdf of this tutorial? I would like to print it as I don’t have internet where I sew… am I missing it somewhere? thank you in advance!
Hi, there will be a pdf in a week or so. We usually don’t have time to do both the site and the PDF for the initial launch. When it is ready, we’ll post to Craftsy. If you put the pattern in your Craftsy account now, I think it will notify you if there is an update which will happen when we post the PDF.
I’ve learned another method that makes turning fabric tubes easier for me. Allow an extra 1/2″ of fabric length and enough extra cord to hang on to while pulling on it. When sewing your tube together place the cord inside, tucked tight to the fold; sew a 1/4″ seam across the end to attach the cord; sew the side seam being sure to not stitch into the cord. Now just pull the cord through the tube, trim 1/4″ off the sewn end to get rid of the bulk, and there’s your filled tube! If you want an unfilled, flat tube, just remove the cord entirely. I’ve even made spaghetti straps this way, when a safety pin big enough to hand on to would be too large to pass through the tube.
Hi Suzan, thanks for sharing. Sounds interesting!
Check out my question under Judy……..
this is the method i always use. easy and always successful. no aggravation on pushing anything through’
I really enjoyed this article and they turned out great! I can think of another use. A custom dog leash and collar. Can’t wait for the bag.
Agreed. That would indeed be another good use of this technique. Thanks for sharing!