


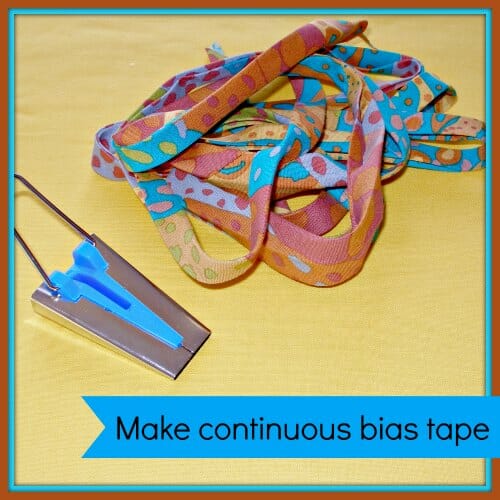
I was so inspired by some of the projects shared as part of the Seasonal Sewing Series back last November that I have been keen to try my hand at lots of non-clothing sewing projects. On my list for this month – sewing for the kitchen and I wanted to make some swanky potholders. Oh no, they need bias binding, and I've never made or even used it before. So here's my first attempt at making continuous bias binding tape – shared for you all to enjoy or laugh at, depending on how it turns out!
Materials
You will need:
- A square of cotton fabric
- A ruler and Fabric Marker
- Scissors
- An iron
- Optional but highly recommended – a Clover Bias Tape Maker
Two ways to make bias binding
It seems there are two main ways to make bias binding strips.
- Cut lots of individual strips of fabric on the bias. Discard all the edge pieces which are too short. Sew the lot together individually to make one long strip. (Nah, sounds like too much little fiddly stuff.)
- Turn a large square of fabric into one long strip and avoid the fiddly stuff with very little waste. (Sounds like my favorite option.)
If you want to have a go at option 1, then you will find some really good tutorials on the So Sew Easy Sewing Tutorials Group Board. Not a member yet ? – you should be! It's the best place to pin all of your favorite sewing tutorials and find new ones. Read about it here and let me know if you want to join.
Making Continuous Bias Binding Tape
We need to start with a square of fabric. Make sure to cut it accurately. Later on, I'll be sharing a table and a spreadsheet calculator which will show how much you can make from a square of any size, or how big a square you need for any length. For now, I'm using an 11 inch square of cotton.
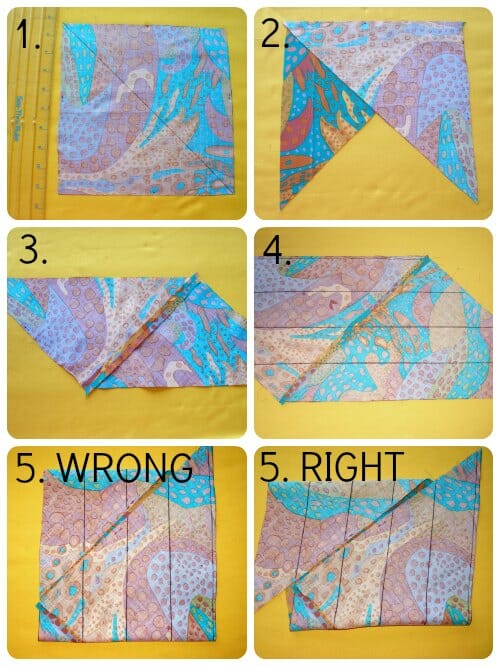
1. Mark with your fabric marker just some little dots on the wrong side on opposite edges, 1 dot on two sides and 2 dots on the other sides. This will help us line up the right edges later on. Draw a line across the diagonal from one corner to the other then cut along this line to make two triangles.
2. Place the triangles right sides together, matching up the sides with the single dot. Sew with a 1/4 inch seam.
3. Open out and press the seam flat. You now have a funny shape called a parallelogram.
4. Starting at one of the long edges, draw lines right across the fabric. I want to make double fold 1/2 inch finished tape so I am cutting my lines 2 inches wide. 2 inches folded in half twice = 1/2 inch. You'll probably end up with some extra fabric at the top that doesn't make a full row. That's OK.
5. Now comes the tricky part. It's time to sew the sides together that have the two dots we marked earlier. BUT – they don't go together evenly. If you sew them together evenly you'll end up with rings of fabric, not one long strip. So you need to OFFSET the rows by one.
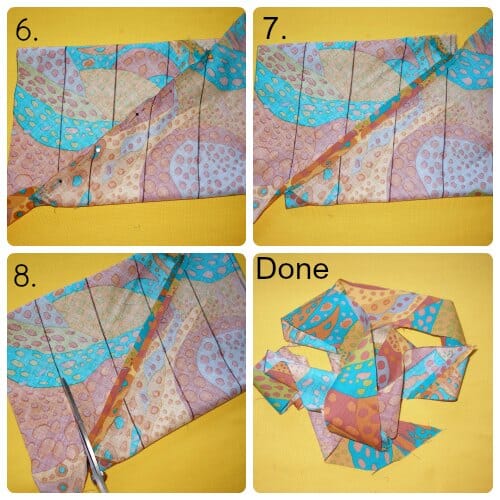
6. We are going to sew with a 1/4 inch seam again, so to line up accurately, I stuck a pin through the FIRST line at 1/4 inch from the raw edge. Then I stuck the same pin through the SECOND line on the other edge of the fabric, 1/4 inch in from the raw edge. Once these were matched, I could pin all the way along.
7. It's going to look rather odd, with a spare bit of fabric hanging off either end, but it's all going to work out well in the end so stick with it. Sew these two edges together with a 1/4 inch seam, then press this seam open.
8. Now it's time to cut. Start at one edge and cut along the line you drew earlier. As you continue to cut, you'll see that you don't come to the edge of the fabric, you just keep on and on cutting in one long spiral, until eventually you get right to the other side of the fabric and have cut a big long strip 2 inches wide. Magic, and no fiddly sewing of little bits together.
Turning the strip into bias tape
There are basically two methods for turning your long strip of fabric into usable bias tape:
- Fold it all very slowly and meticulously by hand as you iron. (Boring, with burnt fingers)
- Spend a few dollars on a handy bias tape making tool and actually have fun doing it in super quick time. (Guess which one I went with!)
If you don't have a bias tape maker, then the procedure would be to fold your fabric in half all the way along and press. Then open out, fold in the edges towards the center, fold in half and press again. Laborious if you have a lot of length, but it can be done with good results.
With the Swanky Clover Bias Tape Maker, it's actually fun and really fast. I bought the 1 inch size – careful when you buy the tape maker because the sizes can be rather confusing. The 1 inch size takes 2 inch wide strips and makes 1/2 inch wide double fold tape. Confusing right?
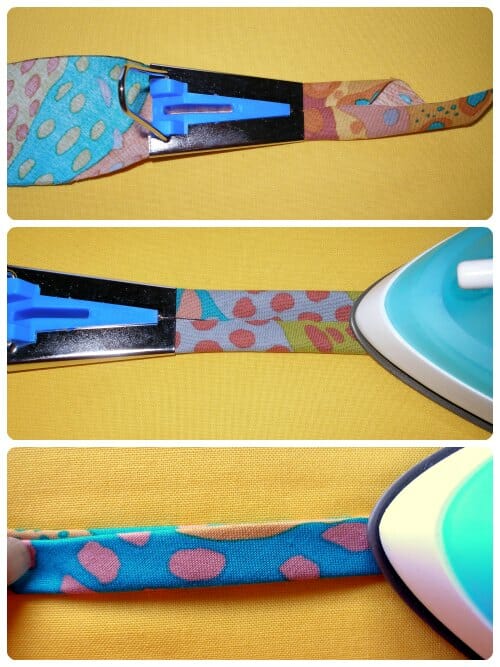
Simply take one end of your tape and feed it wrong side facing up into the wide end. I used a pin to help feed it through to get it started. Then you can pin the end to your ironing board, gently pull the little handle and press with your iron when the neatly folded tape comes out the end. Eventually I got fed up with repositioning the pin, and I just pushed the maker along the ironing board with the tip of my iron slowly and this worked just fine too.
Once you have the neatly folded tape, now you can fold in half again and press to make the double folded tape. Traditional bias binding is usually a fraction wider on one side than the other, so you can make yours this way too by folding the top over so it doesn't quite meet the edge on the bottom. And voila! Your own cute home made bias binding.
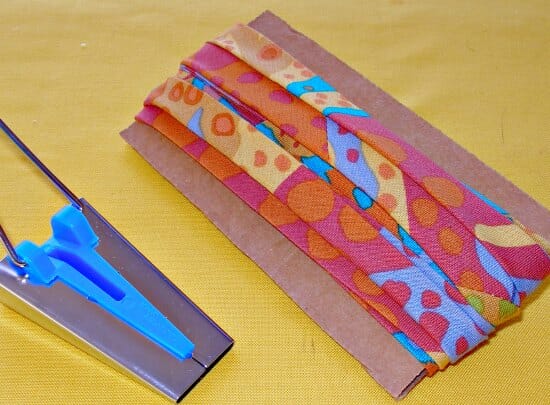
Wrap it up neatly on a piece of thick cardboard and pin in place and it will be ready to use. I've got so many ideas for how I might use this tape and I went a bit crazy and made yards and yards all in different fabrics. It was really quite fun.
Have you ever made your own continuous bias binding? What do you use it for? Share a link to your projects in the comments…


I was just about to start cutting long diagonals when I thought “there must be a better way to do this!” and googled. Yours was the top result and well deserved too! Thank you so much for this tutorial. You have just changed my life!!
Just started looking at your site, the information that I am learning is fantastic.
I downloaded your pattern for the beach dress and I am going to make it tomorrow. I also looked up your tutorial on continuous bias binding tape, great information on how to make it the quick and easy way.
I am also a beginner at quilting and will try some of your patterns. Do you have a favorite one,
Thanks so much,
Donna
HI Donna, most of the quilting patterns in this site are from contributor writers, I am not a quilter (I wish I had the time). But I love the kind that looks like artwork and can be hung on the wall.
Thank you for such a great tutorial! I found something that really helped me. I have a piece of 2″ X 4″ wood that I sanded smooth and use as sort of a clapper. I have found that as I pull the binding out of the tape maker I press (up and down) with the iron then promptly put the block of wood down. It holds the folds in place so much better. It only takes a few seconds. I just keep moving the iron then the block as I progress through the fabric.
Thank you so much for sharing. The bias tape pattern you shared was great!!
Thank you again
Dev
My mom showed me this trick when I was first starting to sew.
My 7th grade home ec teacher gave me bad grades on making bias binding because I didn’t use the official school method (which was cut long diagonals and then seam), I used my mom’s way.
Homai… i can spend a whole day reading your page. From 1 link after another. Your page is really addicted. LOL! now only i realized ,it’s already night!! There goes my sewing project for today.. LOL
Oh my goodness you’re a genius! I’ve just come here from watching your Roundabout bag tutorial on Youtube. I was going to just make my bias tape using the 1st method you mentioned, but I’m so glad that I discovered your second method! I’m off to practice it right now 😀
[…] a really good tutorial I found on how to make “continuous bias binding” from a single square, rather than cutting and sewing strips. It’s a bit of a mind bender at […]
[…] Next we’ll be finishing the neckline with bias tape. You can either buy a narrow bias tape (16mm would work really well) from your local haberdashery, or you can make your own (like us!) from offcuts of your monochrome dabs fabric. There’s a great DIY bias tape tutorial here. […]
[…] with an offset in the strips. This allows to create one continuous strip. More details on this step here (step […]
FINALLY!! Someone to show me how to do this AGAIN! Over 20 years ago an old boyfriend’s Mom showed me how to do this. She was a professional upholsterer. As with along things it seems – use it or lose it. Well, I definitely didn’t use it enough to remember it. Now I can stop sewing all those bias strips together. Thank you!!
You’re welcome Cathy. Please enjoy!
Fantastic. I had to make load of bias binding to edge a jacket. The straightforward instructions made it so much easer than cutting and stitching lots of strips. Thank you so much!
where is the calculator for estimating the amount of fabric you will need?
Hi Lois, the calculator is here: https://so-sew-easy.com/continuous-bias-binding-calculator/
Great instructions, followed exactly and have almost 4 yards of 1/2″ binding from a 17″ square. The only problem is that it isn’t bias. I know this for sure because I am working with striped ticking, and there are no diagonals. Did I do something wrong?
Hi Joanna, The stripes are confusing. I can only imagine your frustration. I am guessing it had to do with steps 1-3, where you are left with a parallelogram and how you draw the stripes. Try again and pay special attention on what way you are placing the print. Once you have done step 3 draw the lines and stretch with your hands across the points (longest side) of the parallelogram if it does not give and the stripes are not on a bias, you won’t have a bias tape.
I laughed at you. And then I did the same thing. The secret is in which two edges you sew together, after cutting the triangles.
Works for cutting piping cord cover fabric too!
You’re a genius! Thank you for sharing your brain!!
I absolutely love this!! Can’t wait to pick up the binding folder gizmo.
Thanks so much!!
I had made bias binding tape in the past but without the tool. Man, that was tedious and not fun.
I am making some mug rugs and found your tutorial. I ordered some binding makers from Amazon and followed your instructions. The tutorial was easy to follow with clear instructions! I actually had FUN making the bias tape from scraps.
Thank you for taking the time to put this tutorial together and posting it! We really appreciate it!
Thanks for the tutorial this was helpful- how can I email a photo of project?
Hi Debi – you can join us in the sewing chat group for sharing and inspiration, and load any project photos there. Come on over to https://www.facebook.com/groups/soseweasychat/
There are a lot of tutorials for this out there, but yours are the best! Thank you.
Hi Gina, You are very kind, thank you. I do try hard to make sure I get in everything that you might need to know.
I used this tutorial previously & it was great. But now I’m unable to locate the video that goes with it. Can you direct me please? Thank you!
Hi Jane, unfortunately, I don’t think we ever made a video about this one. We’ll put it on the list of ones to do in the future. I think it would be popular. Thanks for your comment.
Oh my god. How did I get to 60 years old and not discover this earlier! Thank you
so pumped to find this tutorial and the tool tip! got my tool ordered and can’t wait to get it! so looking forward to following this site.
Wow! All I can say, is this is a whole lot easier than when I tried to make my own bias tape so I had matching bias tape! Definitely going to remember this one. Thanks for sharing it.
I am still stuck at no 5 can’t seem to get any edges together help will keep fiddling though
Me too 🙁
Deby many thanks for the brilliant explanation, I have always bought the binding, but decided to have a go myself especially as I bought a set of bias making tools. Pam
Thanks so much for the tutorial. That one picture did it for me, picture 5, I understood, like the light went on and all the rest of the instructions fell right into place! Once you get your brain around this it’s really very simple and to think we pay money for this stuff when we can so easily do it ourselves. Thanks again!! 🙂
Thank you for really great directions.
Thank you so much! i took a FQ, and cut it into a 17″ square, and ended up with approx. 114″ of 2″ bias binding! Needed it for a Christmas wall hanging!
Really great tutorial – Thank you!!
wow. thanks. its like magic.
I had not heard of a Clover Bias Tape Maker. Where do you get them? I live in Australia and enjoy reading the various hints/tips.
I got mine online from Amazon. Sorry I’m not familiar with the Aussie online shopping options, but Clover is a worldwide brand I think so you can probably it, or the local equivalent in a good sewing shop, or big online store. Here is the link for Amazon so you can see what they look like -http://so-sew-easy-store.com/small-tools/clover-bias-tape-makers-package-includes-all-5-sizes
Jenny – you can buy bias makers ( May have a different brand name) from all Lincraft and Spotlight stores in Australia and many other stores selling sewing supplies. They are available in several different widths.
Thank you so much. I could not find them in either store however I have now found them ‘on line’ and purchased one from Punch with Judy at The Rock in NSW Australia. A great lady and so very helpful. I do thank you again for your time.
I actually bought one of these tools the other week because of this blog! I love it! I cannot believe how quickly I can make bias tape now, i have been gifted a smaller one too that will be handy for edging some bibs I am making. Thank you again for your tutorials, they are always so clear and helpful! I am on the look out for some “bloke” fabric so i can make a woven cushion for my hubby. Another brilliant tutorial!
PS, I have completed your survey too x
Thank you so much Sharon. I’m really glad that you have found some useful things here. I’d love to see your bloke pillow – do send in a photo once its done.
Thank you! I knew about this method but didn’t know exactly how to do it, especially the “tricky part.” Now I know and have confidence that I can do it. Have to get a bias tape making tool next!
Great tutorial! Thank you!
Very clear tutorial. Thank you for the great photos and instructions.
I’ll be coming back to your tut next time I need custom seam binding for sure.
AWESOME!
Thanks for posting this – always great to see things done another way. I use the rectangle method also, so was glad to see Kristine’s version above – that eliminates a lot of extra seams in the finished binding, too. My instructions came out of the Reader’s Digest Sewing Guide, from the late 70’s. It was my sewing bible in my early years, and still a great go-to resource!
for those of us that are a bit slow or really really new to sewing a video would be nice because honestly, this still left me confused. I am not lucky enough to have any sewing people in my family.
Good suggestion Sherry. I’ll add it to my (ever expanding) to-do list and make a video to go with this post.
Thank you for this tutorial. I’ve never made bias tape I should give it a try, it sounds pretty easy. Pinned!
Marti
My mother shared this technique with me years ago and you are right, it is so much less fiddling around and waste. I would add that you don’t have to use a square of fabric, you can use any rectangle, as well. I sometimes need a certain amount for a quilt edge or such and you can use as large a piece of fabric as you need to get your binding length. If you use a rectangle, picture that your image #1 extends down by another 12 inches or so. You would still fold your right top corner down to the left edge to find your 45 degree bias cut. Then simply lift that top triangle straight up and move it to the bottom, so that what was the top edge is now aligned with the bottom edge. That becomes your seam. Then proceed to mark your widths. I hope this is a helpful add on to your great tip. Sew on and sew forth! Kristine
Kristine, thank you for your added information. I too was shown this method many years ago but I had forgotten so Deby’s tutorial was awesome. I’m wanting to make binding for a double wedding ring quilt which was hand pieced by a lady 89 years ago. Because of a family tragedy, she put it away. Now, her granddaughter is a friend of mine (we’re in our 70s) and I have quilted it for her and now I need to make a bias binding. Can I just mark the lines 2.5″ wide?
Gabi
I want to know this question too
THANK YOU so much for this tutorial.
that i will definetly try cant wait Jean