


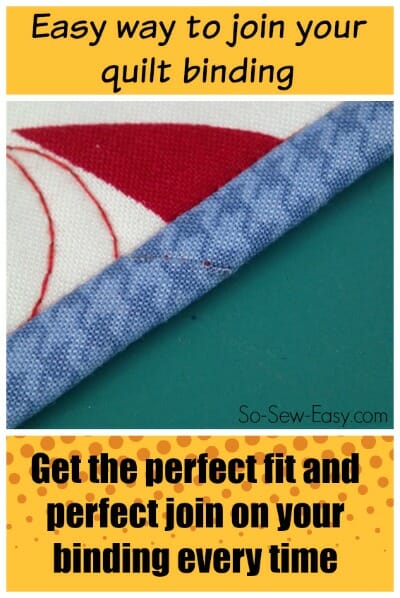
I know that for many of us, sewing on binding is our least favorite part of a project. It usually comes at the end after all the other hard work and investment, and is a very visible part of the end result. If it doesn't look good, then it can leave you feeling let down 🙁
I've recently been practicing my binding skills and especially this week practicing on how to join the two ends of the binding at the start and finish, where they meet. I don't know what I was doing wrong, but I just couldn't get it right. It was always wonky somehow, or I'd measure what I thought was the correct amount but then it would end up just that little bit too long and I'd get puckers trying to make it fit. Arggh. Frustrating. Until the lovely Lucy from Granny Sassy Designs, my quilting mentor showed me the solution to all my binding joining worries. She makes it look so easy and – it is! I hope I can explain it properly.
How to join quilt binding
Let's pretend that this is a quilt, mug rug, wall hanging or some other kind of project I've been working on that needs binding around the edge. You will need to make sure you have plenty of length to your binding, and ideally, at least 10 inches extra length in addition to the edge to be bound. Here I'm just working on a practice piece for ease.
Cut your straight cut binding strips. I'm using 2.5-inch wide binding, folded in half to make it 1 and 1/4th inches wide. I find this works nicely with a 3/8th of an inch seam. If you have a very thick batting you may need to allow a little extra in your strip width for that thickness – test it and see or move your needle to get the seam allowance just right.
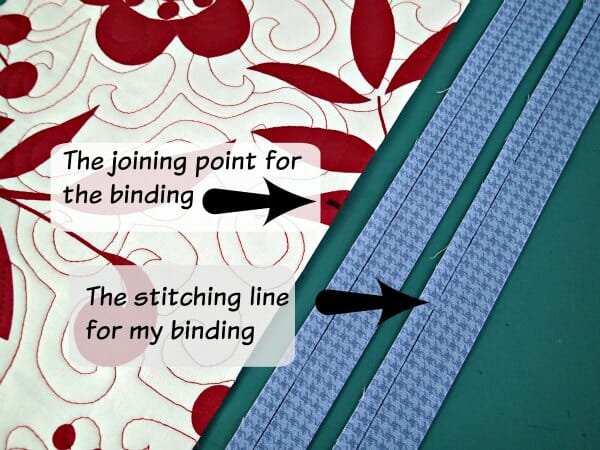
First, decide where the approximate join is going to be. If it's pretty invisible that shouldn't matter too much, but don't make it too close to a corner because you'll need space to work. I've marked my join point with a Sharpie so you can see it.
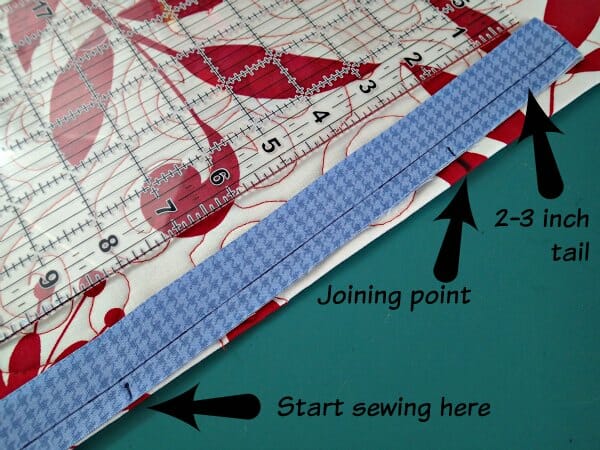
Leave enough of a tail to cover that mark plus about 2-3 inches and then start sewing about 6 inches away from the join mark. Sew on your binding with the 3/8th of an inch seam (or whatever you have chosen for your project), and complete all the way around until you get to the final side again. (See this earlier article on how to turn corners with binding.)
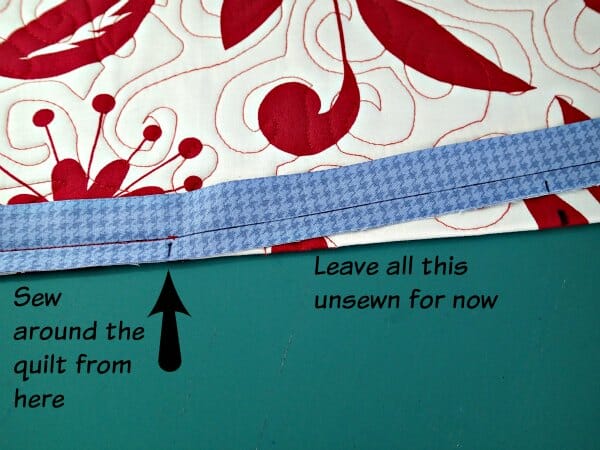
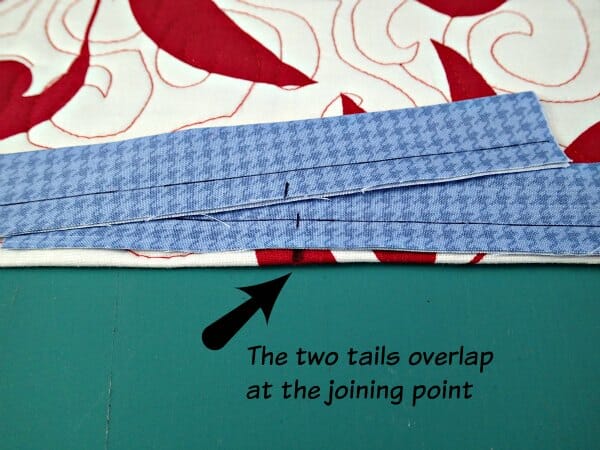
As you approach your joining point from the other side, stop sewing about 6 inches away and make sure you have enough binding left over to go past your joining point by another 2-3 inches.

Snip off the extra binding. If you smooth your binding out now, both ends should overlap and go 2-3 inches past the joining point.
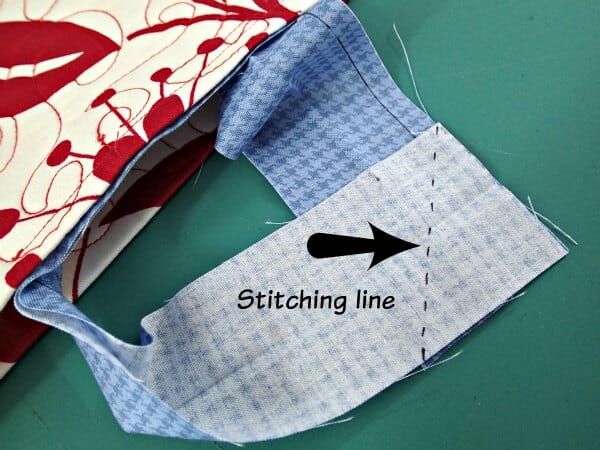
Take some of the extra binding that you have snipped off and open it out to the full 2.5 inches wide. Line up the binding over the join point so the center crease in the binding is right over your join point.
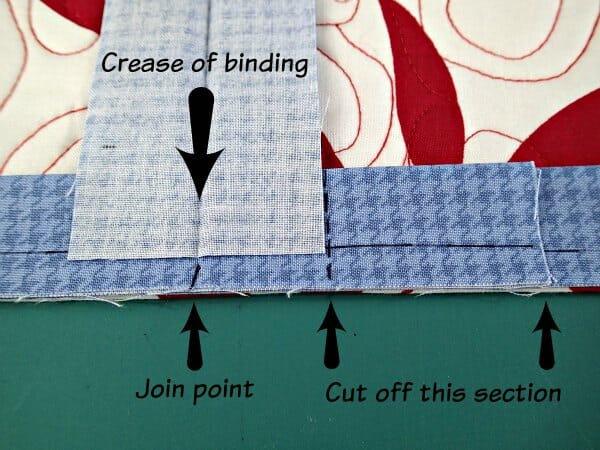
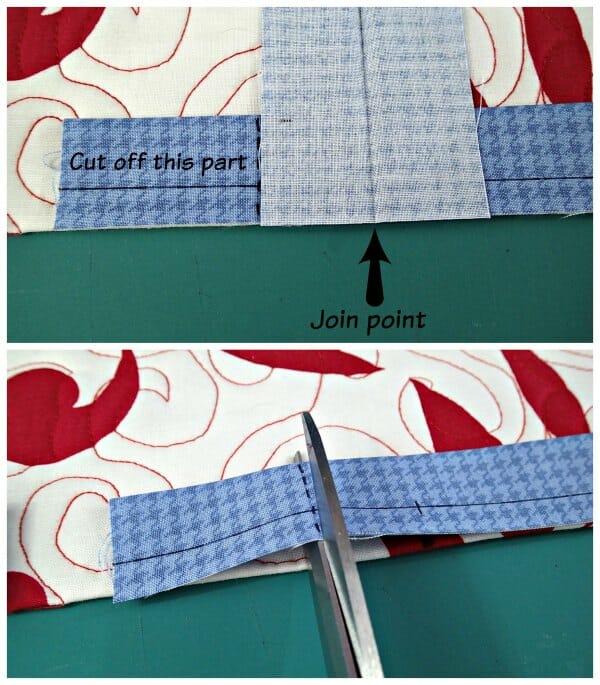
Mark the top piece of binding on the side away from the stitching, and cut off any extra. Fold this piece of binding out of the way now, this is cut to the right length.
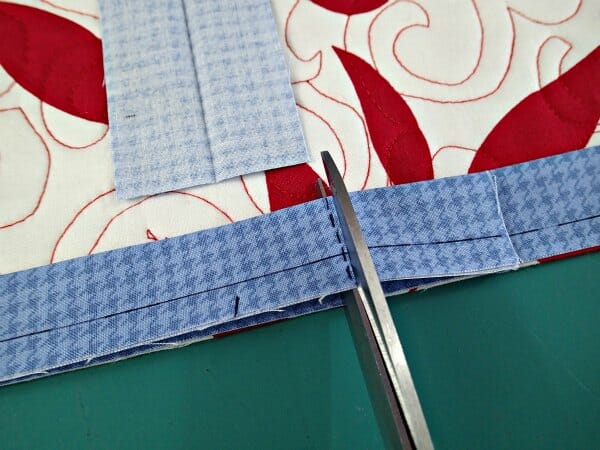
Mark the lower piece of binding on the side opposite to the stitching and cut off the extra. Now if you overlap the two binding pieces they should exactly overlap the same width as the binding strip. Double check that. Good.
Time to join the two pieces. Fold the quilt in half at the join point to give yourself some working space. Place the two pieces of binding right sides together at a 90-degree angle, matching up the ends nice and square like this. Add a couple of pins if you need to.
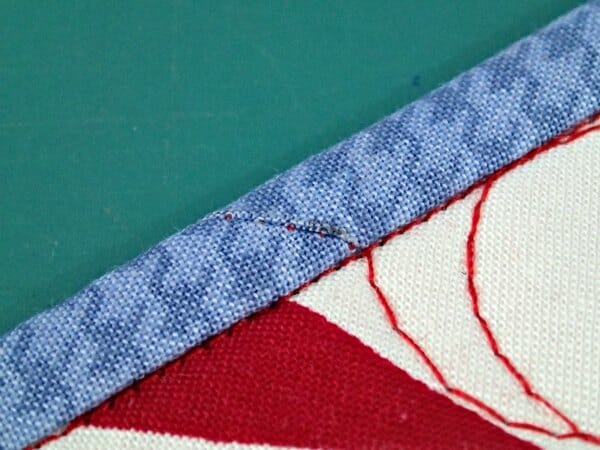
Then sew from the one corner to the other through both layers. To double check which direction to sew, the point should be on the right of your needle and the quilt will be on the left. Open out to check you've done it correctly and if you are happy, cut off the excess fabric leaving a 1/4 inch seam. Press the seam open – finger pressing should be fine.

Fold the binding back in half, smooth it out even with the edge of your quilt and sew the gap between the two points of stitching. Your binding should fit in there exactly – like magic!

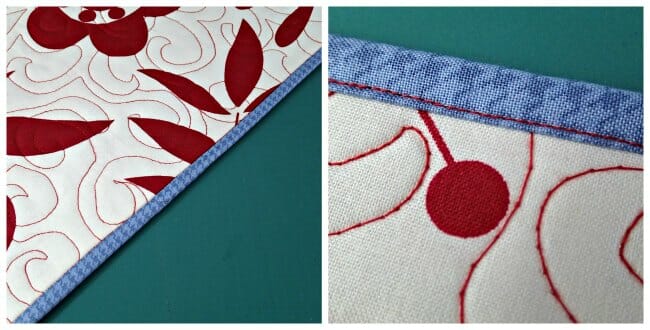
Now you can turn the binding over to the other side and finish, and you'll barely be able to see the join. Obviously use matching thread, not the contrasting thread I used for this example.
I stitched in the ditch from the front and caught the back of the binding evenly on the reverse. The join is nice and smooth, the binding fitted perfectly with no puckers. Easy when you know how!
More useful binding articles for you:
- Binding calculator – how much fabric do you need to create a certain length and width of bias tape?

- Pinterest feature – some of my favorite bias and binding pins


Thank you so much for this tutorial. I was almost in tears yesterday trying to follow another set of instructions and just couldn’t get it. My husband says I have no spatial concept skills. This made sense to me!
THANK YOU!!!!!!!!!!!!!!
Thank you for a wonderful easy to follow tutorial! The contrasting colors of fabric made it easy to see what you were doing.
I’d love for you to do one on turning corners that way. The one you mentioned has too similar fabrics and colors and it is hard to make out for a novice like me.
Thank you!!
Thank you so much for the very clear instructions and pictures for how to join the quilt binding. It makes it easy to refer to the instructions as many times as needed (in my case, many). Videos go too fast to follow and hard to go back up. Many, many thanks! Karen Wales, Flatwoods, Kentucky
I’m a beginner and I have written down and drawn pictures of all if these instructions. Going to practice first on a scrap square. Thank you so much for the detailed instructions and pictures. I am a very visual learner so yours is the best instructions I have seen. God Bless!
Off to practice! ?
Got it! I need to practice patience!
Oh my soul!! I just went for it! I was using store bought extra wide double fold bias and carefully studied your pictures and instructions. Then I used center fold to mark for cuttings on each end. After sewing it together I checked it and it was perfect. So just so you know it works for bought binding too. I am amazed! Thank you so much for sharing this tutorial! ?
Is it horrible to say that I think I love you? I’ve never been able to do this join neatly & this set of instructions was so easy! Thank you so very much!
When sewing with striped or like this small houndstooth in the pictures, follow the stripe or pattern even if it is not exactly on the grain of the fabric. I learned this at a Stretch and Sew class when they still had stores many years ago. Also, if sewing the length of a stripe, don’t try to sew between 2 stripes. Sew right on the stripe with matching, or a tad darker, thread. It will blend right in.
Happy Sewing to all you Sew and Sews!
Tried to print it and nowhere does it say print with a printer symbol! This method is so simple, love it, my battles with binding is now over! Many thanks Myra!!
Hi Tina, pls use the sharing buttons on the left of the screen. Choose the three dots and then “printfriendly”. It will create a nice .PDF that you can save or print.
Wow–loved the tutorial and this tip on how to save as a PDF!!!
When I select the 3 buttons on the left, nothing happens. Is it disabled?
Great tutorial. I have been doing it similar to this for quite a while now. thanks for getting the help out to all the people learn easier ways.
Best binding tutorial I’ve seen! Thank you!
Finally, a binding join technique I think I can wrap my head around. Now to finish something so I can practice this.
Thank you for sharing such great instructions and pictures. Bias tape has always been a dreaded part of some projects for me. I could never seem to get it right. This is soooooooooooo helpful!!!! 🙂
I go back to the nearest corner and make the join in the corner so it does not show. Tip thanks to my sister Alice.
Sylvia, I do just the opposite. I start on the side and end on the side so the corners are easier to miter.
This is brilliant! Do you think it would work for joining piping as well?
Very similar, just make sure one of the ends of the cord ends where the other begins and you will have a perfectly joined piping.
This is great! I’ve only sewn a couple small quilts, and had so much trouble with this part. I just butted the ends. This will help nicely! Now to practice on some mug rugs. Thank you!
Most welcome!
This is exactly the way I’ve been finishing my binding for the last year or so. Saw it on another blog BUT your instructions a MUCH clearer. Wish this was in a pdf so I could show my quilting buddies!
WOW….What an absolutely great way to apply the binding. I am pretty much a low intermediate when it comes to making quilts. I have made 6 quilts and have always freaked when it comes to the binding. I have a quilt from about a year ago and now I can get it bound and delivered to one of my Granddaughters and get going on another for the other Granddaughter. Thank you so much for the helping hand.
I use the binding foot which adjusts to many widths. It really helps as well.
Please just send to my email address
Thanks
I will add you to our email list.
Yay! Even I can do this. I can’t thank you enough for your tips and tutorials. Your avid fan
Cheryl Masters
So glad I came across this! You explained it so clearly. Thank you.
You are most welcome!
Fantastic tutorial and excellent photos. I always have trouble with finishing the binding nicely. I am very impressed with the result and it makes my quilt it looks very professional. I have used a pieced binding and there is no way to tell which were normal joins and which one was the one joining the binding together. I have saved the link for the future and will be passing on the information to my friends. Thanks a million.
Many thanks for great instructions and clear photos. I have been joining my bindings for years another way. This is much better, quicker and easier. Very grateful.
Been sewin for 60 years, quilting 40 of those. Never have I gotten such a perfect join…or I should say that I have always given up and used a “butt together” join. Iam soooooo happy!
I cut my binding 2″. Would I use that piece to cut the tails or use a 2.5 piece of fabric?
Thank you this is the worst part of making a quilt for me. You make it look so easy.
I can,t wait to try it! Thank you for the clarity of your instructions.
Very good tutorial! Thank you!
Absolutely the easiest, most practical binding join method! THANK you for the clear tutorial!
What an awful looking comment. I wish I could delete it and start again, I swear that’s auto correct and not me!
Hi Holly, I’ve made a few small corrections for you;).
Looks pretty easy peas! Can’t wait to give it a try on my next project! Thanks for an excellent tutorial!
Hi there I live in South Africa and am new to the art of quilting, I just love it! My quilting teacher has shown me various awkward ways to complete a binding but none as easy as this method…I will have to teach her how now?Thanks you so much for making my quilting journey even more enjoyable!?
Hi Marilyn, that’s terrific to hear. Thanks for the feedback and happy quilting!
How can I pin THIS tutorial? I love it! (I pinned a couple on your “pin link”.)
There are a full set of sharing buttons at the bottom of all of the articles so if you would like to pin, just hit the Pinterest sharing button that looks like a P and you should get the option to add it to your Pinterest boards.
Terrific tutorial! Thanks so much for de-mystifying how to do this! I’m printing this out and will use it on a quilt that’s been waiting for binding for months
Deby as always thank you for the awesome tutorial! I to have always struggled with joining binding, but i am sure with this trick it will get easier! Thank you!!
Thank you for this – great tutorial!
What a wonderful tutorial, clear and easy to follow. Thank you so much!
Great pictures and description! I’ve done it with a fancy “binding tool”, but the way you show it, no tool is needed.
My problem is that when I match up the ends and sew on the diagonal, I often end up with an extra twist. I’ve learned to pin baste the diagonal, and straighten it out, just to make sure it’s OK.
Thank you so much Deby for this tutorial on how to join the binding. I’m sewing a table runner out of ulphostery samples given to me by a store. This afternoon I was up to the point of joining my double bias tape. Lucky I am, your trick was there for me. At first I wasn’t sure if it would work the same with a double bias tape, but yes, I confirm, it worked very well. Thanks for your clear explanations and so important enhanced photos (with your little arrows)!