


I've been making a few throw pillows (cushions if you are British) just recently and been looking for ways to close the back so they are still easily accessible for removing the insert and washing the cover, but I don't have any long zips right now (and I admit I've not yet ever sewn a zipper into a pillow cover) so I was looking for alternatives.
A few ideas:
- Just step up and learn how to do it with a zipper (added to a future to-do list)
- Sew on buttons and buttonholes (I've got these skills mastered now I think)
- Use Velco, hook and loop tape (sticks to everything in the wash)
- Make an ‘envelope' back that just opens and overlaps (Like my woven fabric pillow and the Oliver the Owl nursery pillow)
- Just stuff and then sew the pillow closed and unpick when it needs washing (can't be bothered with that nonsense)
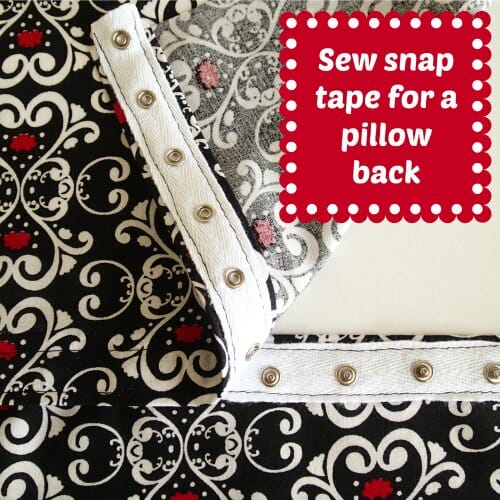
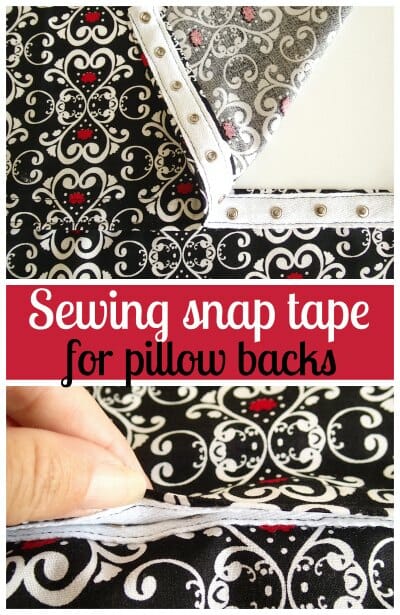
- Close it with snap tape.
I settled on the snap tape. I love to try out something new and actually I couldn't find much online about how to sew snap tape for a pillow cover, so I just improvised and it turned out very nicely. Very quick and simple, and if I had taken the time to match the pattern, almost invisible.
Materials used:
- Snap tape available from Amazon in black or white)
- Zipper foot
- Pillow back
- A little light-weight interfacing
A bit about snaps and snap tape
It's my first time working with this sort of thing so I had a look at the various versions of snaps and tapes around and it seems there are basically 4 types
- A long and thinner version of the snap tape with plastic snaps further apart (here), that might be used for something like making your own duvet cover.
- Plastic snaps designed for use in baby and children's clothing (here)
- Metal snaps that you sew on by hand, set with a tool, or bash with a hammer!
- Higher quality metal snaps, closer together on a wider tape, typically used in home decor. Perfect for my pillow cover.

I liked this version on Amazon because it fully metal and has a clean-looking ring on the side that shows. I preferred that over the one where the top of the snap is a flat circle which is what I used in the tutorial below.
However, when I actually sewed it, I hid the tape in the cushion cover anyway in this example so it didn't matter so much, but I like that I can easily feel where they are.
To close a pillow back with snap tape.
Decide where you want the opening. Right across the middle? Towards the top or bottom? Cut your pieces of fabric accordingly, allowing for the size of your finished pillow, plus seam allowances, plus an extra 2 inches or so on each of the two pieces for the tape overlap.
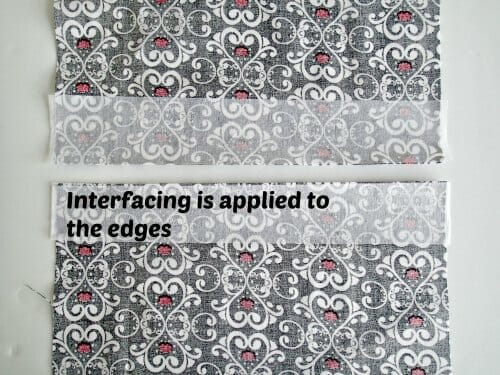
My fabric was a little flimsy and the tape is pretty robust and heavy with the snaps so I decided to add a little light interfacing to support the tape. I fused a 2-inch wide piece across the width of the opening on both pieces
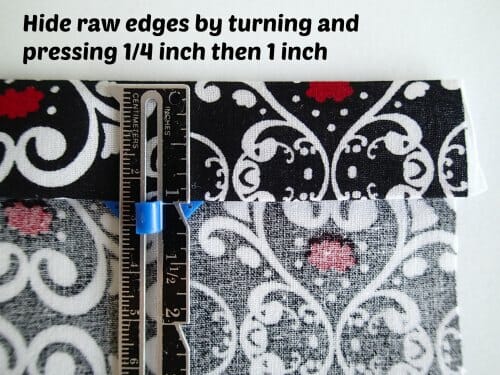
On the top piece, turn under 1/4 of an inch and press. Turn in another 1 inch and press. This forms the strip where our tape will sit.
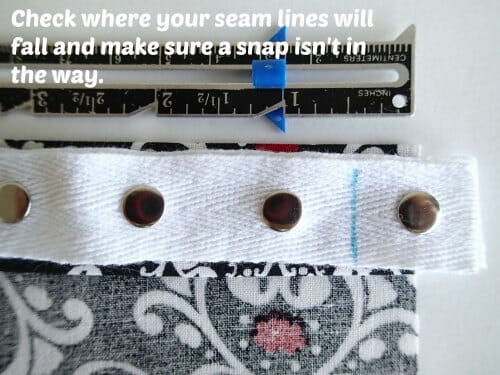
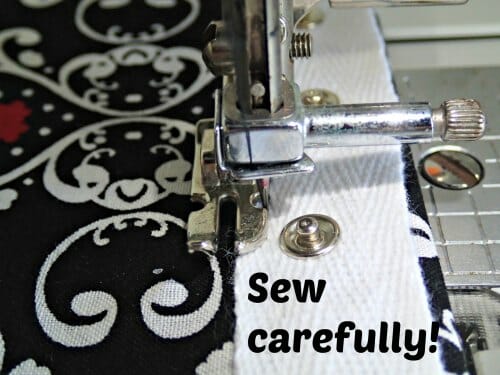
Put the zipper foot on your machine. Lay out the length of tape, and note where the snaps fall. You don't want to end up with a snap right on the point at each end where you want to sew your side seams later on, so make sure the snaps fall clear of the seam lines.
[If this simply cannot be avoided, cut off the tape short of the seam allowances, turn under the ends and sew the ends in place at the same time you sew the sides. ]
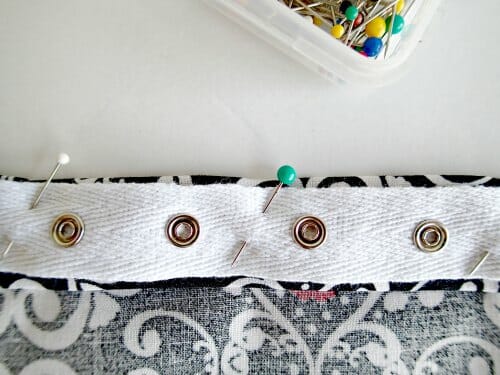
Use a little Wonder Tape to hold it in place, or some pins. Just a reminder – you want the domes of the snap facing towards the fabric, and the tape is on the underside of the opening.
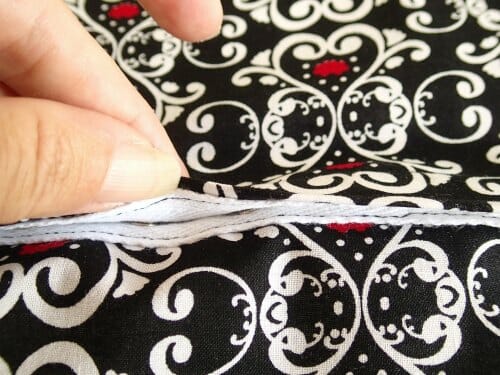
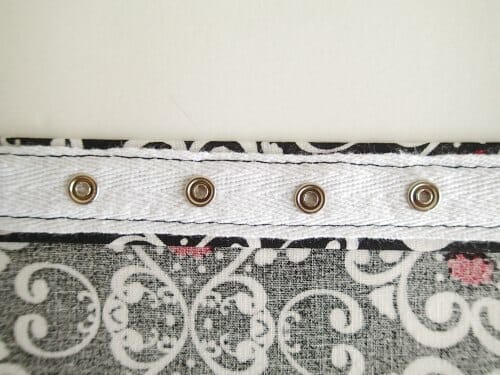
Sew along one side of the tape using your zipper foot. Try to sew neatly because the lines of stitching will show on the outside. Pick a suitable thread color to match your fabric.
Then sew along the other side, starting from the same direction to try to keep any wiggling and puckering of the tape to a minimum. The top piece is done
Repeat the pressing on the bottom piece, 1/4 inch and then an inch. Lay the tape in place, making sure to match the position of the snaps with the same position on the piece you just sewed, or they won't close when you are finished! For this second side, the snap tape goes on the right side of the fabric.
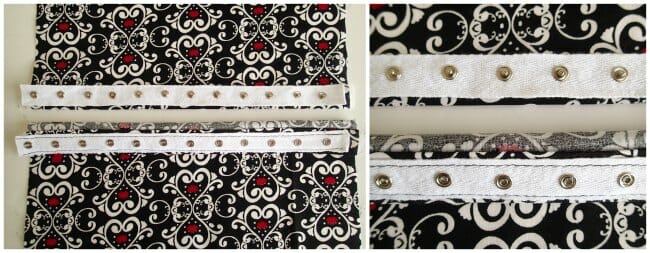
Stitch the tape in place as before.
If you have any snaps that fall within the seam allowance or too close to the seam line, sew the tape right to the ends and then use some small scissors to remove the snap that is too close to the seam line. Once the side seams are sewn, it shouldn't be a problem.
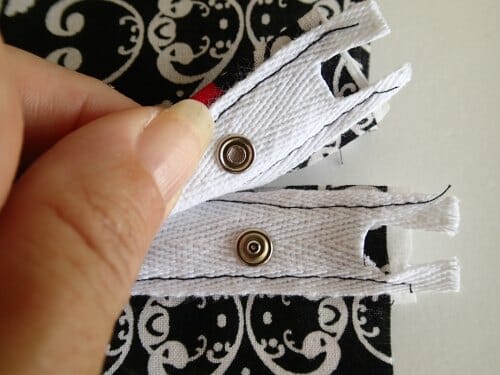
Now close up the snaps, trim to the correct size if needed, and your pillow back is ready to sew into your new cover. Great work!


Great idea. Did not know that product existed.
Another snag with zips is closing up the cushion cover with the zip closed and then finding you cannot open! Properly it should be an invisible zip sewn into the bottom edge seam just the same as you put an invisible zip into the back of a dress.
What a smart idea. I think I have some of that in my stash from ages ago. What a great way to use it. Thanks!
I am tickled to see this snap tape! I have a pillow that needs something to close it. This will be perfect! Thanks!
Neat idea, but wash the snap strip before sewing on fabric because it will shrink.
can you give me some advice? i have large pillows that serve as back cushions for outdoor furniture “but” they dont have any zippers like the seat cushions do. i would like to remove the fabric carefully, wash them in the machine then use your great idea on this page to make the covers easier to put on and off the filler.
but i dont know if i should unstich the seams or not? or maybe i should just take an exactor knife and cut a long slit near the bottom (instead of removing the machine stiching) and just sew the snap tape.
any suggestions, youtube or websites on the how-to would be great. thanks.
I think it would be best to unpick one of the seams. If you cut the fabric, you’ll end up with a raw edge that you’ll need to turn under, thereby making it too short to meet up again. Unpicking one of the side seams means there is already a seam allowance there to work with. You can then add in your snap tape or even velcro or a zipper. I have a tutorial for adding a zipper to a pillow cover coming up very shortly.
A few weeks ago I decided to make some pillow covers and decided to use snap tape. I found out that it’s very expensive – around $11 a yard. Even with a coupon off and for small pillows it wasn’t a very economical choice. I went with my back up plan – to use Velcro. I was skeptical about that but tried it on pillows we use often (my bedroom shams). The Velcro worked great and was much less expensive than snap tape. Just FYI for those who can’t find snap tape inexpensively.
Great idea to use snap tape for a pillow closure! I’ve got a Craft Gossip post scheduled for tomorrow morning that links to your tutorial:
http://sewing.craftgossip.com/tutorial-snap-tape-pillow-closure/2014/09/22/
–Anne
THank you, this is a very good alternative to zip.
It’s a great blog, very informative post. It’s so much easier to add snap tape to close a pillow back than adding snaps with a hammer.
Oh, so much easier than adding snaps with a hammer.
Hi Deby, I’ve featured your snap tape tutorial today…