


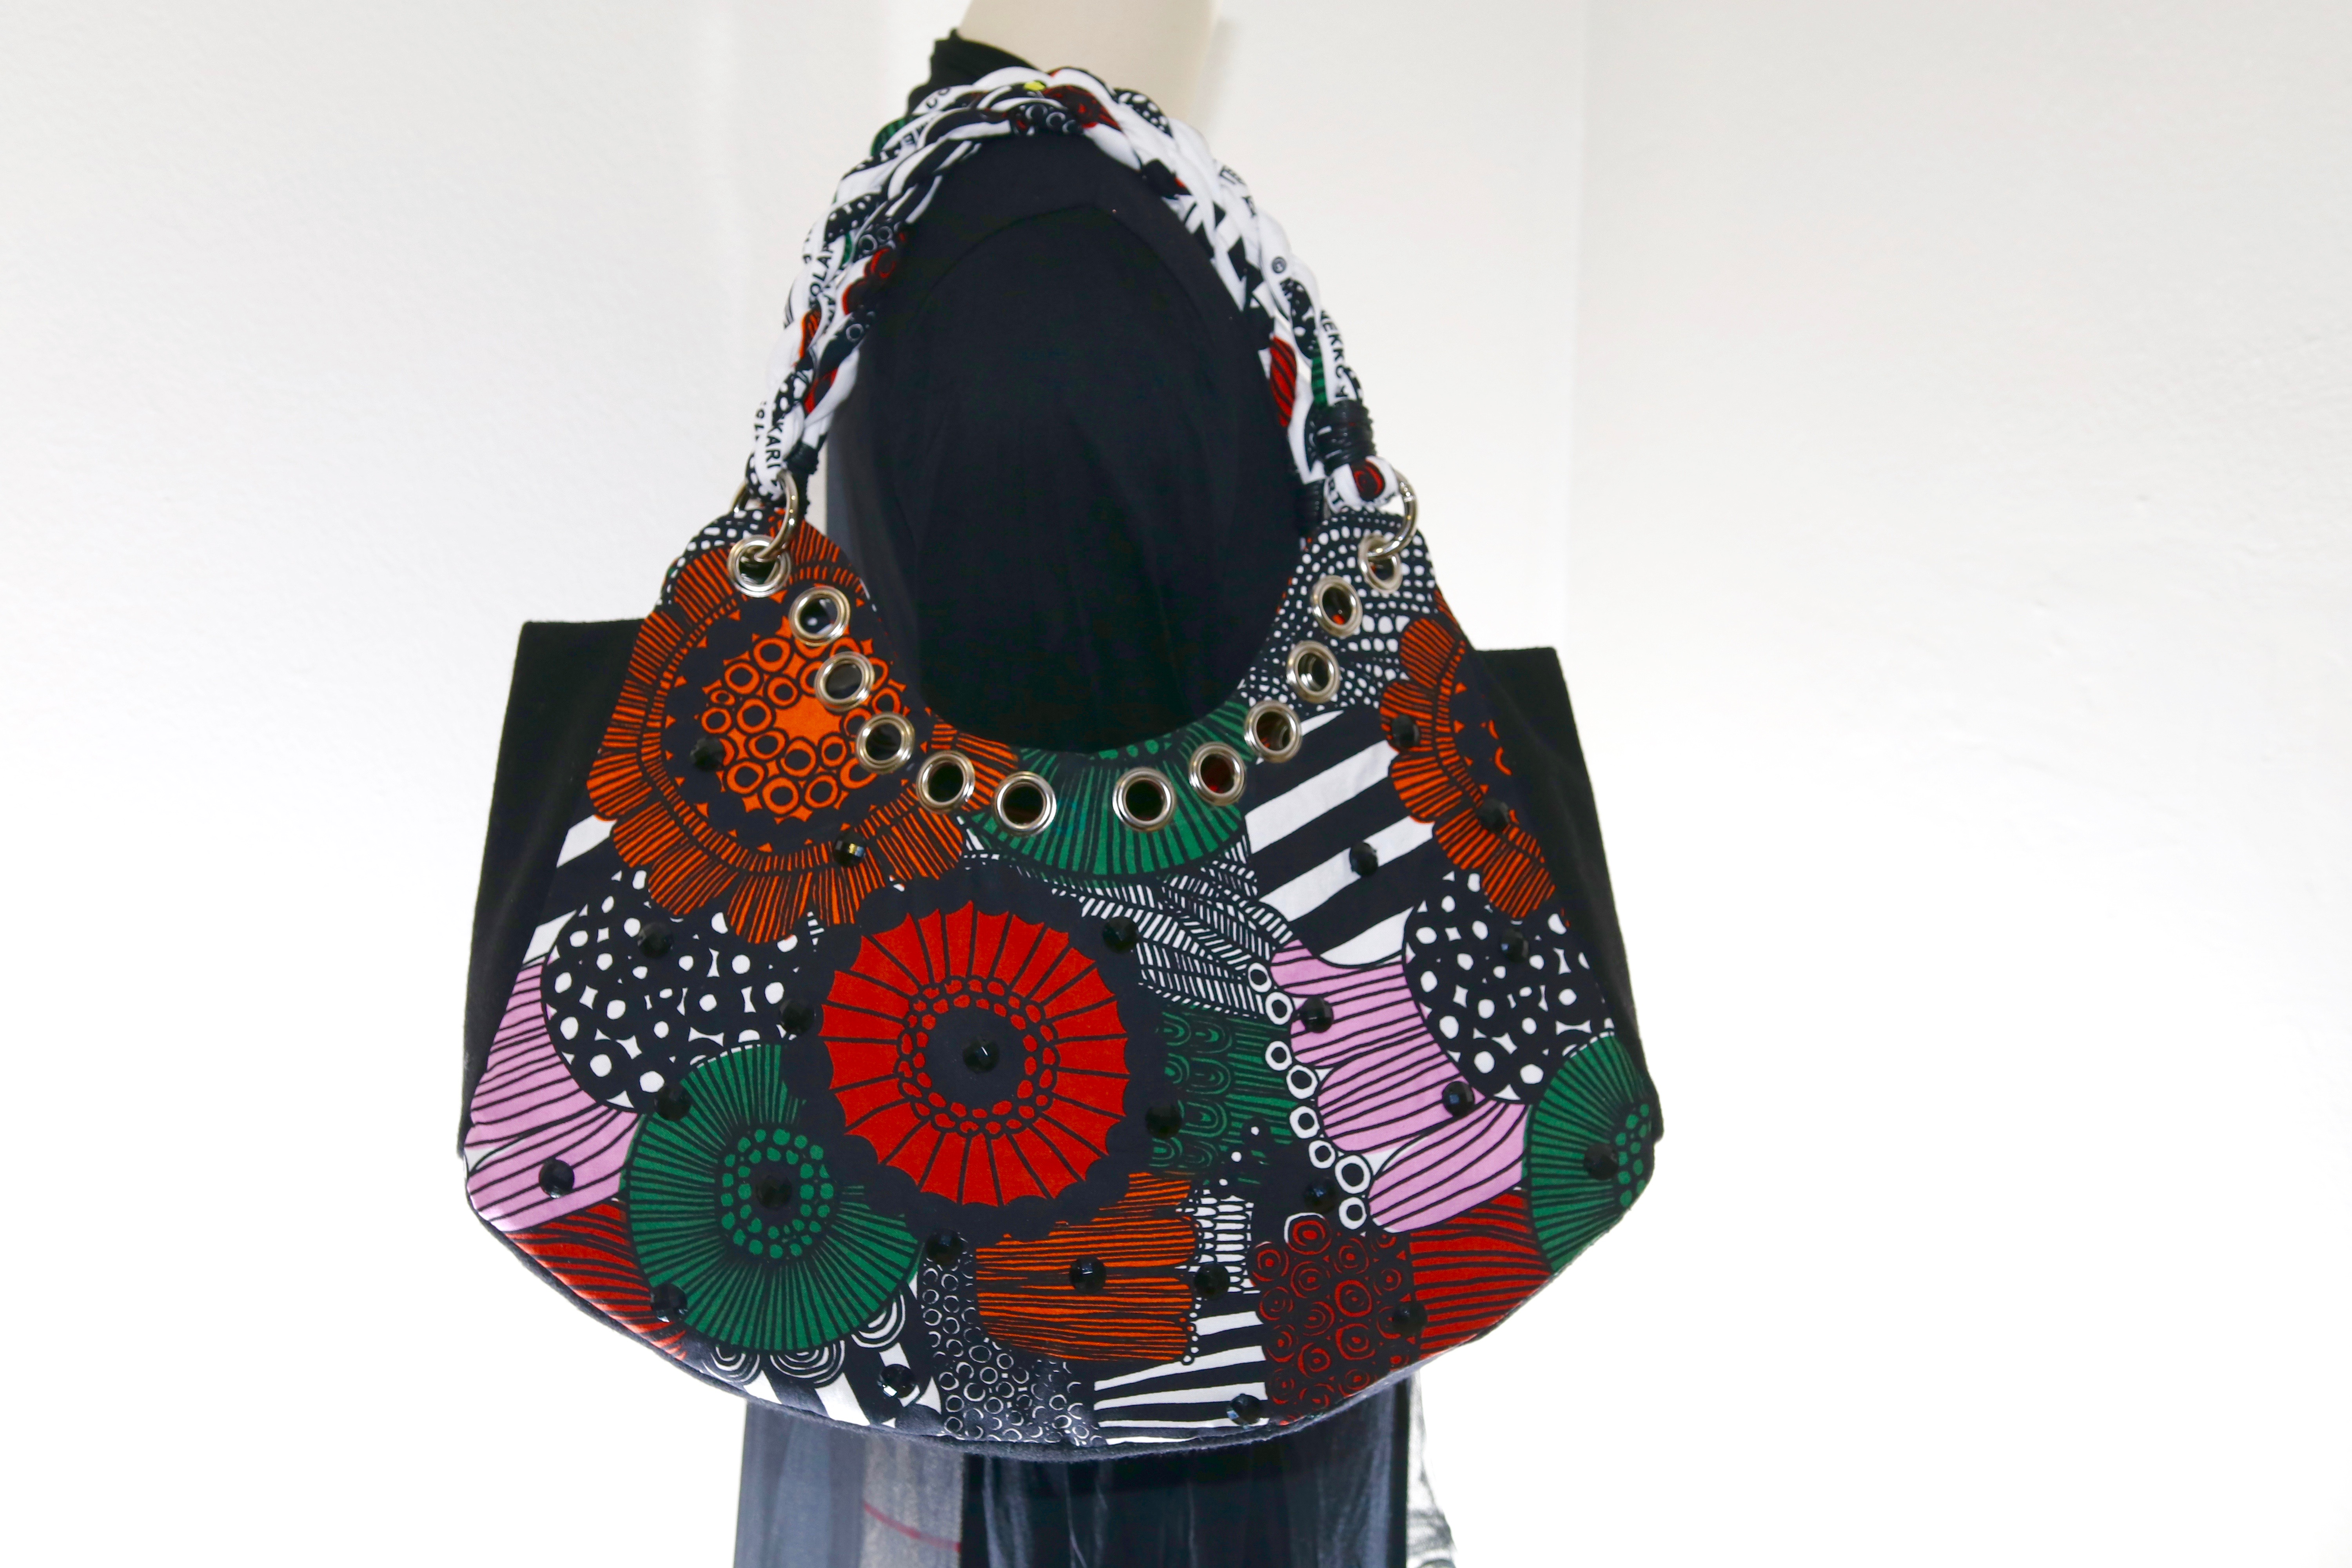
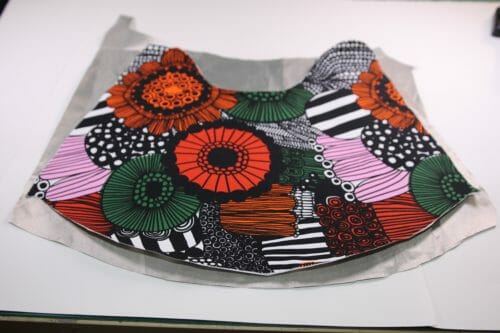
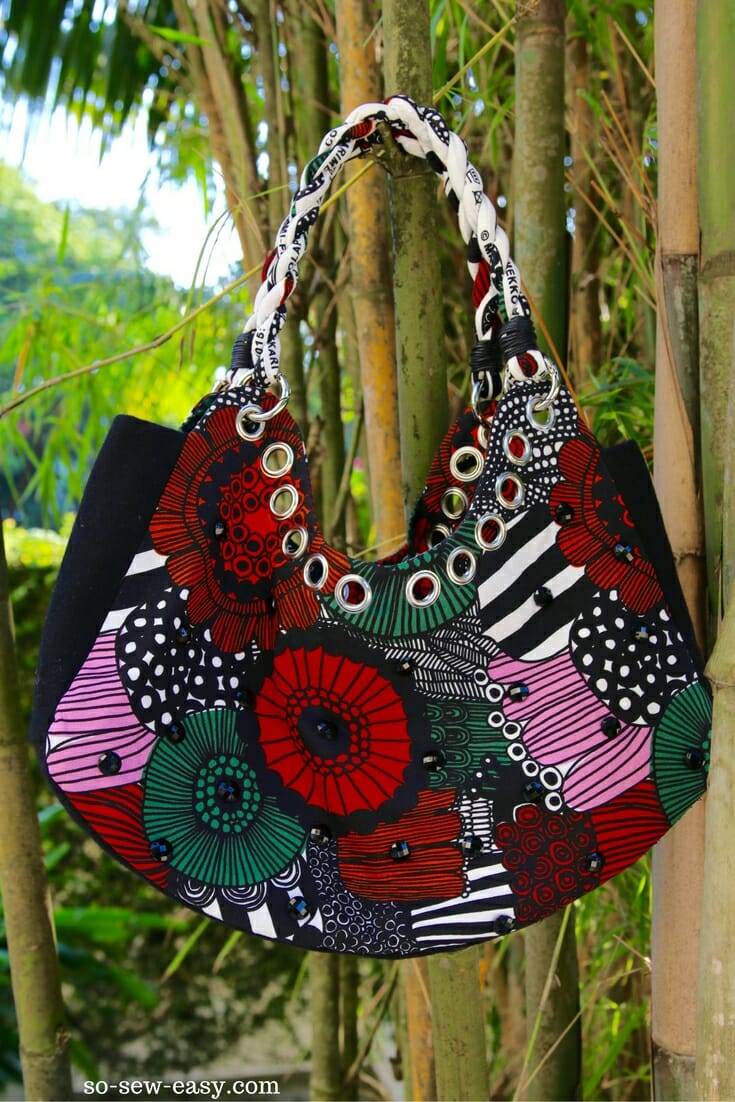
I have been looking for the perfect shopping handbag. After a lot of research, I now realize there is no such thing. Unless you want to walk around with a safety deposit box as a handbag, there is not a completely secure handbag. However, there are certainly a lot of things we can do to make our handbags safer, more secure, and functional. I took some of the ideas from our last bag, the Anti Pickpocket Bag, added a few details from your comments, and came up with this new shopping handbag that I'm naming Gleam.

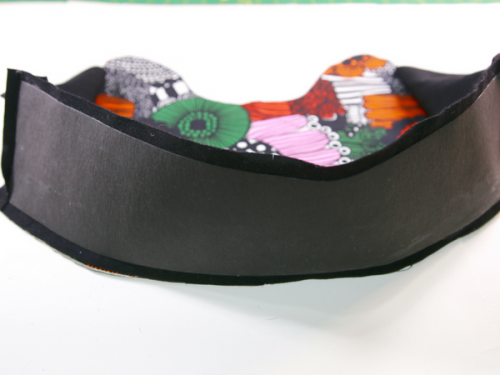
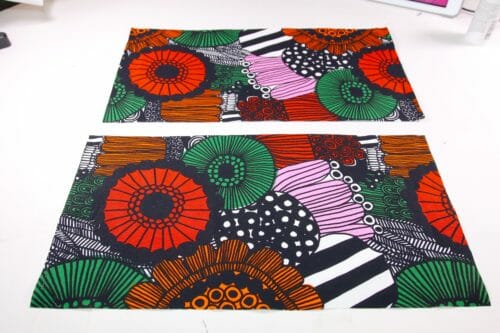
I have added RFID shielding fabric and made the bottom stronger. I have kept the handles the same and added a removable pouch big enough for a camera. The zippered internal pockets are hard for pickpockets to get to because they are hidden under the facing. I am using a strong cotton fabric from Marimekko's latest collection and added some rhinestones for bling.

In the last project, I told you about my daughter being pickpocketed while we were on vacation and after being left with a $1,000 in roaming charges to Uruguay in addition to the lost iPhone, I was annoyed and determined to make a bag that can secure not only a phone and wallet, but also guard my electronic information as well. Electronic pickpocketing is a growing problem in crowded places like shopping malls, concerts, public transportation, and airports. This new bag has two layers of RFID shielding fabric attached to the main fabric pieces as well as inserted as lining and making up the inner pockets. My own tests have shown that this is the minimum amount required to stop the electronic reader's ability to get the information from my card.
Key Features:
- RFID shielding fabric to protect from electronic pickpocketing.
- Hidden zippered inner pockets for money and valuables.
- Strong twisted fabric handles that will let you hold the bag securely.
- Removable zippered pouch.

Materials:
- Heavyweight cotton to 1 1/2 yard (I used a print from Marimekko)
- RFID shielded fabric Two (2) linear feet x 59 inches wide (see below)
- Felted wool 1/2 yard (or vinyl)
- Steam-A-Seam 1.5 yard (I love this stuff..)
- Kraftex
- Thin fusible interfacing
- Twelve (12) 1/2″ grommets or large eyelets
- Four (4) rings with spring
- Fabric glue/Fast Tak or Easy Tak
- One (1) yard 1/2″ bias tape
- Sew-in 10mm flat back rhinestones
- Two (2) 8″ zippers
- One (1) 14″ zipper
- One (1) metal ring 3/4″ to 1″ in diameter
- Two (2) small lobster claws
Tools
- Sewing machine
- Microtex sewing needle
- Sewing needle #14
- Spatula
- Eyelet Tool
About RFID Shielding Fabric
This RFID shielding fabric is silver in color because it uses conductive metals, in this case, silver, woven into and coated on the fabric. This metal creates a mesh that conducts the electricity or electromagnetic radiation around your bag or wallet, rather than into it, thus preventing your cards from being read by a thief with a common RFID scanner. The concept is pretty simple if you remember from your high school physics class, the concept of a Faraday cage, where a mesh of wires can shield a person even from lightning. Click on the image or HERE for more info on where to purchase this kind of fabric. You will need two linear feet to do all the double lining detailed in this tutorial. You could do a single layer with one linear foot of fabric which would provide some protection.
RFID stands for Radio-frequency identification which is a very popular technology that uses electromagnetic fields to automatically read, identify and track tags containing electronically stored information. These tags are very common now and you will find them in almost all credit cards, passports, student and employee IDs.
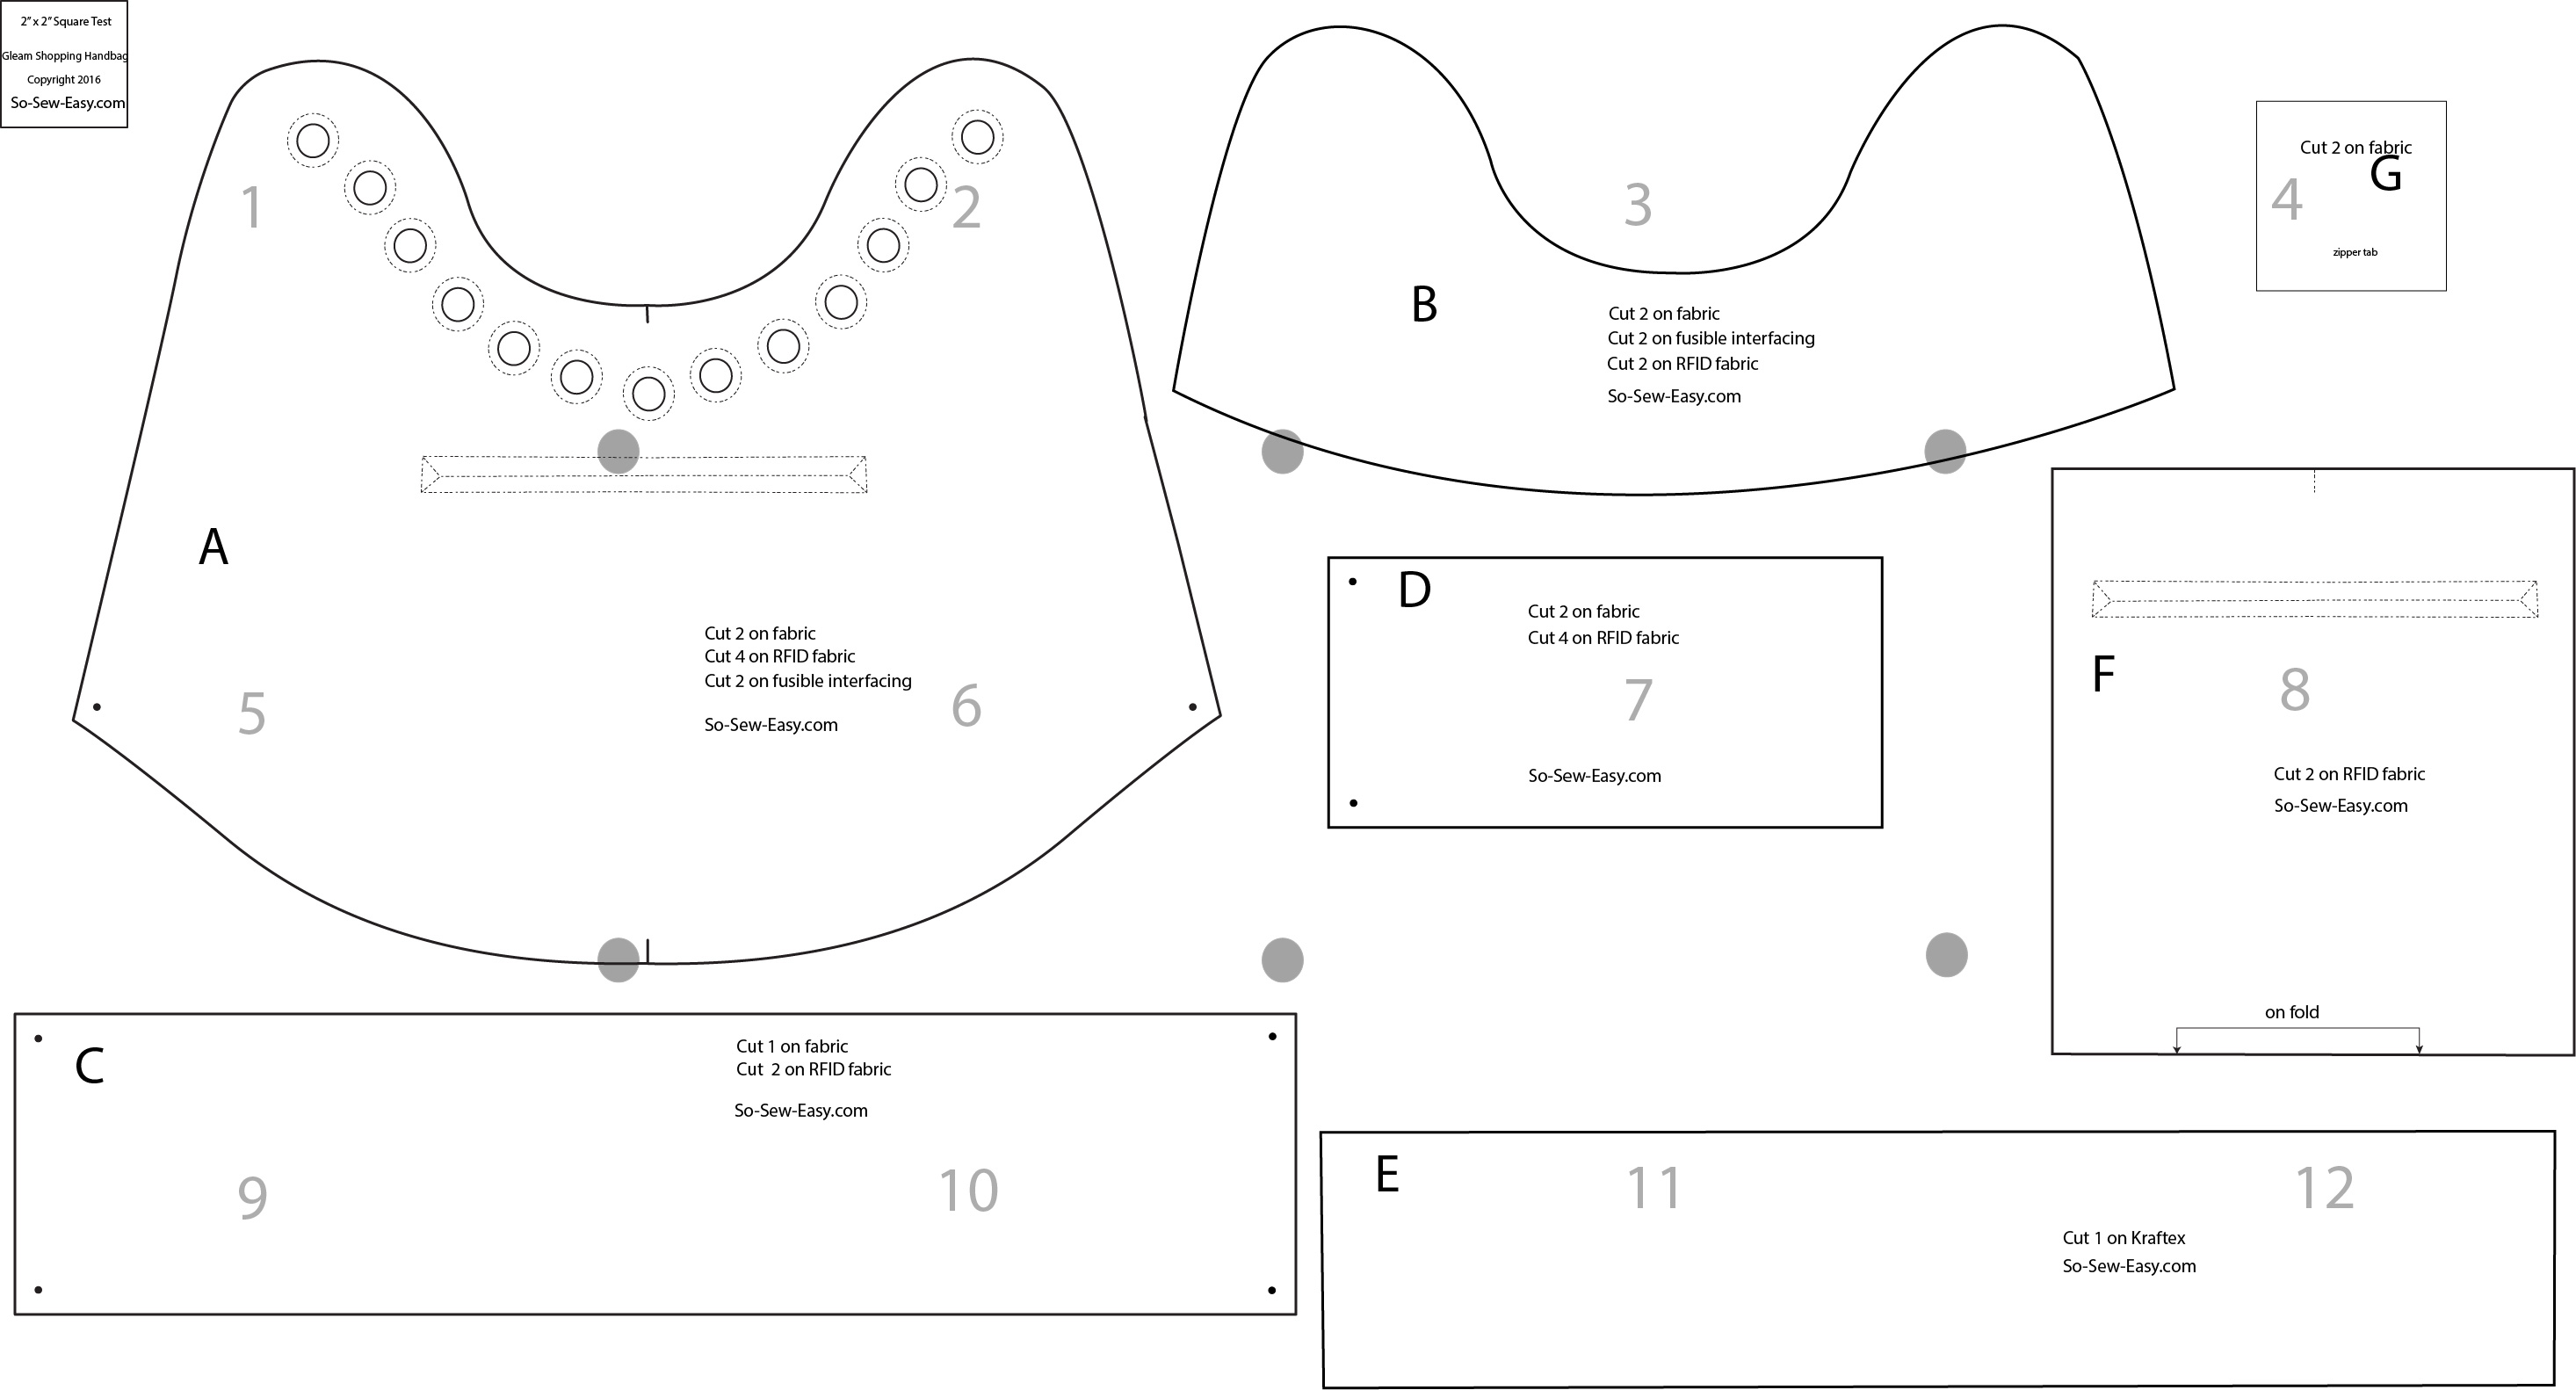
Print the pattern in landscape format. Use Adobe Reader and preferably a computer. Any doubts, please refer to our tutorial on How to print and assemble a PDF Pattern.
Pattern Layout
Pattern Download
You can download the pattern for this RFID Shielded Handbag called Gleam from our account at Payhip.
For help downloading and printing PDF patterns, please CLICK HERE.
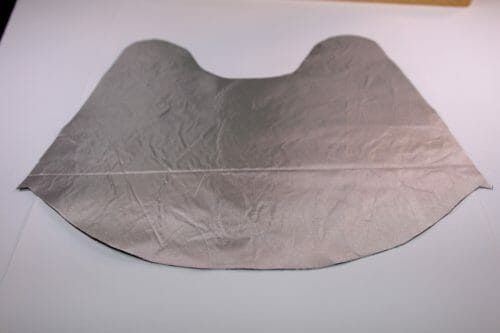
Step One: Preparing the fabric
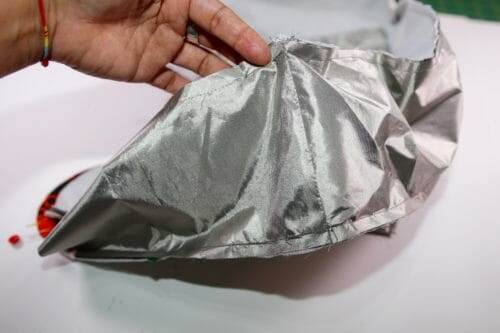
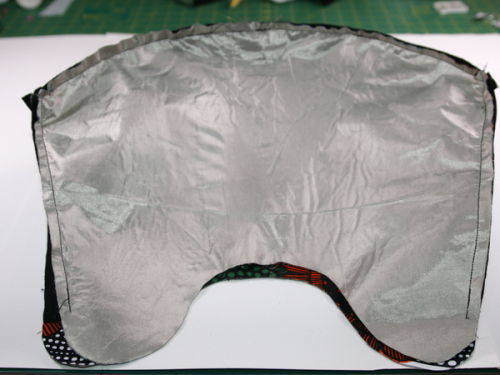
There is a bit of fabric preparation for making this bag. We will be fusing a layer of fusible interfacing to the wrong side of the main pieces of the bag and then using Steam-A-Seam to fuse another layer of RFID fabric to these same pieces. These layers not only provide some body to the bag but also help stop RFID signals. We will also be lining the entire bag with RFID fabric and making the inner pockets out of it as well which will add a great deal of protection. This fabric looks and feels like the same type of nylon we would be using in a regular bag lining but we get the added RFID protection.
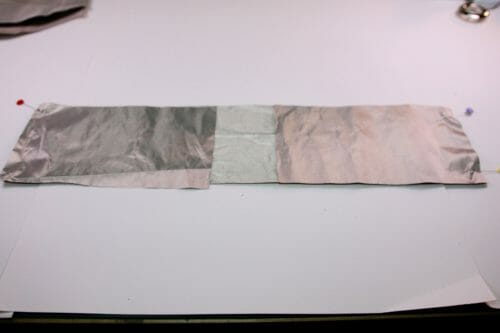
Cut all the pieces as marked on the pattern. For pieces A and B, there will be two pieces of the main fabric and fusible interfacing as per the pattern. We're also making a full internal lining of RFID fabric so we need the additional RFID fabric pieces.
We're going to attach the fusible interfacing to pieces A and B and then use Steam-A-Seam to attach the RFID fabric to the fusible interfacing which is fused to the main fabric. I am looking for a crisp, but not necessarily stiff look. Follow the instructions on the package closely.
Using Steam-A-Seam can be tricky. I have used a small scrap of paper to show you. The flower is not part of the pattern, just an example to see the process.
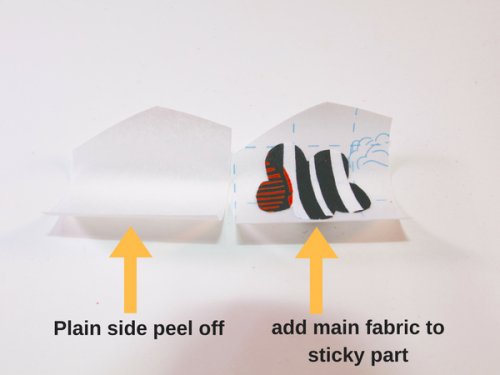
Peel the first layer of the plain paper exposing the sticky glue. Place the fabric using the line to guide you on the sticky side. Cut the pieces of the bag, and facing.
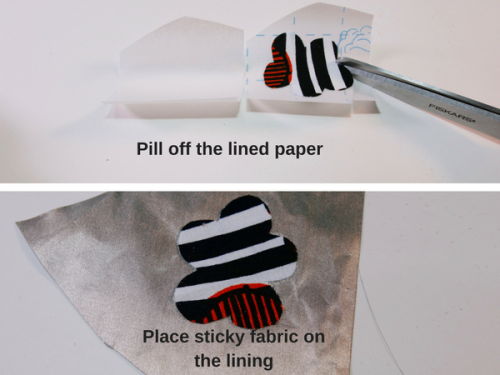
Peel the lined paper layer and lay the fabric on the RFID fabric. Trim the edges and repeat with all the pieces. You will need pieces A and B (2X) lined with RFID fabric.
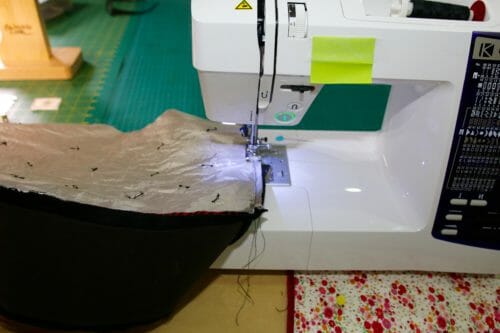
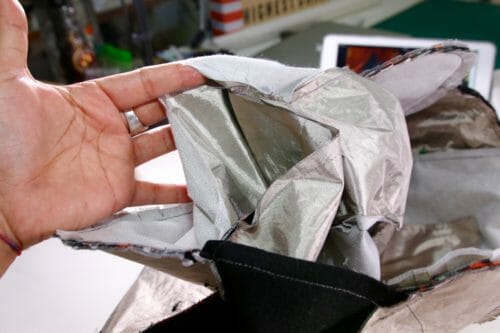
Step Two: Sewing the hidden pockets for the RFID shielded handbag
For a detailed video tutorial on this step please have a look at https://www.youtube.com/watch?v=pfqGSFGanJ0
Subscribe to the YouTube channel:
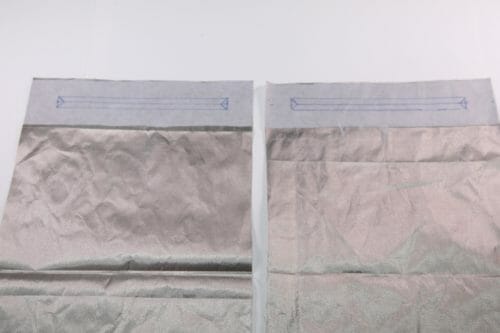
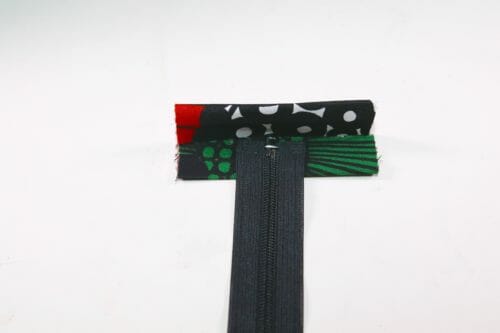
Fuse a rectangle 9″x 3″ of thin interfacing, on the top edge of the pocket pieces.
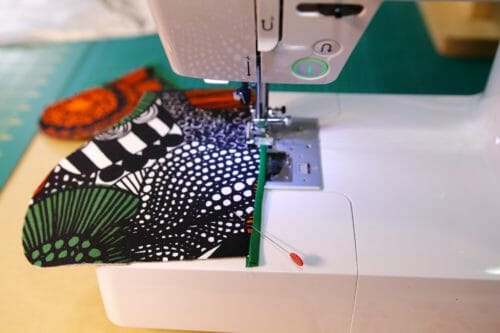
Draw the pocket 1 1/2″ from the top edge. I have used an erasable ink pen. The ink will disappear once I apply heat to it or spray a little water. Before you sew the pockets, change your machine to a Microtex needle. This needle is excellent to work on difficult fabrics such as satin and lamé.
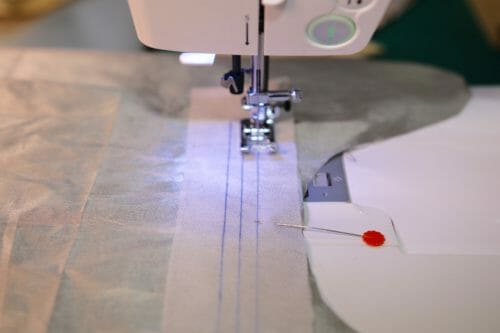
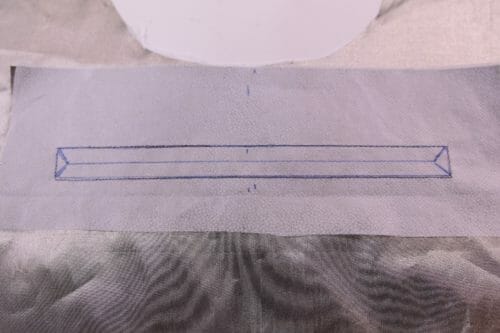
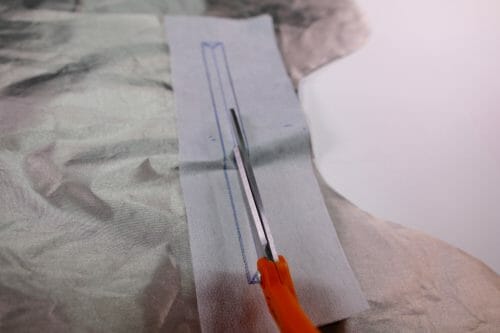
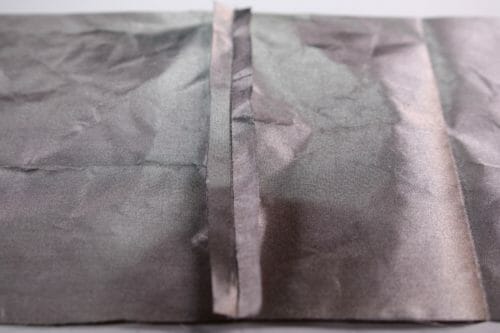
Sew around the rectangle following the drawing. Make a small cut in the middle, and cut on the center line but stop at 1/4″ from the end. Cut to the corners indicated by the small lines. Do not cut to the seams.
Feed the pocket through the cut you just made and finger press the opening.
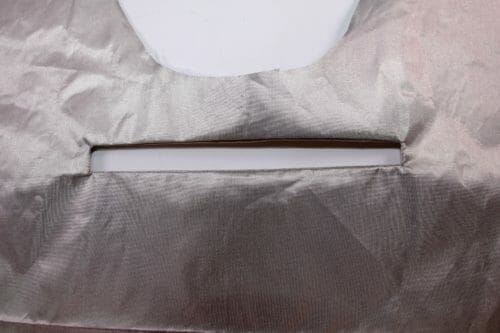
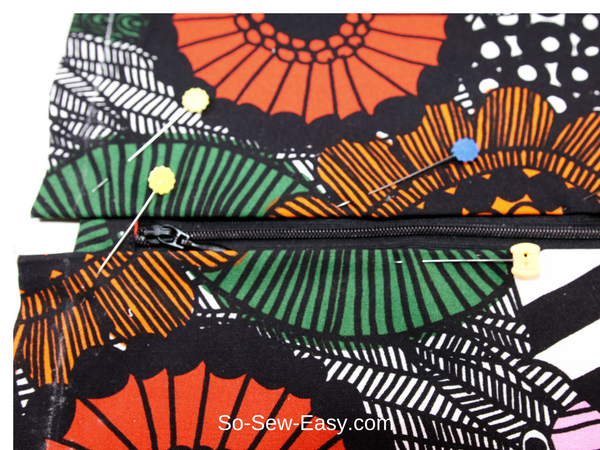
Attach the zipper by aligning it around the opening.
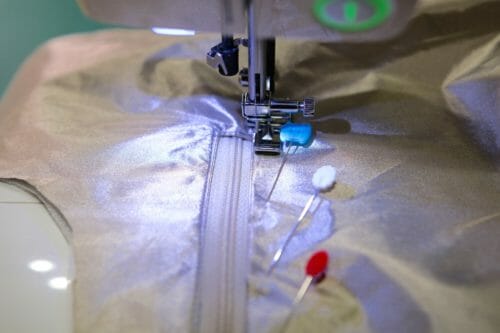
Remember to start sewing the zipper away from the corner. Use the side of the zipper foot as a guide. Keep the edge of the zipper foot right on top of the edge of the opening of the pocket.
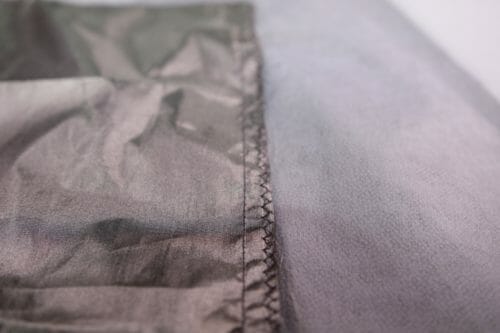
To finish the pocket, fold the pocket upward and sew on the sides and on the top. Zigzag all the seams.

Step Three: Sewing the lining for the RFID shielded handbag
Sew the side gussets to the bottom gusset. You will need to repeat this step for each side. According to my tests, two layers of RFID shielding fabric are needed to prevent electronic information from passing through the fabric so please use two layers for both the bottom and sides of the lining.
Finger press the seams open.
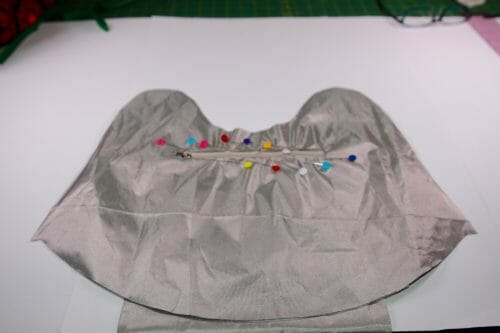
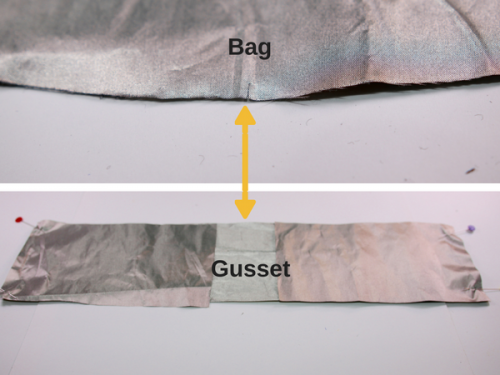
Using the notch in the middle of the main lining piece, match the middle of the gusset lining.
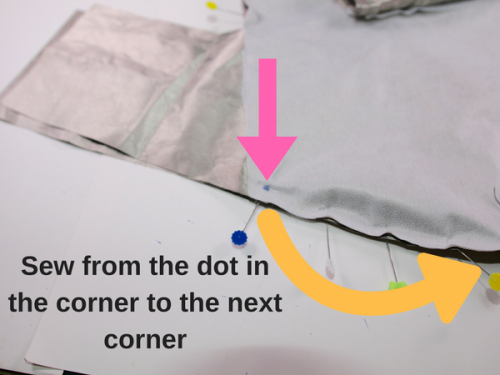
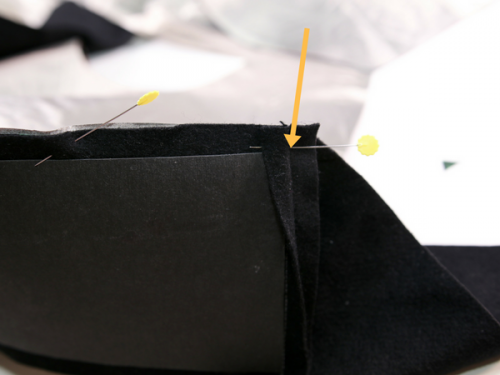
Pin the gusset to the bag and sew from one corner to the next. Refer to the pattern markings.
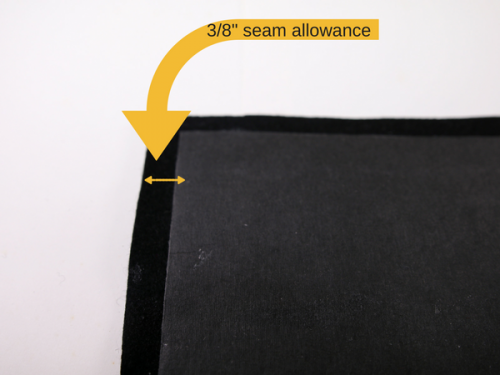
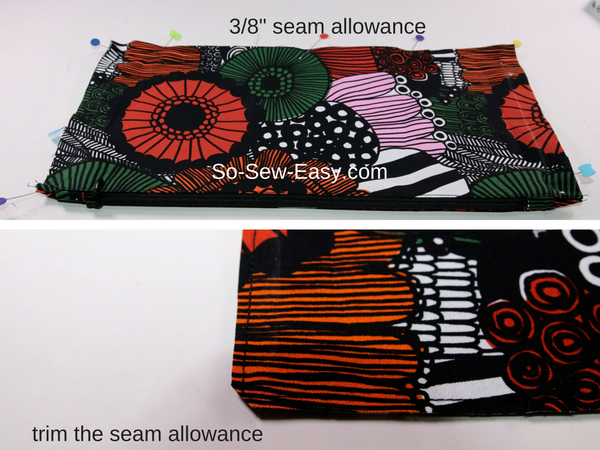
Leave 3/8″ margin and sew to the other corner at 3/8″.
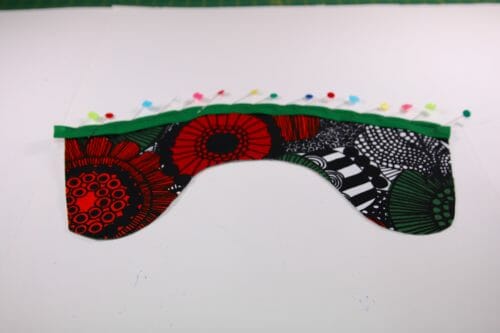

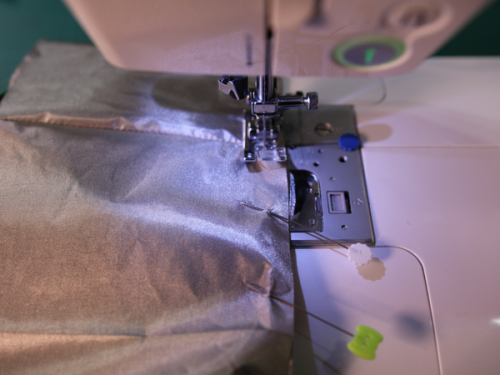
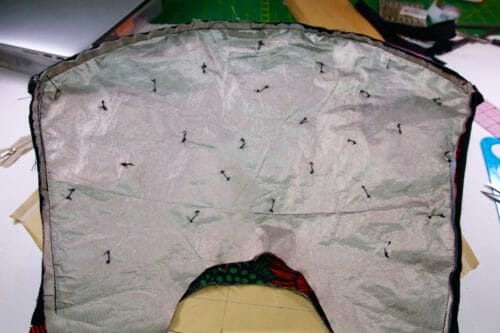
It is time to add the facing that will hide the pockets. Bias tape will be added to the facing lower edges. Pin the narrow side of the bias tape to the right side of the facing. Sew the bias tape on the right side of the fabric. Fold the tape to the other side of the facing and sew on the right side of the fabric again. Align the facing to the top of the piece end topstitch the sides at 1/8″.Pin the other side of the lining. Sew from the dots marked on the pattern to the other dot. You are working on the bottom of the bag for now. Pin the sides and sew at 3/8″.
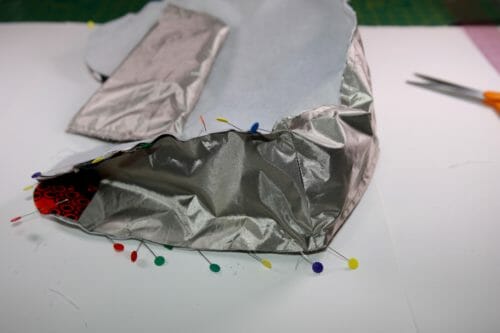

Remember to leave a gap of about 5″ to be able to turn the bag inside out.
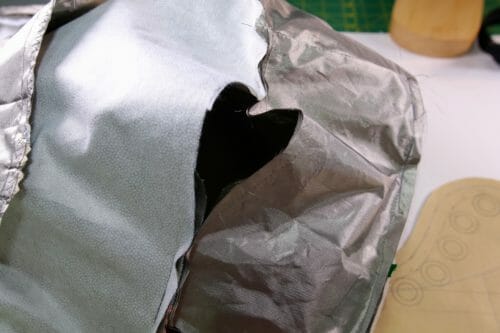
Step Four: Sewing the body of the RFID shielded handbag
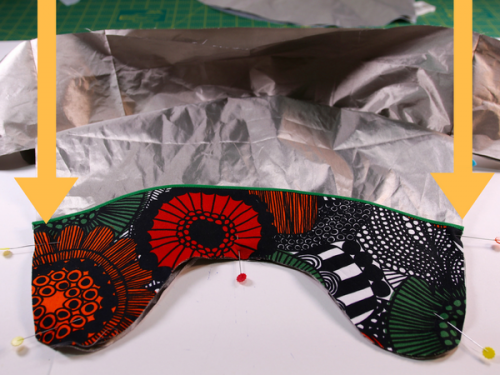
Glue Kraftex (E) on to the wool felt fabric (C). Make sure you leave 3/8″ for the seam allowance.
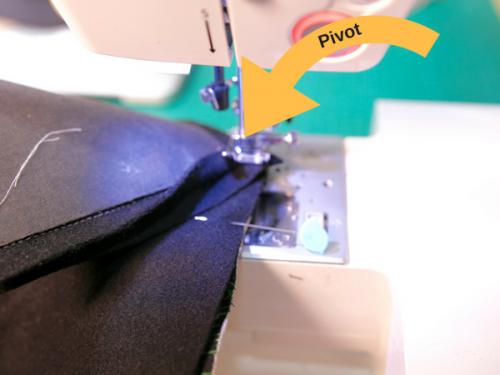
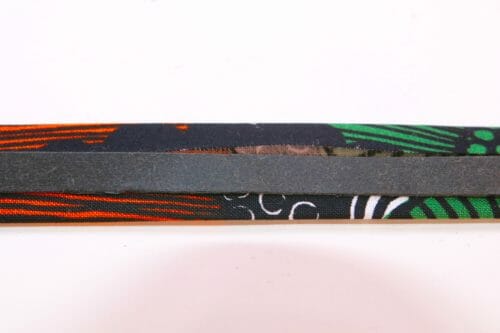
Sew the bottom gussets (C and D) together with open seams. PLEASE NOTE: It is important to keep the seams open. Then turn your work and continue sewing until the top of the bag. Repeat on the other side.
Step Five: Adding the rhinestones
This step is optional. Sew each stone on the bag with a needle and thread.
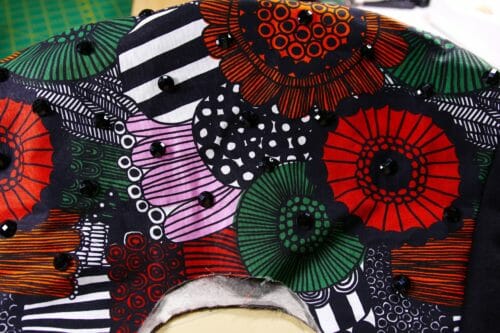
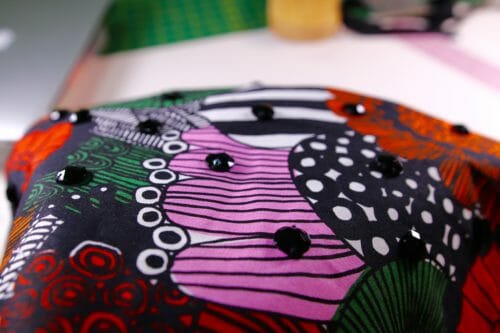
After sewing the stones, sew again to reinforce all the seams.
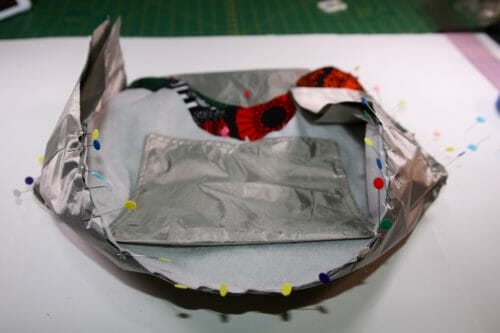
Step Six: Attaching the lining to the bag
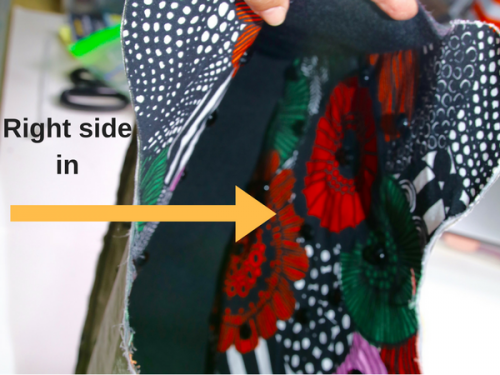
With your bag right side inside, place the lining right side out inside the bag. Right side with right side.
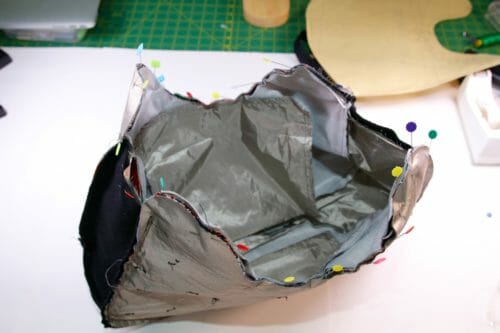
Pin the top edge aligning all the seams and corners.

Sew at 3/8″ twice.
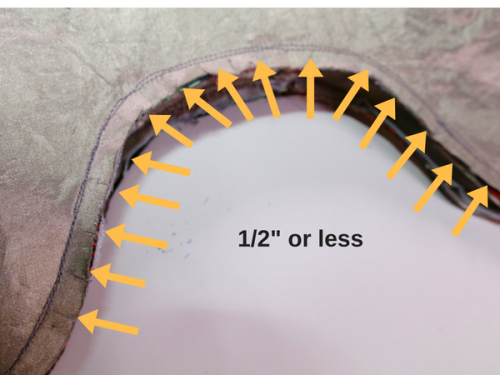
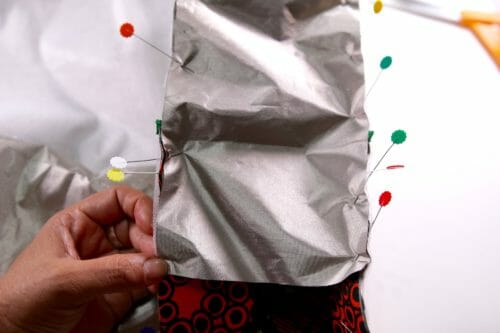
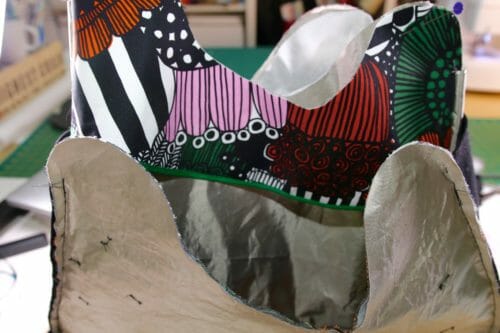
Clip the seam allowance every 1/2″ or less around sharp curves and clip the corners. Insert your hand into the hole and turn the bag around. Shape and iron the bag with a cloth. Sew the opening by folding the seam allowance in and topstitching at 1/8″.
Step Seven: Attach the eyelets
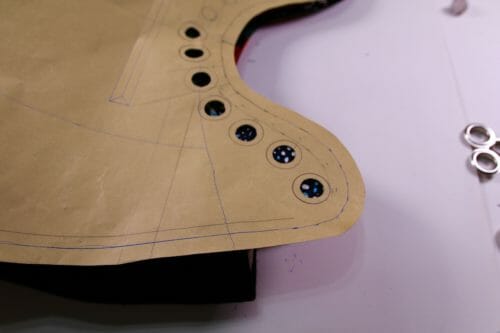

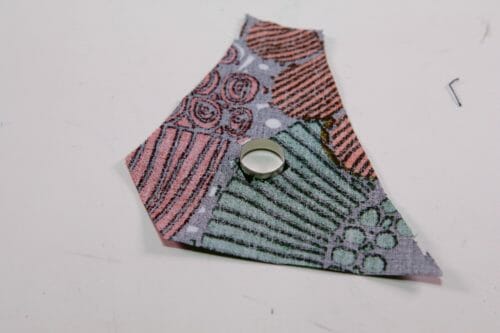
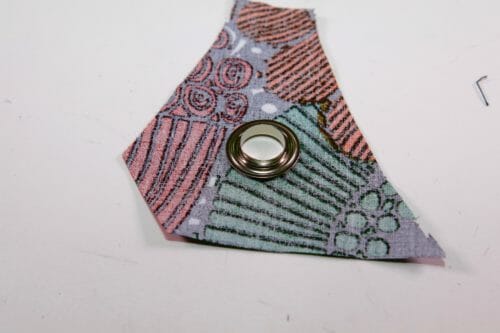
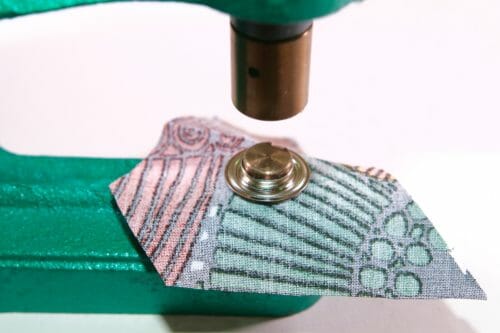
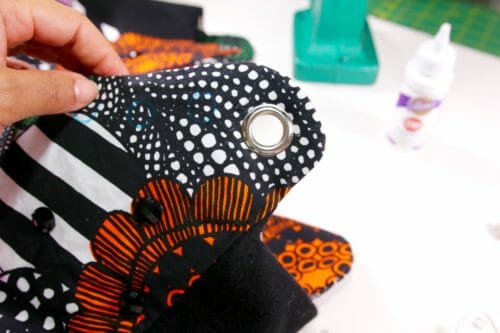
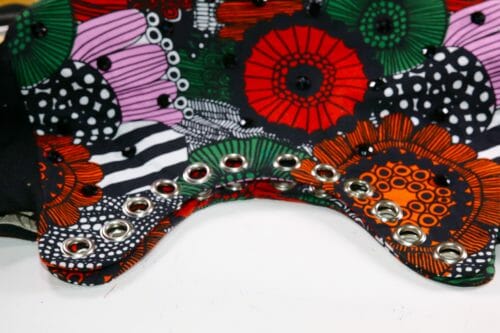
Use the pattern to mark the locations of the eyelets. With a sharp pair of scissors, make the hole. Insert the male part of the eyelet from the right side of the print and the female part on the back. Then use the tool provided with the kit and press.
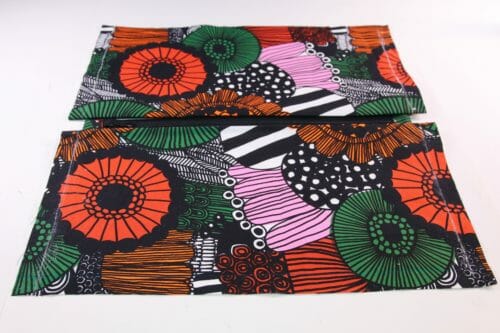
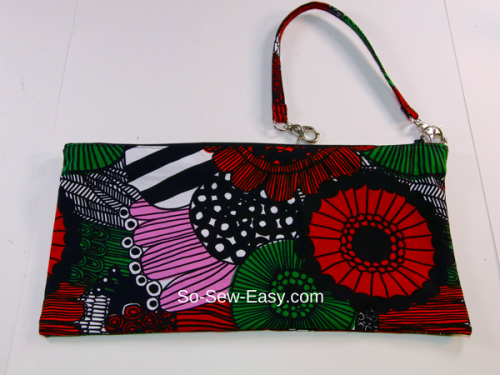
Step Eight: Making the removable pouch for your RFID shielded handbag
Cut two rectangles 15 1/2″ x 8 1/4″. These are not in the pattern but they are regular and easy to make yourself.
Cut two squares 3″ x 3″. These will become the zipper tabs.
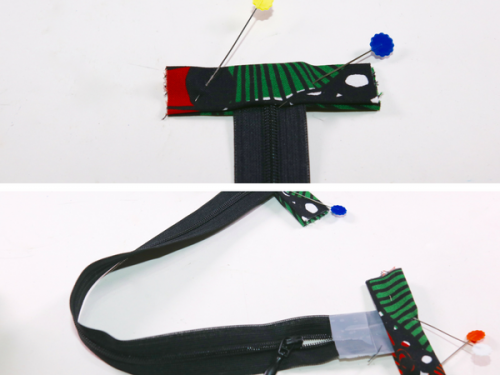
Fold the square in half. Or mark the middle of the square. Then fold each half to the center again, this is to end up with the raw edges inside the tab. Place the zipper in the middle and repeat on the other side. The zipper should measure 14″ with tabs included. Cut your zipper if you have to. Sew the tab and make sure you catch both sides of the tab.
Place your zipper right side up. Place the square with 5/8″ folded seam allowance on top of the zipper. Mark 5/8″ seam allowance with your tailor's chalk. Make sure the tab of the zipper does not pass the chalk mark. Sew with a zipper foot at 1/8″ from the edge of the fabric.

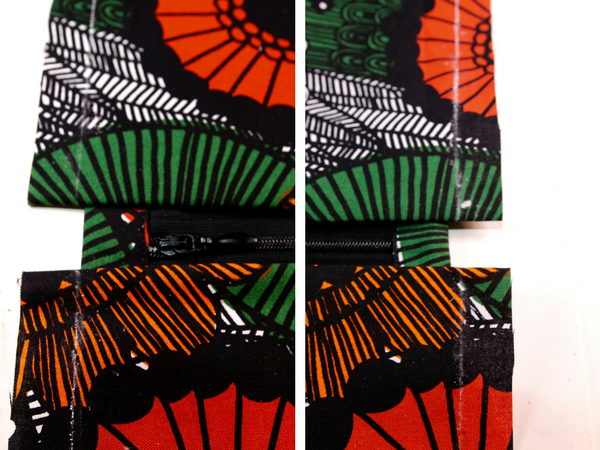
Fold the pouch print side out and sew a 3/8″ seam. Trim the seam allowance and clip the corners. Open the zipper and turn the bag inside out. Sew the seams again at 3/8″. Turn the pouch right side out and iron.
Step Nine: Making the strap
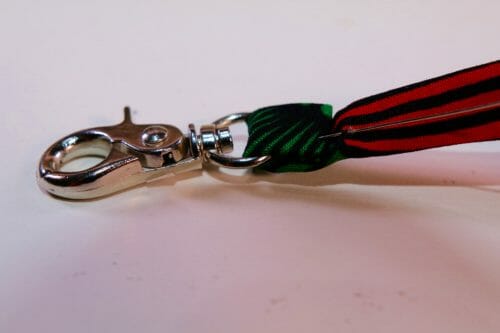
Cut a strip of fabric that is 15″ x 2″. Fold the edges to the middle and iron, place a cable or a strip of Kraftex in the middle and fold. Sew the edges together at 1/8″ seam. Insert through the ring of the lobster claw the strap. Fold the end by 1/2″ and again by 1/2.
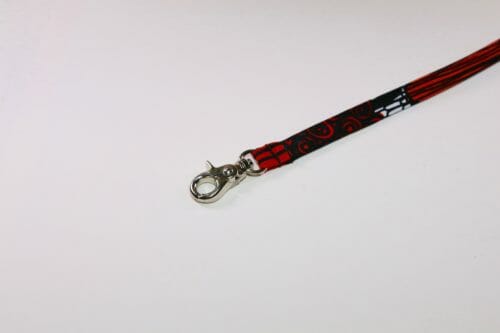
Sew very close to the edge and again very close to the ring. Remove the tab from your zipper and insert a ring. Repeat the same application of the lobster claw on the step above.
Now the pouch is ready to be inserted into your bag. You can line this pouch with the RFID fabric if you wish for added protection.
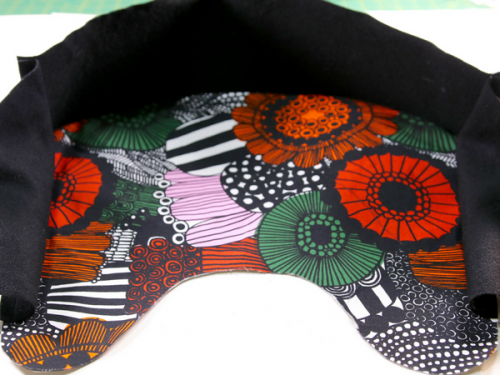
I hope you liked this project, as much as I did. I love the print and the functionality of this RFID Shielded Handbag. This handbag is big enough for my 13″ Mac, my drawing book, a cardigan, my wallet, sunglasses, a bottle of water, and a bag of Oreo's. I think I am off to find some fabric now. Leave your comments below. I love to hear what you think of this new take on a shopping handbag. Until next time!


This is a very innovative and informative also helpful Article. Very good article on the latest trending topics.
Thank you for sharing this sewing project, have been looking for something like this.
You’re welcome, Karen. Good luck and happy sewing!
I enjoy your emails. They arrive Sunday morning for me; perfect for morning tea time. I love the idea of this special fabric. I make my own bags and am going to be marinating on this! I looked at the whole tutorial… trying to absorb. I appreciate you sharing your knowledge and skill with me. xxoo
If you’re wanting to have a safe purse when traveling, why not have a long strap to go over your head and across your body instead of a shoulder one that can be slipped off easily by a determined thief? I find these type of bags awkward.
Beautiful and inventive idea, and very generous of you to share it freely. Thank-you for doing all the research on this timely idea. I learned from my time in the workplace that the corporate style manual requires that to help your readers, explain your acronyms the first time they are used. I had to read way down into this to find out what RFID is. The text should have read, “I have added Radio Frequency Identification (RFID) shielding fabric…” Again, thank-you so much for your extensive work and generosity.
Sewing an RFID-Shielded bag is a wonderful idea; however, I’m just not a fan of this style of bag (I don’t know if it’s the fabric, the bag shape, or both, but it’s just not appealing to me). Do you have any suggestions for any of your other bag patterns for using sewn-in RFID mesh? I would imagine I could use the same steps you outline here in that bag pattern.
Thanks!
Will you be able to get this bag through airport security in The USA?
Yes, x-rays pass through the silver threads quite easily. They block other sorts of radio waves, but not x-rays.
Excellent Excellent work on safety Protective purse.
Thank you. Mayra
Just a question, I can understand wanting to have a section for shielding cards with chips, but if you put your phone in a handbag that is shielded, won’t that block the signals TO it and therefore it won’t ring if someone tries to call you…
Hi Becky, I think it’s different types and wavelengths of signals. Also, the mobile phone signals are much stronger. An RFID chip doesn’t use a battery or have any sort of power, but it has to get it’s power from the antenna that is looking for it so it can send a signal back. Shielding in a bag seems to be enough to stop this process but won’t stop phone signals as far as I can tell.
This is a lovely bag but I prefer the “Pockets A Plenty” pattern. Would you consider providing instructions on how to include an RFID lining for this bag? I’m going to buy the pattern and make one or two for Christmas gifts. Thank you so much!
Hi Suzanne, just replace the lining of the the fabric with RFID fabric it is that easy.
Nancy’s Notions in the USA has rfid material. Not as wide as 59″, but certainly can be used in smaller pockets specific to id/credit cards.
I do not know at this writing if Nancy’s Notions ships internationally.
Okay, you’ve gone and done it again – given us another FREE awesome pattern!!! You REALLY have to stop this or I’ll never get everything done for Christmas! ☺ I absolutely love this pattern and can’t wait to make it. In fact, I’m making the first one for ME so these may go on next year’s Christmas list! Well, maybe I’ll get a few made for others. ☺☺ Thanks again, Linda
Good luck with the pattern. Glad you like it. Please share a picture of your work if you can. I’d love to see it. Happy sewing, Mayra
I plan to make it, but it looks like the pattern needs to be in landscape view. I can’t figure out how to do that in adobe. Otherwise, many of the pieces are run off the page.
I sent you an email Carol, but if you have not read it press print then when the printing dialog shows on the left side of the panel you will see portrait of landscape, then you can see the little window that shows you the view for both settings. Choose according to the pattern.
Thanks so much for the free pattern!
You are welcome Beverly!
You probably do not need to go through the expense of rfidblocking– sounds catchy but anyone with those resources is going to go for millions and not stand on a street corner, aluminum foil or metallic beverage/food cooler insulation works as well. Sending your card info wireless carries more risk.
Hi Roch, thanks for this and your other comments which are great. As far as RFID, the card sniffing technology we referred to is relatively common and easily accessible here in Asia unfortunately. I suspect it would be too in the US and Europe. I do agree that other materials will work to block RFID as well.
Roch, the threat is actually more common than you think, along with card readers that overlay a normal card reader to steal your info as yoiu swipe. I’ve had very small amounts stolen, like a dollar here, a dollar there, always less than $10 each, and never more than one or two per month. The theives run thousands of cards like this, taking only a small amount from each, hoping no one will notice or contest the small charges. Each of my fake charges went through with a WalMart or Kohl’s merchant ID, two places I do shop. Even small time theives can make card readers and are keen on steling without being noticed. Large fraudulent charges are far too easy to spot. Small repetitive charges slip by many people.
I received my yard of fabric, and plan to make an “insert pocket” that will hold my wallet with credit cards, and my 6+Edge Android phone, since these are the items that I carry that have the Wi-Fi symbol or access. I may do some “testing” to see whether a single or multiple layers of the fabric are necessary for complete blocking.
Please do let us know how your test went. Many will be interest on your findings. Thank you Paula.
I’d be interested to hear tyhe results of your test as well!
Hi Mayra, I think this is a great idea and I am all for safety, I have just been on line to see if I could purchase some of this mesh here in the U.K. but only came across wallets and purses already made. I have been using foil for linning in the pouches that I have been making but ofcourse this has a limited life use;and I am notcertain if it is effective regarding security.
I am not sure if this is available in the UK, I have put a link to amazon, hopefully the supplier can deliver to the UK.
What a delightful pattern. Thankyou so much Mayra, you are very generous. I am rummaging in my fabric cupboard as we speak as I had some fabric I ve been keeping for this very bag, it will be perfect..
I would love to see your bag, hope you share a photo when you are done.
Ladies pls am a beginner in sew my question might be silly but take it easy with me.my question is isn’t when u download a pattern say any one it only comes out on a small A4 paper? So how do I make it big in order to get the size cuz my think is that the. A4 paper is just a small piece of paper. I need some explanation plz.cuz I have two lovely girls and I really want to make lovely things for them.thank you.Gisele.
You have to print the pattern on Actual Size, and tape the pages together. Here is an article to help you, https://so-sew-easy.com/download-print-pdf-sewing-patterns/
I love the tutorial! Love the RIFD concept! Thank you so much for the beautiful and very useful bag! My niece is going to travel and I can’t wait to make her this bag!
You are welcome Sarah, Enjoy!
Thank you Mayra for your kind and helpful not only tutorials but free pattern. Squeeeee. Who doesn’t love a free pattern. Especially when it saves us from the baddies out to take our hard earned monies. I do appreciate all your hard work and you have still have been most generous enough to gift us with this wonderfully beautiful bag which I am quite certain a lot of people have already made by now. I know I am planning on a cruise in the next spring months and will endeavor to make one for that very trip. After all, with your generosity we can afford to make one to match each of our trips…Right ladies? Sincerely. Candy B.
Hi Candy, I would love to see you with a handbag on the deck with a stunning see background, what do you say?
Which pieces are the side gusset and which piece is the bottom gusset? Also which pieces are for the internal pouch?
Sorry, found the inside pouch step. I am guessing that D is the side and C is the bottom, align at dots?
All pieces are mark on the pattern, follow the instructions on the article please. Thank you Janea.
Really great idea…thanks so much! Where did you get the Marimekko fabric?
I bought the fabric in Helsinki when I went to meet the PR manager for the company, I have an article coming up soon. There is a link in the blog for the e-store they have.
Kind Regards,
Mayra
Love this and thank you for making it free.
I don’t think the mesh protects from lightening but I can understand it could protect from lightning (typo spotted).
Indeed. Well spotted. Correction made. Many thanks!
Thank you for the beautiful bag pattern and for trying to protect us. For some who can’t afford the material & thread, you can get credit card sleeve, wallets and other supplies less expensive and still make the bag. In the meantime, while I am waiting for my supplies, I understand foil can be used. Not as nice, but better safe till you get supplies and your bag made. Even standing in line at stores or anywhere you are at risk.
I always look forward to your next creations.
Yes, Nelly I am in the process of testing other alternatives to RFID fabric, and drafting smaller patterns I will let you know what I come with. But definitely make the bag is very functional.
I like the idea of an RFID-protected bag; however: http://truthiscool.com/rfid-blocking-wallets-too-good-to-be-true
Hi Elizabeth, thanks for that. I think everything in the first part of the article is probably correct, although quite dated. The fabrics out today are newer and likely better than anything around in 2011 which was when the referenced tests were done. They use silver, which doesn’t seem to be mentioned in the article. In any case, who knows what was actually sewn into the various tested items since they’re talking about some sort of finished wallets. But as the article said, the author was able to create an RFID shield with duct tape and aluminum foil. That would probably work today too, but would be difficult to sew into a particularly elegant looking bag which is what we’re trying to do. The bit at the end of the article about just turning your cards around to avoid them being read seems a bit unlikely to me though.
Thanks for making a free pattern available, and good to know the dimensions of the bag are 16 x 9. It’s a good looking bag and I can’t wait to try making it! If I’m just trying to protect the chip in my credit cards and/or passport, I’m thinking less RFID fabric is really necessary – and my understanding is that when multiple RFID cards are carried, they effectively create a confusing signal that can’t be read by scanners. So the fabric makes sense to protect one card, but is it necessary when carrying multiple cards? And you mention that your testing indicates that multiple layers of the fabric are required for safety – can you elaborate on that please?
Hi Trifles, yes, you can certainly make do with less RFID fabric. I don’t really know whether multiple cards would scramble anything. It is just information and my sense is that the reader is going to read any cards that it can. In the end, it isn’t a large volume of data being transmitted from each card, just very important data.
I like the idea of using RFID fabric in a bag, but I wonder if the material will make it through airport or court house security scanners? Or will one wind up having the bag hand searched? That’s generally something to avoid if possible.
The fabric is quite thin so the x-rays would certainly pass right through it. I’ve never heard of any issues with this nor can I find any commentary online that would suggest this causes any problems. I’ll definitely test it out on my next trip but I don’t think there is an issue.
The RFID fabric is 59″ wide, but you still need 1.5 yds? And it’s sold by the foot, so that would be 4.5 feet at $30 per foot. So just that piece of fabric alone costs $135. Is that correct?
Hi Trifles, thanks for pointing that out. I had forgotten the fabric is so wide. You will need two linear feet to do everything suggested in the post. You could make do with one linear foot if you wanted a single layer and you would get some protection. I have updated the post to reflect this.
Awesome – thank you Mayra!
I am only going to line some interior wallets with the RFID material. You only need your credit cards / passports protected. If you line your purse with it and put your cell phone inside, it won’t work.
Oh, and your IDs – they have chips in them too, now.
Great bag!! I would like to let people know that by putting your phone inside something wrapped in an rfid blocking fabric could make for some confusion! Just be aware once inside you wouldn’t get service…no calls text or wifi. Have a great day!
yes you are right, it truly becomes that line in the movies “don’t call me, I’ll call you”
Will this RFID fabric pass those security checks?
Yes, I have never heard that it won’t. The fabric and silver threads/coating itself is quite thin. Please see some of the other comments.
I found the RFID fabric is very expensive. I was thinking of just lining the pouches or maybe one layer in bag and two in pouches. I haven’t printed the pattern yet to see what what the dimensions are. Sorry if you put the dimensions in the pattern….I must have missed them. Did you use regular thread or the RFID thread? This is a great pattern. Thanks
Hi Sara, In that case do line the pockets 16″ x 9″ are the dimensions, in the pattern this piece is on the fold. You need double layer for each. The important thing is to protect the information in your cards.
No, I did not use RFID thread but now I am on the hunt. Let you know with another project if I find it.
Thank you for this pattern and the RFID idea!
This is awesome idea.
Love it. Love your fabric. Going to try to make something to fit in a man’s wallet made with RFID fabric for his credit cards. You have great projects.
Very pretty and stylish handbag (and safe!). Looove the Marimekko fabric and embellishments! Well done! I have also seen some anti theft bags (pacsafe) insert lightweight, stainless steel wire in the handles/straps for added security.
I love Marimekko too, I am planning to use more of their fabrics, I got just the thing in my mind, hope you will like it.
I really like this and plan to make one for someone who is taking an international trip.
How is the bottom on this bag made stronger than the “Anti Pick Pocket Bag” which I really like also.
I used Kraftex and thick wool felt which is really hard to cut through, you could even glue some wires in between the fabric, and the Kraftex piece, no one will know they are there.
Lovely bag, great instructions! I’ve been thinking about adding RFID pouches to my bag and this inspires me 🙂
Hi Patricia, thanks for your feedback and glad you like it.