


I've been working on some new bag ideas and one of the areas of bag-making that has been a bit of a puzzle to me until recently is how to close the top of the bag. Of course, not all bags need to be closed. Some simple tote bags are left open, and that's just fine.
With these examples of the Expanding Nautical Tote Bag and the Turning Japanese Purse, in each case simply holding the handles keeps the bag closed.

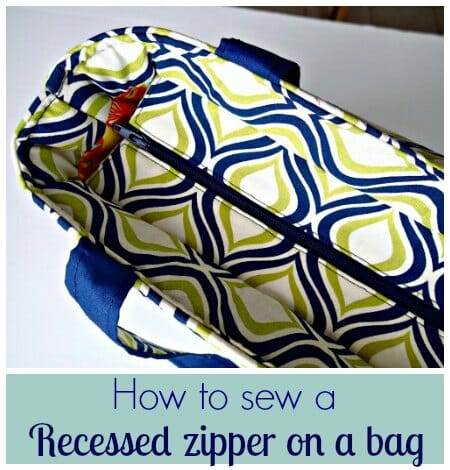
The Zipper Top Tote bag as a zipper right across the top and isn't very deep. Other bags I've made have either had magnetic closures and snaps or zippers at the top, like the Easy Cosmetics Bag. So I was up for a challenge and looking forward to learning something new so I've got a video for you today on how to add a recessed zipper to a bag.
You can pretty much add this to the top of any bag which has a lining, so even if the pattern doesn't call for it, you can split the lining and add in the recessed zipper. Just remember to place any inside pockets accordingly.
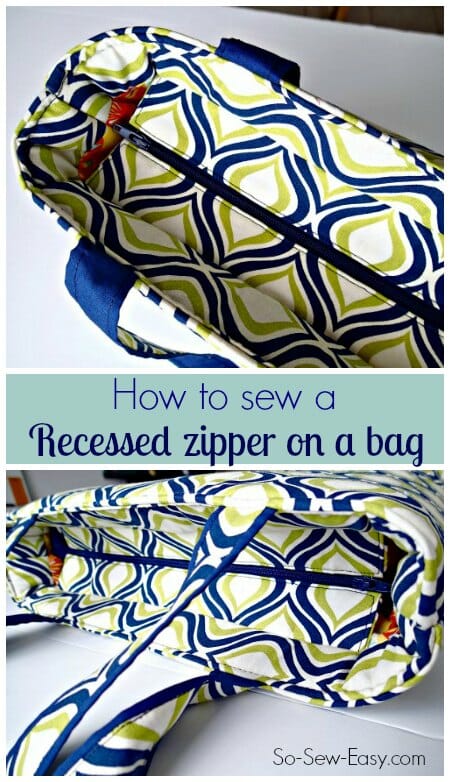
Here's how to sew a recessed zipper on a bag
In the video, I show how to sew the recessed zipper and then add it to a simple tote bag. At the same time, I'm trying out supporting the bag with headliner fabric too. It's all of a bit of an experiment, and not everything goes to plan!
Subscribe to the YouTube channel:
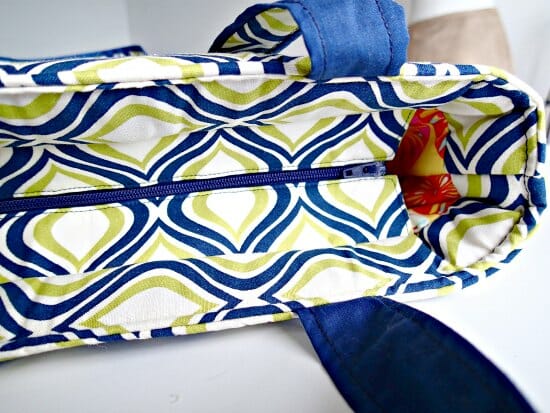
And here's what it looks like – pretty easy and it gives a very nice result. This would work on any bag that has a lining and space to slightly drop the zipper down inside.
Step by step
(See all these steps demonstrated in the video.)
- Look at your bag pattern and see where and how volume is added to the bag. Are the bottom corners cut out or boxed? What is the finished width and depth of the bag? In this example, I'm just working on a small tote bag and assume that it's 3 inches deep and 12 inches wide when finished.
- Use a zipper a couple of inches longer than the finished width of the bag. You can always use a longer zipper and shorten it if needed.
- Neaten the end of the zipper with a fabric tab.
- Cut 4 pieces of fabric. My length will be 12 inches. For the width, take the finished depth of the bag, divide it in half and then add on 1/2 of an inch. My bag is 3 inches deep, so divide that in half to get 1.5 inches, add on 1/2 of an inch to get 2 inches. So I cut 4 pieces each 12 inches long by 2 inches wide. Apply interfacing to all 4 strips.
- Fold under the ends of the zip tape and pin them or hold in place. Turn under 1/2 inch on each end of the long pieces and press. Layer the zipper between two of the long pieces with right sides facing in. Turn the end of the upper piece back over to the underside, and then stitch using a zipper foot from one end of the fabric to the other, keeping everything even. Repeat the same on the other edge of the zipper tape.

- Fold the fabric right sides out and push out the corners. Press the fabric top and bottom away from the zipper and topstitch on all 3 sewn edges.
- Your recessed zipper is now completed. Now we just have to add it to the lining of the bag.
- If your lining is already split into an upper and lower section, then you are good to go. If not, split your lining a couple of inches down from the top and remember to add in a half-inch seam allowance to each pattern section.
- Mark the middle of the lining pieces and the middle of the zipper section and match them up. Make sure the zipper is facing the right way up, towards the top of the bag. Stitch the zipper section in between the lining pieces and press.
- Then add the lining pieces to the bag in the usual way, and sit back and enjoy your recessed zipper.


Just what I was looking for and you describe everything so it is easy to follow.
Great tote bag.
A suggestion for sewing the headliner. Place tissue paper where it will be between the headliner and the machine. Tear off when done.
As someone else said, use tissue paper. You would need tissue paper top and bottom, or tissue paper under the foam and a Teflon foot. Great tutorial, thank you.
Thanks for the video, I am terrible with following written steps/pictures.
Just finished my first ever bag & followed your video to do the recessed zip! Worked a treat.
Thanks again, will check out some more of your videos.
LOL , OHHHHH !!
Now i see it !!! Haaahaaa !!!!
Ok at #8 it starts there !! My bad !! I read it prior to commentating but didnt click in my brain !! Still dont get amount but what im gathering is basically THIRDS ?? Plus Seam Allowance!!!! Im gonna use the fact that i had surgery last week as my excuse that i didnt see it !! Thanks again for the tut !!!
teflon machine foot + tissue paper next to feed dogs to sew headliner fabric
I use freezer paper, cut out for where the needle is and tape it down all the way around what ever distance I need (I work boat canvas, vinyl and upholstery) to the machine bed and table. I use tissue that comes with the various clear vinyl for huge areas. Everything slides through with either teflon foot or walking foot.
Did you cut your lining a couple of inches short to adjust for the piece you placed above the zipper or did the pattern already have the strip you sandwiched the zipper sides into?
Love this bag. Maybe just using a hem tape o
along your sewing line so there is a barrier between the foam and the machine plate would help? Thank you, your tutorials are always wonderful.
I put the foam side down on the bag fabric so that the other side, the fabric side of the headliner, feeds into your machine. It doesn’t stick like the foam.