I've been taking the Sew the Perfect Fit class from Craftsy. I decided that I was not going to allow 2013 to close without me tackling my biggest sewing challenge – picking the correct pattern size to start with and then getting it to fit correctly. I know from my sewing survey earlier this year that its something most sewists struggle with.
If you missed them, here are the earlier posts that tell you all about the course and show my muslin and pattern alterations.
- Introduction – 2013 is the year of Sew the Perfect Fit
- Muslin Bodice Adjustment
- Bodice Pattern Adjustment
- Making a skirt muslin
- Altering sleeves, armholes and truing the pattern

The Class Over 10 Lessons
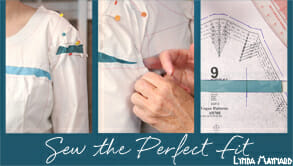

Just to recap if you've not seen the previous posts, these are the lessons:
- Introduction – a short lesson about Lynda Maynard, our instructor, and what we are going to learn in the course.
- Getting started. Where and how to measure yourself and how to pick your pattern size.
- The Muslin Test Garment, why, how, marking, construction
- Fitting Standards, Assessing proper fit and what it should look like, fitting patterns
- Neck and shoulders, narrow or wide shoulders, rounded shoulders and more
- Upper body, full bust adjustment, lengthening, etc. How to transfer all of those adjustments to the paper pattern.
- The Lower Body, Making a Skirt Muslin
- Altering Sleeves
- Armholes
- Truing the pattern and final check.
Sew the Perfect Fit Review
In a nutshell…. after following along with Lynda and her three very different fitting models in the class, I made and adjusted my first real muslin. It didn't take anywhere near as long as I thought it was going to. Although I was trying to fit myself without anyone to help me pin, I did a pretty good job for my first effort. I imagine all the awesome experienced sewists out there will still be wringing their hands and wailing that this is not the perfect fit – but for me, it's an amazing fit and I'm delighted with it. You can see more examples of the muslin in the earlier posts linked in above.


Once the full muslin was adjusted, then I transferred my alterations over to the paper pattern. Again, it was far easier than I expected simply because of all that I had learned from the course.
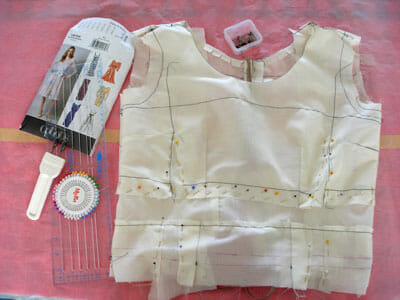

Then I used my revised pattern to cut my fashion fabric and lining. And because all of the alterations had already been made, I sewed up this dress in super quick time and really took the effort to give it a lovely finish.
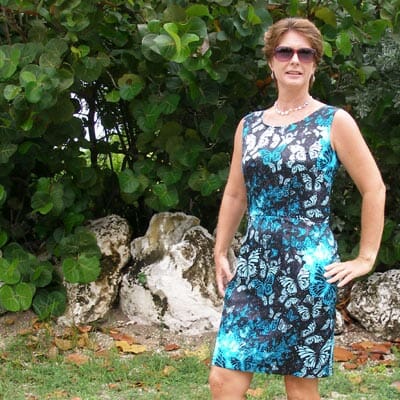
Ta dah – the finished dress.
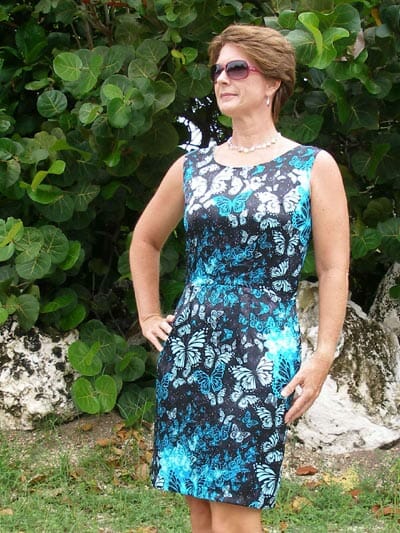

(The fabric is a beautiful silky butterfly print in black with turquoise and pale blue butterflies and covered in little sparkles that really catch the light. You can find it here. The lining is a light blue pongee that matches the butterflies.)
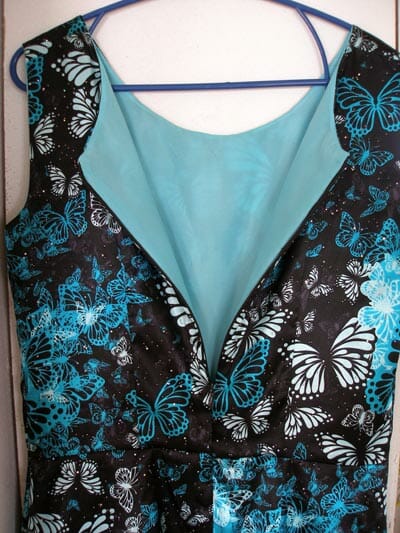

So I did say at the start of the course that this style of dress pattern was not one I would have chosen. I still feel that way. I have such a rectangular figure with no real waist that this kind of shift-style dress doesn't flatter my figure. I normally pick a lower neckline, an empire line rather than have a straight line across the non-existent waist. BUT, the fit is very very nice and it feels just right – you know?
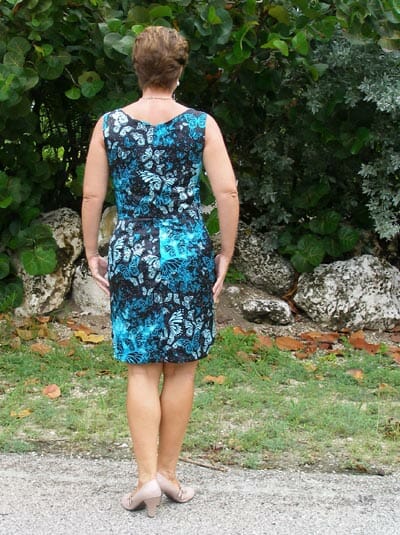

Even if the style is not great for me, the best thing about it – I now have my basic pattern and I know it fits. The bust darts are where I want them. The shoulders and chest fit as I like it. The shoulder straps are the right width and placement. The waist is in the right place. The back length is now correct. The skirt fits nicely.
I can now use this well fitting pattern to compare against other patterns I decide to make up so I can decide what size to cut, know where to lengthen/shorten, know where the neckline will fall. It's going to save me such a lot of trouble, fussing, fitting problems and wasted time and fabric going forward.


So do I recommend the course? Absolutely! If you have fitting issues, or aren't sure which pattern size to pick, or everything is always too big, or you need lots of fitting adjustments, often need a full-bust adjustment or just want to end up with a basic pattern you can use as a template for the future – take this course! It will really change the way you sew and results you get.

Sign up and enjoy the 20% off discount Craftsy are offering below. Also don't forget that you can also still get the 25% discount on the Sewing with Knits too – see the full review for the Knits course here.
Good news for So Sew Easy readers - in return for this class review, Payhip have offered you all an exclusive discount off the Sew the Perfect Fit course - get 20% off using this direct link.
Free Class Giveaway
And now the moment you have all been waiting for – the GIVEAWAY. In return for my class review, the Craftsy Team have kindly given me a course to giveaway to one lucky reader. It's easy to enter, just click the link below. Good luck everyone.


Just click the link below to enter. If you are already a Craftsy member, you will be automatically entered. If you are not, then you will need to register to take part in the giveaway.
Don't forget to check out the other great courses on offer at a discount.
Disclosure – I bought the course myself and am not being compensated in any way from Craftsy for this course review. I really love the Craftsy classes and negotiated this special rate and the giveaway for your benefit. I am an affiliate so will receive a commission if you buy this course using my special discount link.
Authored by: Deby at So Sew Easy


I’d been deciding between this class and Joi Mahon’s class. I chose Joi’s class and enjoyed it as well as her book. I use her techniques for adjustments on my patterns. You make a great point in that I should invest the time in doing this on a basic pattern so I can save even more time each time I sew. I’m tall so I always have to make adjustments to just about everything pattern piece. It’s a pain sometimes, but totally worth it to get the right fit! Your fit looks perfect!
http://www.StyleSewMe.com
Having taken both I think both approaches are equally valid and probably best used together. So you start off by making length and width alterations to the paper pattern using Joi’s method and then adjust the muslin using this slash/fold type of method for fine tuning. Making huge alterations to a muslin isn’t fun so getting most of the way there on paper first is ideal.
I can’t get the patterns to download. Any ideas?
I’ll need more to go on in order to help you out Suzanne. Can you drop me an email. Let me know what patterns you are trying to download, where from and what is going wrong. I’m sure we’ll be able to sort it out for you.
I am looking for the Wear Anywhere Dress. I found it on Pinterest an went to your web site ,then clicked on download pattern and a new blank tab appears.
Are you using Kapersky internet security Suzanne? There’s a bug that prevents certain types of redirects. I can help you with the fix for this, just drop me an email and I’ll send you the instructions.
Hi Deby This dress is so flattering on you. It might not be island casual, but certainly looks fabulous. It lead me to thinking about acquiring a dressmakers mannequin. How essential would it be for a beginner dressmaker? Which one would you recommend?Thanks
It’s really not an essential. It depends on what help you have at hand. I only have my poor husband to try to help me fit and pin at the back etc, and he does his best, but its not the same as having a sewing friend to work with, or a sewing group if you can attend one. I have my Penelope now and although I did get her to mimic my measurements, she hasn’t quite got the same shape as me. (I’m a bit more saggy!) I need to spend a little more time perfecting her shape, but again this is not easy to do when you have to measure yourself so precisely. If you haven’t already, you could read my reports on my PGM dress form and the Fab Fit padding system I used here – https://so-sew-easy.com/category/penelope-the-pgm-dress-form/
I think the dress is really gorgious!!! Not classic, but classy!!
Hope you get a lot of wear from it.
First, let me say thank you for taking the time to do the a review of the class, it was extremely helpful. I signed up for the class last year and I finally started watching the videos last week. Linda’s method of pattern alteration is different, It is a bit of work but the end result is priceless. I’m using Linda’s tutorial to work out the fit on a jacket, one I am done with the jacket, I will use your review along with the tutorial to work on the dress. Thanks again.
I have to agree with everyone else here: you look gorgeous in that dress and it does flatter you!! I also believe my waist is too wide for this style of dress but when I see the result on you, I might actually try this style myself. We are our own worst judges, you know. Thanks for the inspirational series!
If you really do feel that you want something to break up the flat style, you could always make a soft belt either in the same or a contrasting fabric and just loosely tie that around and off to the side. It can give some emphasis to your middle and give the impression of a waistline if you don’t have much of one yourself. But actually, the design of the fabric here does a lot to help out, the diagonal print looks much more flattering on my rather square figure than the black and white one. So try to look for a fabric with a random pattern and this can keep the eye moving too, and not draw attention to parts that aren’t your favorites. I’d love to see what you make, so if you do sew, would you upload your dress to the pattern page on Craftsy so we can all see? Thank you Kim.
You’re Final Dress looks perfect – in every way! Although you might not like the style, it is very becoming on you and shows a great silhouette. I am taking the Perfect Fit Class and it has been such an eye opener for me re fitting. LOTS of info and work but the end result will be worth it, I’m sure.
I loved reading your fitting posts. It’s a topic I’ve struggled with a lot and I still do. I’ve taken the class and I have yet to utilise all the knowledge from it but I think it will be really valuable as I go. Your dress looks wonderful, and I really admire your courage in putting your fitting photos out there. WELL DONE!! Looks amazing! 🙂
Looks great! Love the color, too 🙂
I think your dress looks so classy! It might not be something you would have chosen on your own, but it really is quite flattering. Sometimes it’s good to do something a little out of your comfort zone, and it seems to have paid off here. Your dress looks wonderful on you!
Your dress is so pretty! My mom also stitches dresses and tops. It might be able to help her! Thank you!
So glad I found your blog as I am trying to talk myself into trying sewing again.
Like the others, I think the dress looks lovely on you , but if you find you don’t like the fitted waist, I think it would also look lovely with a nice jacket or wrap as a topper.
The dress looks wonderful and it looks lovely on YOU! Thank you for sharing!
Maria
I just think you are entirely wrong about your style. Your dress is so pretty on you!
Hello Deby, Thank you for such a great review! I know what you mean about sewing something which “isn’t your style”, yet the dress looks lovely on you. I do have issues with “snug” clothing not being something I would ever EVER wear (snug/tight fitting clothes make me want to rip them to pieces as I take them off never to be worn again) so I am wondering if such a class would be helpful to me.
I think the perfect fit varies between people. Some people like a snug fit, others would feel much more comfortable in a less fitted dress – both from the same size and the same pattern. If you look at the examples in the course, the teacher often leaves much more ease that I have in my own dress. I suppose I am mostly used to wearing stretch clothes and so I fitted the dress more to my shape than I could have done. The perfect fit is up to you to decide and is ultimately what you feel comfortable in wearing. The class really is there to show you how to make alterations to your pattern to make it fit as you would like and the principles you learn would apply to any dress-making project, loose or fitted, fixed or stretchy. It was certainly worth it for me. Maybe you’ll be lucky and win the class!
This is so helpful! I usually wing it but will def take a closer look at this post and possibly take the class. You are indeed a teacher and take sewing beyond mere inspiration, continue to love your blog!
It does not look at all frumpy, Deby! Although I can relate, I feel frumpy in almost everything I wear, LOL. The dress is beautiful, and a perfect fit! Nicely done!
could you put/make a belt that may help define your waist area, that would make you feel more comfy in the dress. Because it does look very nice on you
TFS Sandy!! I haven’t yet tried a muslin before sewing an outfit. I am going to try doing this with my next clothes pattern.
Its lovely, you did such a great job on it, the fitting is sooooo good! The dress looks very nice on you. But I understand we all have our own likes and dislikes for what we wear, but it truly looks lovely on you.
Thank you Sandy. I think it’s mainly two things – the horizontal line across the waist seems to me to make my waist look even wider than it already is, and that mid-height neckline. I would usually wear something lower. It feels just a bit ‘frumpy’ perhaps. Some would call it a classic style I suppose. But I’m still happy with it, and mostly with the skills I learned in the course which I know I’ll be able to put to so much use. And the basic pattern I made in the course is going to be so useful going forward – I’ll be able to use it to decide which size to cut right from the outset. I think it’s been a great success. Thanks for writing Sandy.
It really fits well, and not flattering??? Why not?? I think it’s a lovely dress and suits you well!! neck line ok…, I also should lower it, don’t know if you can but I also would iron the waistline, so that’s more neat and straight.
I also love the fabric!!
You are so right about the pressing! It really does make all the difference when sewing to press as you go. I was a bit reluctant with this fabric in case all the sparkles melted off!
This dress may not be your style but it looks GREAT on you! Maybe you should rethink it 🙂 I am like you and so many others that sew garments for themselves….frustrated….Thank you so much for your step by step review, you have inspire me.
That dress looks great on you, of course, much of the credit goes to the fabulous job you did on the fitting.
You are being too hard on yourself. You may have a bigger waist than you would like but you are far from pillar shaped. I bet few people have the ideal 10 inch difference between waist.
When I took a draping class, one of the things the instructor stressed is that even if our measurements are the same, we may not look the same. I have very narrow shoulders. I carry all my weight in my bust, tummy, and rear. According to my measurements I am a figure 8 or a X but in reality I am a definite pear shape with a large bust.
She had us create this contraption using two L shaped rulers to compare our bodies to our mannequins. The results were interesting.
regards,
Theresa
I think this a very flattering dress for you … perhaps it’s out of your comfort zone. Good job!
Oh my! This is indeed perfect!