


Welcome to Episode 10 in the How to Sew A Skirt Sew-along series. The subject for today is: Sewing an Invisible Hem
Our skirt is nearly finished. For me, it's been a marathon of not just sewing, but taking notes, taking photos and blogging too. My new skirt is already finished so I know it's been worth it! I'm using the example of the skirt in the middle here during our Sew A Skirt series.

Sewing an Invisible Hem
When it comes to hemming the skirt there are SO many options. You can simply turn up the hem once, press then turn up again, and sew around with a regular straight stitch.
Or you could do a fancy hem finish with a hemming tape -from Stitch in my side.
Or you could turn and hand stitch – from Megan Neilsen.
You can try any of these options, or if you fancy, how about having a go at an Invisible Seam, sometimes called a Blind Hem? An invisible seam isn't completely invisible – depending on the fabric and thread used, you might still see some regular tiny stitches. And in a patterned fabric like mine, you cannot use a thread that matches all parts of the pattern, so some stitches will show. But it does give a very nice result and I recommend having a try at this.
I'm working on a leftover piece of fabric from my skirt so that I can show you the process using a bright pink thread to make the stitches easier to see. If you haven't done this type of hem before, then do practice before trying it out on your skirt.
Preparation
The preparation of the hemline is important for this type of seam. Once you have tried on your skirt and decided where you want the finished hemline to be, do measure this and mark it.
- First measure up 1/4 inch all the way around your fabric and press the seam to the wrong side.
- Then fold the fabric inside again until your skirt is the correct length. Measure how much you have turned and turn this same amount all the way around to get an even hemline. Using a sliding hem gauge will help.

- Once everything is pressed, you have to fold your entire hemline back to the outside of the skirt, just leaving a small area of the first turn visible. This is where your stitching will go.
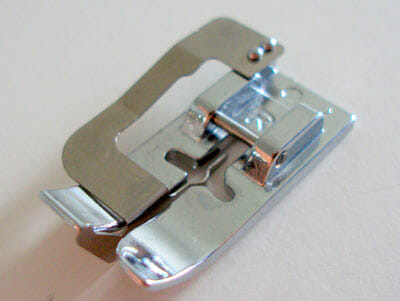
- Select the invisible hem stitch from your sewing machine – consult your manual if you need to for how to set up the width of your stitch and adjust it if necessary.
- If you have a Blind Hem Foot, great. If not, you may still be able to do this with a regular machine foot if you line up the fabric carefully and stitch slowly.
- Take your fabric to the machine and line up as shown….
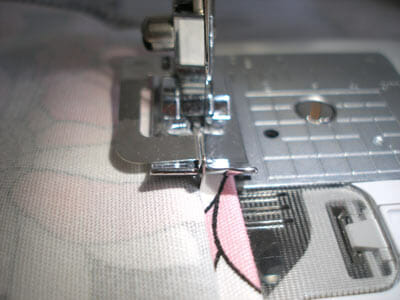
- When you sew, most of the stitches will be on the right hand side in the folded part of the hem fabric, and when the needle swings to the left, it should just catch the fabric to leave a tiny stitch.
- Practice on spare fabric first to get your stitch width settings correct.
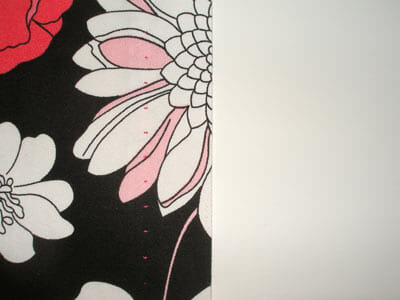
- Once sewn, the hem should look like this from the inside…

- And like this on the outside of the hemline. Remember I am using the bright pink thread to show you the tiny stitches.
- If you are happy with your practice, now go on and do the same to the hemline of your skirt. Press when you are done.
- If you don't have the right presser foot, or don't feel confident – that's OK, just try one of the other more simple hemline finishes instead – try here, here or the links above.
Our next step
A quick recap of what we have completed so far in case you have missed a step and need to review :
- Overview, tools and equipment and choosing your fabric
- Drafting your custom fit pattern, and all about ease and seam allowances
- Cutting your fabric and pattern matching
- Marking darts perfectly
- Sewing darts perfectly
- All about zipper feet
- Sewing an invisible zipper
- Lining a skirt – part 1
- Lining a skirt – part 2, the zipper
- Sewing the hemline
Join me soon for the next step in our Sew A Skirt series – Finishing and series round up
If You'd Like To Support Our Site
If you want to help us continue to bring you a wide selection of free sewing patterns and projects, please consider buying us a coffee. We'd really, really appreciate it.Never miss a post, and follow along with the Sew A Skirt tutorial series. I'll send all updates to your mailbox twice a week for you to keep and follow along at your own pace.
I'm really looking forward to seeing your skirt and featuring it on Sew So Easy!
I promise, no spam. Just an email once or twice a week with the new posts.


[…] a sew-a-long series of posts for beginners covering every step in detail from choosing fabric to inserting the invisible zipper and lining the skirt too. It's been really successful and ladies have written to tell me how they […]
[…] overlocker or zigzag to finish the hem, then turn the hem 1 3/8″. I suggest using an invisible stitch at this point. See the linked post if you need help with […]
This is great for wovens. What is the trick for hemming a knit that is larger on the bottom?
A serger and a twin needle will do the trick.
I am very short, so whether I sew the garment from scratch or purchase it, I have to hem it. I have used a blind stitch hemmer for years and absolutely love it. Thank you for offering a tutorial for all to use and learn by. Sometimes we all need a refresher on how to do something.
Hi Deby,
I have a question here .
When we are hemming flared skirts with fabrics having some weight(Med weight cotton). Then when we double fold the hem has to be eased in right. The bottom edge will be longer than the place where it is to be folded and sewn (because of the flare) how is this tackled. For light weight fabrics the hem will be narrow so this is easy. But I am confused with med weight fabrics and when hem must be like a inch or so. Is really double fold hem recommended in this case ?
Thanks for the series. I had fun reading through and refreshing my knowledge base:)
It’s not something I’ve had to do so far because the more gathered skirt doesn’t often suit me so almost all the skirts I sew are straight. But I have seen an article somewhere, which escapes me now, where after the first small turn, a line of almost basting stitches was sewn round and when the hem was turned up, the basting stitches were just picked up with a pin every few inches and pulled ever so slightly just enough to ease in the extra. If you have a serger I guess this isn’t a problem, but for us with just the regular sewing machine, dealing with raw edges can be more of a challenge. Most double old hems on a circle or curved skirt are going to be narrow for this very reason that turning up a wider hem is nearly impossble to do neatly. (I found this page to explain – http://studentz.squidoo.com/how-to-hem-a-circle-or-tight-curve-sewing-tutorials-tips)
Yes . True it i not easy. i too read some articles online and I am going to try some methods. Thanks Deby .
This is a great series! I love to sew for myself and all of these tips help projects look more professional!
Thank you for following along Sheridan. I really wanted this series to be different to a lot of the other ‘learn to sew’ series out there. By the end, if you have followed along through all the tutorials, a reader will have a really well fitting, and well finished lined skirt and will have tried out lots of useful sewing techniques. I think its important to concentrate on fit and quality finish so you can be proud of the result. None of us want our clothes to look ‘home made’ but YES to quality handmade.
Ooh I love blind stitching but haven’t done it for years! Thanks for the refresher!
I haven’t had good luck with this stitch so far, but I’m going to try it again tonight; my husband has a pair of pants that need to be re-hemmed. Thanks!
Hi Deby,
You inspire to go back to sewing. It has been awhile I have touch my sewing maching buddies. I like that there is a blind hem foot available, making it easier to sew hem like this.
Thank you so much for sharing all your sewing tutorials at Pin It Monday Hop. I appreciate it.
Judy
pursuitoffunctionalhome.com
Thank you for a great tutorial!
Sewing an invisible hem, that is something very usable for me to learn. Thank you so much for your tutorial!