


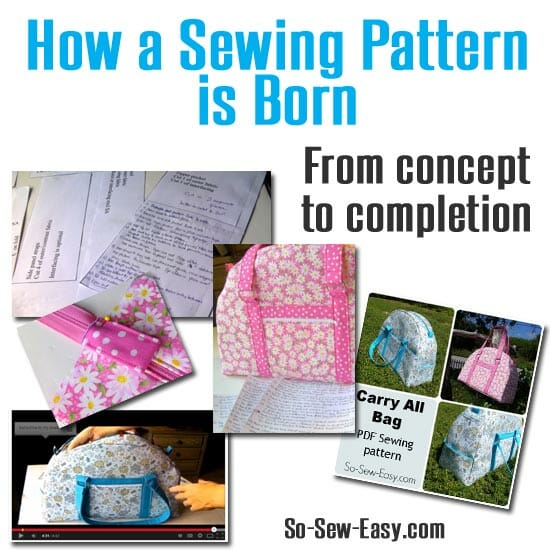
Over the last few months, I've had several readers write and ask about how I design and produce my sewing patterns. I thought it might be interesting to see how a pattern is developed right from the early stages of first idea through to pattern development, testing, and the production of the samples. So here goes – from conception to birth of a sewing pattern.
Stage 1 – inspiration and conception
How does a pattern design start? For me, it often comes from considering what I personally want to wear or make. A LOT of time and materials go into developing a pattern and if it wasn't something I was personally interested in, I would quickly loose interest.
Inspiration can come from several sources. Obviously for a lot of crafters, inspiration comes from Pinterest. That's why we collect all of our favorite pictures and links into such nice organised boards, so we can find them later. Like an online ideas and inspiration scrapbook. I also find myself looking at people differently when I'm out and about. “What are you staring at?” my husband will ask and typically my reply will be along the lines of “I love that dress. I wonder how easy it would be to sew?” or “I'd love to make a bag like that.”
I've taken to carrying around a note pad and pen wherever I go and when I see something I like, I'll draw a quick sketch and some notes. It was from one of my sketches that this Carry-All bag started its life.
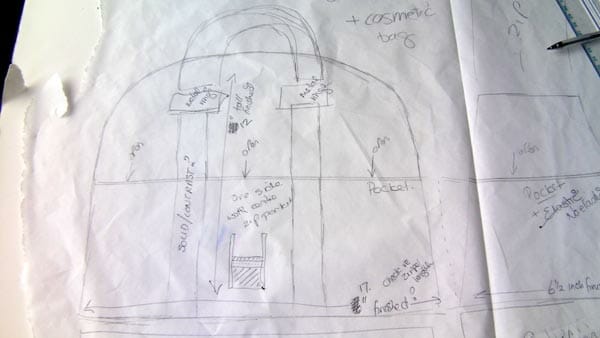
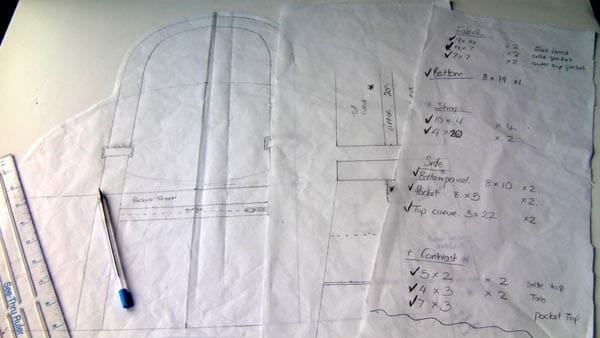
I'll sit with a big roll of my pattern making paper and draw a rough sketch, and mark on a few initial ideas and measurements. It's pretty scrappy at this stage and I'm not exactly what you would call an artist!
But the basic idea is there and recorded. Time spent – about 45-60 minutes.
Stage 2 – first days
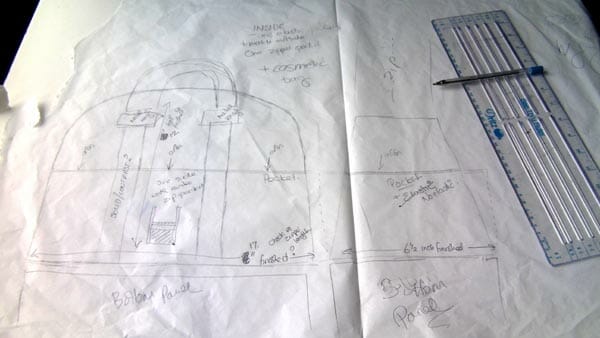
So I have an idea, but will it work? How would it come together and function in real life? Do I want to spend days making this bag/project/garment over and over again? If the answer is yes, I'll start to draw up a few scale drawings and see how the proportions look.
I'll often at this stage make up the pattern in paper and tape it all together to get an idea of how it might look. Then if something is glaringly off, its too tall, too short, to narrow etc, I should be able to pick it up in the first 3d paper format.
My scale drawing is altered at this stage, and further 3d models made up if needed until I'm happy with the design.
Then I think about fabric. Assuming this bag is going to be made from fabric 44 inches wide, do any of my pattern pieces exceed this? Or will the project use far too much fabric or require too many accessories to make it uneconomical or unattractive to sew?
I'll do a rough idea of how much fabric it's going to need to see how reasonable this might be. Assuming fabric is often bought by the yard, I'll try to get the pattern to fit roughly within a yard of fabric, or two for a dress. It's too early to tell for sure, but an early indication is a good idea.
Time spent – 4 – 5 hours
Stage 3 – concept testing with an ‘Ugly'
So my idea might seem to work out on paper, even in a 3d model, but what about fabric? Will it be easy to construct? Will I run across any problems I hadn't through of?
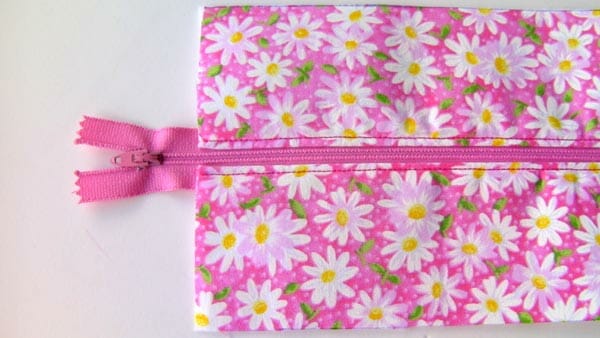
I draw the pattern straight onto some fabric following my scale drawings, then cut out with a wide seam allowance. I'll sew together my first ‘Ugly' version using what ever $1 fabric or remnants I have hanging around. I was lucky to get this bag out of a single piece. I often make my first test out of all mix and match scraps! Everything is basted in place so I can reclaim my zippers etc for use again.
Introducing Ugly !
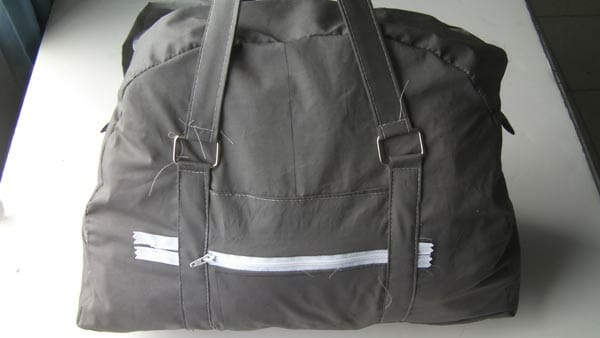
So this gives me an idea of how the bag will look made up in fabric, how the construction works, how the proportions work out. I make a few rough notes as I sew, change a few dimensions. I don't usually have a complete disaster at this stage, thank goodness.
Time spent – depends on complexity of pattern – approx 4-5 hours
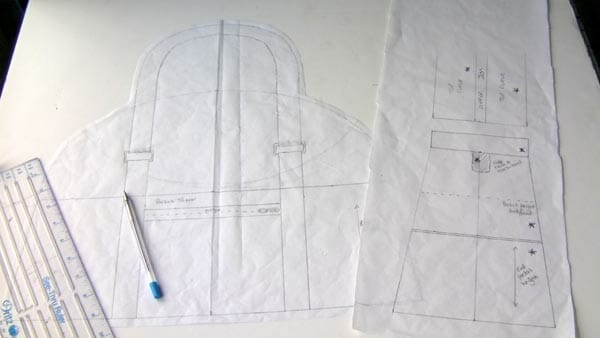
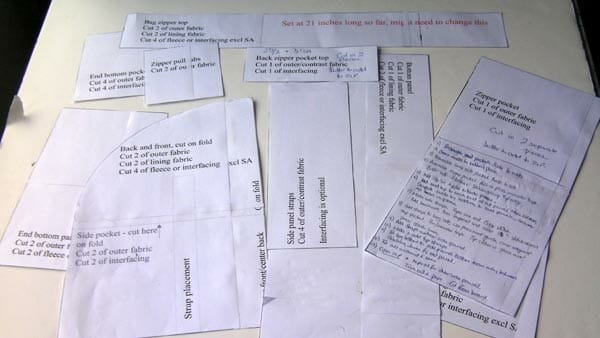
Stage 4 – drafting the pattern
Now it's time to start work on the first draft of the pattern diagram itself. For a pattern like a bag where there is only one size, I can draft straight onto the computer. But for a clothing pattern where it has to be graded, I'll go back to my big roll of pattern drafting paper and draw out the basic pattern. I always start with my own size and then I'll usually draft up and down from there, grading to the different sizes.
Once my pattern is drawn up on the drafting paper, then I need to cut it up into smaller pieces that will fit in my scanner, and scan each piece individually. Its a bit tedious. But next comes the puzzle. Once all the pattern pieces are scanned, I open them in my drafting software and have to put them all back together again to make the whole pattern. Getting everything just so, so that all the lines and exactly matching can be laborious and I certainly need my reading glasses and some coffee for staring at the screen so long.
Now that I have my hand-drawn pattern in the software, I redraw all of the pattern lines and sizes, add in markings, different colors and dotted lines for the different sizes.
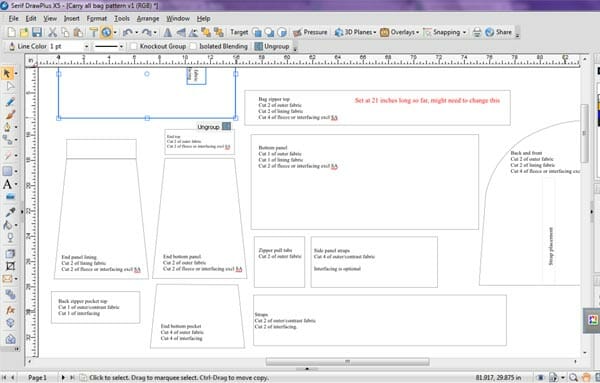
If I'm making up a bag, like in this example, I'll draft straight into the software because there is just one size. Using my scale drawings from earlier, and the notes I made during the sewing of Ugly, I make my first pattern pieces. I add in some notes where I think I might want to make changes or double check. Version 1 is complete.
Time spent – depends on type and complexity of pattern. 4-6 hours, more for clothing with graded sizing, 8 hours or more.
A note about software. I use Adobe Illustrator and the Adobe Creative Cloud to draw up the patterns in digital form. I found it quick and easy to learn the basics, as I was already familiar with using Photoshop and it's not much different. It has the ability to export directly to PDF which is useful, and the software can be accessed on a low-cost monthly subscription for something that used to cost thousands of dollars to buy outright. If you want to draft your own patterns, I recommend Adobe Creative Cloud.

I also invested in a Wacom drawing tablet so that instead of trying to draw straight lines with my mouse, I can draw them more naturally with a pen-like tool on the digital tablet and it draws lines in the software. It's much easier to get curved lines accurately this way.
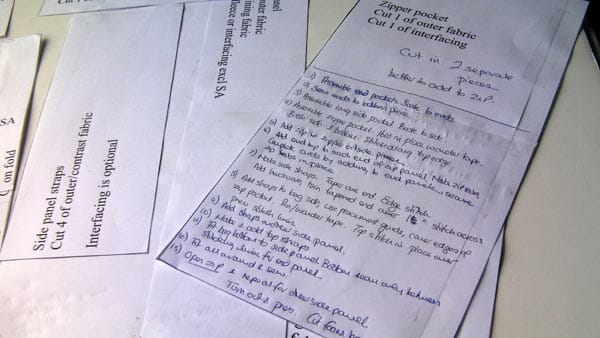
Stage 5 – checking the pattern
The pattern is printed for the first time. Did it print correctly? Are there any glaring mistakes, wrong lines or colors, lines that don't match up? Are all of the pieces there, did I forget anything? Did I remember to add in the seam allowances!
The printed pattern pieces are assembled and carefully checked against the scale drawings and notes made during the construction of Ugly for any revisions. Pattern seams that are intended to match each other are checked in length.
I make any notes on the pattern pieces for things to check during construction or alter in the next pattern revision. Any glaring errors are corrected now.
Time spent – 2 hours.
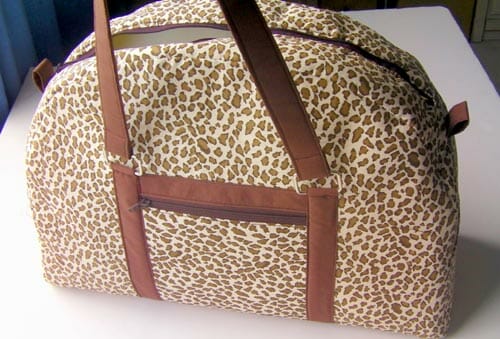
Stage 6 – the ‘wearable muslin'
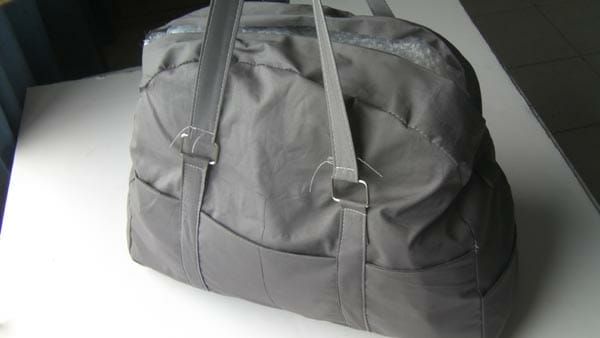
The next stage of testing is the first real test of the pattern. The end result of this test if everything goes well will be a usable or wearable project, although probably not perfectly constructed for this first trial run.
I want to be very accurate so I use the exact materials the pattern is designed for rather than scraps and if it turns out well then it might be suitable for marketing photos, so I try it pick a semi-nice fabric for this first trial. I also make sure I cut perfectly accurately, perfectly on grain, and on the reverse of my fabric I mark the stitching lines on each piece to make sure that during construction I am sewing with the accurate seam allowances at all times.
During the sewing process I refine the order and method of construction and make notes n the order as I go along. Sometimes my seam ripper comes in very handy at this stage as I work out the best order of construction, or continue to make some more small changes to the pattern pieces.
Eventually my first trial piece is completed.
Time spent – for this bag, 8 hours.
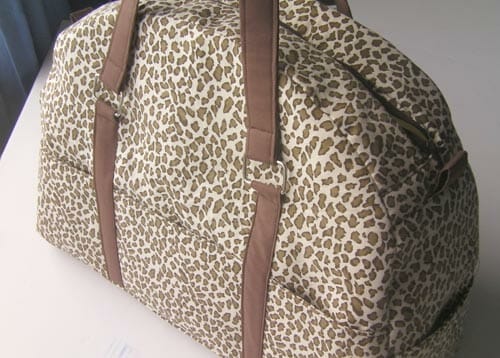
Stage 7 – the ‘Instructions' bag
The pattern pieces are revised again if needed following the first ‘wearable muslin' test in Stage 6. Usually, only minor changes are needed at this stage.
Then it's time to make another piece, using the revised pattern pieces. Each time, I print a new pattern and use it to cut the pattern pieces, just in case I've made a mistake with any of my revisions.
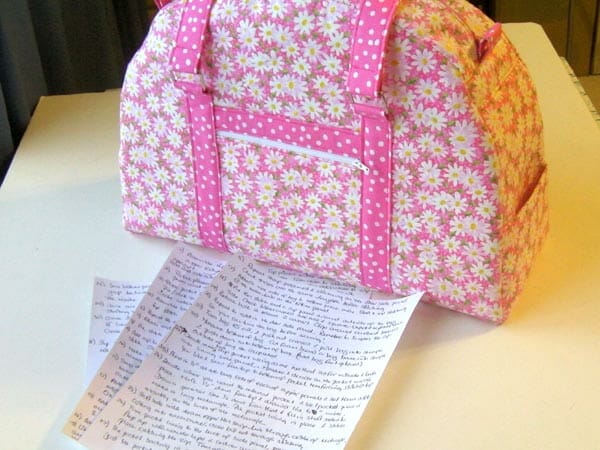
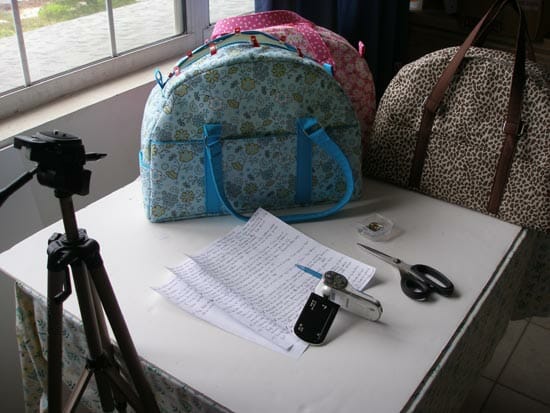
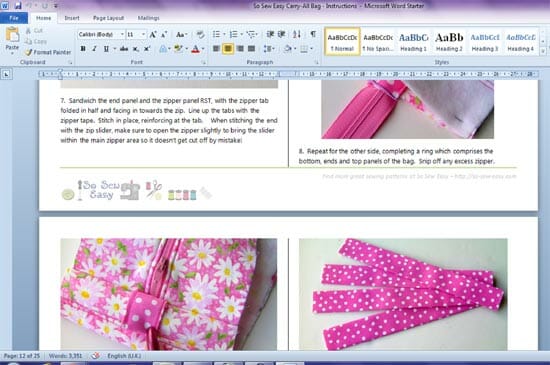
Using the order of construction notes and the latest pattern revision, another garment/project/bag is carefully sewn. This one is going to be the basis of the written and photographic instructions so again it has to be carefully and accurately sewn.
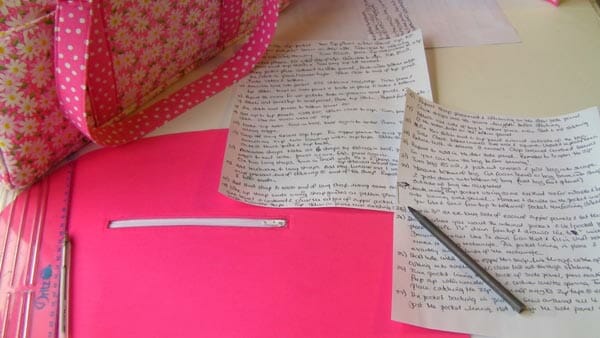
As I sew, I take several photos of each stage of the construction and I start to draft long-hand notes about the construction which will form the written instructions in the pattern later. I try to take a lot of photos just in case any of them are blurry later on. But photography still isn't one of my strengths for sure!
Everything should go together smoothly at this stage, my construction order should work out nicely, and the finish should look good. My stitching needs to look nice and neat for the working photos (although it often doesn't and I don't really mind, I'm just human). Over the course of making this pattern it went from early morning to late evening so getting consistent lighting and color on the photos can be difficult.
My seam ripper is still my friend but we shouldn't need to get together on this version.
Time spent – 8 hours
Stage 8 – the ‘video' bag
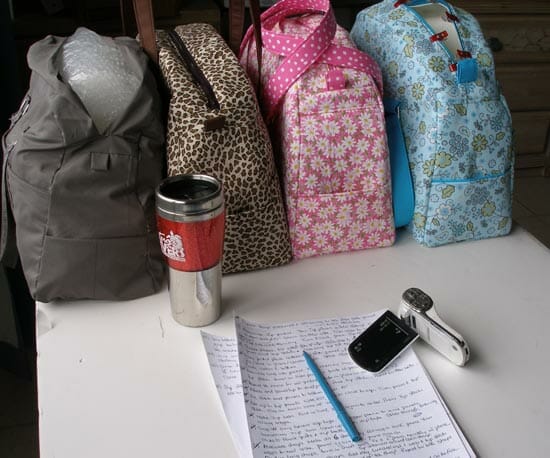
At this stage, this is usually at least the 4th time I will have sewn this bag so I should be pretty confident that its all going to work and that I can talk someone though the construction steps in the right order. I get out my video and tripod and get to work.
I try to pick an attractive fabric and one that is light enough to show up well during the video. I'll use a thread that isn't too close in color usually to the fabric so that if I need to, I can show some of the stitching. It takes a long time.
Of course it doesn't all go in one take. I often stumble, stutter, get tongue-tied or just find myself rambling on and on without getting to the point! Sometimes my cat likes to get in on the action by jumping up mid-shot as he thinks I am talking to him, and he lies all over the fabric. Or my husband will shout up to ask if I want a cup of coffee. In which case – I'll need a re-take. Sometimes several times.
Eventually the video is completed. My sewing is completed. I'll usually have sewn the same thing at least 4 times, sometimes more, specially for a clothing pattern where I want to get a good fit or perfect a particular styling.
Time spent – 8 hours (3 changes of video battery and a lot of coffee)
Stage 9 – the editing
Now it's time to move away from the sewing machine and on to the computer. I have a lot of photos and videos to edit!
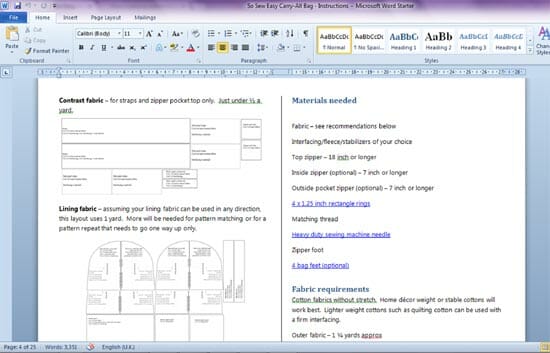
I start by typing up all of the step by step instructions, including materials list, fabric recommendations, sizing details if needed, and any special notes needed for the construction. I try to include a few links back to my site for the tutorials page, or links to other sewing patterns to bring some traffic back from the patterns to my site where I can.
I set up fabric layouts in Serif and try to get the best possible use of fabric. The Carry All bag has layouts for the main fabric, the contrast and the lining. I should now be able to get an accurate idea of how much fabric is needed. Of course if the fabric only works in one direction or needs pattern matching, more will be needed so I can't tell you exactly what you might need.
It takes a while to type up all of the instructions and keep re-reading them to make sure it is both concise and makes sense. It's only too easy for me, I've sewn the pattern several times already, but I need to write in a way someone who has not sewn this type of project before can understand and not make a mistake.
If I haven't done already, I'll need to take the proper shots of the finished project to go into the blog post, and for use in marketing the pattern. Usually this is the most traumatic part of the whole process! I'm terribly camera shy and hate to have my photo taken so I've always got a strained expression on my face, and my husband gets all tense because I'm tense and we usually shout at each other. At least the bag can't shout back in this example. But getting a good setting can be difficult because the wind is always blowing strongly so my hair looks silly, or the skirt blows up or the bag blows away! But we get there in the end.
The written instructions are finished in their first draft form and ready for checking.
Then it's time to edit the video and cut out all the bloopers. I just use Windows Movie Maker that came on my computer. It's easy but it can be fiddly to try to make good transitions between the shots and the video editing takes longer than I would like. If I got it all right the first time, it would be much quicker!
The finished video for this bag came out at 40 minutes long so I split this into 6 smaller sections to correspond with sections within the written instructions, so a reader can only watch the parts they want to.
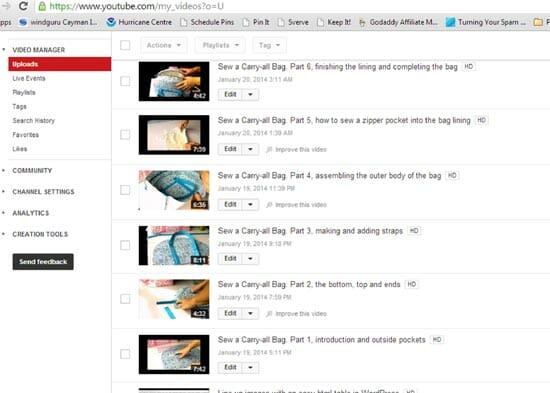
Videos are saved, uploaded into YouTube overnight, linked together annotated, descriptions and keywords added.
Time spent – 6 hours
Stage 10 – the pattern testing team
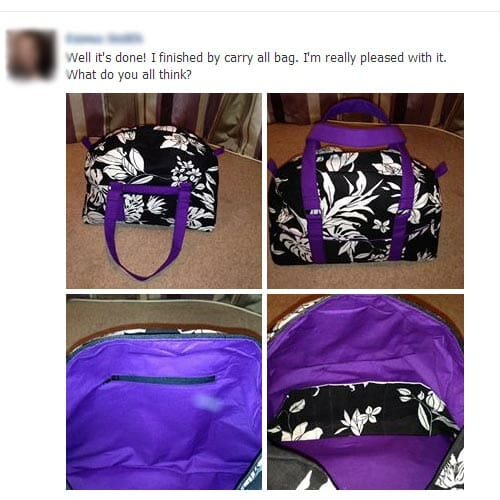
It's time to see what the team think! I'll send an email to the pattern testing team to let them know the latest pattern is available. I send some photos, usually just a few quick snapshots at this stage, give them details on materials and sizing. Not every pattern is everyone's cup of tea so not everyone wants to sew everything. But usually a good number will apply to put the design and instructions through their paces.
We chat back and forth during the construction process, I clarify any points, read through all their suggestions and I always really enjoy looking at the photos of the finished items. The team – all of you – you are amazing! Thank you all so much.
A deadline for completion is set and I'll review all the comments, review forms and feedback left during the review process, and save all of the photos submitted.
Time spent – varies. Approx 2 hours to upload files and set up and send emails
Stage 11 – final revisions
The feedback on the pattern is in. Hopefully it's good with no major issues found. Any minor adjustments suggested to the pattern are carried out. Instructions are revised to take into account the suggestions from the pattern testers. Revised files are saved and uploaded.
Time spent – about 6 hours
Stage 12 – uploads, launch and promotion – the pattern is born
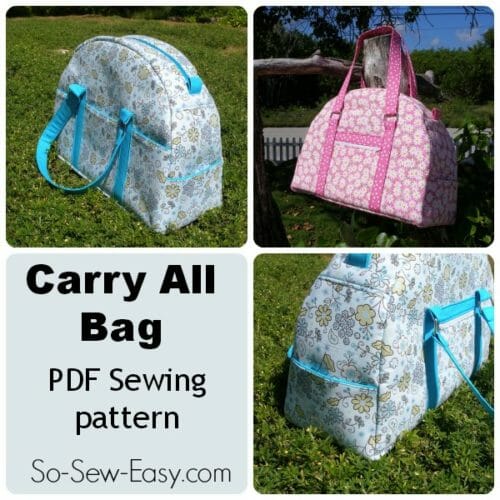
It's time to bring the pattern into the world. It's been a long time in the making, usually around 6 weeks. I make the video lessons public on YouTube. I'll load the pattern and instructions onto Craftsy so that readers can easily add the pattern to their cart and download it from there.
The blog post is written including a selection of the pattern tester photos and feedback, and I design the graphics and photo collages to use in the blog post and for marketing the pattern. The post is scheduled to go live and I put a note in my diary.
On the day the post and pattern goes live on So Sew Easy, I spend some time promoting and listing details of the project and pattern across other sewing related sites to bring in more traffic to the launch, and hopefully even a sale or two!
Time spent – 3.5 hours
Stage 13 – start all over again with the next one!
I kept a record of time spent on this Carry-All bag pattern just to see how long it took from start to finish to develop and publish this pattern. I was amazed at how long it took:
- inspiration and conception – 1 hour
- first days – 4-5 hours
- concept testing and ugly – 5 hours
- drafting the pattern – 6 hours
- checking the pattern – 2 hours
- the wearable muslin – 8 hours
- the instructions bag – 8 hours
- the video bag – 8 hours
- the editing – 6 hours
- the pattern testing team – 2 hours
- final revisions – 6 hours
- upload, launch and promotion – 3.5 hours
Total time invested in developing this Carry-All Bag Pattern – 60.5 hours approximately. A full 6-7 days work.
When I look at it like this, including the time taken and all of the materials used in the process, it's a lot of hard work and expense to design a pattern. This is one of the reasons that prompted me to start offering some paid-for patterns as well as the free ones. That is a lot of hours work to put in to give away all the patterns for free!
Some are of course more popular than others, some get more sales, some take less time to develop than this Carry-All Bag. Do I enjoy it and is it worth it? Yes, I do enjoy it, and no I don't get enough sales on each pattern to make it ‘worth it', but I still love doing it anyway and I'll keep on doing it every month and hopefully get better and better too. Practice makes perfect.
Watch out later for the Carry All Bag release.


It truly is an eye-opener as to how much time and effort go into this process. Thank you for your passion!
Thank you for taking the time to explain how you create a pattern. I have been leaning in that direction for the past 4-5yrs and was interested in comparing notes. I find the general population don’t realize the time involved that goes into a well made pattern or design. Word of mouth goes a long way. Thank you very much for detailing all that goes into your work, I certainly appreciated this. Pat.
Fascinating! Thanks for sharing your process. I have a favorite little shoulder bag that I would love to reproduce. Your article has inspired me to try.
Nice! And I love this bag! I made three! One fir each of my younger girls and one for me. Lol I need to make another now fit my hubby. Lol
Having designed patterns, both garment and quilt, I understand and appreciate the amount of time that it takes from inception to finished product. I think you are incredibly generous In giving away some of your designs. Thank you for sharing.
I was just wondering the other day how patterns go from concept to useable. This was fun. Thanks.
This was “sew” fascinating!! (sorry, I couldn’t resist). I would never have imagined how much goes into pattern drafting. It’s obviously quite a challenge but it certainly must be rewarding to see your ideas come to fruition. Thank you for showing us how this is done.
It’s terrific that you offer so many patterns for free but I wouldn’t mind paying for any of them.
Speaking of which, you published a pencil skirt pattern/drafting project some time ago that I’d really like to try. However, I went to download the Pencil Skirt Pattern Sloper Calculations Spreadsheet and was unsuccessful. Is it still available? Is there a way you could provide it?
Thank you so very much!
i love the design part of any project….this was wonderful.
thank you
Hi Deby: Are you a teacher of some sort? Because your explanations are clear and interesting. Here, in UK , handmade stuffs are not apprecited at all. People want to pay less than the one in a shop even knowing that those are made in China by millons. It is very disappointed.
I agreem people who make things reort this the world over. No one appreciates the time and effort (and expense) to make these things. They’ll gladly pay $40 for a 20 minute hair cut but only want to pay $10 for that wallet that cost you $8 in materials and 3 hours to make. I think arts and crafts are seen as a hobby by some – but not all. We just have to find the right market for those products, and its not always easy.
And yes, I used to be a scuba diving instructor so I’ve spent a few years breaking down difficult new skills into easy to understand sections – or at least I hope so!
Oh wow! That’s a lots of hours spend on the entire process. I didn’t think it took so long. Keep up the excellent work.
Hey there Deby! Love your web site! LOVE all the bag patterns! I enjoyed this blog about “how-to” make a pattern. Wow. I have made some patterns for my own use in the past – but have not ever made anything that I know someone else could follow! Lots of details for ya!
You mentioned the “the pattern testing team” ….. oooooo, that sounds like fun! If you are ever in need of additional sewers on your team, I would love to be a part of it! I would be most interested in testing the bags, not so much the clothing, but maybe sometimes!
I just joined the FB group ….perhaps I’ll see you there!
Drop me an email Penelope and I can save it and add you to the list. At the moment the group is full, but when a spot comes available I’ll get in touch with you. Happy to hear you are having sucess and following along. Getting nice comments makes my day 🙂
I just discovered your site today and am bookmarking it. I had to laugh when I saw the pink flowered material you used for the one bag because I made a shirt out of the same material. I think I will be visiting you quite often! Even though I have been sewing since I could reach the treadles on my mom’s machine I always want to learn more about sewing. Thank you for being here!
So glad we found each other Miqui.
Hi Deby,
Great tutorial. We are featuring this post at this weeks party. Thanks so much for sharing it with us.
Debi and Charly
Adorned From Above
That’s so kind. Thank you Debi, always a pleasure.
I guess that is why paper sewing patterns from major sewing companies are so expensive now. It’s hard to pay $15 + for a pattern until you realize what goes into it.
Thank you for a great post. Thank you also for your generosity in offering so many lovely patterns for free, I have just completed a test of the Wear anywhere dress – it is well named, easy to sew, good fit and terrific shape that will indeed take it anywhere. Thank you again
Good to hear Ann, I;m glad it worked out for you.
I enjoyed reserving your post! very interesting. The only thing is I keep receiving the same introductory one. I do enjoy receiving your information on new items to make. I have made the travel diaper change pad with the two pockets. What a great idea, and fairly easy to make. Thanks for all your great patterns and turtotials.Diane
Hi Diane, I wonder if you have me mixed up with someone else. You mention a travel diaper change pad, but I’ve not made one of these. I’m also not sure what you mean when you say you keep receiving the same introductory one – do you mean an email? If so, there may be some kind of error – would you mind sending it on to me so I can see what email it is that you keep getting over and over? Do you perhaps just mean the weekly email from Sunday which is the round up of all the posts for the week?
This is the email I receive all the time. I am interested in new emails re new patterns etc but I do not appreciate receiving this certain all the time once y is enough. Thanks
Diane
I don’t understand Diane, I’m going to send you an email and let’s see if we can get to the bottom of it.
THANK YOU so much Deby – great post and love your detailed information. Best wishes on your continued creative journey!
How do you ensure that things are a precise size in DrawPlus? That has been my one sticking point with getting things from paper to digital is I can’t figure out how to guarantee the size of the images.
Yes, this is tricky. When you scan, you have to make sure the dpi of the scan and the dpi of the file in Draw are the same, otherwise the scaling won’t be right. I had to figure this out, and then when I opened it again later in Photoshop to add in page breaks and numbers etc, it all gets messed up again with scale. It’s really not easy! The best way is to draft directly into Draw without drafting onto paper and the scanning in if you can. Then you can set the precise length of the lines as you draw it. But its all very fiddly.
Thank you! It helps to know I’m not missing something really obvious!
Wow! Who knew it takes so long to design a pattern! I never would have guessed. Kudos to you, Deby, for spending so much time going through this process over and over! I sure admire you for that and for your designing talent!
What an inspirational post! Yep, sewing patterns are more work than meets the eye….. Thank you for sharing your ideas…!!
Pinning!! Happy Easter to you and yours…. 🙂
“hugs” Crystelle
This is a really fantastic walk through of your process. I go through something similar for knitting patterns, but have only recently started sewing again. I’m still in the beginner stages, but like to think that some day I’ll be able to sew something I’ve seen someone else wear without too much waste.
Hi Deby, just dropping by from the Pin Junkie link party. I love this bag you designed, and thank you for sharing your creative process! I studied pattern drafting in college, and remember thinking, ‘Wow, this took way longer than I thought it would!’ It really is amazing how much time goes into it. Hope you have a great day!
Thanks for sharing this – it’s very informative!
Thanks so much for sharing your pattern process! It is very interesting to see all the work involved in the background. I especially appreciated the time breakdown for each step.
This has made for some very interesting reading.
I think most people would be unaware of the time taken to develop a pattern – It’s great to read about someone who takes such pride in their work.
Where on the island do you get such great looking fabrics?
Hi Janine and thanks for leaving a comment. I’m sorry to say almost all of the fabrics you’ll see on my site come from overseas. I have to order online and get them sent by container ship. Takes weeks to get here and makes it very expensive! Sometimes I’m lucky with some knits at my local shop. Ordering online can be a bit hit and miss!
Amazing! I’ve been wondering how a pattern comes about. Now I know. I have great respect for you, to do what you do, and then GIVE THEM AWAY!!! I just wish I could manage my time better so that I could try out my favorites. I am terrible! I buy/download all these patterns and then never make them, except for two of your bag patterns. (I still need to make another one for a contest entry.) Thanks so much for what you do.
Thanks Robin. Yes, do enter the bag contest. I’d love to see something you sew.
That was totally awesome! In a 40-hour work week, that would be a week and a half to “birth” a pattern. Makes one much more appreciative of your free patterns. Plus, I always want to go behind the scenes.
I really like your site it is very informative. Want to make the carry all bag for sure
What material do you suggest for this project. Lots of great ideas. Can’t wait to get started
Diane
I used regular quilting cottons for my bags, but some of the testing ladies used home decor weight for a bit more weight and wearability. Either will do. It’s important to consider what interfacing, interlining or stabiliser you will use if you want a nice crisp shape. When the review post comes out, each of the ladies will talk about what they used to give the bag shape and make their recommendations. You can also double up – I used a Decor Bond first then a second layer of fusible fleece. This made a very nice finish. Also try headliner fabric for a lightweight but stable option too. I’ll be carrying out a review of interfacing once I get some more supplies.
Thank you so much for sharing this process Deby! I am toying with the idea of making a pattern and this gives me a place to start. This has been so incredibly helpful!!
Really glad to hear it Liza. I think perhaps it takes me longer than the average bear. Simply because I would hate for something to go out wrong, and I waste a persons time or fabric. And the video and editing takes a long time, most people would skip that part and just do the printed pattern. Good luck with yours.
You are so smart! Thanks for all the tips and for sharing this with us at the Show-licious Craft & Recipe Party. Pinned. 🙂
Thanks for sharing how technical creating and finishing a new pattern can be. I couldn’t stop reading your step by step process. I love the carry all bag! I will definitely try to make it. Working on my own basic totes but loved reading this post!
Great info Deby! Yes – pattern designing is time consuming but I love it as it challenges me. Thanks for sharing about the software you use – I will be checking that out.
Can you make a video on this? LOL. I’m such a visual learning and I’ve always wondered what steps needed to be taken to make an online pattern. I’ll have to see what Sherif is all about. Thanks again for taking the time to share your knowledge.
I’ve been following for a while now and, while I absolutely love your blog, I am so envious of your sewing and pattern making abilities. It’s like you’ve been doing it since you were born, not a fairly new arrival to the sewing scene. You’ve got a real talent!
That’s very kind of you to say Toodie. But I still have my fair share of disasters – did you see that horrible bag I made! I just don’t show them all. But I do find sewing a totally absorbing hobby and now I have got into designing my own clothes and patterns, I’m totally hooked. I’m still very much a beginner but learning new skills all the time and hope to get better and better. I’m just back from the fabric shop today where I found some great remnants and I feel some summer dresses are just around the corner – I’ll share them of course.
WOW! Thanks for sharing the process.
Wow Deby!! great that you decided to blog about this. People think that they can become designers or sewists very easily and many dont realise the hard work that goes into creating toiles and mock ups. I have never used serif but it sounds great. But can you grade your patterns in it?? I have used CAD softwares like reach or lectra where you can create blocks and then manipulate it to create different designs like we do by hand. you can also grade, make markers and export images. Its expensive but it will cut your drafting time in half and if you have access to a plotter (or a printer used for construction plans) you can take a direct print out, cut out patterns instead of drafting them twice.
Serif is just a basic drawing program, so it doesn’t do anything fancy like a CAD or the programs you mention. I just have to grade manually by drawing again in a different size and merging all the patterns for the end result. It’s a very laborious process, but proper pattern designing software is far outside my budget. Maybe one day, but I’d have to sell a LOT more patterns to justify that!
Wow! That is an amazing amount of work to create a pattern. Your bags are beautiful. Thanks for sharing the genious behind the product!
Your bags are really nice, and functional to boot. I loved reading the process and the breakdown of time for each step. Thank you!
I always like to read about how other people work. So, thank you for this post. I see that you are very thorough with your pattern-making method. I would not hesitate one bit to buy one of your pattern.
Hey
I am looking forward to this bag – it looks like it might be the perfect size for an “overnight” bag my aunt would like to have… so I’ll be definitely checking it out so see what size it is.
Thanks
Deby- I love this post! Thanks for sharing the process. It is a total time suck, but in the end the pattern and finished project is so worth it! You are a great designer!
Where can I get the “Carry-all Bag Pattern”? I’ve seen the video & would like to try the bag. Thanks. I made 4 of your make-up bags & like your videos & patterns.
Hi Diane, the final bits and pieces are being put in place and the bag pattern should be released on 17th of this month. I’m so glad you’ve been enjoying your sewing – those make up bags really are neat.