What is Staystitching?
Staystitching is invisible in your finished project but is part of the hidden bones that give it shape and strength, and a neat symmetrical finish. It is a row of stitching within the seam allowance on curved or angled cut edges. It can typically be found on necklines, around the armhole and on bias grain lines such as a v-neck.
Why do it?
Staystitching helps to prevent cut edges from stretching during the construction process. Without it, you may find one seam stretches more than another and they no longer match. Or a neckline can stretch and gape, or not match its facing.
As you work on your project, the weight of the fabric itself can pull on those curved and bias grain lines and cause stretching and distortion. This is particularly true of heavy fabrics and projects that require a lot of handling or are complicated and lengthy in construction.
It can also be used on very stretchy fabrics to help stabilize them during the fitting process.
How and where to do it?
- Your pattern instructions will generally tell you at what point to use staystitching. It's always best to use it right after cutting your fabric pieces and before any stretching can occur.
- When staystitching around a curve such as a neckline, don't try to straighten out the fabric as it approaches the presser foot – this defeats the purpose of the staystitch! Stitch slowly and gently turn the fabric as you sew to keep the stitches even from the fabric edge.
- Stitch length -use a slightly shorter stitch length than you will use for your seam lines. Having the stitches closer together makes it a little stronger hold.
- Most sewing guides and tutors will tell you to stitch 1/8th on an inch inside your stitching line. So if you are using a standard 5/8th-inch seam allowance, your staystitching should be at 1/2 inch.
- Facings that match a curved or angled edge should also be staystitched so they will match their corresponding pattern pieces.
Once the staystitching is complete, check the dimensions of the fabric against the original pattern piece. If there is some stretching, you can very gently pull it back into shape by pulling every 3rd stitch with a pin until the piece resumes its original dimensions and then pressing it back into shape. If your staystitching is a little too tight, clip a few stitches here and there, and gently pull it back into shape.
Direction of staystitching


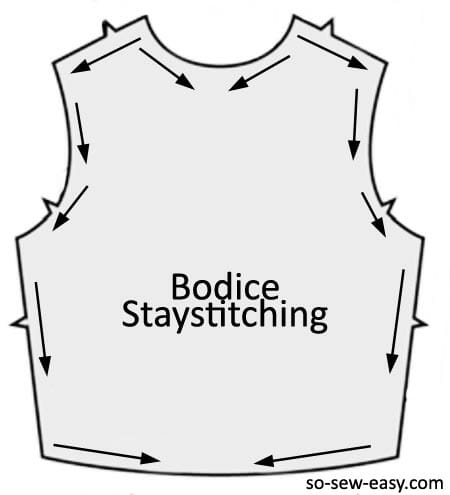
There are two trains of thought on staystitching. The ‘best' sewing manuals will tell you to always stitch in opposing directions. So for a curved neckline, you would sew from the shoulder to the center, then start again at the other shoulder and stitch to the center. In couture sewing, sewing with the most delicate of fabrics or where absolute symmetry is required, then you could take the time to make this extra effort.
While no doubt this is technically correct, for most home sewing applications, and most fabrics, a simple line around the neckline from one shoulder to the other would suffice, and most modern sewing patterns would instruct you this way.
However, it does make sense that if you are sewing one armhole from top to bottom, that you also sew the other armhole from top to bottom. If you sew one shoulder from neck to arm, you also sew the other shoulder from neck to arm.
You get the idea.
Am I going to use this soon?
Now you might be wondering why I'm telling you all this. What's the sudden interest in staystitching? Well, you might just find that this technique will be used in the next free sewing pattern coming to the site in the coming weeks.
Pin this technique so you can refer to it later! 


I staystitch necklines, shoulders, and armholes but never thought to do the facings. Thanks for that. E
I was lucky to have sewing in school and learned how important it was to stay stitch on your garments. I see that there is a lot of important details left out that would make or fail in your garments. I feel sorry that they don’t teach home economics in school anymore. the kids now days are missing out a lot.
Amazing – I never put this much time or thought into stay stitching – I now see why I have a few problems – great instructions, thanks.
[…] Stay-stitch the curve, neckline or armhole. Normal stitch length, just inside the 1/2 inch seam line. This will help to stop the curve stretching out as you work on it. Do handle your fabric carefully and avoid letting it hang or these curved edges can stretch and then getting a smooth finish will be much harder. […]
I recently made my first item, the Colette Sorbetto which needed stay stitching around the neckline. I know that you are supposed to do it towards the centre from both sides, however being lazy I did it shoulder to shoulder in one go. After going back to the project the next day, I noticed the stitching on one side was droopier, but I can’t remember if it was the “going to” or “going away” from centre.
Question: if you do it towards the centre, do you turn the fabric over to do the other side, or do you then have the bulk of the fabric on your left for one half and then switch over so the bulk is on the other side, or do you flip the piece over and always have the bulk of fabric on your left?
I would say that turing the fabric over to keep the main body on the left was the way to go. I think we don’t realise how much fabric gives and moves or stretches when sewn until you see an example like this in a more delicate fabric. It can certainly make a difference to the finished result.
Awesome tutorial!
OK I just bought some ultra cuddle for making pajama bottoms- like any other project the first GO has some stuff to laugh about, by the time you get your assembly going, you perfect it and you’ve run out of project!
On the up sides- I LOVE my first green pair, and the black ones? Everybody that sees these jammies wants a pair… so plenty of practice I guess!
( I just need to figure out how to do a reversible cowl top- one side black one side green and I can wear it with either set either way. )
I DIDN’T DO THIS STITCH- but I double pinned. So I pinned about an inch away from the side, then another inch or 2 into that. It helped tremendously to keep the fabric from sliding- the feed dogs demanded SOME action! OK I had to do something- I went with pins- I just got this email today.
I’m going to try this one next time
OK ( I’ve been project crazy lately ) then I started on a stretch burnt velvet sleeveless top, and realized half way into it- SOMETHING isn’t working here…
I decided to change stitch pattern- that stuff was going all over the place too. Although THIS top isn’t perfect, it’s more than wearable for me- it’s adorable with skirts or jeans and I can go with either cami or turtleneck like a jumper.
( Oh and forget about it- it ROCKS with my black jammies 🙂
I’m doing a dress next- same deal, same cut, same fabric, just a little longer- fab with leggings and boots
I think between change stitch pattern and a stay stitch I can nail that neck line and straps.
It’s not really a fabric you can use facing, and I’ve only just started, so I’m not really at “facing projects” yet. I did spend a bundle on this stretch velvet lace fabric though, And I’ve got a mind-riot going on over here with ideas.
So when we do the stay stitch we can just pull this out when we’re done right? Like basting?
So if I’m working with brown and black stretch velvet lace, and I use a BRIGHT RED thread on this- I can just cut the knot and yank it out right?
And start around the NECK then?
I’m not lining any of these, I’ve got enough camisoles and slips that it won’t be a hassle. I’m just not there yet on liners.
I love your newsletters! Thanks so much. And yes, there WILL be some secretly sewn undies happening with this brown fabric! I want to go back and buy the whole bolt of the stuff!
I have never heard about stay stitching before. Weird. Thanks for sharing.
Definitely a technique that makes a garment look more professionally sewn.
Wow. I have so much to learn still. Thanks for the tutorial. I did Pin it and will refer back to this and the other tutorials you have. Thanks for sharing!
I just bought a pattern for a cape for Halloween and the very first thing it says to do is stay stitch. I had no idea what that meant, so I you tubed it and watched a tutorial. Then, out of the blue, here is your post about stay stitching! I pinned it and will refer to this in the future. Thanks for the tips and uncanny timing!
Glad it came in useful Trina. It’s not something you see mentioned on sewing blogs very often – I guess its not ‘sexy’, but it can really make a difference to your project and prevent problems before they happen.
I never heard of stay stitching before, you live you learn, I guess! Thank you for the tips and advice!
I always forget to staystitch. I know it makes a big difference in the final garment, maybe it’s because I use knit so much I rarely need to staystitch!
great tutorial, thanks!