


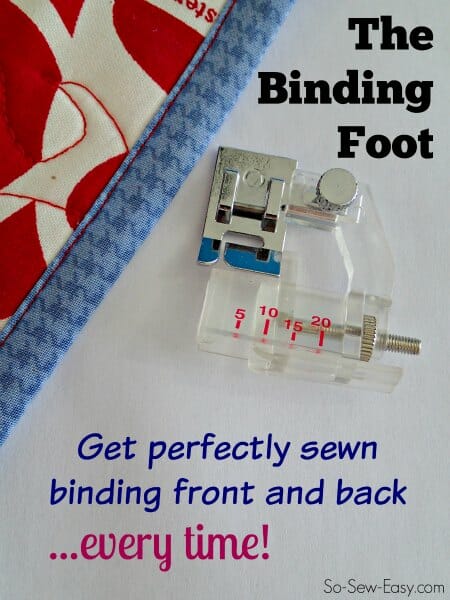
If you get frustrated putting on binding because you sometimes miss catching the back of the binding and get little gaps – you need this article! Never miss the back again and get perfectly straight stitching – learn how to use the Binding Foot.
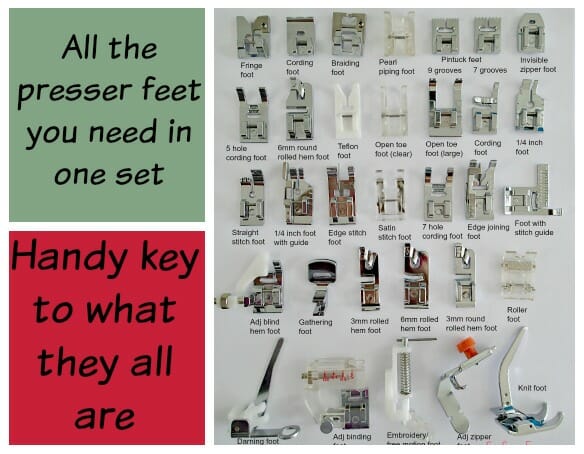
Do you remember that lovely big box of sewing feet I bought? I've been gradually working my way through them a bit at a time, with varying degrees of success. I'm never one for worrying too much about the accuracy of my sewing so these are certainly helping me get a great finish on all of my test pieces.
There is one, in particular, I wanted to share with you, the Binding Foot. This is a revelation! I now worship the binding foot and have been making up all sorts of little bits and pieces to add some binding onto.
Let's take a look at how it works
Features of the binding foot
The binding foot is adjustable so that it can deal with varying widths of binding. It works with bias binding and is perfect for use around gentle curves and circles, and it also works with straight-cut binding for straight edges too. With some practice you can also use it to get neatly mitered corners too – maybe once I get a bit more practice, a new how-to will follow to show you my tips for doing that. For now, we'll assume we have to add binding to a straight edge and will do it in a single pass, sewing front and back at the same time (perfectly).
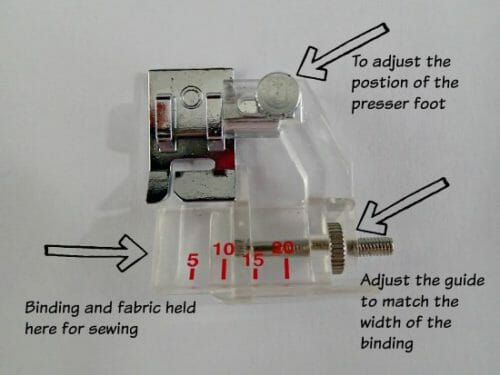
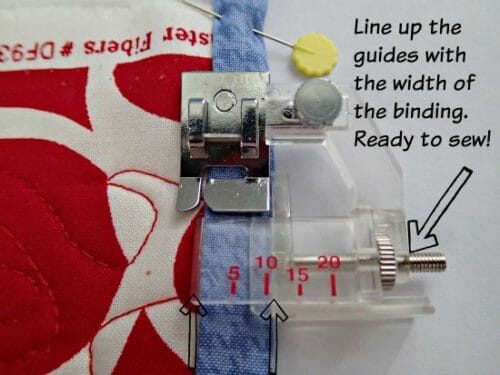
There are two wheels on the foot. One so that you can adjust the position of the foot itself and slide it left or right and then another wheel that adjusts the width of the clear part of the foot that holds the length of binding. This controls a sliding guide that runs along the length of the binding as you sew and keeps it snugly in place against the guides for perfect stitching.
The plastic parts are flexible, especially when that lower wheel is turned to the wider setting so that they can be opened wide to allow the fabric and binding sandwich to be put together.
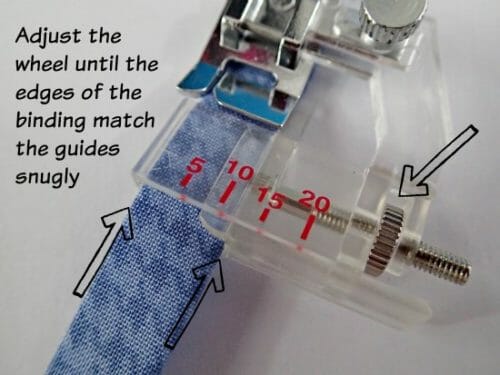
Mine has numbers printed on indicating the width of the binding, but you don't really need the numbers. Just turning that wheel until the binding is snug is more important than using a number as a guide I think.
How to load the binding and fabric
Open up the lower wheel to move the guide over to the right-hand side. This allows the upper and lower piece of the ‘jaws' to open up more easily. Now at this point, some tutorials I have read suggest feeding in your binding first and you can certainly try this and see if you get on OK that way.
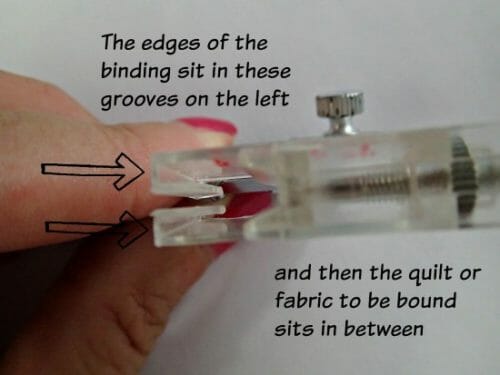
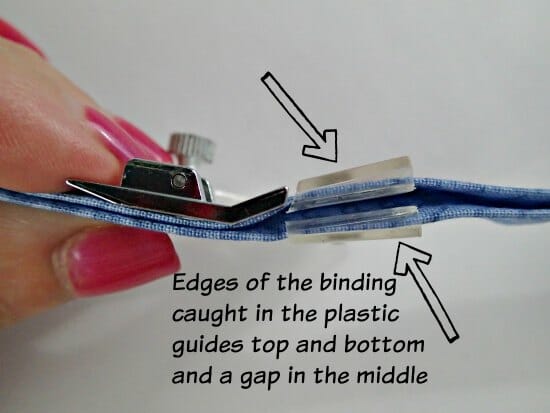
Binding first method. Feed in the binding tape with the open edge on the left and the fold on the right. Separate the open edges and slide both the top and bottom edges inside the little tabs on the left of the jaws. This is how it should look with the fabric top and bottom separated and held by the little plastic guides.
Adjust that bottom wheel until the guide now moves over snugly to the folded edge of the binding so that the binding is held in place smoothly between the left and right edges, but without puckering.
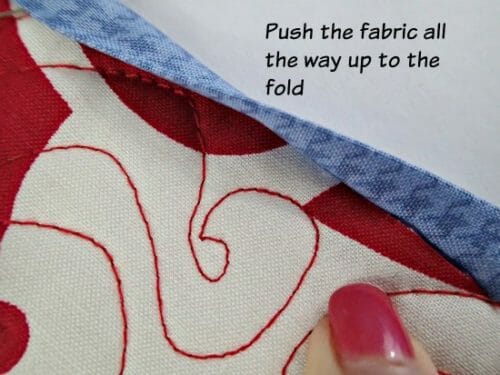
Now open up the jaws with your fingers and slide in the item/fabric/garment/quilt to be bound. Push the edge right up to the fold of the binding. Slip the foot and binding up to the start of the edge to be bound. You are all set to sew.
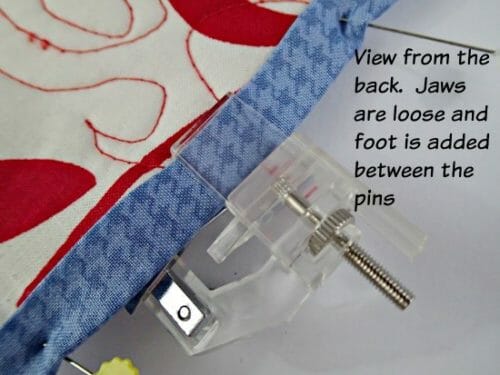
Whole sandwich method. I found this one easier personally, so try each and see which you prefer. This time instead of loading the binding first and then the fabric after, I pinned the binding to the fabric and loaded it into the foot all in one go. Move the guide over to the right so you can open up the jaws easily. Near to the start of where you want to sew, pin or clip the binding to the fabric/quilt as if it were ready to sew, with a gap of 3 or 4 inches between your pins.
Now slide the foot in place around the whole sandwich, between those pins, and position the edges of the binding in the little guides on the left. Make sure the front and the back are lying in the guides smoothly.
Turn the lower wheel to move the right-hand guide snugly up against the fold of the binding. It's all now in place and ready to sew. Remove the top pin, slide the foot back to where you want to start sewing and you are all set. Remove the lower pin as you sew.
I found this way less fiddly by loading the whole sandwich at once.
Stitching with the binding foot
If you have a machine with an adjustable needle – easy! Clip on the foot to your machine and adjust your needle to exactly where you want to stitch your binding. Pick right on the edge, or just back from the edge to be extra safe you won't miss a spot on the back.
If you don't have an adjustable needle position, then you will use the little screw at the top, loosen the foot and then slide it so that the needle position is lined up just right so sew along the edge of the binding. Then tighten the screw again.
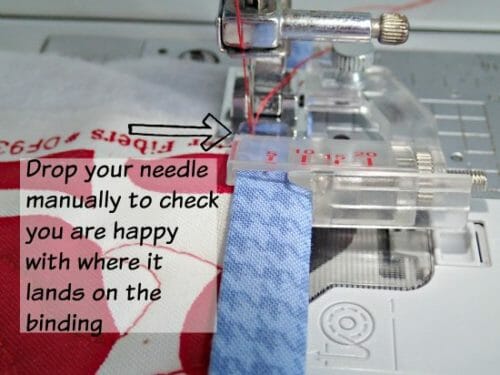
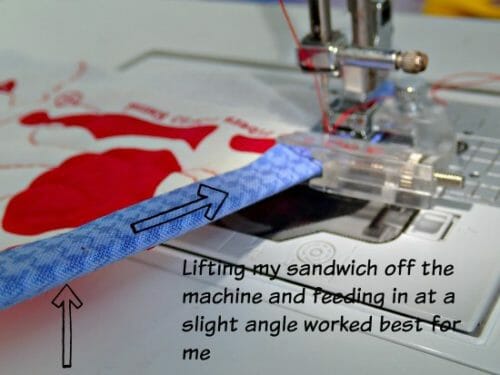
Just manually drop your needle down into the fabric to check you are happy with the placement. Assuming you are, then you are ready to sew. Your foot may be pretty flat or it might be like mine. With my binding foot, the front plastic part is at an upward angle as it faces me. The presser foot itself is, of course, flat against the bed of the machine and the feed dogs, but in order to feed my sandwich into the foot, it worked best for me to hold it up at a slight angle to feed in.
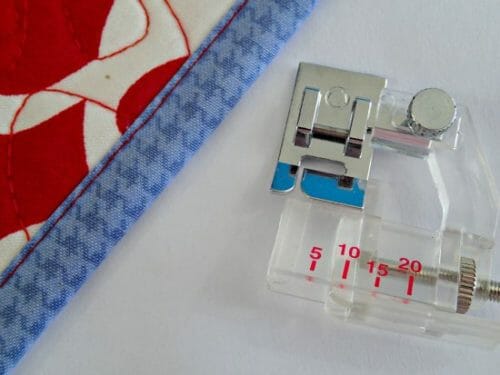
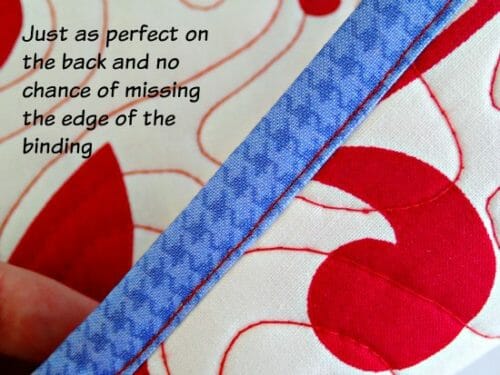
Now just sew merrily along, make sure the binding stays in the little guides and that the fabric or quilt in between the binding stays butted up close to the fold and let the foot and the machine take care of the rest. What do you get? Perfectly sewn binding front and back, a perfectly straight line of stitching, and no missed bits when you turn it over – genius!
So if it drives you crazy when sewing on binding that you turn it over and find you missed the back in a couple of spots, make your sewing life easier with one of these binding feet. Get it in the super-set of presser feet above, like I did or you can, of course, buy them separately too.
Here are a couple of really good options on Amazon:
Now relax knowing next time your binding will be a breeze 🙂


Thank you so much for this Mayra! I’m a new to sewing and I can see how this will help me both with my quilting and my apparel projects. Great job!
Thank you for the great tutorial, I have always been scared of doing binding. finally conquered my fear yesterday, came out pretty good then out of the blue I found this, looked in my feet box and found three of these feet! All this time I could have been using it. Now I will start looking to see what all the other feet in there are for. Thanks again
I have used this binding foot quite a bit, including on several quilts. The instructions that Katie posted in 2016 are pretty much what I do, I learned by trial and error! If your quilt is not too thick ( i.e. low loft batting) the binding foot works very well. I have also used it for purses, totes, placemats, stretch fabric such as jersey knits ( practice first!) and various other items. I have a Husqvarna machine. I make my own binding, and on a quilt, I always stitch the edge to prevent stretching and unraveling of any seams. Stitching the edge of a quilt before using the binding foot seems to prevent many problems! I have never used the binding foot on scallops as I think it would be nearly impossible! Have fun.
It is a Husqvarna viking machine.
I am trying to use it now but my new needle is hitting the presser foot. How do I fix it.? (It isn’t hitting on my regular foot.)
Hi Linda, you need to adjust the distance of the foot and the needle.
I had the same problem with my Viking
Thank you for explanation! I’m so lucky, I found this article by googling something else, and actually I’ve recently bought this EXACT SAME foot (and we live on different continets) and didn’t know how to use it.
Hi, I purchased this as well in hope of making binding for quilts easier. Any idea how to pass this on to creator of the foot to see if they could engineer the same foot to work on quilt thickness? They would make a fortune from the thousands of quilters out there.
Glad I went through this info before trying the foot. The foot was a Christmas gift with the intent that I could do binding on a quilt. I see from the comments that it is not for use with quilts. Also, it appears that this needs binding that’s made like commercial binding. For quilt binding, one edge has a fold and one is raw. The raw edge is sewn on first and then the binding is turned. So it appears to me that this won’t work for quilts. I also noted that someone else mentioned that quilts are too thick to be used with the foot.
Thanks for this great info here as i was thinking of buying (for simple quilting/piecing projects). But for flat, thin binding this foot is a big help.
Nice tutorial on using that binding foot.But, the tutorial linked for tutorial on turning corners isn’t really applicable to using the bias binding foot since the whole idea of using the foot is to sew both sides simultaneously.
But, your directions are very clear in that method and I’m sure it’s helpful to many readers.
Katie’s method for mitering corners when using this foot works pretty well.
Thank you for the tut. I bought this foot about 2 months ago and haven’t played with it yet. Thank you for making it easier for me to work with it.
Awesome, I just bought this sewing machine foot and did not really know how to use it. Since I´m a quilter this will come in so handy 🙂 thank you so much
Does this foot only work on Vikings?
Hi Sherry, not at all. As long as the foot is made for your machine, it will work the same way. Viking was just an example someone used in the comments. There are links to sets in the article that will work on most makes of sewing machines. Please give it a try. It’s a very useful foot to master.
Viking sells three types of binding feet for various uses. Two are cone-type and the only difference is the thickness of the fabric you can run through them. The smaller is for single layers and the larger works for quilts. They also have the one used in this article. In my experience, there’s a bit of a learning curve to using these, so I recommend one practices on scraps before jumping into attempting to bind a project they’ve put a lot of work into. I hope for the day when I get this figured out and it goes as easily as the tutorials show!
Hi Sarah, thanks for your contribution and best of luck with it.
Thank you so much for this info I ordered this a long time ago and go no instructions to chicken to try I am a visual person this was a great post I enjoy your site will continue to be a fan.
I’ve read the comments explaining how to turn corners, sounds like trial and error Is best to figure the way that will work for you. But how are you finishing it when the ends meet? I can’t find any instruction on this part. I’m just completing my first quilt and am watching and reading a lot of instructions before going to the next step. I ordered this foot as soon as I read your article. Thanks for your help.
argh! I ordered this presser foot, and, lo and behold, my machine doesn’t have the snap on feature. Am I overlooking something simple? What do you advise?
Is there a way you can screw the snap on feature? if yes, then you have to buy that too. The way to know is if you have a hole for a screw in your shank. What kind of machine do you have?
Mayra, I have a Singer and a Kenmore, neither of which has a snap on shank. The presser feet all have upper openings that screw into the hole in the shank.
I am sending you an email with a photo of the piece you need to get, so you can use the binding foot.
I bought the adapter yesterday and bound my quilt. I found that I had to go back and redo a couple of sections because I wasn’t careful enough about making SURE the edge of the quilt was against the inside of the fold of the binding. It was a little wavy in some spots! With practice, this will be PERFECT! Thanks for your help!
May ancient Janome Combi came with a screw on adaptor for snap on feet as standard equipment. I love it. I can pick up any oddball snap on foot and it will fit.
How do you do the corners on our quilt? Multiple layers make it too thick to fit in the binding foot. You can’t miter them as far as i can tell with this foot either. I have never figured that out and can’t find anything on how to do it?
Hi Dia, yes this foot is not for quilting, much to thick to go through the foot.
great post! I put the foot on my wish list, it’s not too much $ so worth a try thru amazon…. is it bias binding like single fold like bias tape?-where it meets in the middle? I’m reading reviews that it can’t take the thickness of it all.
You’re awesome!! I bought this same set of presser feet, but haven’t been able to play with them all. Do you have anymore tuts on the rest of the them?
Thank you from Germany!
There are a few on the website and Deby is writing about a few more in the future. Thanks! Hope you get to play with a couple.
Hi Delene, we’ve got a lot of material on presser feet for your enjoyment. Please check out: https://so-sew-easy.com/more-presser-feet/ and this: https://so-sew-easy.com/zipper-feet/
So helpful! Now I need to get myself a binding foot…
Great tutorial. I just purchased a bias tape kit that came with the binding foot. Now I fill fully prepared to use everything.
Would this work on a Singer Featherweight machine?
I don’t have a Singer, so I could tell you, but why don’t you hop in our chat room, the ladies there are quiet knowledgeable.
https://www.facebook.com/groups/soseweasychat/
Thank you so much for this information. Machine binding is the bane of my exisitance at the moment and when you have a large project hand binding, though invisible and “prettier”, is so time consuming. I’m going to see if I can find one of these feet for my Husquvarn/Viking machine pronto!
Lisa
Hi Lisa. I have a Viking #1.
Does this technique also work on binding for knit and/or woven garments?
We haven’t tested on knit garments, but it works on woven. Let us know if you try it!
How do you do corners with this foot?
Hi Sara, unfortunately the foot itself doesn’t do much good around corners. It is really aimed at getting a perfectly straight seam when you’re sewing in a straight line. We have a separate tutorial on Turning Corners with Bias Binding that may help you. You can find it here: https://so-sew-easy.com/turning-corners-with-bias-binding/
Hi, I had mentioned in an earlier comment that I use this foot all the time to bind my quilts. If you round the corners on your quilt then you can go around the curves and apply the binding in one pass.
I would like to share my process on how I do mitered corners and also join the 2 ends as its a completely different process joining the two ends as with the traditional method without the binding foot. I LOVE using the binding foot, in fact I have only completed two quilts without it and have sewn many many quilts and sell them in my Etsy shop. Hopefully my tips make sense without a tut with pictures,please feel free to ask questions. I will be finishing a quilt with binding in the next couple weeks and will try to put together a tutorial with pics!
To miter a corner with the binding foot:
Sew all the way down and stop at a 1/4″ from the corner and back stitch to secure thread. Remove binding and quilt completely from machine/foot.
Prep a needle and thread to hand baste only a few stitches. This will be temporary and to help with removal use a contrasting thread. Pinch the end of your seem where you back stitched in one hand, between your pointer finger and thumb of your other hand fold of the binding that should be to the right of your quilt sandwich so you or folding it over to the left. I’m referring to the part that has not been sewn to your quilt yet. Fold it over to make the mitered corner, you want to bring the tips down to meet the seem. Secure in place with a few large basting stitches, this part may be tricky and it’s important to make sure you catch the front and back where you want them to be when permanently sewn.
Once basted replace quilt sandwich back into the binding foot with binding and push it back up to your basting stitch and begin to sew as your were. Make sure to back tack towards the top so you catch the folded part. Repeat process for 3 corners.
After quite a few trial and errors I discovered the easiest way for me to join the ends is to start at one corner. Meaning I don’t start in the middle and leave a tail like you would traditionally. It’s impossible to join the tails this way because you can’t unfold the binding since both sides are sewn down at once. So, when you first start sewing your binding start at a corner, leaving a 2 inch tail. Once you complete all 3 corners sew up to 1/4 inch of your last corner, backsticth and remove the project from the foot. Cut the binding loose from the end you just sewed even to the quilt edge. This is the othet tricky part that takes some hand sewing but it is SO worth it once you get the hang of it and nobody will ever know but you. Tuck that two inch tail under forming the miter so the raw edges are hidden underneath the binding, iron and temp baste in place. Then secure by machine. You may also need to whip stitch the mitered corner securing the raw edges under out of view with matching thread.
Anyways that’s how I’ve figured out how to do it after blood sweat and tears but it’s SO worth it. Now that I’ve got the hang of it I can finish a throw size quilt binding in just over an hour!
Am so intrigued with this presser foot but can’t figure out in my head what to do when I get to that important corner with a mitered binding. Will this work for that? If you don’t do a mitered corner what option do you use for the corner of a quilt? Thank you so much! We travel to much for me to get in on classes and I can use all the tips I can get since I still consider my self a “newbie”. 🙂
Hi Lisa, unfortunately the foot itself doesn’t do much good around corners. It is really aimed at getting a perfectly straight seam when you’re sewing in a straight line. We have a separate tutorial on Turning Corners with Bias Binding that may help you. You can find it here: https://so-sew-easy.com/turning-corners-with-bias-binding/
THANK YOU for a very informative tutorial. This was very helpful. I am getting ready to do a project that will require binding and your information will be put to use!
Thanks! I hope I can get a 9 mm one for my janome!
Does this foot work on adding binding to unquilted fabric, like woven or knit garments?
We haven’t tested on knit garments, but it does work on woven garments.
you always made the best explanation ever known. I am very happy to follow you. I have copy your pdf to put on my feet box. I don´t know how to use most of them. Now i know one more. Thanks a lot.
All I can say is THANK YOU! What a revelation!
Oh Mayra, great tutorial! I’d love to see how to turn corners with the binding foot. Thanks!!
This tutorial is wonderful. Thank you so much for the clear instructions. I need to go buy one of these feet. I make a lot of table runners and this foot will certainly speed up this process. I too would love to see a video on your process.
Deby, Your explanations are always so clear, thank you! Can I Pin this article?
Hi Lodi, we’d love it if you would pin this article and share with all your friends. Thanks for the good feedback!
Thank you for all the hard work you have put into this fantastic presentation,
Anne H.
I have had one of these for years. I have only given it one try so far but will have another go. Have you worked out a neat way to finish or do you also just hand sew as I do? I am looking forward to your mitring instructions.
I found that overcasting the edges of the quilt sandwich first helps keep everything together when feeding into the foot. You can use your serger or your sewing machine to do this.
Since I discovered this foot, I use it all the time with bias binding for all my quilts. Just curve your corners and you can go from start to finish in one round.
Just slow down. Not a speedy sewing foot.
Where do I buy this set of feet. Will it fit on a Bernina and what will it cost
Hi Elize, I’m not sure which Bernina you have but you can find one that fits quite a few models here: http://amzn.to/1XqTFtP If that one doesn’t fit, just use the search function to look for one that does. Good luck and let us know how you go.
you need to purchase an adapter shank for your Bernina like this one I need for my Bernina 350PE http://www.ebay.com/itm/380470755104
For Bernina with shank http://www.ebay.com/itm/201262382505
I bought the same set of feet, when I read your post about them. I’m so glad you explained the binding foot! I’m feeling rather foolish that I didn’t try to use it yesterday when I had to put on binding and had the same problem I always have – stitches not catching the back in places. Uughh!
I’d really love it if you could do a video on this! It would be even more helpful. Besides, I miss your videos!
Great tutorial! Thanks ?