


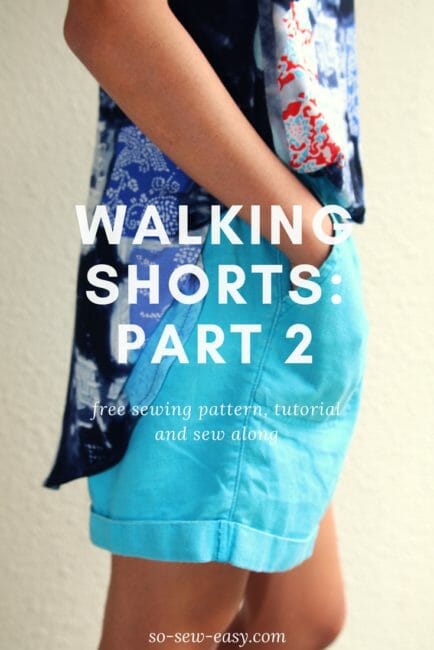
We've had so many requests for this over the last few weeks. This walking shorts pattern is the perfect opportunity for you guys to make the shorts many of you requested after we published a compilation of shorts for women and children a few weeks ago. In that post, there were many types of shorts, with some of them being very short. These are not that short and even if you find them too short I will show you how to make them longer. Which is why we are going to start from fitting the pattern than sewing first.
We will go through the procedure –making the patch pockets, sewing darts, sewing a fly front zipper, attaching a facing with a fly front zipper and finally hemming the shorts. In addition to all this, I will be showing you how to transform this pattern into lovely palazzo pants in a different tutorial.
You will find the hips rather large, this is because of the many ladies who kindly sent their measurements, which means this shorts will look best on hour-glass, and triangle-shaped women.
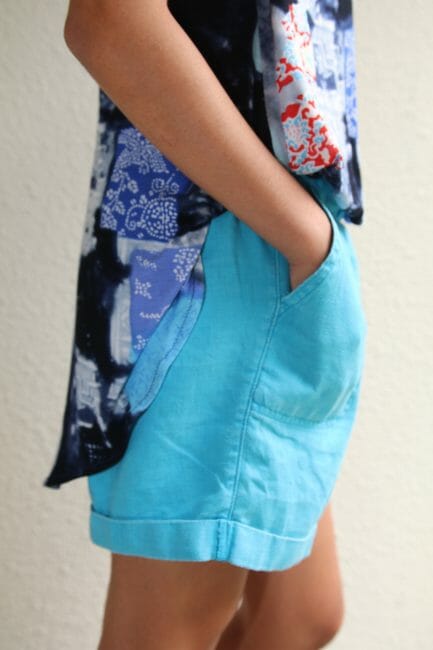
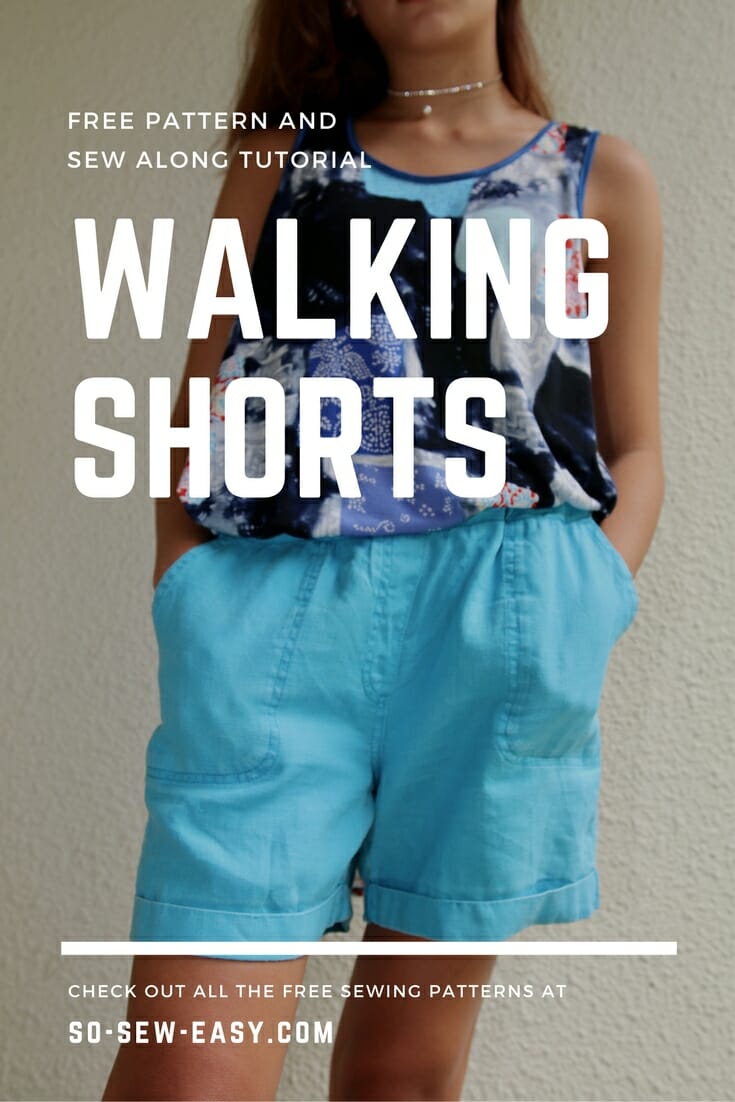
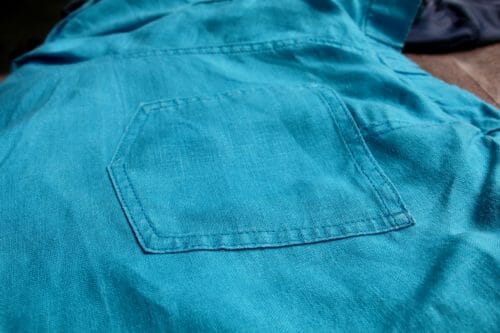
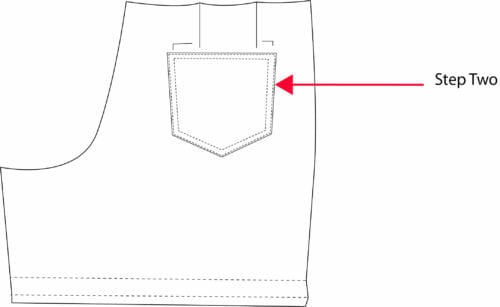
I'm naming these shorts “on a stroll” because that is what most of you wanted. Just a pair of shorts to go walking around, hang around the house, do gardening and still look good and age appropriate. These walking shorts have four pockets, two slant pockets in the front and two unlined patch pockets in the back.
This is the first part of a three-part sew along. In this part, we will be fitting the pattern to your own body size and shape as well as attaching the unlined patch pockets. In Part Two, we will be making the front slant pockets and sewing the zipper. We'll release that within the next weeks. In the third and final part, we will be attaching a facing to the zipper and hemming the walking shorts.
Skill Level
Advance beginner to intermediate who knows how to use a sewing machine has made a few skirts and knows how to sew a zipper and make a buttonhole using a sewing machine. This project is for people interested in learning pattern making alterations to fit patterns to their own body.
Warning this pattern is not for everybody, it is for ladies with wider hips who do not want a skin-tight garment. This sew along requires patience and willingness to try something different. It is not a quick and easy DIY project.
Materials
- 1 1/4 to 1 1/2 yards of calico for the mockup
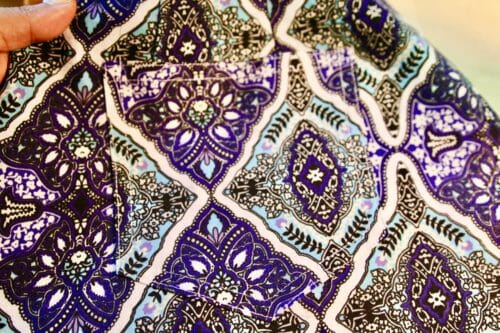
- 1 1/4 to 1 1/2 yards of 60″ fabric: linen, cotton twill, or medium weight cotton
- thread to match
- 5″ metal or nylon zipper
- Lightweight Iron-On Fusible Interfacing
Recommended Fabrics
Finished measurements:
| Size | Waist | Hips | Length |
| S | 28″ (71cm) | 56″ (142 cm) | 14″ (35.6 cm) |
| M | 33 1/2″ (85cm) | 59″ (150cm) | 14 3/4″ (37.5 cm) |
| L | 37″ (94 cm) | 63″ (160cm) | 15 1/4″ (38.7 cm) |
| XL | 41″ (104) | 67″ (170cm) | 15 3/4″ (40 cm) |
Pattern download:
You can download the pattern for these Walking Shorts from our account at Payhip.
For help downloading and printing PDF patterns, please CLICK HERE.
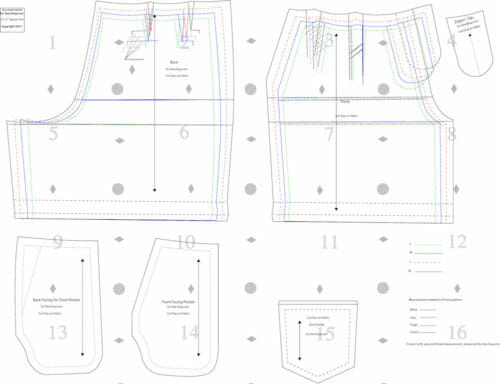
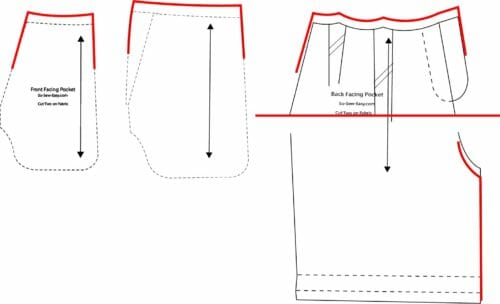
Pattern layout
Fitting the walking shorts pattern
Measure your lower body to determine which size you need. Choose a size closer to your hips, if you have to choose between a larger or smaller size choose the smaller size. It is always easier to enlarge a pattern than making it smaller. However, if your thighs are the larger part of your body, choose the larger size.
You will need the following measurements:
- Waist (bend your body and measure exactly where the waist bends)
- Hips (wrap the tape around the fullest part of your bottom)
- Thigh (measure the thicker part of the thigh)
- Crotch (wrap the measuring tape from the belly button between your legs and towards the back stopping at the waist)
Making the crotch larger
The first thing you need to do is to eliminate the seam allowance in the front pockets and the hemline. We will add them back on when is time to true up the pattern.
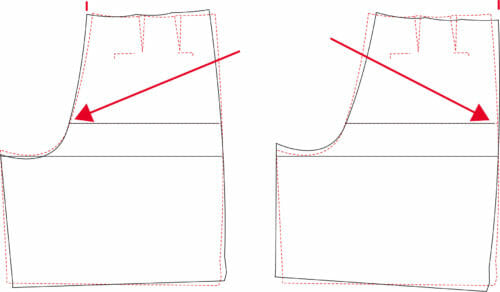
How to measure the crotch on your pattern. Place both front and back patterns side by side. Crotch facing each other. Using your tape measure, measure from the back crotch to the front.
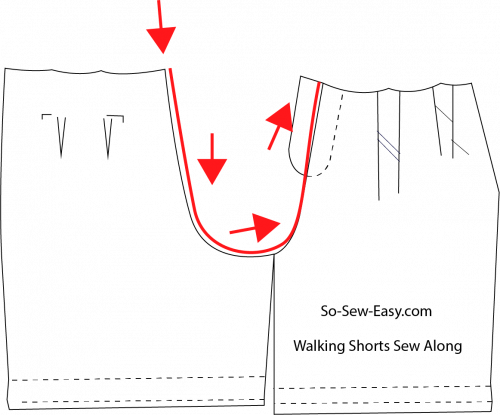
Compare these measurements to your own. The most accurate way to measure your own crotch is to wrap a piece of elastic or ribbon around your waist (where you want the shorts to sit) without the waistband. Measure using the tape from the front to the back.
You will need to increase the crotch to accommodate a larger tummy.
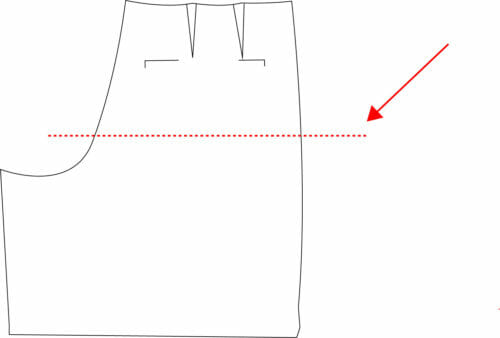
Cut the pattern in half and tape the top part to a large piece of paper. Slide the bottom part to the amount you need according to your body measurements. For example, if you need to increase by 4″ divide this amount in 2 (front and back).
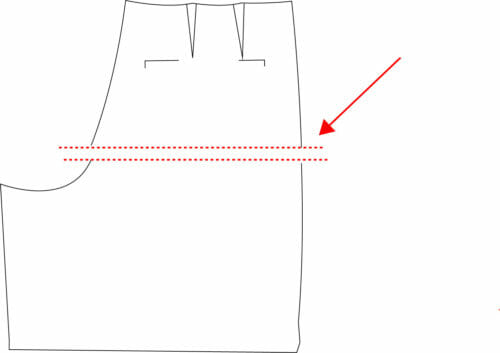
Retrace the new lines and lower the crotch line 1 ” down.
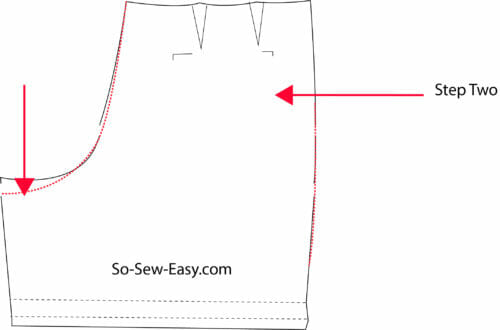
Repeat this procedure on the front part. However, because we have a slant pocket you will need to increase the top of the pocket so it will be the same size as the front. Do notice the pockets already have a 5/8″ seam allowance.
How to increase the waist
The following procedure is to increase the waist up to 6″. Divide the measurement you need in four. Mark the pattern with the amount you need on each side of the pattern.
Use the first line to use it to pivot the pattern using an awl or a pin.
Retrace the new pattern. This way you increase the waist, not the leg size.
How to decrease the width of the thighs
The crotch is too large and the legs are too wide? The following will reduce the width of the shorts up to 5 .5″ at the thigh and 2″ off the crotch, in total. Adjust this according to your needs. The simplest way is to reduce the crotch by cutting away more in the back than the front. Trace the amount you need to cut away. The back is always wider than the front and you can reduce it to be just 1″ bigger than the front. Warning: keep in mind this will reduce the crotch.
There is an advanced method to reduce the width of the pattern at the legs, folding the pleats all the way down and adding them back on. This technique is best used after you have done the mock-up Because you need to know how the walking shorts fit on your body first.
Please note!
Before you cut the mock-up eliminate the hem from the pattern. We will add it back again and we true up the pattern.
Add seam allowance to the pattern. On a woven project, 5/8″ is the best, because it allows you to make alterations to the finished project if you need to. However, if you have already made alterations to your pattern use a 3/8″ seam allowance. I'd recommend using an inexpensive fabric to make the first mockup.
How to make the shorts
The first thing you need to do is to wash and dry the fabric. Iron and cut the fabric. Attach fusible interfacing to the zipper facing and the opening of the front pockets.
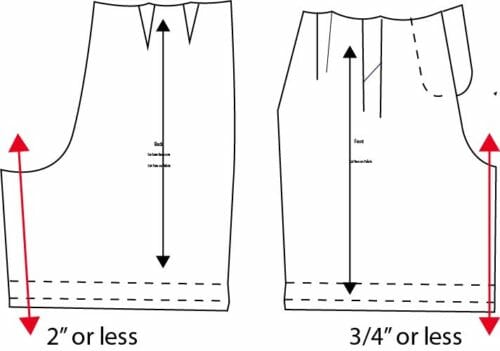
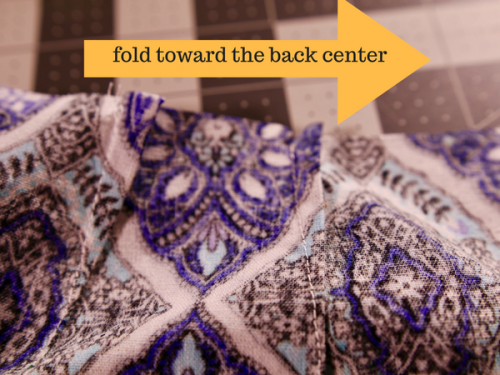
Step One: Sew the back dart
Sew the two darts at the back and press them using a pressing ham toward the center back.
Fitting the back darts
When you try your first mock-up you might find the darts a little too short or have a dimple at the end. . . if this is your case, you will need to lengthen the darts by 1/2″ to 1″ longer depending on your body.
Step Two: Sew the patch pockets
Follow this tutorial for a perfect patch pocket.
I hope you enjoyed this first part of our three-part sew-along for making this walking shorts pattern. If you have any questions about fitting, please leave them in the comments below and I'll be sure to answer them. The whole series is now complete, so just follow the button below or the link here to continue.
See you there, And Until next time and happy sewing!
Walking Shorts Sew Along –Part Two: Slant Pocket and Zipper


Thank you for the patterns and videos! I want to try these shorts too. My waist and hips are pretty much the same size. I don’t have large thighs though. I am an apple shape. I look forward to seeing the video and seeing if the enlarging of the waist is how I am picturing it in my mind.
Sorry but my hips are 110.5 cm which site do I have to take ????
What is your waist, from your hips along I would try size 8 and enlarge the waist if you need to. However read the instructions about fitting this shorts to see what you need to do to ensure this is going to fit your body well.
Thank you for these cute shorts and your patience with all of our questions. After reading many comments I know the size questions especially with the hip size are confusing many of us. My hips are 45″ so if I understand you correctly I am to use the S size which more closely relates to my hips? But according to my waist, I should use a XL. (I’m also a past middle age woman who is over-weight.) I’m sure you will be clarifying this, For now I have printed the pattern and bought fabric – and I can’t wait to learn about the fitting. Thanks again.
Hi Mindy, after reviewing the questions I have updated the article. The shorts are designed to be wide leg. In your case, I would choose L. Make the mock up and see how they fit. If the legs are too wide you will have to reduce the width. I am going to address all this questions on the video. Thank you for your question, it was most helpful to me to improve the article.
Can you tell me how much fabric you would need if the fabric is 54 inches wide and also if the fabric was 44 inches wide. thanks You say you need 1 1/2 yds if it is 60 inches wide.
Hi Dilys, the best way is to print the size of the pattern you need and take it to the store and ask for the amount according to the fabric you choose. If you are buying on line most stores will only sell you 1 yard/meter with and increment of 1/2 yard/meter and most only will sell you 1-2-or and above.
Question about taping the pattern together. My printer stops printing about 1/8″ from the edge of the paper. Do I need to draw out the lines to the edge of the paper and then connect the pages edge to edge? The scaling is correct, the 2″ block was exactly right.
Yes you do. US letter is not available outside US, Canada and Mexico. I use A4, and the rest of the world does too.
Would it make a difference if I printed it on A4 paper? I do have some on hand.
You can use either one as long as you use Actual Size.
I already have my linen fabric picked out for this perfect short project. Quick question does the pattern already come with the seam allowances or do I have to add the 5/8″? Let me know so I can start cutting!
Hi Stacy, you need to add your chosen seam allowance. Pay special attention to the zipper area.
My sister and I are going participate in the sew-along, even though we live in different states. Love technology – makes it seam like we’re sewing together!
Fantastic Idea!
What a lovely pattern thank you.
But I too am struggling to understand the sizes. With a 36″ waist and 43″ hip my initial thoughts are to make an L, but whilst that gives 1″ positive ease on the waist it’s 20″ on the hips, is that right?
Sorry, meant to say, ‘ is that the right size to use?’
Yes you are spot on, you can go ahead and make the first pair in an inexpensive fabric. If you want to make the leg area smaller do wait for the video I will show you the way to reduce the leg ease.
THANK YOU for sharing your patterns and knowledge. I really appreciate all the help in sewing.
You are welcome Janet.
Thanks for this pattern. If I can still see after cataract surgery this week, I plan to try this out.
Hi Trisha, good luck with the surgery 🙂 Kind Regards.
What is the rise supposed to be on these shorts? I think I will need to make a short waist adjustment–could you advise the best way for these shorts? Also, are the finished measurements the garment measurements or our own measurements? Thanks!
Hi Melanie, thank you for your question, I will added it to the video, because it will be very useful for everyone. The finished measurements are the garment measurements. It is meant to help you decide what size you want to go with.
Love the looks of these shorts but need sizing for 3 or 4x. Is that possible?
Hi Diane, anything is possible. Tomorrow (it is 2 :26 am here ) I will update the article to accommodate this question. Thanks for taking the time to write.
I’ve just downloaded the pattern, this looks great! I can’t wait to get home and begin to sew it 😉 here in South France it is about 40°C which means very very hot, shorts are recommended to be worn 😉
I can picture your fantastic countryside wearing the shorts, with a white shirt and a straw hat on a bike on your way from the market. It would make a great Instagram picture. Do share #soseweasy 🙂 it would make my day!
Looking forward to making these and getting some that actually fit me. Thank you for sharing this pattern, you’re a star. 🙂
Thank you Dee, and welcome to the sew along.
My waist and hips are the same 43″ – Make larger and decrease or smaller and increase
Hi Gail, print XL and increase, in the video I will use your measurements if you allow me to, send me the rest of the measurements in an email to mayra@so-sew-easy.com
What a great pattern. And you even included a section on increasing the waist size. Thank you so much. I’ve sewn zippers but not a flap zipper before-looking forward to the challenge! You guys are tremendous!
You are welcome!
I’ve got a 34″ waist and 42″ hips… I’m not sure which size I ought to choose?
Medium will do, just increase the waist.
That is me too! Thank you for asking.
I hope tomorrow is the next weekend ???.
I am so excited! I need some great fitting shorts and this looks like it will fit the bill!
Can’t wait to break out the Sewing machine. It’s been years since I have wanted to sew anything.Great looking shorts pattern! THANK YOU
Welcome back, Nancy hope you stay for a while.
Thank you – these are the shorts I’ve been looking for! Practical, not too short, adjustable for those of us middle-aged folk who have less than perfect figures. I’m looking forward to following this one.
Wicket Aunt! I had a good laughs 🙂 Welcome to the sew along.
Thank you so much for this pattern Mayra. You are most kind to share so “freely”. I will be following along with your tutorial. My waist and hips are nearly the same size — only different by 3 inches. I will need to size down the hips a great deal, but it will be fine in the end, I’m sure. I’ll make a test run on muslin first. These shorts are just adorable, and great for an older, more modest lady, like myself. ??
Beautiful pattern, like I need one more. My husband tells me when I die I will have to come back on week ends to finish up all my projects.
I really love to sew things. I took my son in law Marines shirt and made my daughter a purse even put his last name on purse too. Turned out great.
I am just startng to sew again after 45 years { since leaving school }. If I can work out how to print the pattern { ! } I would love to have a go. Thanks for the chance.
Hi Jean, welcome we have an article to answer just that. How to print: https://so-sew-easy.com/print-a-layered-pdf-file/
Love this! Thanks for making it available!
when can we get part two, these short are so cute, can’t wait to make them
Is this the appropriate place to ask questions? How much ease should we aim for – say at the hips? Finished waist should match waist measurement but what is the correlation between my measurement and the patterns finished measurement for hips?
also – you add the seam allowance when cutting?
Hi Kris, you can add while cutting but I find this method leaves room for mistakes. Add the seam allowance to the pattern before cutting and mark your pattern with the chosen seam allowance.
oh, that was just my question to move on with the cut. Tks Kris for ask and Mayra for your answer! 🙂
Hi Kris, great question and I think I have to increase the information on the fitting. Sadly only you can answer the question by learning to manipulate the pattern. This shorts are wide leg meaning, it is by default wider at the hips. The key in this pattern is the crotch measurement and the size of your thigh. Make a mock up using inexpensive fabric try them on and find out how much easy does your bottom looks better on. I will show you how to reduce the easy on the thigh without changing the size of the pockets. Tricky but not impossible.
These look awesome… but I am a larger size. Can you give instructions to increase the size generally?
Yes, i will do this for you.
Just for her (Linda) or for anyone who needs help with that adjustment?
Any one who is participating in the sew along, leave your questions in the comments or send me an email, I can address them in the video.
What is the pattern crotch length so I know if I need to add?
Hi Ginger, you need to print the pattern using your waist measurements. Then measure your crotch and compare to the pattern and see if you need to add or not. If you do not know how to measure your crotch, let me know and I will write and article on how to measure your body. I know this is bizarre, but there is a reason to this madness.
Is there a waistband? And what are the straps forlease?
Hi Carol, I am assuming you mean the stripes on the pattern? they are for you to cut and spread and alter the pattern. No there is no waistband because you will be making your own with the option of adding belt loops.
Are those hip measurements correct? They seem really large relative to the waist sizes.
Yes they are, the shorts are wide at the hip, according to the flood of emails I received with the ladies measurements. I will show you how to alter the pattern to transform it to your own measurements.
Just what I need! Did I miss the pattern for that fabulous, short in the front – long in the back, top? I need that, too!
That was last Sunday, do check your email the link is there.
I would love to sew along with you on these much needed Walking shorts, but my hips are 41.5
Am I going to swim in the size small?
Hi, Rosemary, perhaps you will, or perhaps not because I do not know your size. Take your measurements and get the calico ready and you will be able to answer the question. Alternatively, you can use Rayon, it drapes close to the body.
Rayon would be lovely for these shorts!
This looks like great fun Myra! Can’t wait to get started!!
Thanks, Pamela!
I would like to see an elastic waist so there is a little more ease in that area.
Thank you, Becky! great idea, considerate done. I might have to extend the saw along to a fourth part.
Oh My Goodness! Thank you so very much for this pattern! It’s exactly what I was looking for and thought I’d never find it so I bought one close, but would have to enlarge it a bit. But this one is absolutely perfect! When you publish the next set of instructions will you be emailing them, or will be need to watch for them on the face book page? Again, Thanks!!!
Hi, Betty, email is my preferred method.
I love this site and can’t wait to make these comfy looking shorts. I love that they are not tight.
You are the sunshine Martha! Thank you for your kind words.
Great tutorial other than I don’t understand how to increase the waistline. Where am I pivoting it to?
Hi Lesley, it will all be clearer with a video. But for now, place the pattern on a large piece of paper, retrace the original pattern and use a pin to move the corner of the pattern to the left or right like a gauge or pendulum the amount necessary to increase the waist.
How do you measure for the hip measurement given? The number seems huge!
Go with your waist measurements then. You need to measure your own hips and waist and pick the size closest to your body.
Would be easier to see with plain fabric.
yes, I this is true. i will use calico and dark thread so you can see better. But it makes for very ugly pictures.
These shorts are cute but the hip measurements seem very large compared to the waist at least in inches. Aren’t hips usually 6 to 10 inches larger than waists?
Yes, that is what a textbook would say. I used the measurements of 38 woman from different states in the USA and 5 from Australia who kindly sent their measurements to me. They were either Pear shaped, Hourglass or Apple. It is impossible to make one pair of shorts that will be great looking on everyone. That is why I decided to make it a sew along to show you how to work the pattern and transform it according to your own measurements.
But still: a hipsize of 160 cm for L? That’s realy too much. I am apple and mine is 110 cm and size 42/44 European size. But I love the pattern thank you
You are welcome Marianne.