


We've had so many requests for this over the last few weeks. This walking shorts pattern is the perfect opportunity for you guys to make the shorts many of you requested after we published a compilation of shorts for women and children a few weeks ago. In that post, there were many types of shorts, with some of them being very short. These are not that short and even if you find them too short I will show you how to make them longer. Which is why we are going to start from fitting the pattern than sewing first.
We will go through the procedure –making the patch pockets, sewing darts, sewing a fly front zipper, attaching a facing with a fly front zipper and finally hemming the shorts. In addition to all this, I will be showing you how to transform this pattern into lovely palazzo pants in a different tutorial.
You will find the hips rather large, this is because of the many ladies who kindly sent their measurements, which means this shorts will look best on hour-glass, and triangle-shaped women.
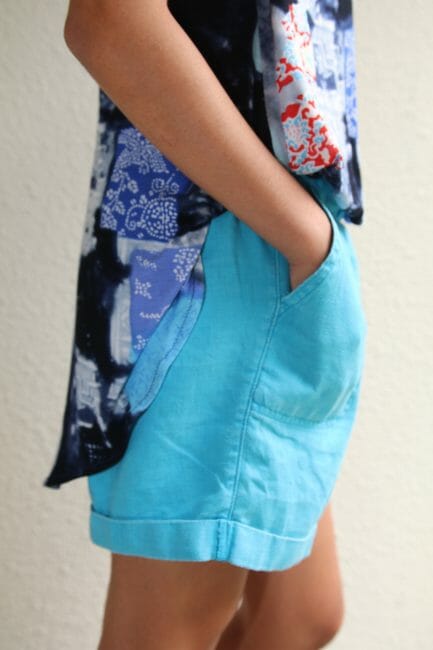
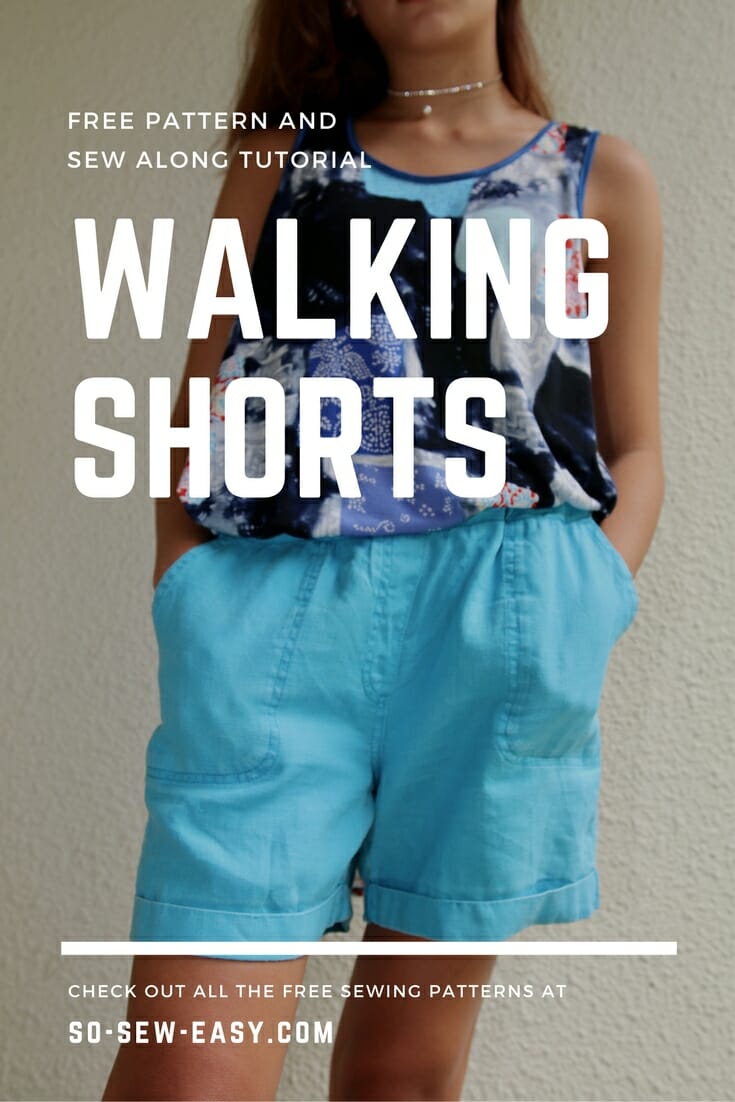
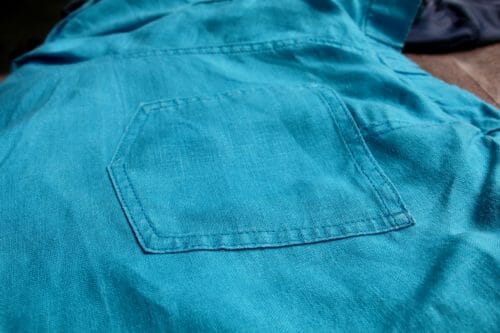
I'm naming these shorts “on a stroll” because that is what most of you wanted. Just a pair of shorts to go walking around, hang around the house, do gardening and still look good and age appropriate. These walking shorts have four pockets, two slant pockets in the front and two unlined patch pockets in the back.
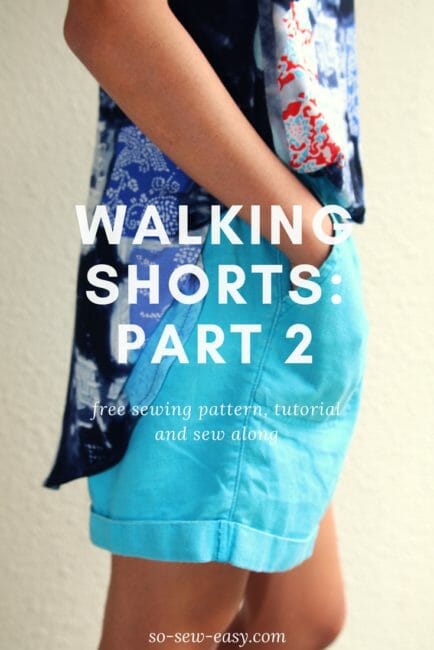
This is the first part of a three-part sew along. In this part, we will be fitting the pattern to your own body size and shape as well as attaching the unlined patch pockets. In Part Two, we will be making the front slant pockets and sewing the zipper. We'll release that within the next weeks. In the third and final part, we will be attaching a facing to the zipper and hemming the walking shorts.
Skill Level
Advance beginner to intermediate who knows how to use a sewing machine has made a few skirts and knows how to sew a zipper and make a buttonhole using a sewing machine. This project is for people interested in learning pattern making alterations to fit patterns to their own body.
Warning this pattern is not for everybody, it is for ladies with wider hips who do not want a skin-tight garment. This sew along requires patience and willingness to try something different. It is not a quick and easy DIY project.
Materials
- 1 1/4 to 1 1/2 yards of calico for the mockup
- 1 1/4 to 1 1/2 yards of 60″ fabric: linen, cotton twill, or medium weight cotton
- thread to match
- 5″ metal or nylon zipper
- Lightweight Iron-On Fusible Interfacing
Recommended Fabrics
Finished measurements:
| Size | Waist | Hips | Length |
| S | 28″ (71cm) | 56″ (142 cm) | 14″ (35.6 cm) |
| M | 33 1/2″ (85cm) | 59″ (150cm) | 14 3/4″ (37.5 cm) |
| L | 37″ (94 cm) | 63″ (160cm) | 15 1/4″ (38.7 cm) |
| XL | 41″ (104) | 67″ (170cm) | 15 3/4″ (40 cm) |
Pattern download:
You can download the pattern for these Walking Shorts from our account at Payhip.
For help downloading and printing PDF patterns, please CLICK HERE.
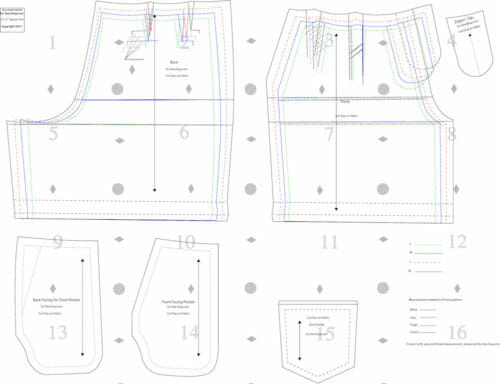
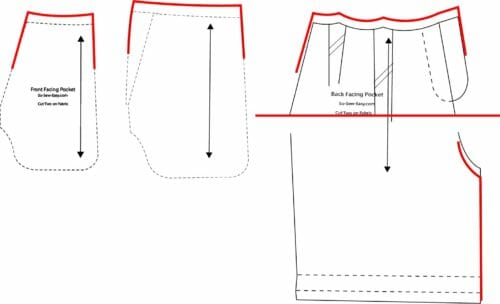
Pattern layout
Fitting the walking shorts pattern
Measure your lower body to determine which size you need. Choose a size closer to your hips, if you have to choose between a larger or smaller size choose the smaller size. It is always easier to enlarge a pattern than making it smaller. However, if your thighs are the larger part of your body, choose the larger size.
You will need the following measurements:
- Waist (bend your body and measure exactly where the waist bends)
- Hips (wrap the tape around the fullest part of your bottom)
- Thigh (measure the thicker part of the thigh)
- Crotch (wrap the measuring tape from the belly button between your legs and towards the back stopping at the waist)
Making the crotch larger
The first thing you need to do is to eliminate the seam allowance in the front pockets and the hemline. We will add them back on when is time to true up the pattern.
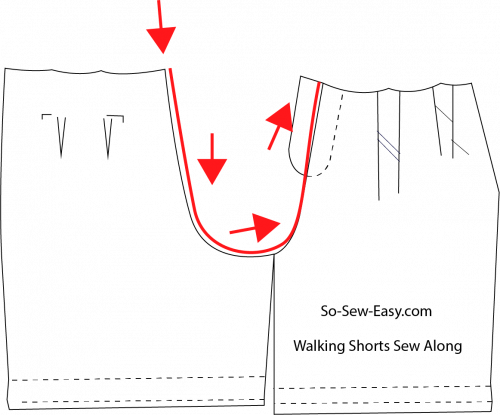
How to measure the crotch on your pattern. Place both front and back patterns side by side. Crotch facing each other. Using your tape measure, measure from the back crotch to the front.
Compare these measurements to your own. The most accurate way to measure your own crotch is to wrap a piece of elastic or ribbon around your waist (where you want the shorts to sit) without the waistband. Measure using the tape from the front to the back.
You will need to increase the crotch to accommodate a larger tummy.
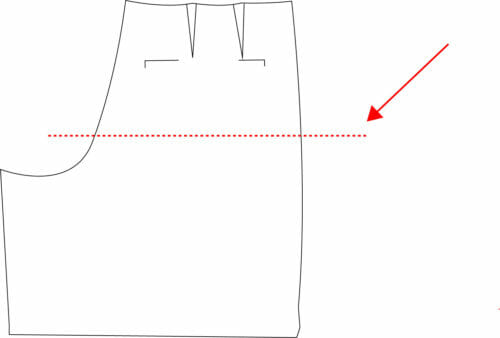
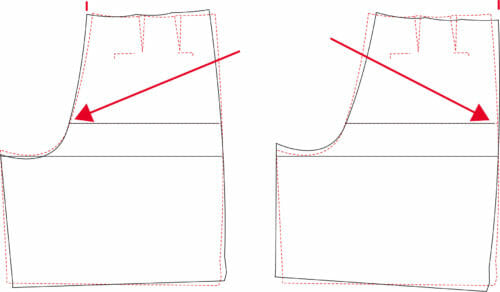
Cut the pattern in half and tape the top part to a large piece of paper. Slide the bottom part to the amount you need according to your body measurements. For example, if you need to increase by 4″ divide this amount in 2 (front and back).
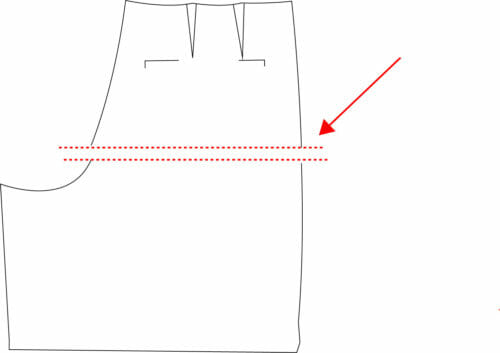
Retrace the new lines and lower the crotch line 1 ” down.
Repeat this procedure on the front part. However, because we have a slant pocket you will need to increase the top of the pocket so it will be the same size as the front. Do notice the pockets already have a 5/8″ seam allowance.
How to increase the waist
The following procedure is to increase the waist up to 6″. Divide the measurement you need in four. Mark the pattern with the amount you need on each side of the pattern.
Use the first line to use it to pivot the pattern using an awl or a pin.
Retrace the new pattern. This way you increase the waist, not the leg size.
How to decrease the width of the thighs
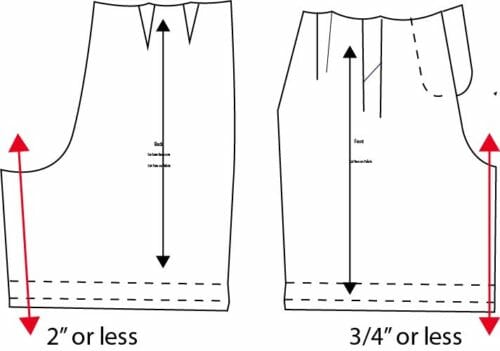
The crotch is too large and the legs are too wide? The following will reduce the width of the shorts up to 5 .5″ at the thigh and 2″ off the crotch, in total. Adjust this according to your needs. The simplest way is to reduce the crotch by cutting away more in the back than the front. Trace the amount you need to cut away. The back is always wider than the front and you can reduce it to be just 1″ bigger than the front. Warning: keep in mind this will reduce the crotch.
There is an advanced method to reduce the width of the pattern at the legs, folding the pleats all the way down and adding them back on. This technique is best used after you have done the mock-up Because you need to know how the walking shorts fit on your body first.
Please note!
Before you cut the mock-up eliminate the hem from the pattern. We will add it back again and we true up the pattern.
Add seam allowance to the pattern. On a woven project, 5/8″ is the best, because it allows you to make alterations to the finished project if you need to. However, if you have already made alterations to your pattern use a 3/8″ seam allowance. I'd recommend using an inexpensive fabric to make the first mockup.
How to make the shorts
The first thing you need to do is to wash and dry the fabric. Iron and cut the fabric. Attach fusible interfacing to the zipper facing and the opening of the front pockets.
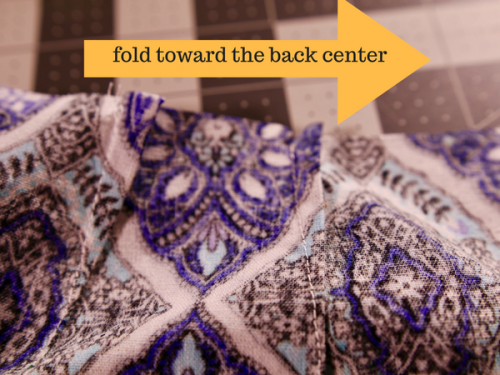
Step One: Sew the back dart
Sew the two darts at the back and press them using a pressing ham toward the center back.
Fitting the back darts
When you try your first mock-up you might find the darts a little too short or have a dimple at the end. . . if this is your case, you will need to lengthen the darts by 1/2″ to 1″ longer depending on your body.
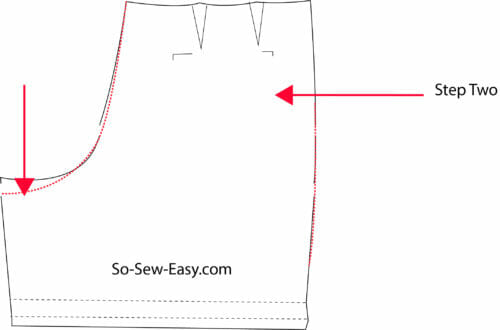
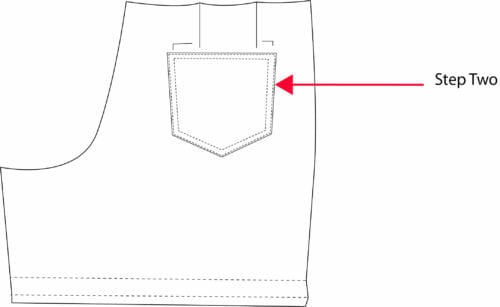
Step Two: Sew the patch pockets
Follow this tutorial for a perfect patch pocket.
I hope you enjoyed this first part of our three-part sew-along for making this walking shorts pattern. If you have any questions about fitting, please leave them in the comments below and I'll be sure to answer them. The whole series is now complete, so just follow the button below or the link here to continue.
See you there, And Until next time and happy sewing!
Walking Shorts Sew Along –Part Two: Slant Pocket and Zipper


Hi Mayra,
I got the pattern and printed it and then I measured myself! Which was silly. But I have 36” waist and 43” hips. So if I use the S, there isnt enough allowance to get to 36” (more than 6” from 28”) but the M has a much much larger hip measurement. Could I take that much (59-(43+6)=10 inches) off from the legs width? I think ur article says up to 5.5”. I have made shorts for my boys plenty of time, but women’s body sure is a lot more complex. Happy to do mock ups and give it a few go, but maybe you can let me know which size pattern I should start with.
Thank you,
Bethany
So far I have wasted many sheets of paper and now cannot go on to part 2–it shows complete blank pages. I can figure this out by myself, as I do a lot of sewing, but would be nice to get the complete finished set of instructions. I have never had as much trouble with a web site as with this one. I do not know why I keep coming back.
I just got this going to print it out soon, I am excited that you show how to alter it to your size as I am all over the place in sizes. I Love these type of shorts my only problem is my job frowns on any thing less than knee length…I am hoping I can just add length with no problem!
yes you will be able to do it, if you have a question just leave a comment, many of the readers are advanced in the craft and will be able to answer if I do not.
Linda glad you asked that. I prefer knee length myself so ill be looking to do the same. I tend to use old duvet covers for my mock ups rather than buying calico, it’s worked for dresses. Really looking forward to thus as I’ve only made pj bottoms before and would live to do shortscand trousers.
Hi there!
I love these shorts, and can’t wait to get started on them. Thank you for sharing. I’ve traced my pattern, and added the seam allowance, but I am struggling with understanding how to increase the waist. My waist is 85cm and my hips 102cm. I’ve selected the S size, but need to increase the waist. I’ve divided my waist measurement by 4 (21.25cm). The existing pattern is 71cm divided by 4 (17.75). The difference is 3.5cm. Do I add 3.5cm to each side of the back only, so in total the back increases by 14cm? If this is correct, then when I pivot the pattern from the 1st line to the waist edge, the angle of the line is not right. Do I continue the line further down the outside leg and crotch edges? I don’t think I can add to the front edges because of the slanted pocket edge and zipper flap?
I’d really appreciate your help on this point.
Hi Collen, sorry it has taken me so long to answer your question. I am in a farm in Chile with very little internet at the moment. The increment on the waist needs to be done in both the front and the back otherwise it will not look proportionate. You are confused because you are doing it only in the back. You should have only one back and one front and cut your fabric on the fold so when you cut you will have two back and two fronts.
Thank you for your reply. I’ve made these shorts, and absolutely love them. Great fit and VERY comfortable, with easy to follow instructions.
Thank you for your feedback Colleen! If you have Instagram could you use #soseweasy so I can see them
Love these shorts! Just wondering if the hip measurements are typos though. I have a 30″ waist and a 39″ hip. can I narrow the hip that much or should I choose a different pattern? Thanks for your help!
Hi Ellie, it is not a typo, it is a big booty friendly pair of shorts and if you continue reading you will find how to make them narrower. However, I left mine as wide and wear them a linen white short suit. Loving the look! But yes do alter the pattern.
Finally i got it. thank you very much Mayra
Wow… very useful information you have shared.
It is unclear if the pattern includes the seam allowance of not. Can you please clarify?
It does not.
im excited! this sounds like a great fitting pattern!
These are nice shorts. Can men wear these shorts with a few changes?
I don’t think so since they are design for a larger bottom and smaller waist.
GREAT PATTERN. THANK YOU FOR SHARING.I WAS EXCITED TO HAVE THE FREE PATTERN BUT THERE WAS SOMETHING WRONG AND Y COUDN’T GET IT
IS THERE SOMETHING TO BE DONE?
THANK YOU
Not sure why this is happening. There has been a lot of downloads so I am wondering if you have a pop blocker.
Hi Mayra
Thank you very much for your help.
Like Nick ( JULY 28, 2019 AT 10:13 AM) I still could not download this pattern. May be lots of downloads . I’ve just download Camisole Top Pattern (18/08/2019) without any trouble
No pop blocker
Anyway thank you again
Hi Maria, sadly this is still hosted with Blueprint I will repost and move it out into Payhip so you can download it without a paid membership.
Thank you. I’ll come for it again latter
I love the look of these shorts. They look so comfortable. Would you be able to adapt the pattern for a more straight or boxy shape? I have a 45″ waist & 47″ hips. Could one of these sizes be adapted to me?
It would require a couple of tries to see if the fit is correct for your body. I would eliminate the darts (not sew them) and increase the waist of the small size so that sits well on the hips.
PS. Love that pattern. I have the perfect fabric for it in my stash right now.
Just one question. I realize the waist measurement should be quite close to our actual measurement, but how much ease should we allow for the hip? I’m thinking a little more than rather than less cause these are to be loose fitting? Thanks, Pam
I would allow 4 to six inches of ease.
I have mine at 6″, I love to wear them with wedges, a long sleeve blouse and a belt. It is casual but chic.
When I go to the pattern download page, it comes up blank and will not load.
Have you tried more than once to print.
Very nice tutorial i would like to try out?
Is the pattern with 5/8 seam allowance all over?
I understand the crotch measuring on me and on the pattern.
“Cut the pattern in half and tape the top part to a large piece of paper. Slide the bottom part the amount you need according to your body measurements. For example, if you need to increase by 4″ divide this amount in 2 (front and back).
Retrace the new lines and lower the crotch line 1 ” down.Repeat this procedure on the front part.”
Q:
Am i sliding the bottom part 2 inches and lower the croth line 1 inch OR sliding the bottom part 1 inch and lower crotchline 1 inch???
The waist measuring i dont understand. Should i compare my messuring to the pattern minus the seam allowances? Or to the meassures in the table of finished meassurements?
I dont understand the increasing of Waist. The pictures shows pivoting but nothing is increased at the waist as i see. The sideseam is lifted ?
Great questions! Slide 1″ and lower the crotch line 1″, according to the example of increasing by four inches.
The waist is pivoted by moving the pattern outwards. Notice the red mark on wither side of the top of the picture, this is showing where the new line will be traced.
I’d really like to eliminate the zipper and fly and have an elastic waist instead. I know everyone wants something added or subtracted but I think that will make these more useful.
You will have to eliminate the darts as well since they will need to be able to go through your hips.
Love these-can’t wait to try them! Thanks for sharing!
Hi, I’m in the UK and having problems with the pattern download. I’ve downloaded a couple of your patterns before (from the new site) and had no problems. But this time I seem to get stuck on the page : https://shop.mybluprint.com/sewing/patterns/walking-shorts/499546?SSAID=1217208&sscid=71k3_rl56g&sasClickId=71k3_rl56g&cr_linkid=ShareASale_Banner_ShareASale&cr_maid=46579&cr_source=ShareASale&cr_medium=ShareASale
with the line at the bottom showing https://www.nbcuniversal.com/privacy ???
With our current mini-heatwave these shorts could be a godsend … please help.
Best wishes, Nick
NBC Universal is the new owner of Bluprint. I will have to move the pattern to the new site. I will let you know when this is done. Thanks for letting me know.
This is awesome! Thank you!!
I am going to give this a try. The alteration instructions are very good. Thanks
Hi, Mayra: I printed this pattern last year, and I’m now ready to get started. I thought I read somewhere that you would publish how to add a cuff. You may have done so and I just haven’t seen it. I love cuffs because it helps shorts hang better. Love your patterns and creativity!
Dana
Hi Dana, thank you for your comment, I appreciate it. Here is the link to the fourth part of the sew along. https://so-sew-easy.com/making-cuffs-shorts-pants-pattern/
“The first thing you need to do is to eliminate the seam allowance in the front pockets and the hemline. We will add them back on when is time to true up the pattern.”
Not clear on this step. Why are we talking about the front pocket and hemline in a discussion about increasing the crotch length?
Hi Guys,
Love this but cannot find link for part 3 – please help.
Hi Tasha, sorry for the confusion there. Here’s the link: https://so-sew-easy.com/how-to-sew-a-waistband-fly-front-zipper/
I’ll put some more links and instructions in each section to make it easier to follow along.
Just finished making the shorts, and they fit perfectly! Had a little trouble with the zipper fly at first, have been out of sewing practice for a while, but figured it out. They came out great, and will be making another pair soon. Thanks for the great pattern and tutorial!
The pattern and instructions look great, but when I went to download it I was asked to install some software on my computer. I’m not comfortable with that so unfortunately won’t be making these great looking shorts. You might consider a simpler way for customers to download.
Hi Vivian, our patterns are all hosted on Craftsy and there is no software to install other than needing Adobe Reader to properly print the pattern. Perhaps you clicked on the wrong link? The link is in the gray box with an orange button. Please give it another try.
I saw mention of a Braeline pattern for golf. Where do I find it? Thank you!
Hi Susan, not sure if it is a typo, I am afraid I do not know what a bareline is.
Can you tell me when Part two and the video will be out? Sorry I’m so impatient, i really really want to get started.
Part 2 is out now.
Hi Mayra! I can’t figure out how to get to Part 2. I keep thinking it will be a link on the Part 1 page, or a new email update. I keep checking the website; but I don’t see a link anywhere. Is there a hyperlink somewhere that I’m just missing? I’ll admit that I’m not super computer savvy; so I’m sure that problem is from my end. I want very much to keep following along with all of your wonderful alteration advice. This pattern is so cute. It reminds me of a favorite pair of shorts that I had as a teenager. ? Thanks for all the work that you have done to share this project. I appreciate it very much.
Hi Kelly, I still need to link it, which I will do. In any case, here’s the link: https://so-sew-easy.com/how-to-sew-slant-pocket/
Hi Mayra I can hardly wait to get started on the shorts, I hope it is as easy as your braeline pattern which is just great for golfing in the summer months in Spain as these walking shorts will be.
You are a great teacher.
Thank you Maryke you are very kind, part 2 is out. I will be in Spain this summer, fancy a round of golf?
really looking forward to the video and part two , and getting started on these really cute shorts !!
just to clarify , the seam allowance needs to be added to pockets too? or just the body of the shorts?
Great question! and one I was hoping someone would notice. Yes, Judy add seam allowance to the pattern after you make all the alterations, when making the mock up use a 5/8″ seam allowance but when you cut the main fabric you can still use the 5/8″ or 3/8″. The pockets have the 5/8″ if you have to alter the waist and the crotch you need to take the seam allowance away, alter them then add the seam allowance back.
Thank You.
Thank you ! I love the pattern. exactly what I needed because none of my old patterns fit me anymore, they have been cut to many timesand my body I still change as we get older (74) we go through transformation me at least . I am dying for the rest……What kind of waist band will it be done?
Hi Marie, you will be able to make a straight waist band with a button and a button hole.
Hello Mayra, this section about adjusting patterns is so helpfull! now I just wait on how to measure the crotch of your pattern so I can start altering.
Do in it as I am readying your comment.
Thank you Mayra! I am looking forward to doing this! Got my pattern printed out and ready to go!
Just to clarify-the crotch and the waist would both need to be altered to accommodate a larger tummy? Is the waist increase the only measurement that needs to be divided by four? I assume since the crotch is a length alteration, it would not? Thanks for your help. You are doing such a wonderful job with all the tutorials.
Hi, depends how larger the tummy is. Please measure your crotch and and write it down. I will update the article on how to measure the crotch on the pattern so you can compare the two and see how much if any adjustment you need to make. Great question! Thank you for taking the time to ask.
Thank you!
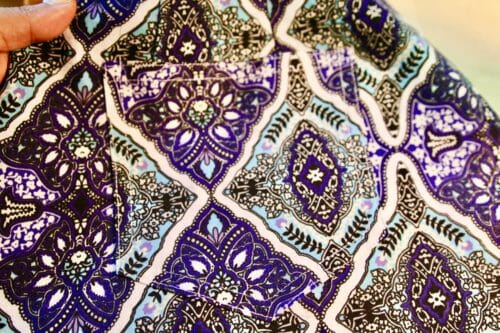
Luv the turquoise fabric you chose for the shorts… any idea on where you purchased it? Would love to buy some myself! Thanks for the great tutorial! I’m always looking for comfortable clothes that look super cute… and these fit the bill!
Hi Barbara, both fabric I am using are linen purchased at a store called Spotlight in Australia
I love this pattern and am anxious to get it made, however I am wondering how difficult it would be to make it into a Skort? Any help would be appreciated.
Not difficult at all Lois, in fact it would be a fun project to do. We would have to explore pattern transformation by the flat pattern method. This would be better explain by video.
Thank you so much for your reply. I was thinking I could cut out the shorts then cut the skirt from the same pattern making it flare out and sewing the zipper and placket on both fabrics at the same time.
HI Louis, it seam to me you got this. I am open to any design idea. But, wouldn’t be easier to cut the shorts then cut the skirt and sew over the shorts, attaching the skirt to the side with a button. Either way, I suggest to make a drawing first to see how it would look. Which reminds me a meant to share a tutorial on how to draw your own clothing design for people just like you with ideas of their own. Thanks for the reminder. Let me know how they turn out.
I have a couple of commercially made skorts. The shorts underneath have a zipper-less fly with a clean finish front and a fly facing behind. The shorts are a little shorter than the skirt. The waistband was applied with the skirt and shorts being treated as one.
Where can i find the tutorial for the whole pattern and not just part 1 of the sew along, i wanted to make a mock up to see what needs altering. Great pattern!
Hi Wendy, On page to is the link to the free pattern.
Hi! can I make this pattern a lot longer in the leg? I have had knee replacements and need to keep the scars covered in the sun. Do I just make the leg longer and taper the leg, or do I need another pattern entirely. Love your tutorials even though I have been sewing for ever thank you
Hi Jacqui, thank you for your kids words. I will be showing you how to make them longer, but if you know how go ahead and do so. Tapering is a matter of personal taste and balance for your figure and only you can tell me if that is necessary. I hope you recover from your knee soon, I hear it can take a few months to get back to normal. Let me know what have you decided to do and share a picture with me I am curious.
Hi I am really looking forward to doing this sew along. I can sew but relatively new to making clothes. I am confused by the measurements . My Waist is 44 hips 53 thigh is 27 crotch is 30 . Whichsize should I choose L or XL How much should I increase the crotch by.
Hi Beverly, XL will be fine for you, proceed to make the mockup and see if you like the fit. If the crotch is too large, we will go through making the crotch smaller in the video. Thanks for your question and please keep them coming, they make the article better and believe it or not it make me be a better teacher. So thank you!