


 Wide leg pants are sometimes called Palazzo pants although the designs can vary a little. This wide-leg pants pattern is sure to give you a long and elegant look. At least that's what I am told every time I wear these pants.
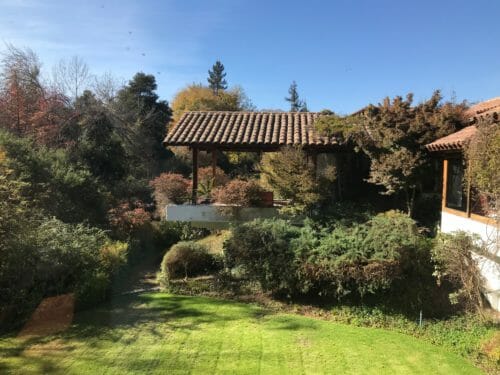
I am currently in the southern hemisphere. The days are nice and warm but the nights are so cool that it's impossible to wear shorts (comfortably and without shivering uncontrollably). It is mid-autumn and from my window, the leaves are starting to fall and change color. The sun is glorious and I still refuse to wear the dreaded black color that most people here prefer in winter.
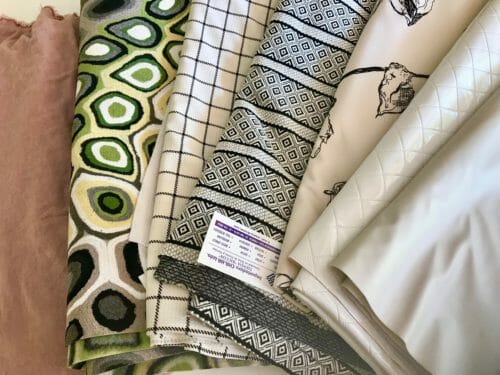
To take advantage of the warm daylight sun, I went to the market and bought some jacquard knit. I am determined to wear lighter colors until the harsh cold of winter will force me to put some jeans on. You may recognize one of the fabrics in my current stash from the carpet tote bag project.
Carpet Tote Bag FREE Pattern – Making Bags From Unusual Materials
If you have seen my Instagram lately you would know that I have made these wide legs pants before, about a couple of months back. In fact, I have made three so far one in jacquard knit, one in grey wool, and another in blue polka-dotted crepe fabric.
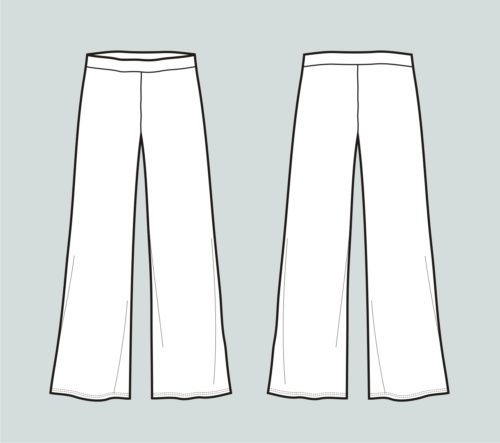
These wide leg pants are not as wide as the old 1970's ones but are more similar to the classic width from the 1930s. This makes a great pairing with a tucked-in blouse, a short tank top, or my personal favorite — a bodysuit.
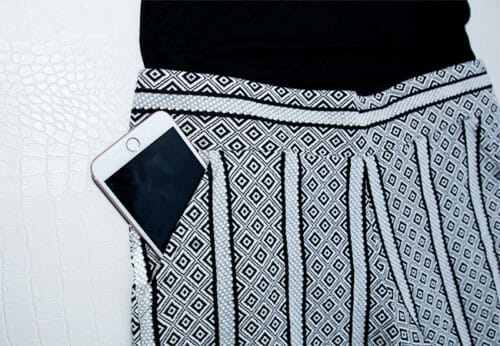
I have added my favorite type of pockets, the slanted pockets. Stylish and useful.
Also, they have a waistband that gently hugs you, without making the dreaded muffin top.
And finally, they can be made long enough to fall just at the edge of your shoes without dragging on the floor which I will show you how to lengthen them in a separate tutorial.
I noticed though that the current trend is to wear them around your ankle or a bit shorter which is perfect for the tall gal. I am not in that group and longer the better.
This is probably an advanced beginner or intermediate project. I hope you give it a try.
Note: Please read all the instructions before you attempt this project. The pants are petite friendly and if you are tall follow this tutorial on how to lengthen any pants pattern.
How To Lengthen Any Pants Pattern- Basic Pattern Transformation
This pattern is for use with stretchy knits only.
Materials
- 2 to 2.5 yards of 60″ jacquard knit, double knit, bamboo or linen/cotton knit
- Elastic for waistband (optional)
- Thread to match
Tools
- A jersey or ballpoint needle
- Sharp scissors or rotary cutter
- Pins
- Sewing machine with zigzag stitching
- An overlocker is ideal but not essential
Recommended Fabrics from Fabric.com
This wide leg pattern is very functional and the look will change depending on the fabric you use.
Use jacquard knit or a pique knit for a tailored look. Stretchable knit and bamboo for a summer look.
Pattern download
You can download the pattern for these Wide Leg Pants from our account at Payhip.
For help downloading and printing PDF patterns, please CLICK HERE.
Finished Garment Measurements
| Size | High Hips | Hips | Hem Width |
| 6 | 31″ | 52″ | 58″ |
| 8 | 32″ | 53″ | 59″ |
| 10 | 34″ | 54″ | 61″ |
| 12 | 35.5″ | 55.5″ | 62.5″ |
| 14 | 37″ | 57″ | 64″ |
| 16 | 38.5″ | 58.5″ | 65.5″ |
| 18 | 40″ | 60″ | 70″ |
| 20 | 42″ | 62″ | 72″ |
Pattern Layout for the wide leg pants pattern

Printing Instructions
Use the latest version of Adobe Reader, this is the only program you will need and we are not asking you to download any other program nor pay for additional programs.
Print the pattern for the carpet tote bag on Actual Size and in a Landscape format.
Cutting Instructions
It is imperative that you maintain a strict grainline, or the pants will not fall the way they should.
Sewing Instructions: Step One
We are going to start by sewing the slanted pockets.
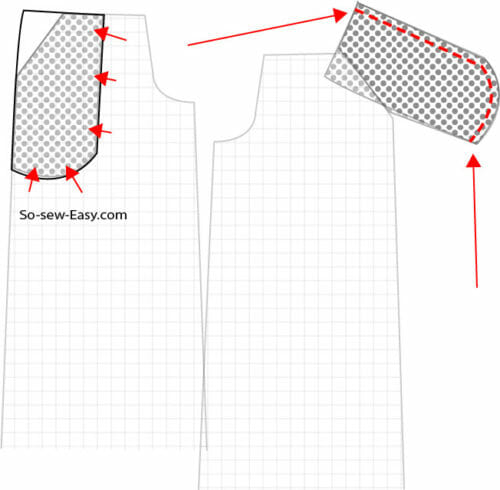
The following illustration is to show you when I talk about print side up or down.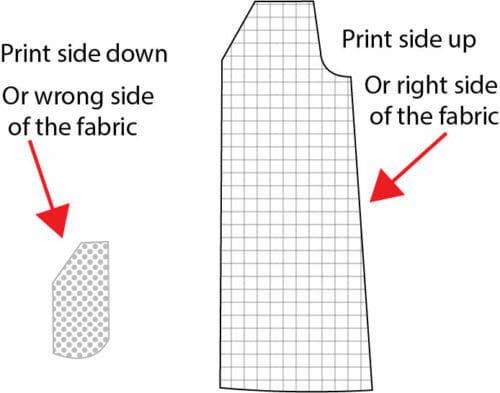
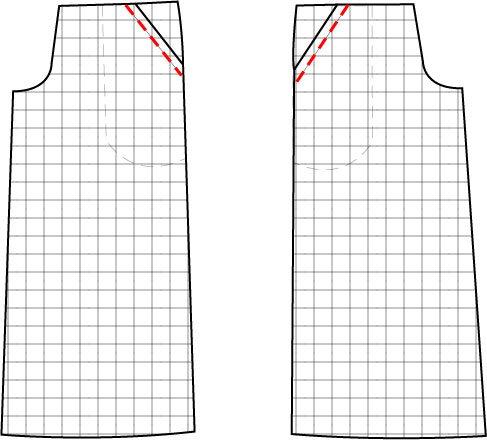
Place the front of the pants print side up. Align the slanted side of the front of the pocket with the slanted side of the front of the pants and sew at 3/8″.
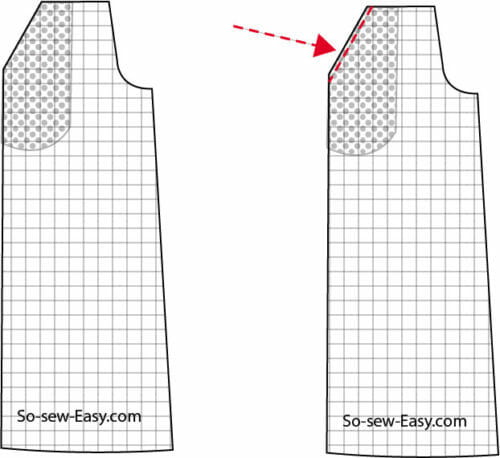
Turn the leg print side down and iron the seam allowance towards the pocket. 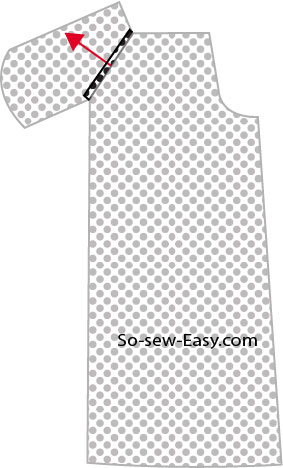
Turn the pocket right side in and topstitch 3/8″ from the edge along the opening of the pocket, use a medium stitch.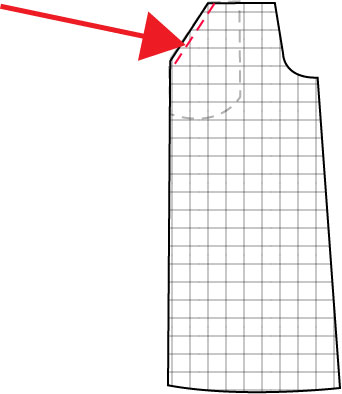
Repeat on the other leg.
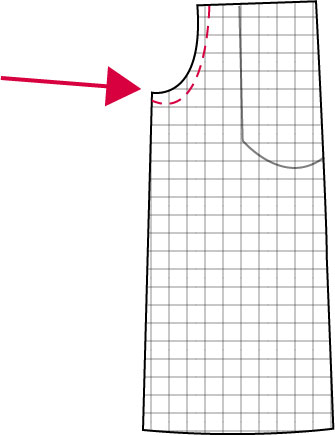
For the next step, you will need the front of the pants print side down and the back of the pocket. Place the back of the pocket on top of the front of the pants aligning it with the other side of the pocket. Pin the two sides of the pockets and sew at 3/8″. Do not sew the sides of the pants yet, this step will be done when we joining the back with the front of these wide-leg pants.
Turn the pockets and topstitch the slanted line.
Step Two
Joint both front pieces print sides together and sew the crotch on the front.
Sew the crotch at the back.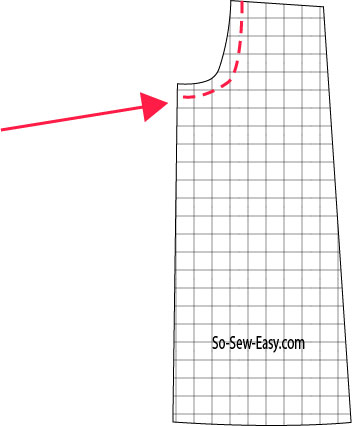
Step Three
Simply sew the sides and inner legs at 3/8″.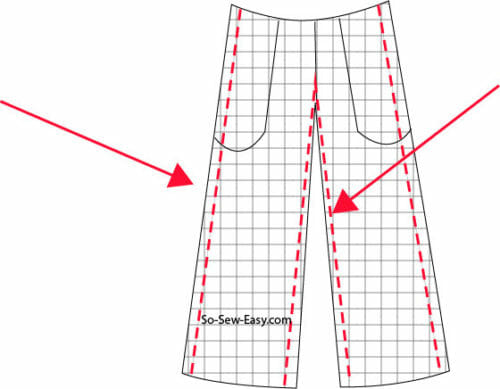
Zigzag the seam allowances before you continue to the next step.
Step Four
In this step, we will be making the waistband. The waistband is not included in this wide-leg pants pattern so we will have to draft it ourselves.
Simply measure the waistline of the pants and draft a rectangle that is 2 1/4″ less than the waist of the pants. You will find that a 2″ subtraction is enough to make the waistband fall on your hips just nice.
Cut the waistband 4 3/4″ X waist measurement of pants minus 2 1/4″. Before you cut the fabric find a wide elastic and try the measurement you have come up with and make sure it is not too tight nor too loose. You want just the right hug around your waist to avoid any lumps or bulges. Let me clarify you will not be using the elastic on the waistband. The elastic is just so you can see how the waistband is going to look around your hips.
A too-tight waist will ruin your look, a too loose waist will make you uncomfortable thinking the pants will fall or there is going to be a gap on your back.
Sew the waistband at 3/8″. Fold it in half, so the band will be doubled. Mark the front, back, and side seams of the waistband. 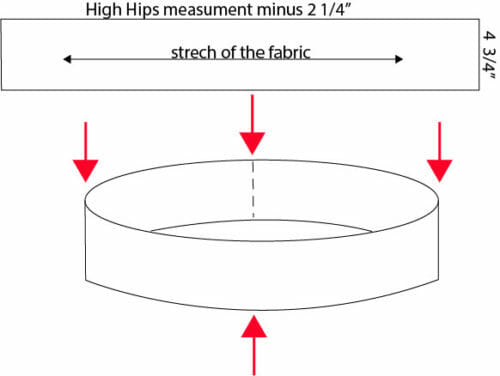 Place the seam to the back and thread the pants through the band.
 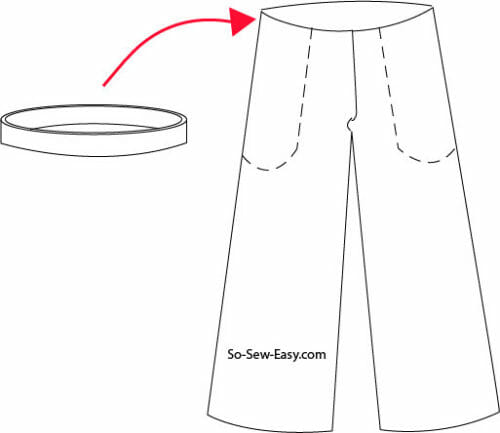 Pin front, back, and side seams and stretch the band between these pins as you sew.
Finally, zigzag the hem. Fold the hem 1″ and stitch.
Then iron the pants, find some fancy sneakers, a hat, and a tank top, and go for a walk. It's a lovely day! At least in my neck of the woods.
Hope you enjoyed this pair of wide-leg pants. I thought they would be fun to make since people are always asking me; where did you get them? Then I say that I made them myself. I'm sure you all know what a great feeling it is to have one of your creations appreciated by others. I am bragging just a bit, but hey! I really love these pants they can make anyone feel taller, cooler, and younger… what else can I ask for?
Check back next week when I will be showing you how to lengthen these pants and add stripes to the sides.
Until Next Time! Happy Sewing!


Hi. I am not sure how to line up your pdf pattern for these. I have used a lot of pdf pattern, usually there is a line that gets matched up. I am not sure what to do with the small squares and rectangles in the corners – how exactly should I be lining those up? Thank you.
Hi there,
Thank you for the lovely free pattern, which I downloaded yesterday.
I have one query, though. On your Finished Garment Measurements chart, it says if the High Hips measurement is 32″ then the Hip measurement is 53″. That’s a massive difference of 21″. Surely this is not correct? It shows the same huge difference for all the measurements. Please clarify. I have measured my child’s high hips at 32,4″ and hips at 34,4″. She is 12. That’s only a 2″ difference. Thanks so much. Marilyn 🙂
Indeed that is the difference, I have exercised my designer’s license, taking in consideration fabric weight, drape and fitting. I would use the smallest size for your kid but mind you this pants are for someone with an hourglass figure where the difference is 8″ or more between measurements. Kind Regards,
Love these trousers but why is the pocket outline inside the pants leg outline? I guess you have to trace that part out ?….it’s confusing me alittle
Yes, you have to trace the pockets out.
Hi Mayra, thank you for this great pattern! I made a pair in a black ponte for work and they turned out beautifully. Keep up the good work! Thank you, too, for making it so easy to support you.
My pleasure Bettsi, makes me happy that you have a pair of beautiful pants and that you are able to say you make them yourself, is there anything more satisfying? Ponte is the perfect fabric for them. Thank you for your support. I am very touched…Kind Regards,
My hips are 48 inches. What pattern size do I use?
The High Hip Measuremt will help you find your size.
I would love to make these. Looks like a gorgeous pattern. I am a bit stumped on assembling the paper pattern. I may just be dumb, lol!???? I have read some of your articles mentioned in a previous comment about assembling your pdf patterns, yet I am still confused. No matter how I cut and assemble the pattern I can’t seem to match the lines. I have printed it on a4 paper and us letter, both on actual size and I cannot figure it out. Do I trim the pages up to the grey squares, or do I just line up the pages, no trimming or overlapping, either way my pattern lines are not matching up. Please help! Should I be printing on A4 or US Letter.
HI Eva, the pattern is drafted so you can use either paper. Are you using Adobe Reader to print?
Hi, I’m in the process of making these pants and just had a quick question about step 1. I sewed the backs of the pockets on and then you say to “Turn the pockets and topstitch the slanted line.” Could you elaborate about this step? I am confused on how to do it without sewing the pocket closed.
Hi Carolyn the pocket have to pieces first you sew the slanted part, Turn, topstitch then the back of the pocket.
Yes – this is the thing I’m confused about too. We topstitched the slanted line, then after adding the back panel we’re instructed to topstich the slanted line again.
This is my favorite go-to pants pattern—from lounge wear to evening wear. It’s all in the fabric to get the look you want. So easy to make. Thank you for sharing.
My pleasure Yvette, you are absolutely right it is all in the fabric. This is also my favourite pants pattern.
Hi, I’ll have to pass on these I’m afraid. I made myself a pair of flared pants in the early 2000s and nearly fell downstairs once (crossing a bridge from platform to platform in a London Underground station) because I caught my foot in one of the legs. Some people helped me steady myself but I could hardly tell them I nearly fell over my pants!! So I have to be either a straight-legged pants girl (old woman) or just have a very, very, very slight flare. Thank you for being kind enough to offer the pattern though as patterns are expensive these days (they tend to be so in the UK anyway).
Hi Patricia, I will be sharing another type of pants, I am sure we can find a style that suits your personality and lifestyle.
Cute, I would never need to lengthen pants, shorten yes. Also there is no way this would elongate my figure as being under 5′ and from 21 to 23″ inseam just not going to happen. LOL I am afraid it would just make me stubbier looking. I enjoy looking at your patterns though. You come up with some cute things.
I look forward to trying this pattern. I noticed the material list on page 3 of the pattern says it’s for the Placemat Clutch Bag. The list matches the instructions on the web page. Thought you’d like to know if you haven’t noticed already! Thank you!
Hi Deadra, I would have download the pattern and see the file. I have not noticed that at all but thanks to you know people can have a look at the site and get the right list. Thank you!
Hi, these pants look so nice and comfortable, but sadly I’m on the larger size (Size 2XL or 42-44 – I’m in South Africa) and the pattern only goes up to size 20 (not sure if that is US or UK but I would imagine US).
Do you perhaps have the pattern in a larger size? I’m afraid I would have no idea how to alter it myself 🙁
Thank you 😀
Regards
Sara
Sara size 42-44 is around 14-16 in USA size do try and measure the pattern against your body and see if these sizes work for you.
Hi, I’m wanting to try the pattern, but step 4 is throwing me for a loop. At one point, you indicate that you will not use the elastic, it’s simply to use for measurement. So, is it optional? If so, how is it implemented into the pattern? You also indicate that the waistband is one piece, that is to be folded over. If it’s one piece, why would I need to mark it’s seams on the back, sides and front? And the last one is…..”Place the seam to the back and thread the pants through the band.” I cannot visualize what that means.
Is there any chance you’ve made a video that someone could follow along? Unfortunately, I am a very visual learner. I want to make these pants, but I’m afraid I’ll get to step 4 and not be able to complete them. Any help/instruction would be greatly appreciated.
The elastic is only a way to find out how it will look against your waist, this pants must be close to your body but should not be so close that it will cause a muffin top. The use of an elastic is not require for the construction of this waistband. The use of the right fabric is imperative there is no way you will look good with a very thin fabric. Please, never start any project which you do not understand the instructions. I have a video of a pair of culottes, it is not the same pattern but the construction of the waistband is similar, slanted pockets and figure hugging fabric. https://www.youtube.com/watch?v=ixdTAjl3Etg&t=190s From minute 9:10 I explain how to make the waistband. Hope this helps, do let me now if you need any further help.
Hi!
I was thinking about making these pants. Almost started with my linen fabric until I realised it was for knits only. Ordered some jacquard knit now so will proceed soon!
I’m from Sweden and we use A4 here. I just wanted to make sure, that if I print this on A4 (100% actual size), will this work or was this pattern done only for the US letter?
HI Heidi! lovely name I used to watch a cartoon with that name, yes it will work. If you follow my Instagram or #soseweasy you will see some samples of this pants in other girls.
I love this style and would like to make some but the legs are a little too wide for me. Is it possible to make them a little narrower, if so where would I adjust the pattern. Thank you.
Hi, I’ve made a couple of your top patterns to date, and I must say that they’ve turned out pretty good! I was wondering what you thought to elasticating the waist and increasing the hip measurements so I could use a rather funky crepe fabric, with minimal stretch, that I’ve got in my stash. I normally wear a UK20-22.
You will need stretch to go through the hips and then recover enough to hug your waist. A minimal stretch may not recover enough and might gape at the waistband. You could add a zipper at the side and that would take care of things. This is an advance adjustment, that requires knowledge of pattern fitting and your measurements.
Thanks Mayra, I’ll probably just make some pyjama type bottoms with my funky crepe. I’m all for the simple life!
Sounds like a plan!
yes knits are a bit clingy for my body. I’m putting in the zipper. Really not hard, I’m just putting the seam for the waistband on the side and using that seam for the zipper.
Hope it works well for you. DO make sure you use Jacquard knit only.
I chose lightweitgh viscose cloth and I was not able to put these pants on without making them widet in hip area and the elastic in the bend. In next version I had to added a zipper, otherwise it is too tight around my hips…
This pants are for knits only.
Hi, just wanted to know if the sew allowances are included in the pattern sizes, or will I have to leave room around the patterns when i cut?
3/8″ is the seam allowance already included.
Would a Scuba knit work for this? I just got many yards of jean scuba fabric and would love to have some wide leg jeans for my winter wardrobe.
Not ideal please check my fabric suggestions for best results with these pattern. You need the fabric to move when you walk. How think is the scuba fabric? Since you have many yards, why not make a pair and se ow you like them?
I would love to see this pattern in a normal material not a stretch. Looks such a nice pant. Is it possible for you to do that? Please Gahanny
Hi Mayra, does this pattern work with viscose fabric? Thank you for your answer. Have a nice day 🙂
It could but you need to add a zipper to it. The pattern has been drafted for knit fabrics so proceed with caution when making it without the stretch.
I had to add a zipper too. Or just cut wider hips and then add elastic in the band. The wide one and sew it together to the top of the pants.
Hi Mayra, would an ITY knit work for these? I found a really cute border print ITY that I think would look cute.
Yes you can use the ITY just make sure the pant fit at the waist perfectly.
OMG I’m SUCH a dufus!!! I totally missed that the pattern was for knit fabrics and wondered why I couldn’t get them past my thighs even though I cut the right size. The plus with wide leg trousers is that hopefully all the folds and such will hide the fact that I’m having to add a large panel to each side, lol, I can’t believe I missed it!!! 😮
How did your panel end up looking?
I think it came out great in the end, because it’s a patterned fabric you can’t easily see the added panels on the side, the only downside is that the pockets are further forward because of them but it’s not a biggy. Also had to make the waistband bigger to account for the no stretch. Will defo read twice next time before I cut tho!!!
I had to do same, missed it too lol
Hi, it says cut two of each leg piece. Do I cut mirrors of each or two exact same of each?
HI, Amanda fold the fabric in half that way you will have two pieces that will correspond to each leg.
Hi Myra, thanks for your pattern, I finally downloaded the pattern, and i am now preparing my fabric. I will send you Picts when I have completed my long awaited pants.
Looking forward Fran to your picture 🙂
How can I adapt this pattern for using viscose fabric? Is it possible to put an invisible zip in and would you recommend the back or the side seams? Many thanks! This is such a great pattern, can’t wait to I wear these for summer!
This pattern is for stretch Knit only preferably Jacquard Knit as I have used.
Hi!
I am 40 inches at my hips. The smallest finished garment hip size is 52 inches. That is 12 inches ease! Are the sizes really big or am I missing something?
According to these charts I am around a size 10: https://en.wikipedia.org/wiki/U.S._standard_clothing_size
But that gives me 14 inches ease…
Hi Laura, I have designed the pants for an hourglass or pear shape figure. If you are a rectangle or Triangle shape but less than 38 inches on the hip you can wear this pants. In order for the pants to fall smoothly on the body, they need to flare out from the hips to the legs, so when you move the pants move with you. Check out Michele’s pants below in the comments, that is exactly what they are supposed to look like. Kind Regards,
I had one more comment I also had problems with the lines and boxes matching up. I printed it twice 2 different ways the box sizing was always correct.
`i manages to piece it together trimming more where needed.
Leslie
Not sure why you are having this problem, the pattern has been downloaded close to 1000 times and just 2 people have this problem. Have you been able to make the pants yet?
I have to say I always have this problem also (I’m in the UK so use A4), I think it’s something to do with the margins (perhaps the default margins for A4) but I’m unable to change them in Adobe reader. I’ve never actually commented before about it though because I usually manage to eventually work out where I’m supposed to tape it thankfully!
Sorry another case of my thinking the photo was like icon rather than big pic, oopsy, clearly I need to stop commenting today!!! Pls feel free to delete pic or comment or both, lol.
Thanks for the comment I am going to have to think of something to do here because I also use A4 where I am.
Hi, i have a heavy linen fabric will this be ok to make these pants with
HI Leslie, no the pattern is for stretch fabric only since it has no zipper.
Hi Mayra, I have some slinky fabric that is 96% polyester and 4% spandex. Would this be suitable to use for this pattern? If so, are there any adjustments I should make? I am petite size.
Thank you,
Vallery
Hi Vallery, it is possible, but not easy to do it, because, it is an advanced pattern fitting skill and to be perfectly direct with you I would have to make a video and hire a model in order to show you how to do it. This is one of the most asked questions when working with knits and I should write an article about it. But, if you still would like a challenge make a muslin first so you do not ruin your fabric. The first thing you need to realize is that you will need a zipper either at the sides or at the back since 4% stretch is not enough to pull pants up your hips to hang at your waist. I recommend one invisible one at the back. Work with the finish measurements of the pattern to find the best size to fit your body, allow 2cm of ease if you like your pants fitted at the waist more if you prefer more room. You will need to cut the waistband measuring your finished pants. I think the work is worth it if you are looking for a pair of pants that you can make in many different prints. Let me know if you need any further help. Love to see a picture.
Where on the waist do these pants come up to? Is it higher than the belly button, or do these sit at the hips like so many pants they’re selling these days? I stopped buying pants for that reason.
Without the waistband, they should fall right around or under your belly button, of course, this will depend on your crotch measurement. Then if you follow my instructions they will be 2″ higher. You can make a bigger waistband if you like.
First, I love the finished product. However, I had some real problems with fit. I had to add 5″ of length (I’m 5’10”). My high hip measurement is 39″, so I chose to cut out size 18 (even though I wear size 10-12 ready made) because the finished sz 18 high hip was 40″. Everything went smoothly until the waistband.
I measured the waistline of the pant and got 43 1/4. I subtracted 2 1/4″ to get 41″. I did the elastic measurement and it was too big. I went down another inch to 40″, figuring that would be just right on my high hip. I cut my fabric 4 3/4″ x 40″. I sewed the waistband on, but had to do very little pulling to make it fit, which I found odd. I put them on, they fell off. I had at least 4″ of gap in the back.
I ripped out the waistband and measured in 2″ on each side to make it 4″ smaller. I sewed the waistband on a second time, this time pulling a little to fit in on. I put them on and I STILL had another 2-3″ gap in the back. Instead of pulling off the entire waistband, I ripped out just enough to take in 2″ more, and I also had to taper the back seam in like a dart because it wasn’t fitting snugly.
I have intermediate-experienced sewing ability, so I’d love some input on what might have happened. Did I choose the wrong size? Maybe I didn’t cut out the right size? Since the sizes are not marked on the pattern pieces and I didn’t see anywhere in the instructions how to tell what size the colors were, I measured to see which piece was the largest and ended up cutting the green line for sz. 18. The back of the pants seem to pull down too, like the area between the waist and crotch isn’t long enough.
First, of all congratulations on persisting with the project, most people will give up and blame the pattern.
Second, you are not alone in finding out the fitting pants is really tricky.
Third, yes you choose a size that is not yours, way too big. However, it looks to me you have a very small waist in comparison with your hips. (Lucky you, you are a goddess:) There are several possibilities of what might have happened and the first one comes to my mind is that yes a. the size was wrong b. the fabric stretched which brings me to the question what fabric did you use? c. your bottom measurement needs crotch adjustment when it comes to fitting pants.
Without real measurements and pictures, it is impossible for me to say what you should do next time you make this pants but it seems, either way, you need to adjust the pattern to your own body. Just remember that it is easier to enlarge a pattern than to make it smaller. Hope that helps, I really would appreciate a picture:) Kind Regards,
Thanks for the help. I’ll remember to lengthen the torso a bit next time. Here’s a couple pictures. Hard to tell they are pants in one, so I had to send the second. 🙂
Let me just say you look like a fun girl to hang out with. Love how you have styled the pants. I think you are rocking this outfit.
The other, wearing them to work!
You look fantastic! What fabric did you use?
Just a regular, semi-weight knit that I found in a clearance bin for $2 a yard.
Thanks for the pattern.
what is the difference between palazzo and culotte? besides the length.
That is the only difference. Both Palazzo en culottes can be as wide as we can think of almost to the point of resembling a skirt. These palazzo pants are not as wide because I was trying to keep proportions and balance for an hourglass, pear and rectangular shape woman.
I wear a UK 12/US 8 what size would you recommend I cut?
I would print size 8 and 10 then check my measurements against the pattern. The waistband needs to be snug but not so that it will make you a roll around the waist.
Thanks. I’ve got thepattern printed and assembled ready to cut out.
Some of the pattern lines didn’t match up very well, but that might be my printer!
Thank you so much for this pattern! Very generous of you to share your time and talents with us. It’s a lot of work putting together this pattern and tutorial! I’m looking forward to making this!
It is my pleasure Kathleen, enjoy the project.
Can this pattern be used for woven fabric?
Knits only, preferably Jacquard knit.
I would love to make these pants are they suitable for petites? I’m 5″2 160 lbs and a pear body shop , my legs are long and I have a short torso, I like to be comfortable at work I set a majority of the time as I work at a computer. Tia for any help
Hi Paula, go for it! You will love this pants.
Is there a picture of them on anyone? I would like to see that.
There’s a problem with the pattern: Page 3 and 4 don’t line up properly. I printed out using adobe and everything, and the scale is right for the box, and there’s noting about margins in the software, and I’m not sure where to go to to fix this. Please Help!
Must be on your side, this pattern has been downloaded so many time and I have never had a complaint until now. I have tested the link and it is working perfectly. Please check your printer settings. Here are two articles that could help you https://so-sew-easy.com/print-assemble-pdf-pattern/
https://so-sew-easy.com/print-a-layered-pdf-file/
let me know if you are still having troubles.
WAY late chiming in here, but I bet you’re using an HP printer! I’ve recently had the same problem but only with certain patterns. It’s an HP glitch, just go into your settings (advanced) and make sure you click “print as image”… fixed it right up for me.
Just wanted to say thanks for such a fun pattern! I’ve never tried a silhouette like this and I really do love them. I typically wear a size 2 in RTW so I simply took a larger crotch seam and several inches from the waistband and they fit perfectly.
Hi Julie, so glad you were brave enough to do that because that is exactly what to do. But, you know girl, a picture is worth a thousand words…Love to see your take on this:)
I tried but I am not able to upload a photo!