


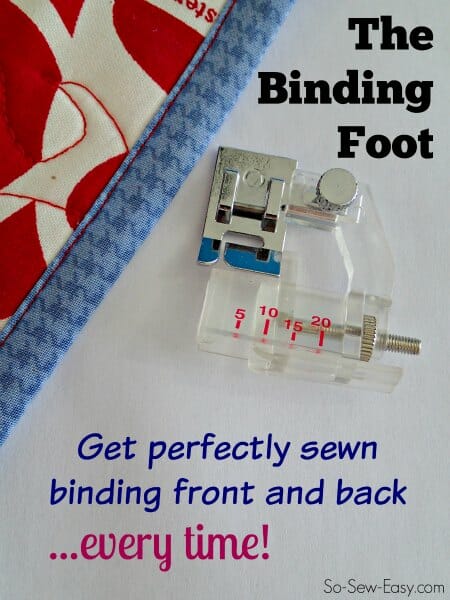
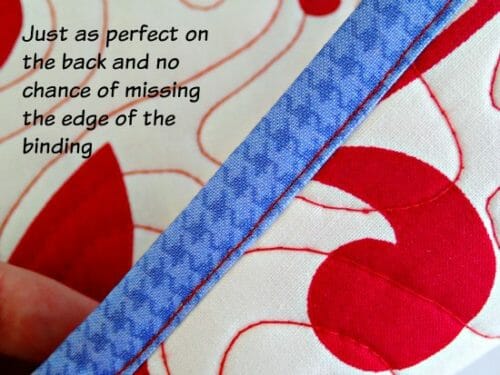
If you get frustrated putting on binding because you sometimes miss catching the back of the binding and get little gaps – you need this article! Never miss the back again and get perfectly straight stitching – learn how to use the Binding Foot.
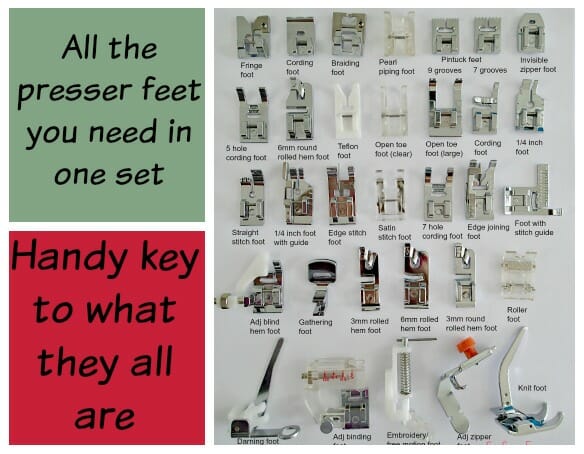
Do you remember that lovely big box of sewing feet I bought? I've been gradually working my way through them a bit at a time, with varying degrees of success. I'm never one for worrying too much about the accuracy of my sewing so these are certainly helping me get a great finish on all of my test pieces.
There is one, in particular, I wanted to share with you, the Binding Foot. This is a revelation! I now worship the binding foot and have been making up all sorts of little bits and pieces to add some binding onto.
Let's take a look at how it works
Features of the binding foot
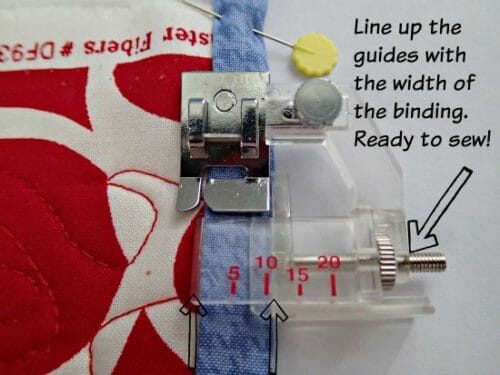
The binding foot is adjustable so that it can deal with varying widths of binding. It works with bias binding and is perfect for use around gentle curves and circles, and it also works with straight-cut binding for straight edges too. With some practice you can also use it to get neatly mitered corners too – maybe once I get a bit more practice, a new how-to will follow to show you my tips for doing that. For now, we'll assume we have to add binding to a straight edge and will do it in a single pass, sewing front and back at the same time (perfectly).
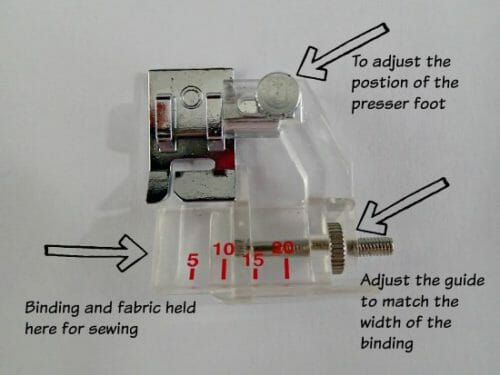
There are two wheels on the foot. One so that you can adjust the position of the foot itself and slide it left or right and then another wheel that adjusts the width of the clear part of the foot that holds the length of binding. This controls a sliding guide that runs along the length of the binding as you sew and keeps it snugly in place against the guides for perfect stitching.
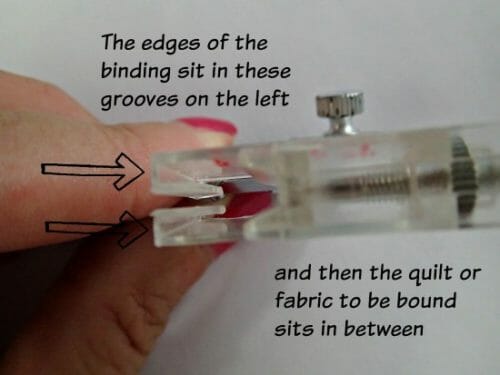
The plastic parts are flexible, especially when that lower wheel is turned to the wider setting so that they can be opened wide to allow the fabric and binding sandwich to be put together.
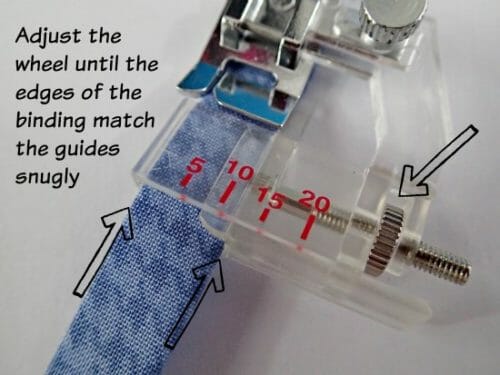
Mine has numbers printed on indicating the width of the binding, but you don't really need the numbers. Just turning that wheel until the binding is snug is more important than using a number as a guide I think.
How to load the binding and fabric
Open up the lower wheel to move the guide over to the right-hand side. This allows the upper and lower piece of the ‘jaws' to open up more easily. Now at this point, some tutorials I have read suggest feeding in your binding first and you can certainly try this and see if you get on OK that way.
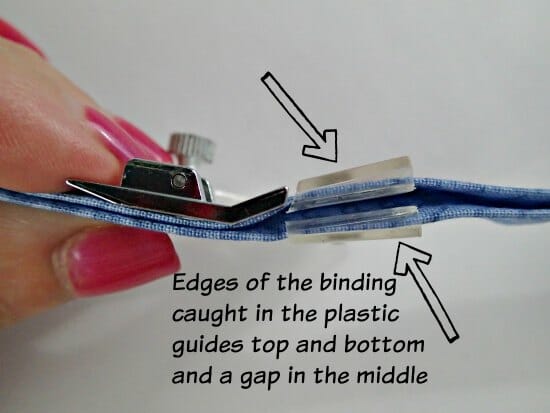
Binding first method. Feed in the binding tape with the open edge on the left and the fold on the right. Separate the open edges and slide both the top and bottom edges inside the little tabs on the left of the jaws. This is how it should look with the fabric top and bottom separated and held by the little plastic guides.
Adjust that bottom wheel until the guide now moves over snugly to the folded edge of the binding so that the binding is held in place smoothly between the left and right edges, but without puckering.
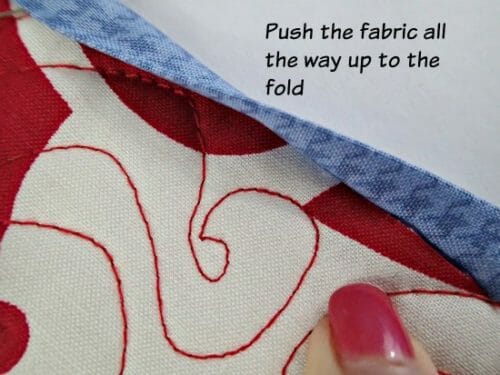
Now open up the jaws with your fingers and slide in the item/fabric/garment/quilt to be bound. Push the edge right up to the fold of the binding. Slip the foot and binding up to the start of the edge to be bound. You are all set to sew.
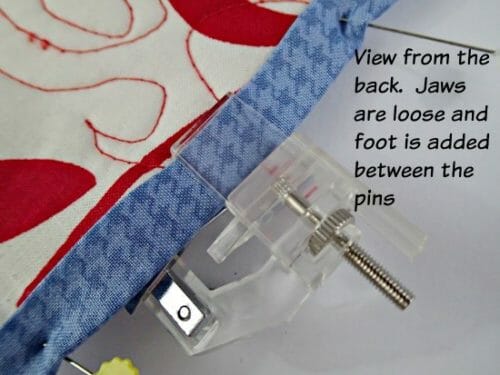
Whole sandwich method. I found this one easier personally, so try each and see which you prefer. This time instead of loading the binding first and then the fabric after, I pinned the binding to the fabric and loaded it into the foot all in one go. Move the guide over to the right so you can open up the jaws easily. Near to the start of where you want to sew, pin or clip the binding to the fabric/quilt as if it were ready to sew, with a gap of 3 or 4 inches between your pins.
Now slide the foot in place around the whole sandwich, between those pins, and position the edges of the binding in the little guides on the left. Make sure the front and the back are lying in the guides smoothly.
Turn the lower wheel to move the right-hand guide snugly up against the fold of the binding. It's all now in place and ready to sew. Remove the top pin, slide the foot back to where you want to start sewing and you are all set. Remove the lower pin as you sew.
I found this way less fiddly by loading the whole sandwich at once.
Stitching with the binding foot
If you have a machine with an adjustable needle – easy! Clip on the foot to your machine and adjust your needle to exactly where you want to stitch your binding. Pick right on the edge, or just back from the edge to be extra safe you won't miss a spot on the back.
If you don't have an adjustable needle position, then you will use the little screw at the top, loosen the foot and then slide it so that the needle position is lined up just right so sew along the edge of the binding. Then tighten the screw again.
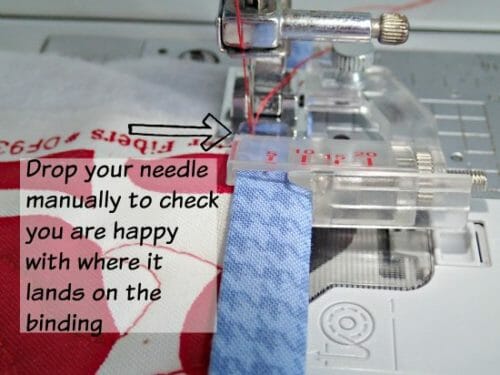
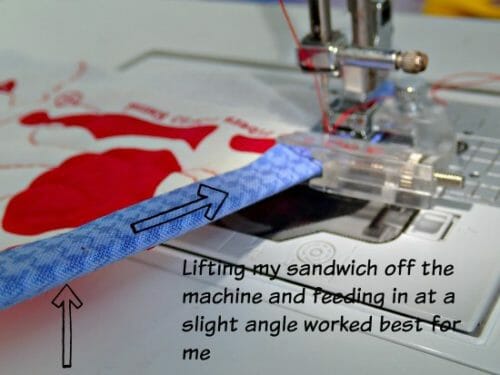
Just manually drop your needle down into the fabric to check you are happy with the placement. Assuming you are, then you are ready to sew. Your foot may be pretty flat or it might be like mine. With my binding foot, the front plastic part is at an upward angle as it faces me. The presser foot itself is, of course, flat against the bed of the machine and the feed dogs, but in order to feed my sandwich into the foot, it worked best for me to hold it up at a slight angle to feed in.
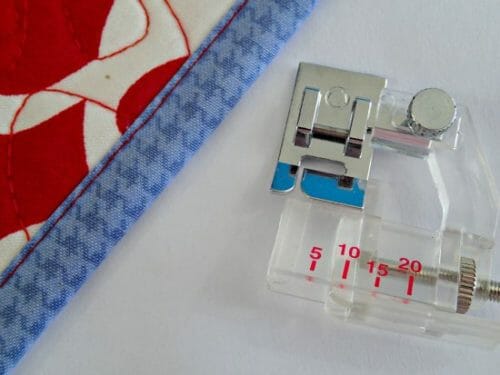
Now just sew merrily along, make sure the binding stays in the little guides and that the fabric or quilt in between the binding stays butted up close to the fold and let the foot and the machine take care of the rest. What do you get? Perfectly sewn binding front and back, a perfectly straight line of stitching, and no missed bits when you turn it over – genius!
So if it drives you crazy when sewing on binding that you turn it over and find you missed the back in a couple of spots, make your sewing life easier with one of these binding feet. Get it in the super-set of presser feet above, like I did or you can, of course, buy them separately too.
Here are a couple of really good options on Amazon:
Now relax knowing next time your binding will be a breeze 🙂


Just wondering how would you turn the corners? 🤔
My son just bought me this foot and I was struggling with how to use it. I am so glad I found your clear instructions. Would love to see a video using this binding foot!
This is timely. My best sewing friend and I struggled with this foot then gave up. Now I feel confident to attempt using it with success.
HI Martha, I hope it helps do let me know if the info is clear and useful; so lovely to have a sewing friend!
brilliant – i didn’t even realise what that foot was for. Will have a go now.
Is there a way to print out these instructions ? I’ll never remember all this the next time I want to use it !! LOL !!!
Did you get an answer about printing these instructions? I too can’t remember all this but I like the way she explains! Would love to print instructions if possible!! Thank you!!!
Hi Renee, there is a print-friendly button on the left of your screen, press it, and it will take away all the ads.
omg. Just used mine for the first time and bit is a game changer. Circle skirt hems, here I come!
Thank you for the very excellent clear instructions and photographs – very different to some of my learning to use fancy feet experiences…
I love this! And I bought it, but I’m not sure if it’s usable with knit fabric. I’m trying to make binding my shirts a little easier, don’t have a coverstitch machine, just a regular sewing machine.
Is there any way to use this with knits? It seems the top part of my binding foot is really narrow and my cotton Lycra is too thick for it? But it really doesn’t seem thick.
I use a double needle on knits or a serger. The double needle works well to emulate the cover stitch.
I want to commend you on your awesome diagrams explaining how this foot works, thank you.
so I just bought this foot because it looks so easy online…my issue is this…my binding is twisting and I can’t figure out why. I tried straight cut and bias cut binding and both twist. any suggestions?
I have used this foot and found it easy to use and produces good results. I’ve yet to try to mitred corners. However the frustration I found was ending it. I did some oval placemats and had a difficult time dealing with the endings. Any advice?
I have this foot and it works quite nice. What I haven’t figured out yet though is how to sew corners? Can anyone give me a hint? Thanks in advance
I would also like to know how to do the corners.
How do you join the ends of the binding using the binding foot.
I just got one of these feet for my old Toyota, it fits and works well with a single layer of fabric and binding. But when I try to use it with, say, fabric sewn to a mesh lining (making a dog harness here or trying to!), it all goes wrong with the material coming out of the binding no matter how hard I try to pin/clip/hold it in place. Also, I’m trying to find some nice, brushed cotton bias binding that will not rub the dog’s legs, but can’t seem to find it anywhere. Help please!!!
Hi Janet, you are going to have to make your own binding, it is the best advise I can give you. I make my own most of the time.
After I asked my question about mitered corners and seeing other people ask the same quaestion, I did another pintrest search and found this pin. Scroll down part way in the article and she tells you how to do the mitered corners using the binding foot . Hope it a help ladies. https://www.sewmucheasier.com/all-about-binding-part-2-how-to-mitre-corners
Just tried the link…and it can’t be found!!
I was reading your replys and I was wanting to know 2 thins. Frist how can I print this off of using a binding foot? Second can you give me a better picture of how to attach the binder foot to a singer sewing machine. I got my binding from amazon but no directions on how to use it ok. Thanks for all your help.Betty
Thank you for the tutorial. I just ordered the foot but realized the tutorial didn’t show how to do the corners. Do you have any suggestions to make it easier? Thank you.
Hi Lucy, please have a look at this post: https://so-sew-easy.com/turning-corners-with-bias-binding/
this method works great when sewing single side sewing in the crease of the binding (1/4in) but how do you do corners using this foot when you are sewing both sides at once? Does it work same way????
Yes I am curious about this too, when using the foot above.
Will this foot fit my Husky Sapphire?
I have a Janome DC 3018 low shank. Would these work on my machine?
No, I don’t think it will. Best to buy Janome parts.
Hi, I have that same kind of binding foot but haven’t used it.
Can I use that foot to apply
this 2″ satin binding or is the satin binding to wide?
Thanks,
Rae
How many layers of fabric do you have there? If it is too think it will not work.
where may I find that book that tells you how to do all 52 feet?
I have used the binder foot and t worked just fine. Nita
Have this foot but never tried it. But it cant be used with a walking foot which is always how I put my binding on my quilts. I think Ill try this with table runners and such. Im so glad I know what it now. Thanks
When using commercial binding, one side is wider than the other. Do u put the wider side on the back side of the sandwiched fabrics?
Thanks for ur time.
Yes, Mary, you need to make sure the needle is going to catch the tape.
I ASKED FOR AND RECEIVED AS A CHRISTMAS GIFT THE BIAS BINDING PRESSER FOOT. MY PLAN WAS TO FAST-TRACK BY HONG KONG SEAM FINISHES, HOWEVER, WHEN TRYING TO USE THE ¼ INCH DOUBLE FOLD BIAS TAPE ON A WOOL/RAYON BLEND, I AM HAVING A DEVIL OF A TIME GETTING THE FABRIC TO STAY W/IN THE TAPE, IT JUST SHEARS OFF. I THINK IT WILL WORK OK WITH A WIDER TAPE (ALTHOUGH I HAVE NOT TRIED) BUT WANTED TO USE THE NARROW TAPE. HAS ANYONE HAD SUCCESS USING THIS FOOT WITH THE ¼ INCH DOUBLE FOLD BIAS TAPE? WHAT SUGGESTIONS DO YOU HAVE FOR GETTING THIS TO WORK? THANKS IN ADVANCE FOR YOUR RESPONSES.
My first side of attaching binding to my quilt was awesome and exciting, but since that moment the binding is puckering. Can anyone guessimate what I might be doing wrong or how to correct this mess.
Thanks
Is there one of these feet for 9mm machines
Think you adjust the fit, to the markings on the side piece
I used the binding foot successfully when I first got it and was delighted with it. However, recently the tape slips out of the top slot every time. I’ve tried different widths of tape and it still happens. How snug should the guide be against the tape? I know it does work, but just can’t figure out what I’m doing wrong. Any ideas?
Great Question Linda, I sent an email to the distributor asking the same, I have not heard back. I have tried all possibles scenarios and still, the tape slips out. Very Frustrating! Hope someone has a solution!
Can I use this binding foot to bind a quilt, or did I waste my money purchasing it for that purpose?
Several sites to order the box set of feet are on delivered in UK. What did ladies go to to buy the set in the USA?
Not sure if you have found a solution, but a lot of the bias tape maker sets have this foot inside. I was researching bias tape makers when I discovered this foot!
On my Facebook feed, Madam Sew had a pop up for a 32 piece set of feet. It was a sale price. Was not the Deluxe they have on Amazon for $52 but did have a PDF download for instructions.
Amazon.com
Great site. I too bought the box of “feet” as well as a book to help me learn. The info on the binding was great will give a try tomorrow after cutting a project.
I just finished a quilt using this foot. It worked awesome. I mitered the corners by stitching up to the end of the one side. Pulled all sewing out of the foot. Turned the corner and mitered the end by using a pointer and pinned each side of the miter to hold it until I was done with the whole quilt. Placed the turned edge back in the foot (sliding all pieces back as close to the corner stitching) and finished another side. Each corner looks great. When done I used the machine with the regular foot to finish off each corner(to secure the miter). Finished it off with long threads (pulled from my machine stitching) to make a double knot. Then threaded the knot back into the edge at each corner so no knots were showing. This worked so well I just had to share.
Congratulations, you are one of the few people I know that have found a way to do it!
Do you have instructions for mitered corners?
Quilters would want to be able to do nice corners, so this wouldn’t work.
This sounds awesome I think I’ll practice first then try it on a piece I’m working on thanks..
About an hour ago I found your site while looking for info about making a lettuce hem. One thing led to another and I began reading about using the binding foot. I looked at the picture of the foot and shot to my feet. “I’ve got a binding foot!” Like you, I purchased a big box of feet some time ago and have no idea what half of them are for. I ran to check and carried it back in triumph. A binding foot! I must bind something immediately! But what? No idea! But I must and will think of something 🙂 It was lovely to discover something ‘new’ that I already had in the house and finding your wonderful website has been a real tonic and reminded me of how much fun sewing can be.
Welcome, Liz, hope you stay a while 🙂
Thanks so much for this tut, i have always been unhappy with the result of sewing the binding and having messy stitches on the back,
Cheers
Robyn
Adelaide
Australia
Can you explain doing corners on a quilt binding? It looks like the binding foot will not work for that. I use the method of sewing up to the corner, remove and fold up 90 degree, turn back down and continue (hope that makes sense).
Hi Bev, yes it does not work for that, but I made a scarf, a bandana and a very wide dancing skirt with and it worked wonders 🙂