


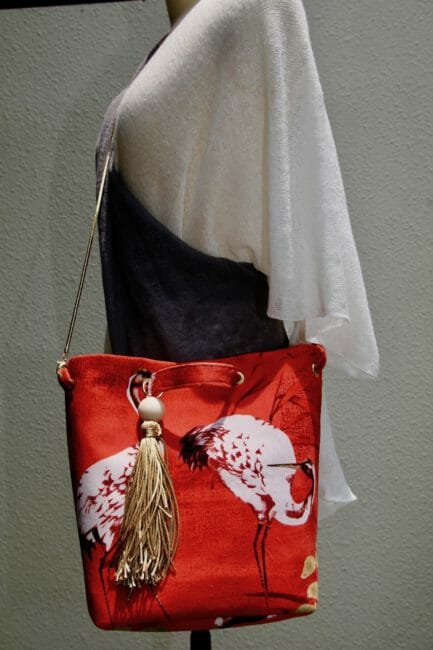
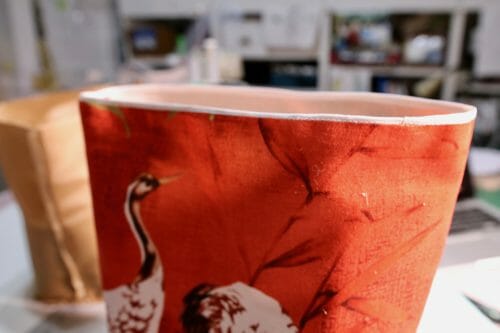
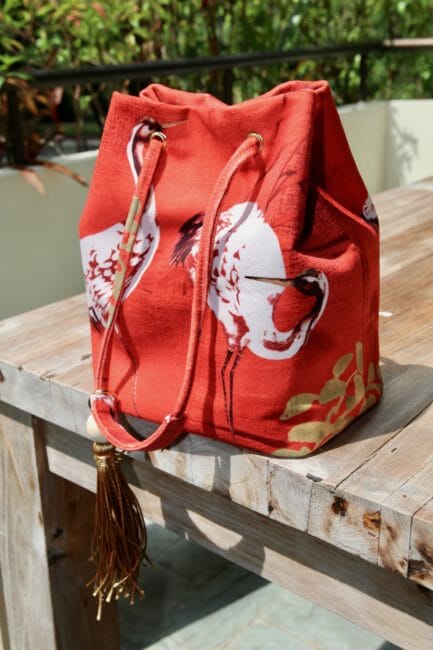
This bucket bag pattern is the ideal project for those of you who would like to experiment with different materials. A couple of weeks ago I showed you a round bag made with cord. This time I am using upholstery fabric which is a very short pile velour to see how hard it is to work with to make bags. I think it came out pretty well!
The bucket bag can be carried as a cross body, or as a pail (which means by hand). Bear in mind, the definition of bucket applies here and if you want to carry the bag on one shoulder, then perhaps you need to make the straps a little longer.

This type of bag is not new at all. It first came to fashion in the 1900's, from a pouch with a string and a hardened bottom. However, this bag style is still largely accredited to Coach, who first launched a collection of bucket bags in 1963. These bags became popular because of the easy-going nature of the bag. You can just throw things in and go. By 1967 all the major accessory houses had versions of the bucket bag.

What made me think of this bag? Well, I was watching the Bucket List with Morgan Freeman, my favorite actor. The first time I made a bucket list, I was seven years old, then again at nine, and 15, 19, 21, well, you get the picture. I have plenty of lists, but no bucket. So here is mine!
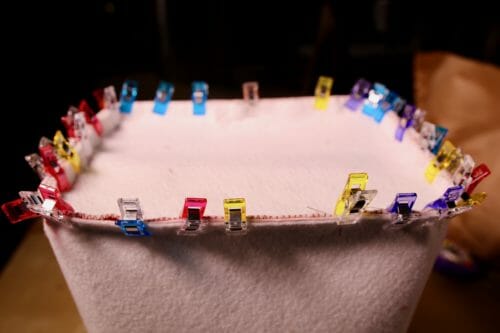
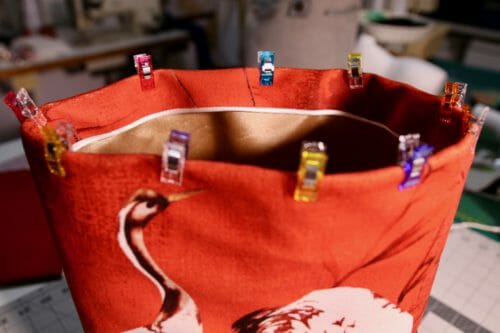
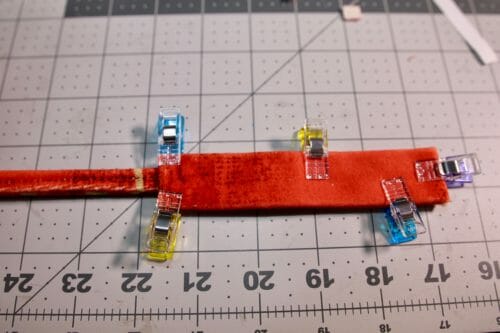
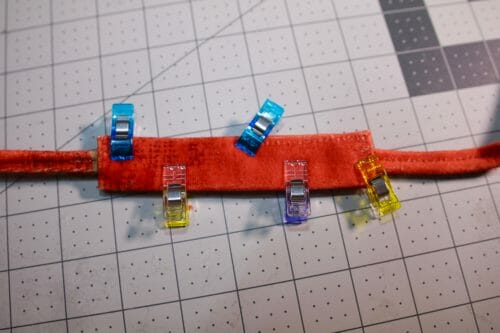
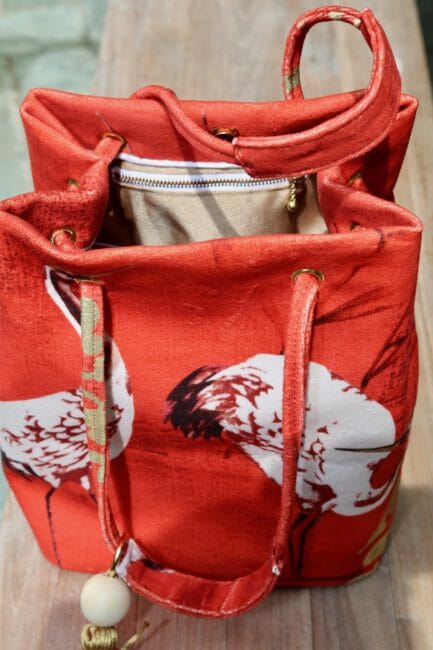
As you make it, just keep in mind, that as I predicted when I was designing the bag, the combination of velour and the lining made it a little difficult to sew. Using lots of clips (many) or pins (even more) is highly recommended. The dimensions of the bag are 15 inches wide and 11 inches tall. There are seven pockets inside.
Materials
- 1/2 yard, 54″ wide upholstery fabric, thick canvas (see recommendations below)
- 1/2 yard, 54″ wide Lining fabric
- 1/2″ Bias tape, one roll (approx 2 yards)
- 17 mm Grommets
- Polyester Thread for sewing canvas
- Double-sided tape 3/8″ wide
- One large bead for the tassel with a 10mm hole
- Pellon Peltex
- Magnetic bag clasp (optional)
My Fabric Recommendations
Tools
- Kam tool
- Zipper foot
- Jeans needle
- Inches to centimeters converter (Optional)
- Rotary cutter (optional)
- Exacto or craft knife (Optional)
Pattern Download
We will continue using the new Payhip web store to distribute our patterns.
Our patterns are still free, but now you have the option of making a small contribution if you like our work! We'd appreciate it, and it will help us keep going with new and fun designs like this. Even a dollar or two goes a long way.
Thanks so much in advance for helping us out. You can use any credit card, and you don't need a Paypal account, although you can use one if you have one.
Layout for the bucket bag pattern
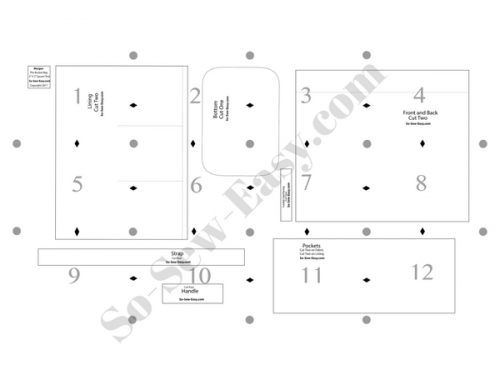
How to use and cut your bucket bag pattern
Print the pattern using Adobe Reader. This is the only program you need to download and print the pattern.
Print using Actual Size and Landscape Mode. There are additional instructions for printing on the pattern.
Cut the fabric on a straight grain. The following instructions are for making a bag in fabric. For leather, the instructions differ a little and will not be covered in this tutorial. Seam allowances vary. Please check the tutorial below.
This project is for intermediate sewers that have experience with sewing zippers, applying bias tape, sewing curves and who have made handbags and handled thick fabric before.
Part One Of Making Your Bucket Bag
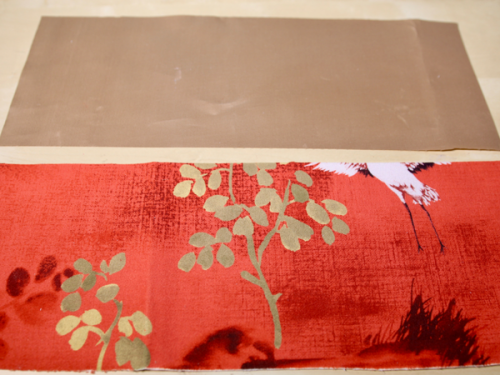
Step One: Fusing the lining
Apply the fusible interfacing to the lining and to the outside fabric. The type of interfacing you need is one that is not so stiff. This is a soft bucket bag and it is not meant to be a rigid design. Check your pattern and you will see the interfacing is 2″ shorter than the outside of the bag. This is to avoid making the rim too thick when you fold the top in and when you apply the grommets.
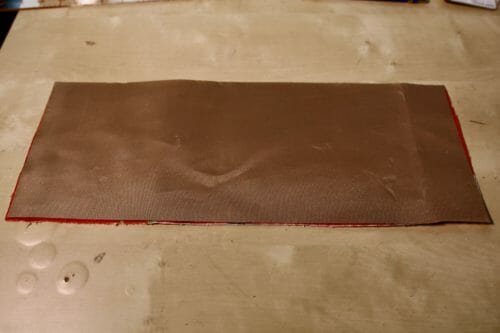
Step Two: Making the pockets
I am using one side of the pocket in the fashion fabric and the other side in the lining fabric.
You can use both lining or both fashion fabric depending on the thickness of the fabric and the capabilities of your sewing machine.
Place the lining and the fabric right sides together.
Sew the bottom which is one of the long edges at 3/8″ and iron the seam allowance open.
Repeat the above steps with the other pocket.
Bring these two pockets right sides together and sew at 5/8″ along the narrow edge making a long rectangle.
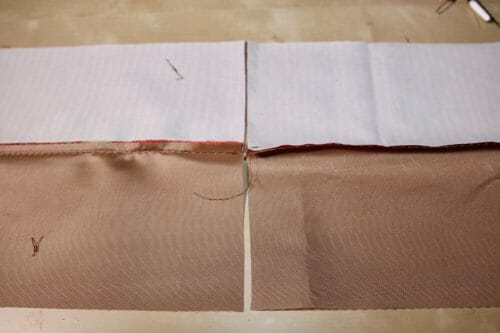

Iron all the seams open. You will have the lining on one side and the fashion fabric on the other.
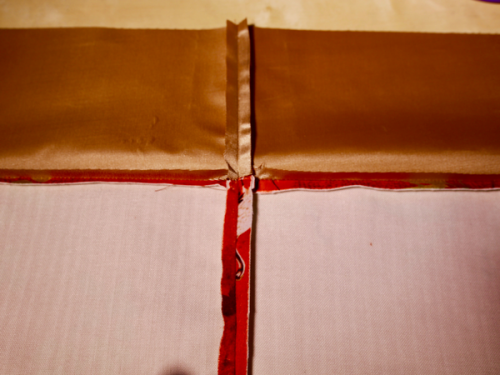
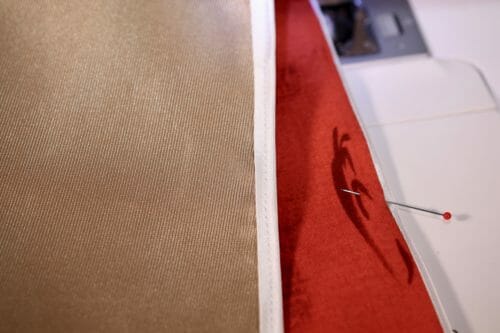
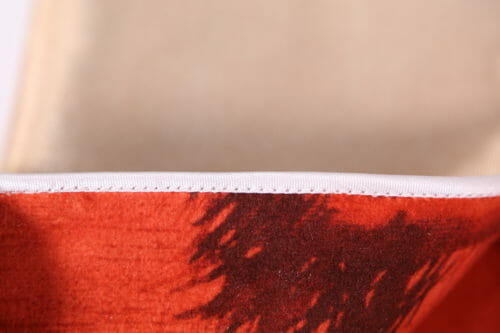
Apply bias tape to the raw side of the pockets. Starting on the right side of the fabric, place the right side of the tape and sew on the crease. At this point, you need to change the thread to match the bias tape.
Trim the fashion fabric 1/8″ being careful not to cut the bias tape. Fold the tape over to the lining side and topstitch very close to the edge on the right side of the fashion fabric.
Step Three: Sewing the lining, lining the pockets and bottom
Place the right sides of the lining together and sew at 5/8″ only one side. Iron the seams open. (Sorry no pictures of this step.)
Place the lining right side up, and pin the pockets following the pattern. This will be 1/2″ from the bottom.
Align the seam of the pocket with the seam of the lining and sew the pocket down to the lining.
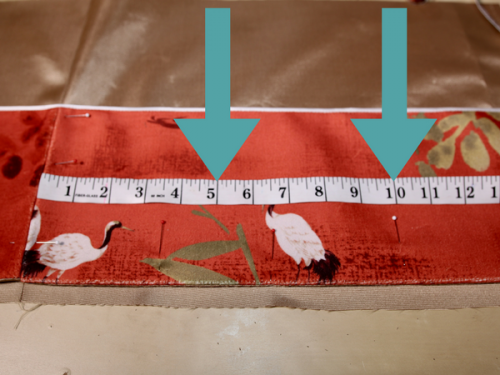
Make two stitching lines from the top of each side of pockets, five inches apart from each other to make three pockets. You will be sewing four lines total and this will divide the pockets into a total of six.
Sew the bottom of the pockets 1/8″ from the edge making sure the bottom of the pockets is at 1/2″ from the bottom of the lining.

At this point, you can add an internal pocket with a zipper if you like. This is optional. Here's how:
Subscribe to the YouTube channel:
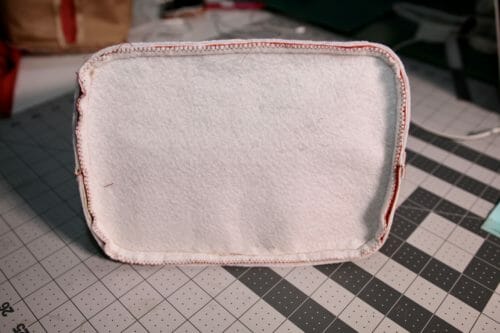
Step Four: Sewing the bottom
These instructions apply to both the lining and the outside of the bag. They are basically copies of each other that we will fit together further in this tutorial.

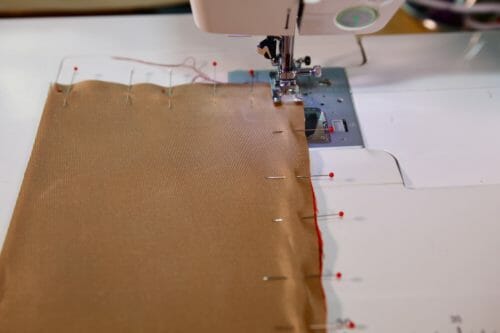
Pin the bottom of the bag on both sides seams first, then pin from the side where you topstitched the pocket to the lining in Step Three and work your way to the other side.
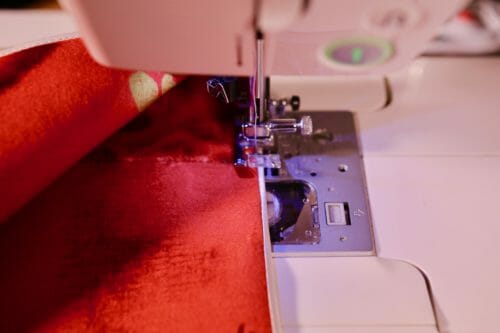
Work from the seam to right and then again from the seam to the left. Sew at 1/4″ first. Then sew at 3/8″. Use your zipper foot to be able to navigate better around the rounded corners. Trim the seam allowance to reduce the bulk.
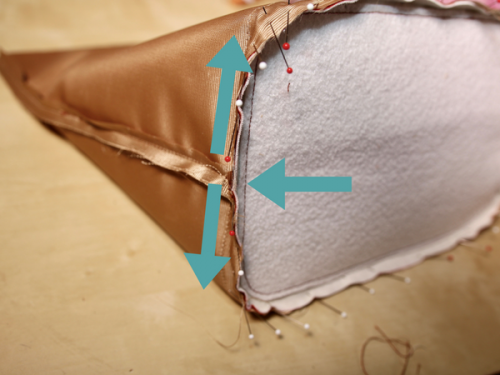
Topstitch on the side to keep the seam allowance open. Trim the upholstery fabric to reduce the bulk.
Step Five: Sewing the outside
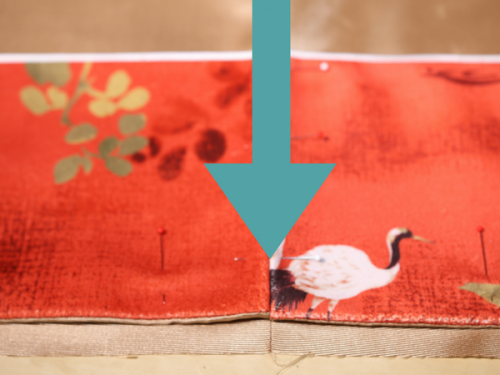
Place the ride sides together and sew at 5/8″.
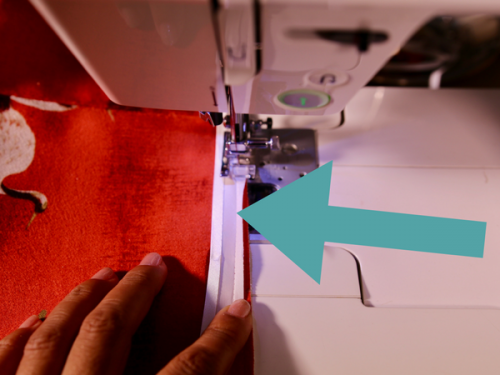
Apply the bias tape to the top as you did with the pocket in the lining.
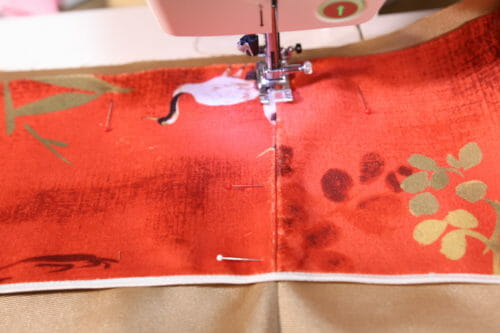
Attach the bottom to the bucket. Pin at the seam first then work your way to the right and to the left as you did when attaching the bottom to the lining.

Sew at 3/8″ then reduce the seam allowance to 1/4″ and turn the bag right side out.
Apply the bias tape to the top as you did with the pocket in the lining.
This is a great place to take a break without losing track of your progress. We'll continue below with the second phase of the project. Below I will show you how to join the lining and the outside, add the pockets to the bag and make the zipper pouch. I'll also give you some pointers on how to make a leather version of the bag.
Part Two
Here's the second part of our bucket bag tutorial and pattern. In Part One, we made the interior and the exterior of the bucket bag. In this part, we will be trying to avoid turning your bag into a “black hole” by making a small zippered pocket to be added to the lining for the little bits you do not want to have swimming at the bottom of the bag. We'll also be joining the lining with the outside of the bag and making and attaching the handles to finish the bag.
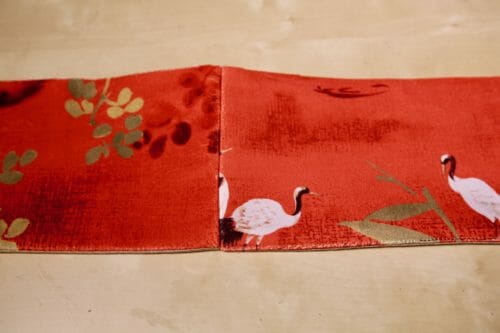
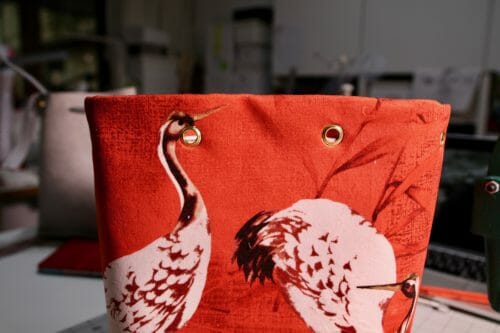
A few of you have asked me where I bought the fabric I used in my own project. I bought it a few months ago in a store called Spotlight which is found in Australia, New Zealand, and Singapore, but unfortunately not elsewhere. The fabric is called Crane Velvet and it came in four colors but appears to be discontinued now unfortunately.
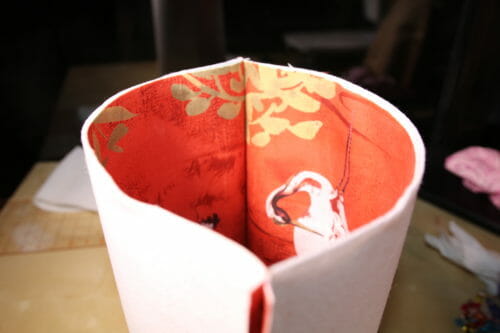
Step Six: Joining the lining with the outside
Insert the lining in the bucket bag and turn the top of the bag inside by two inches. Put aside, for now, we need to make the zippered pocket that will hang from the main fabric.
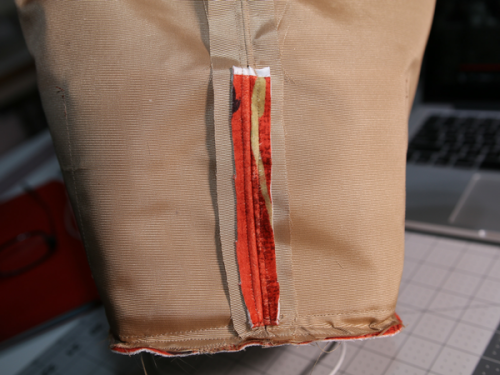
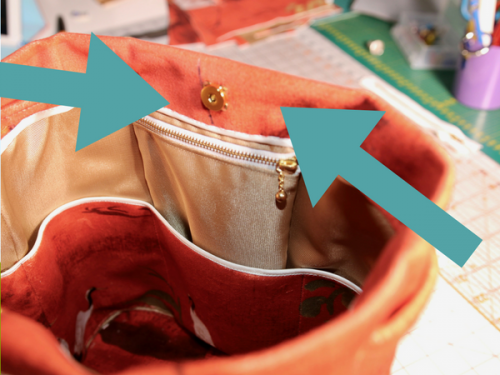
Step Seven: Adding an additional zippered pocket
This is an optional step, but I find it useful to have an additional zippered pocket between the lining and the main fabric. We did a similar thing in the Gleam bag but I'm going to show you here now as well.
I am only adding a 4″ zippered pocket, just enough for a few coins, keys or lipstick.
These are the extra materials you will need to make this additional zippered pocket.
- 12.5″ X 6.5″ rectangle in lining fabric
- 4.5″ metal zipper
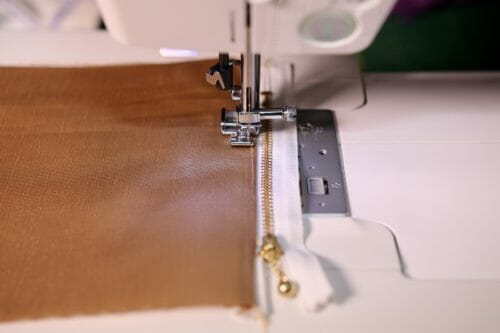
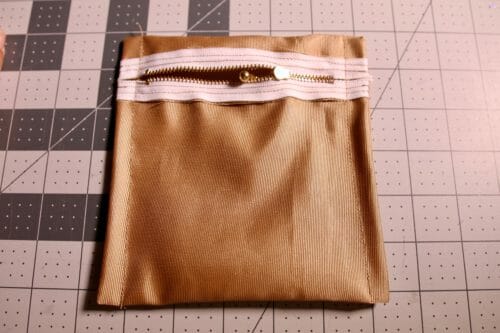
Place the rectangle with the longest side vertical, right side up. With the zipper right side down, sew it to the top of the rectangle.
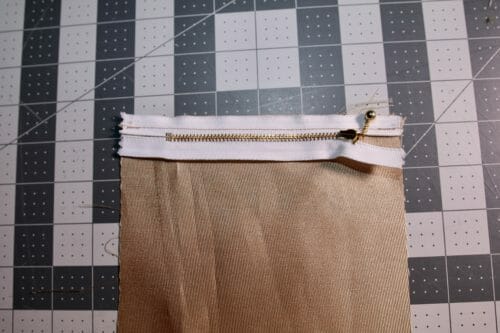
Turn the zipper the right way.
Topstitch in place 1/8″ from the fabric edge.
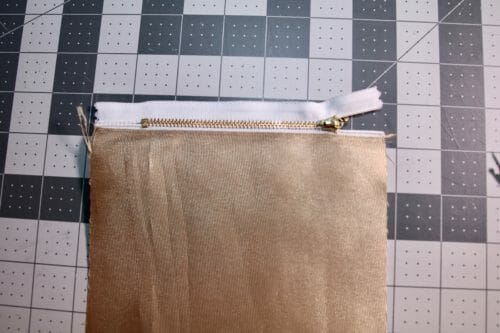
Bring the zipper tape to the other end of the rectangle.
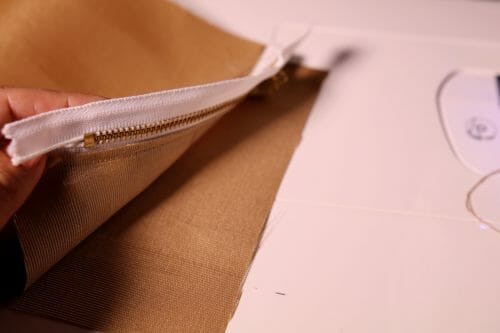
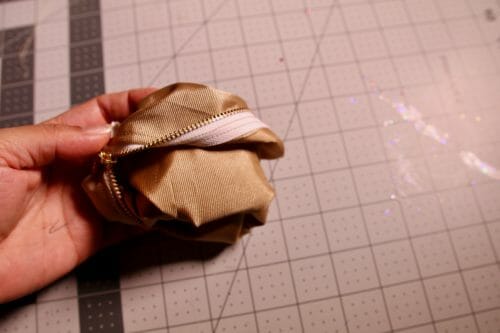
And sew the zipper down. Turn the pouch inside out.
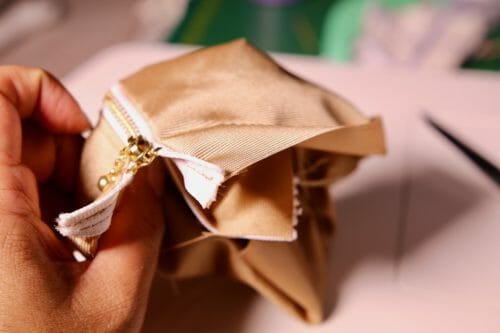
Open the zipper and topstitch on the other side of the zipper. Fold the pouch inch on the top and pin on the sides.
Sew on the sides at 1/4″ and trim the sides to 1/8″.

Turn the pouch inside out through the zipper.
Sew the sides at 1/2″.
Turn the pouch the right way out through the zipper.

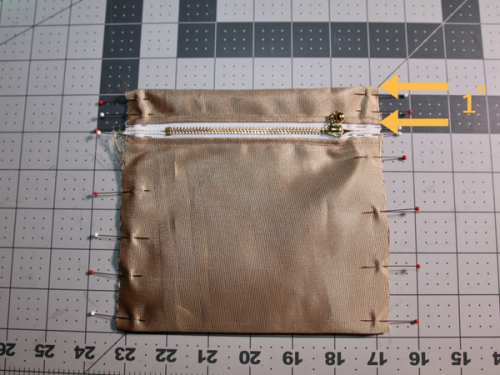
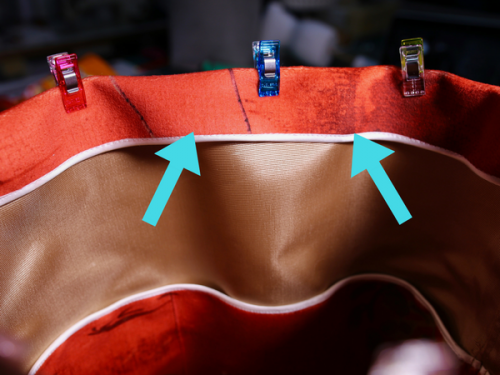
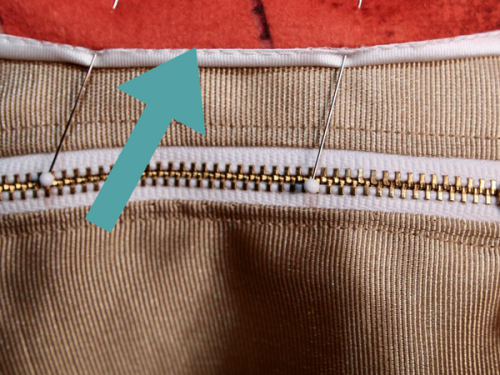
Pin the pouch to the main fabric and use the space between the bias tape and the fabric to stitch down the zipper pouch. Try to align it in the middle of the bag.
This step is also optional as well, but I find it useful to have a magnet to close the bucket. I have used a sew-on magnet because it is the easiest to apply. Just make sure you sew it centered with each part on opposite sides of the bag.
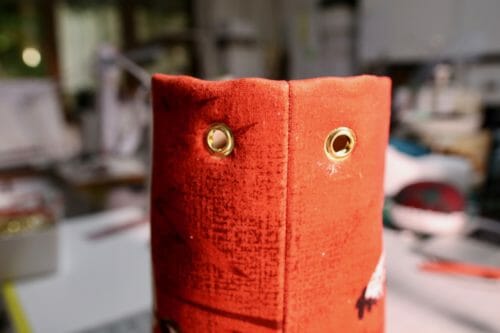
Step Seven: Attaching the grommets
Using the pattern, mark the bag to place the grommets. For a step-by-step demo on how to attach grommets please follow this tutorial on sewing with grommets.
Step Eight: Making the handles
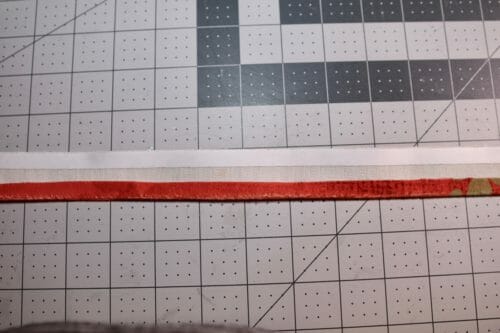
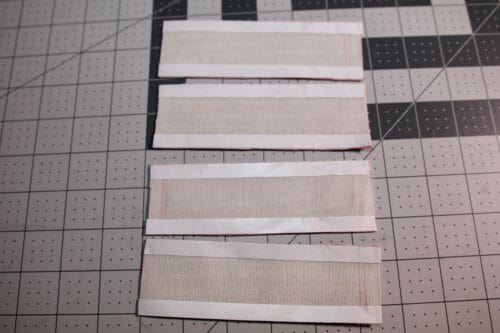
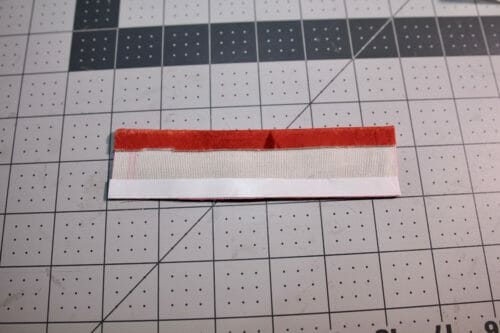
Place the double-sided tape on both sides of the strips.
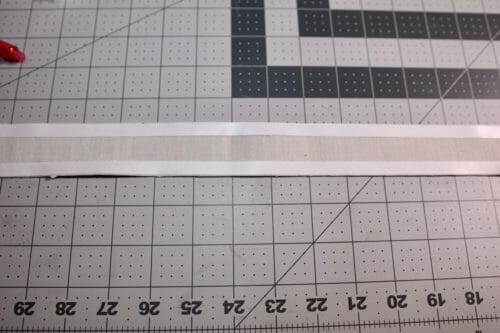
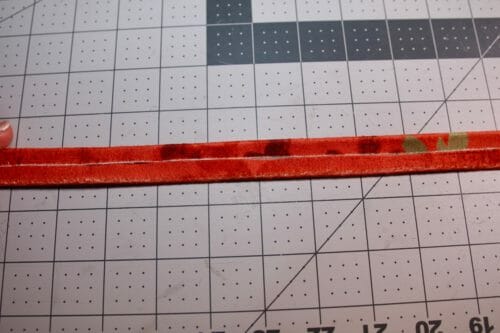
Peel the white paper off and fold the side in.
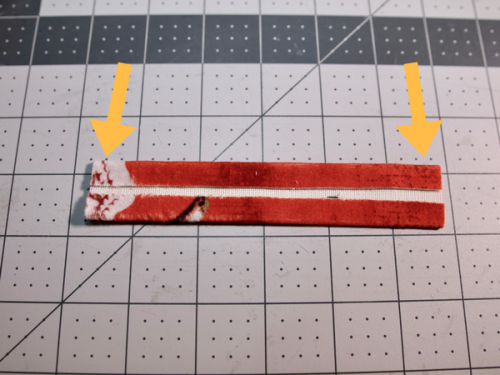
Take the other side off and fold in as well.
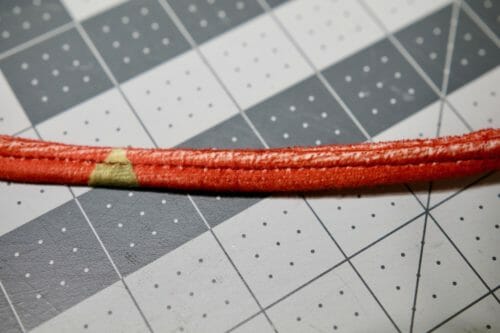
Fold the strip again and sew in the middle. Repeat the steps to make another strap. Put this aside.
Take the small rectangle and use the double-sided tape to turn the sides in.
Place the straps ends on either side of the handle.
Place the other strap on the other side of the rectangle.
Sew the rectangle around at 1/8″.
Final Decoration
I have made a tassel for decoration. If you want to make to make an easy tassel like this one, just follow this tutorial.
Thread the strap to the tassel and lace the strap into the front grommets of the bag. In order to have the tassel hanging from the strap without the use of a lobster claw, you need to thread the tassel before you attach the next set of rectangles to join the straps together.
There is no reason why you can't make this bucket bag pattern using quilting cotton as well. All you will need is some batting to make the fabric thicker to about 2mm.
I hope you enjoyed this project as much as I have. I love that this bag is a great cross of fashion and utility. I find that these types of projects are some of my favorite to make as I can customize them easily for daily use.
Let me know what you think in the comments below, and Until Next Time, Happy Sewing.


The first bag I’ve made 😊 I used an outdoor fabric and didn’t line it, so simpler. Big enough for sunnies and a water bottle exactly what I wanted, thank you. Fabric, #thesewingproject noosa.
I downloaded the pattern for the Bag, however , there are no step-by-step instructions for assembling the bag. How do I print out the instructions? Also, what is a kam tool?
Ab Kam tool is a tool to attach (usually plastic) snaps.
Thank you for all the wonderful patterns you share with us.
Hello please do you have a video of you making the bag?
Hello, I would like to find out if the sewing instructions are the same for Leather?
I need help in cutting the circle for my length of fabric. For a bucket bag. Is there some sort of rule that you can follow to cut the right size circle for any length (side) of a bag. ?
Thanks for the Bucket Bag Pattern. I must have the old version because the pocket pattern does not show how many to cut & I am not able to read what is written on it. Please me know clear instructions. Thank you!
You could read the ones above. It took me more than three days to write them. They are quiet detailed but if they are not do let me know please.
What a beautiful bag! I can’t wait to try this myself. I loved the clear instructions in the zipper video too 🙂
Do you have instructions for the leather version, please? Good pattern. I would like to try in leather.
No I do not yet! I have made the video but not yet edit, this step is so long and painful;.
There is a YouTuber who sews bags by different designers. Maybe she can do a video for you for this bag.
Almost done, thank you for the reminder.
I love this bag. Been wanting to make bags for so long, and the instructions look really clear. With regard to fabric choice, I’m in the UK, and your recommendations are US only. I can really tell from the Amazon listings what type of fabric they are. Are they waterproof canvas?
Amazon sells everywhere, there is a UK site where you can buy from companies within your country. you can use canvas, oilcloth, upholstery fabric such as the one I used, faux leather, leather or vinyl.
I would like to make this bag in leather….you mentioned the tutorial is not for leather. Can you tell me what needs to change to make a leather bag?
Depends on the type of leather and if you are going to lined it or not. Just cut a facing whre the grommets are to you can attach a lining. It will be a very beautiful bag.
I am so happy with this free pattern because now I can make the one of the picture I saved long time ago. This one is without grommets so I have to change the pattern. Thank you!!! 🙂
This looks fantastic! Thanks so much for sharing the pic. Glad it worked well without the grommets. Would make the project simpler especially if someone doesn’t have a grommet machine.
Nice work and easy to follow tutorial. Thanks
I love the pattern. Where can I find the fabric. Been looking in the US can’t find it. Been looking all day.
Hi Debra, I bought the fabric in a store called Spotlight.com.au in Australia, not sure if they still have it, all I know is made in India, I did put somewhere the name of the fabric. and it isment to be used in upholstery. Hope that helps.
Thank you. I found it in four colors. It says 145cm I think that is 57″ & not sure how many yards?
Can’t wait to try it out!!!
Hi Debra,
Thank you for your email. We appreciate the time you have taken to contact us.
Further to your email, please be advised that Spotlight is unable to ship internationally at this time, however orders can be placed from overseas for delivery to an Australian address.
I trust this information has been of assistance to you. Should you require further assistance please do not hesitate to contact Spotlight’s Customer Care team via email at service@spotlight.com.au or telephone on 1300 305 405.
Kind regards,
Sam Rasau
Spotlight Pty Ltd
Level 6, 111 Cecil Street, South Melbourne, VIC, 3205
Australia: 1300 305 405 Web: http://www.spotlight.com.au
Hello. Is there any way to send you the money to purchase it and send it to me in the US?
Ha! well that answers it! thank you for taking the time to write to them.
Hello. Is there any way to send you the money to purchase it and send it to me in the US?
Hi Debra, I appreciate your trust but no I could not do that. Kind Regards,
Hi Debra- I’m also looking for this fabric. Where did you find it? To ship to US? Thanks, Leigh
Wow! This tutorial is awesome. I love how detailed your instructions are and the pdf pattern! Thank you so much for going through so much effort to make this! I’m so excited to try this out.
I’m just doing a read through at the moment. Can you please confirm step 5 – is the bias tape added at the start or at the end of this step (and does it really make a difference?) The instruction appears in both places, but I suspect it’s just an extra cut and paste
The bias tape is there to join the lining layer and Peltex layer together, without it you will have a raw edge which will make your lining ravel and look unfinished.
The free download link doesn’t work for me 🙁
I’m almost done with this wonderful bag–having a lot of fun making it. It really is pretty! But I do have a question about putting it together. I’m finished with Step Six of Part II, where one adds snaps. But I don’t see any instruction on sewing down the folded-in, bias bound top of the bag. Am I missing something? Somehow you must need to sew in the zippered pocket, which I made, and then sew down the folded down bag top. But when? There’s a photo in Step Six where the top of the bag has clips holding the top folded edge in, then the zippered pocket gets pinned in underneath the folded section…the next photo no longer shows the top with the clips on it. The instructions DO say to sew the zippered pocket in, but they never tell you to sew the entire folded edge down. Thank you. Marilyn
HI Marilyn, You need to proceed to part 2. Please. The link is at the bottom of the article. Thank you!:)
Thanks for a terrific pattern. While going through the instructions I saw the line where you state that “seam allowances vary”. Am I correct in saying that all the pattern pieces include the seam allowance?
Thank you.
Yes, Leslie, they are included. I normally do not add seam allowances to patterns that need to be altered to your own measurements such as tops, dresses, and pants.
Thank you for providing your pattern and thorough tutorial free of charge! Your efforts are clearly unappreciated by some readers-unfortunate that they did not read what was clearly stated about how to print the pattern and when part 2 of the tutorial would be published! You did a beautiful job and I do appreciate all your efforts and generosity!
I want that bird fabric…. the exact one in your sample. Where do I get it &/or who is the manufacturer? Thanks.
Hi, Darcie, spotlight.com.sg (Singapore) or spotlight.com.au (Australia) it is called Crane.
Instructions are not completely clear as expected. Some details are not clear. Had to figure out myself. Overall nice.
You did not wait for Part Two. Of course, you had to figure things out for yourself, Good for you 😉
What is a kam tool? Does that have to do with the grommets? The ones you have linked need a setting tool and I could not find one for a 17mm grommet. Would a 1/2 inch grommet do as well?
HI, Chris, a Kam tool is a manual Industrial tool that comes with 3 different size settings, the largest has a 1/2″ hole. You can also apply jeans buttons and decorative rivets on heavy fabric. Take a look at the projects at end of the article https://so-sew-easy.com/sewing-with-grommets-eyelets/ to give you an idea What can be done with one tool.
Love your site! I look forward to your emails. Keep them coming and your project ideas.
Love your projects but can’t download patterns because you have ads on them and my firewall blocks them
HI, Diana, I do have ads on the site, that is how I can make the patterns free. The ads do not interfere with the pattern download.
i will let you know when i finish it
Love this pattern! Is my que til I find the perfect material! Thank you for publishing!
You are welcome Annette 🙂
how do i get to part two?
thanks
preston paul
Hi Preston, it will be published on Sunday. Please check back then.
thank you
So pretty! Thank you for sharing the tut and pattern!
I love the fabric as well, and I definitely have to sew this kind of bag, it would be a perfect birthday present for my sister.
thank you!
This is a great pattern. Your tutorial is very well thought out. I will be making this bag soon.
Love to try this bag pattern
How can I find part 2?
Hi Ana, it will be published next Sunday. Please check back then.
What a lovely bag. Could you let us know who manufactured the fabric? I am a huge fan of everything Asian (especially koi) and would love to duplicate the bucket in this fabric.
Hi Barb, I will put t a link to the store I got it from and the name of the fabric very soon. Check back in a few hours. Thanks!
This is just gorgeous and I love, love, love the fabric. Thank you for sharing this!
I love that fabric.. I hope I can find something similar.
Beautiful – Although, not having the full pattern is a little frustrating. I’ll just have to figure it out on my own which won’t be the first time.
The pattern is complete, the rest of the instructions will be published soon 🙂 Stay tuned, please.
I love it! I am not crazy about bucket bags (we used them in college a good 45 years ago) because of the open (more or less) top, but I never thought of using home dec fabric! You make it sound very easy, so I am going to give it a try. Your explanations are thorough–I need that. ?
Absolutely love it, I am a collector of bags.
OMG! What perfect timing for this bag pattern! The bucket bag with the draw string was my favorite bag when I was a teenager in the late 1960s. I am going on a cruise next month and this will be perfect. Thank you so much for providing my most favorite of all handbag patterns.