


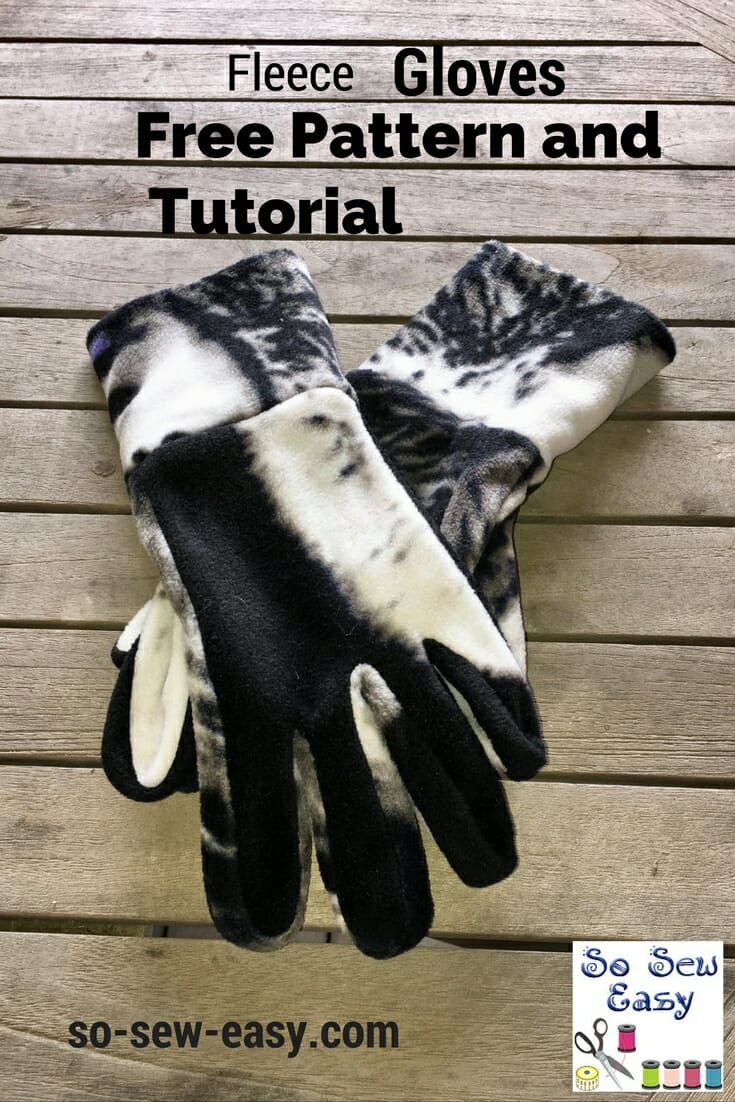
Making a pair of fleece winter gloves is not just a matter of tracing your hand on a piece of paper or drawing straight onto the fabric. Believe me, I have actually tried this before and it makes for very uncomfortable gloves… To save you this exercise in trial and error, here's an easy gloves pattern and tutorial for a pair of fleece gloves that can be made as a last-minute present or for yourself.
The bit you must be careful with is cutting the fabric the right way. I suggest that you fold the fabric in half so you have the right sides for each hand. (I was watching a movie while making the first pair of these gloves and it wasn't until I was about to start sewing that I realized my mistakes. Fleece does indeed have a right and wrong side, so avoid this below….)
The smaller size of the gloves will fit an average woman or a teenager. The M/L and XL are suitable for most men.
Tools and Materials:
- 1/4 to 1/2 yard of polar fleece (see recommendations below)
- Thread to match
- Jersey needle size 10
- Sewing machine
Easy Gloves Pattern Layout
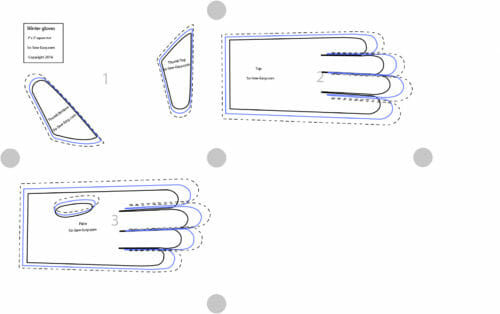
Easy Gloves Pattern Download
Our patterns are still free, but now you now have the option of making a small contribution if you like our work! We'd really appreciate it and it will help is keep going with new and fun designs like this. Even a dollar or two really goes a long way.
Thanks so much in advance for helping us out. You can use any credit card and you don't need a Paypal account, although you can use one if you have one.
Download the FREE Pattern HERE
Fabric Recommendations
How to Make Your Winter Gloves
The seam allowance is 1/8″ for all sizes using a small-sized zigzag and straight stitch.
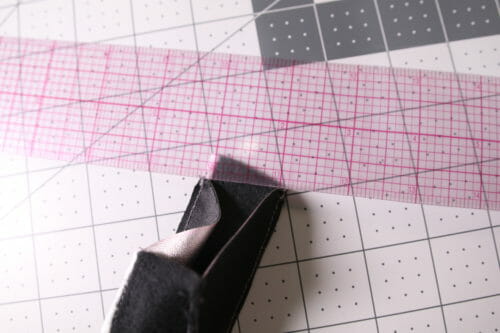
Print and cut the pattern following the grain of the fabric. You want the grain to run parallel to the fingers and thumbs so that the stretch is horizontal or across the hands. Please remember there is a right and left side and up and palm side.
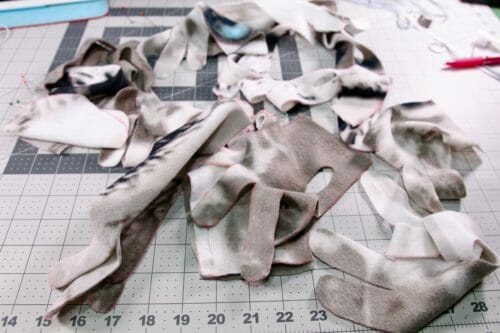
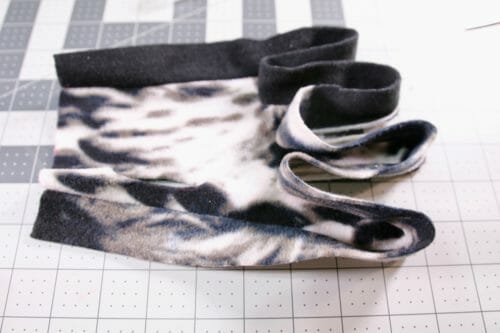
You will need a total of 7 pieces cut per glove. There are three pieces for the hand (two pieces from the pattern and one strip for the fingers), and three pieces for the thumb (two pieces from the pattern and one strip) and one piece for the ribbing tube or cuff.
For the first part of this tutorial, keep in mind that you are assembling these gloves inside out or with the wrong side of the fleece outward. We will turn the gloves as we finish them which hides the stitching and puts the right side of the fabric outside.
Basically what we are doing is joining the pieces of fleece that you cut out with the pattern pieces with these fleece strips that form the sides of the fingers and thumb. You will then attach this assembly to the ribbing or cuff.
Cutting the Strips and Ribbing
Cut the strips of fleece horizontally to the selvage or with the grain and following the sizes below.
Strips for the fingers:
- S: 34 1/2″ x 1″ (88 cm x 2.5 cm)
- M/L: 38 3/4″x 1″ (98.5 x 2.5 cm)
- XL: 41 3/4″ x 1″ (106 x 2.5 cm)
Strips of the thumb:
- S: 7 1/2″ x 1″ (19 x 2.5 cm)
- M/L: 8 1/2″ x 1″ (21.6 x 2.5 cm)
- XL: 9 1/2″ x 1″ (24 x 2.5 cm)
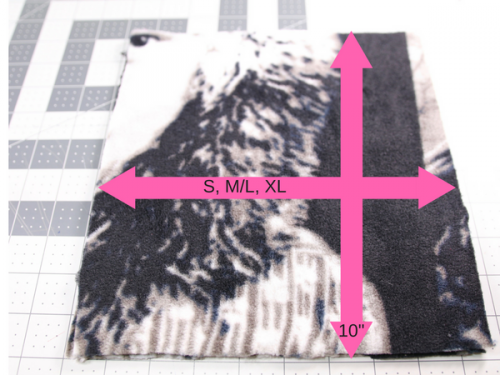
Ribbing tube (for the cuffs)
- S 6 1/2″ x 10″ (16.5 x 25.5cm)
- M/L 7 1/4″ x 10 (18.5 x 25.5cm
- XL 8″ x 10″ (20.5cm x 25.5 )cm

Tip: If you have never worked with fleece before and have trouble sewing rounded edges, use a small zigzag to attach the pieces, then sew again using a normal stitch.
I have many years of experience sewing and I still use the small zigzag to work difficult pattern pieces.

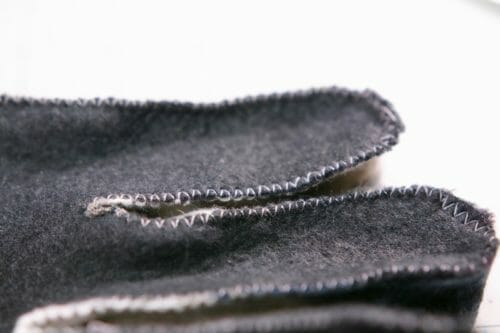
Starting on the outer side of the hand and using a very small size zigzag, sew the strip of fleece around the fingers.
Sewing the Thumb
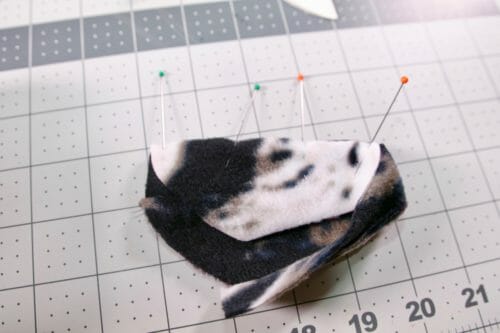
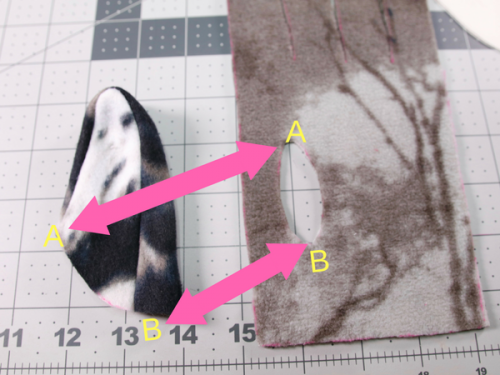
The thumb is made with three pieces. The larger thumb piece is the top, the smaller piece the bottom and the strip joins them together. Starting at the corner, pin the strip of fabric all around the thumb and sew at 1/8″. (You'll notice wasn't following my own advice and I didn't use a small zigzag first which I really should have done.) Pin the other side of the thumb.

Trim the corner so the thumb so it fits into the hole of the palm piece.
Pin the thumb to the hole of the palm, aligning the longer side (B) with the lower part of the hole (B).
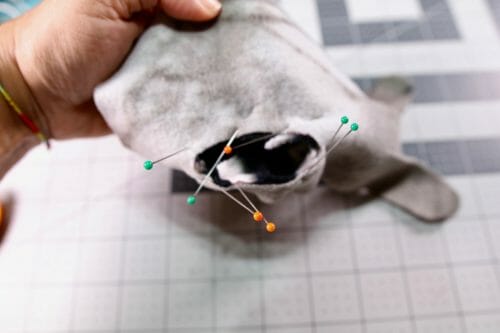
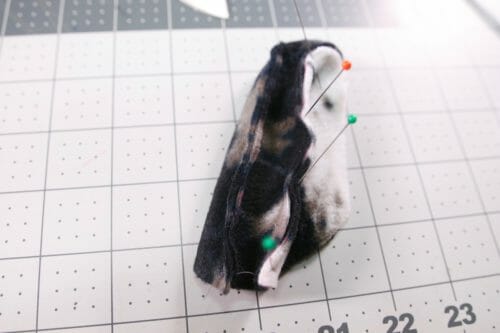
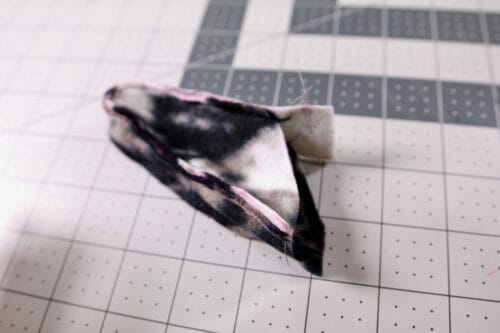
Zigzag the edges and sew at 1/8″.
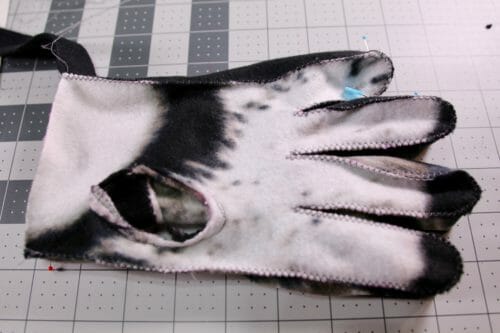
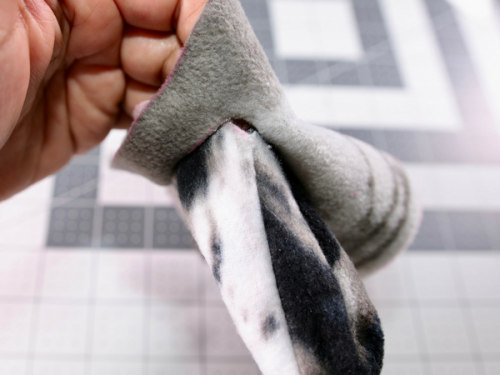
Pin the other side of the glove and zigzag before you sew. This is a very important part so the fingers do not get twisted.
TIP: For thicker gloves repeat all the steps above so you have two gloves per hand. Insert one glove with the seams showing inside the other gloves. You should have wrong sides together and seams are not showing.
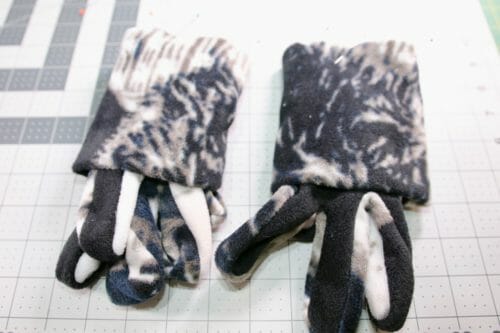
After zigzagging then you should sew at 1/8″. Turn the glove right side out. We are going to work on the ribbing for the glove or what is basically the cuff, but for clarification purposes, I will call it the ribbing tube.
Making the Ribbing Tube
Use the following measurements according to the size you are making. Keep the stretch of the fabric horizontally. This part you can always substitute with actual ribbing fabric.
- S 6 1/2″ x 10″ (16.5 x 25.5cm)
- M/L 7 1/4″ x 10 (18.5 x 25.5cm
- XL 8″ x 10″ (20.5cm x 25.5 )cm
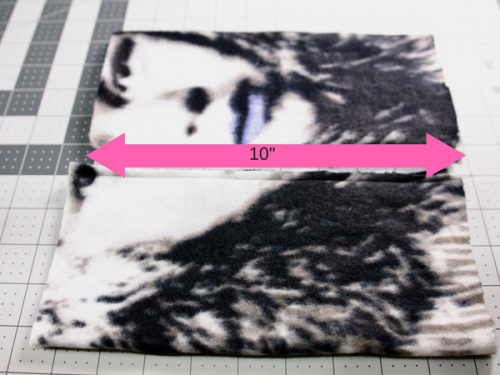
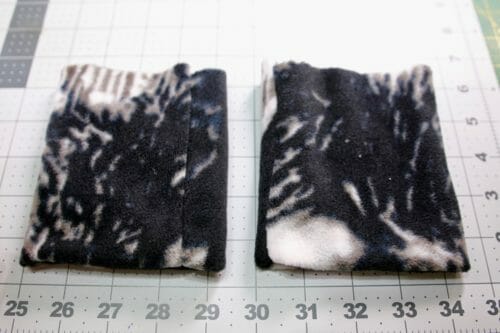
Fold the rectangle from left to right. This means you will have a tube that is 10″ in length. Fold the tube in half. This means the seam allowances are inside and can not be seen. Insert the gloves inside the tubes right sides out and pin. Sew at 1/4″. Pull the ribbing back up and voila!
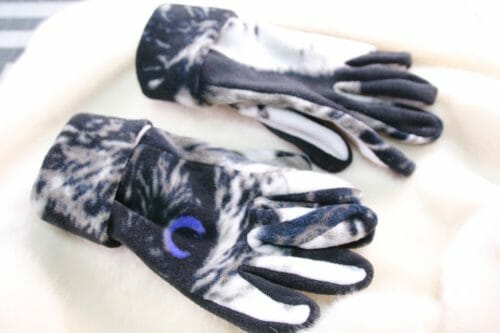
It's that simple to have a new pair of fleece winter gloves. This is a very easy last-minute gift for anyone. It can take you only one hour to make. Not to put pressure on you, but Saint Valentine's is around the corner. If you need a hat to go with these gloves, check out this super easy tutorial on how to make a winter hat from an old sweater.
Stay tuned as we will be making a scarf to go with this ensemble.
Until next time! And Happy Sewing!


im about to try these gloves out for a friend and I’m a little confused on the ribbing instructions. Creating a tube and folding in half? are you supposed to sew the piece into the tube then fold in half? I can probably figure it out once the pieces are cut and i have them in front of me but reading and looking at the pictures I’m a little lost. Thanks!
Would this pattern work for double faced wool knit?
yes it would.
I’m going to Ireland soon from Australia, so I’m going to see how I go. And the Faux Fur Hat looks great also. Thanks Jenny
Thank you Mayra!!! I wanted so madly to find this pattern but couldn t find nothing!!!
I ll try to make them!!!
I think you may have an error with your strip measurements. Looking at the pictures, you need a strip to go around all fingers and just a tidbit size for the thumb but the directions are opposite.
Strips for the fingers:
S: 34 1/2″ x 1″ (88 cm x 2.5 cm)
M/L: 38 3/4″x 1″ (98.5 x 2.5 cm)
XL: 41 3/4″ x 1″ (106 x 2.5 cm)
Strips of the thumb:
S: 7 1/2″ x 1″ (19 x 2.5 cm)
M/L: 8 1/2″ x 1″ (21.6 x 2.5 cm)
XL: 9 1/2″ x 1″ (24 x 2.5 cm)
Gloves will be slippery on a steering wheel, so I might suggest sewing a small patch of leather or vinyl on the palm…
Great idea!
Unable to download free pattern, why?
If you have a window blocker you will not be able to do it.
Please ask author of fleece glive pattern if she has experience and/or reference to glive patterns using lace or thinner fabrics. Thanks.
Hello Rasheeda, i do but this patter is too wide for such fabrics.
I still can’t get your revised artist apron to print to correct size the test square continues to be off by 1/8 inch. I had no trouble printing off the original pattern could you check your revised pattern and make sure it isn’t a mistake on your part? this is the main reason I won’t spend money on print your own patterns. I have followed all the advice in your article and my printer settings are set to what you recommended. Please let me know what to do
These look great and I will definitely be having a go!
Thank you so much for this so useful gloves pattern !
Patricia
Hey! Do you think this pattern will work with twoway stretch fabric as well?
Give that you need so little fabric I would give it a try. Let me know how much stretch was in your fabric and how the gloves turned out.
Hi Mayra, thanks so much for sharing this tutorial with us! I must admit that I’m still struggling to come up with a glove that I’m satisfied with, but I’m sure I will! As I’m making them from (not too thick) polar fleece, I thought I might share a tip I found somewhere on the internet (forgot to note which site, I’m sorry) on how to cut out the fingers neatly: transfer the pattern (the finger tops, essentially) to broad masking tape, stick it loosely on the fleece and cut, and tear it off. Works especially well with dark colors where textile markers are of no use.
Thanks again and I’ll keep trying, I want those gloves before winter is over!
Hi Eveline, thank you for the tip! never thought of it, but it sure will come in handy for people to navigate a dark fabric. Good luck with the gloves. I am making a pair of faux leather and knit from an old sweater (and lined) will let you know how they end up looking. Kind Regards,
Hey, don’t mention it, Mayra! I thought of an even better method to cut out the pattern of dark fleece: transfer the whole pattern to acrylic felt – doesn’t fray, is quite sturdy and doesn’t stretch. I tried it on the pair I’m working on now – pinned it to the fleece – and I must say, it worked! Hoping to post a picture of the gloves very soon! Greetings from the South of France, where it’s perfect glove-weather right now!
Thank you, Eveline, I will try this method, do post your picture love to see your gloves. I love France…you so lucky to live in such beautiful part of the world.
So, here they are! I must admit I took some liberties with your pattern, and I hand sewed them. But I thank you again for your post and your pattern; without that I still would only be dreaming of a pair of hand made gloves in the color I want, as I did for years! Spring is nearly here, but I’m sure I’ll make more pairs next fall!
Eveline! they are beautiful! Love the color! Indeed they make a great Christmas present. And no you do what works for you, hard to tell they were sewn by hand.
If you can sew Barbie doll clothes, you can make these gloves. I don’t know that I’d call this an especially easy pattern, but it is certainly do-able. I needed to hand baste the thumb in place. Just couldn’t manage pinning the small pieces together accurately. Also, when it came time to sew the palm to the back of the first glove, I thought, “how hard can this be?” So I slapped them together without pinning. You can do that if you don’t mind the fingers being twisted. I laughed at myself because you warned me in the instructions. So on the second glove, I was more precise and it looked great! I made them in small, but found them larger than I expected. No problem, just gave them to someone with bigger hands. Thanks for developing and sharing the pattern!
Thank you for your feedback. I am preparing the video and will mention you in there!
Ha ha, thanks (I think)! ?
No, really, thank you. I certainly welcome any thoughts to improve the instructions.
I always thought gloves were impossibly fiddly but your tutorial looks like something I can actually do! I’ve picked out my fleece and downloaded the pattern, I can’t wait to get started.
How do we cut the tube.? How do we sew the tube? There are folding instructions but no sewing instructions? Is the 10” length the stretchy way? Sorry and thanks
I will release the video in a few days, stay tuned. Thank you, Alison.
Well, I muscled through it. :-). I feel 1/2 like a dope and 1/2 like a genius when it comes to sewing. I ended up serging only the attachment of the cuff to the glove and zigged and stitched the rest as instructed. I think the zigzag first is brilliant. I don’t know why one finger turned. Overall, I am super happy. thanks!
Hi Alison, gloves are not easy to make at all. But, I am happy with your picture, thank you for sharing!
Hi Mayra, Would you sew these on a serger? I was thinking to do that but after reading your instructions, I have second thoughts. Do you use a serger generally? Thanks! Alison
You could if you use a small stitch setting. I prefer to use the zigzag.
cool pattern. Thanks Mayra
You are most welcome Tea! let me know how you found the tutorial.
How do you mark the whole in the palm pattern? It looks like it 1 and 3/4 long by 1/2 wide. Is this correct?
I use carbon paper, I should have mentioned, thanks for the reminder!
Here is my first gloves I have ever made. Love how they came out.
Love your fabric choice!
Hi. Thanks for the pattern! I’m confused about the fabric requirements being 1/4-1/2 yd and the strips being 38 3/4” long? Do we piece it?
Hi Amy, thank you I meant to say horizontally to the grain line. You need a continuous strip.
Perpendicular to the grain line?
Hi, Amy, can you point to me where in the article is that?
Please disregard my previous post. It did not print when I did just the extra large gloves but when I put all the layers back in it did so.
I crochet fingerless gloves but wanted to try something different. This is it. Excited to try it for my granddaughters. BUT will have to wait until I finish my other projects. I had flu for 2 weeks and just getting back my strength. Some Christmas presents went unfinished (procrastination). I’ll never learn! Thank you for detailed instructions, especially the pictures. Have the happiness of New Years.
Hi Rita, my mother always fixed the flu with chicken soup, hope someone can make it for you. Procrastination…..hahhhhhaaaa!!! don’t get me started. I am the queen of procrastination! Happy New Year!
This is the nicest, most complete glove tutorial I have ever seen! Thank you very much for your time and thought.
Thank you SO much for this pattern. I was sitting at the computer, trying to come up with something to make for a friend’s birthday and there it was. Something she will actually use, AND I had the supplies for. A win – win!
These look like fun to make. Have just one question. Howl long and wide do you make the strip that is sewn around the fingers. I don’t see that mentioned in the actual pattern.
Hi Olga, it depends on the size you are making, Please read the dimensions I give above, thanks!
Would a walking foot make this easier to sew? I just purchased mine and haven’t used it yet so am curious to know if it would improve my sewing of the gloves.
Hi Quennie, by all means, use it, anything that makes your sewing easier and better should be tried. (Practice using a scrap first) The most important tip I can give you is to zigzag the pieces first, with or without walking foot the zigzag is what going to help you succeed in this project.
Thank you for this great pattern! I just finished the gloves for my daughter with the fleece left I used for her sweater. You just have to be careful sewing the curves but all in all it’s not so difficult. They turned out very well my daughter said they seem to be bought in a store, I think it’s a great compliment.
Here they are! https://it.pinterest.com/pin/514254851185908492/
Thank you for your feedback, I am happy you and your daughter are happy with the gloves. Lovely to hear from you!
Hi! I’m new to sewing. I keep messing up the fingers… The front and back arent lining up. Is there a video? Thanks!!
Not yet Christine a video takes me at least 3 days to make.
[…] the full easy gloves pattern and tutorial by clicking on the […]
Fun!! I’ve got a Craft Gossip post scheduled for tomorrow afternoon that features your tutorial: http://sewing.craftgossip.com/?p=91092 –Anne
Thank you Anne! Happy 2017!
I love this pattern . Thanks for sharing it with us.
You are welcome Linda, Enjoy! do share a picture when you have made it! Kind Regards, Mayra
Thanks! happy 2017, This will be a great break from quilting pattern!
Thank you! and Happy 2017 to you too! Enjoy the pattern.
I have always wanted to try gloves. Thank you for the pattern! Best to you this new year!
Thank you Bobbie, Happy 2017 Sewing Year! Enjoy the pattern.
I tried making gloves years ago with a Green Pepper pattern. Yours look a lot easier with the extra strip of fleece around the fingers. I think it would be easier to maneuver around them. I’m going to have to try these out. I think I’ll use some t-shirt fabric and use them as liners for mittens since I don’t have any fleece that would be thin enough to fit under them.
Sounds like a good plan, to maneuver around the fingers do use the small zigzag, it helps a lot.
Lining them would be the way to go, I thought about it, but I had already finished the post. Using an old t-shirt is a super tip!
THANKS so much; I’d planned to search for a gloves pattern this week, and you provided one with excellent construction tips before I got to a store!
I think this will be my go to pattern for making gloves for the homeless next winter. Thank you.
Excellent tutorial, Mayra! My daughter’s digging through my fabric stash right now so that she can stitch up a pair. (It’s okay that I hid the calfskin from her, right? 😉 )
HA,ha,ha!!! Ooooooh but what a pair it would make!!!!!!
Great idea for a pattern – looking forward to trying it out 🙂
Not so pleased with the site keep loading an advert saying “site will load in 20 seconds” each time I move my mouse away from the main page though – it made a simple 10 second task of copying the pattern into word so I can print it out, more like a 3 minute task (the “continue to site” link wasn’t working either) 🙁
Hi Paddy, you need to clear your cache or change browsers. We do not have such advertising on our site and host the site in a very secure environment.
Thank you so much for the free pattern and tutorial!
You are welcome Lorraine, Happy 2017 sewing year!
Happy New Year Mayra. Is stitching the thumb to the thumbhole straight forward on the sewing machine – or is it best hand stitched?
Thank you
You are welcome! Straight on the sewing machine. Happy 2017 Sewing Year! Kind Regards, Mayra
Looks to be challenging , but worth a try , Thank u for free pattern and tutorial HAPPY NEW YEAR From Glenda
Hi Glenda, please let me know how you go. It is easy I can assure you. Happy 2017 sewing Year!
I’m impressed with the pattern and assembling the fitting. What other material for this pattern can be used to make this pair of gloves?
Hi Emily, you can use a very soft vinyl or leather outside and polar fleece inside. That would make a very cosy pair. Enjoy the gloves.