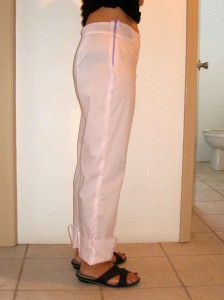
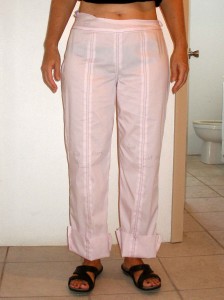
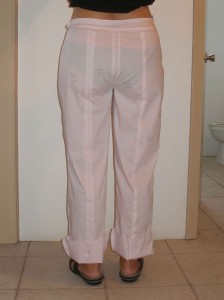
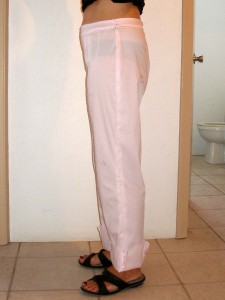
I've been following the Pants Fitting Techniques course with Craftsy. As a new sewer, I have a lot of trouble with fit and pants must be the ultimate fitting problem – hence the course. Here are my first two attempts:
Pants Fitting 1 and Pants Fitting 2
For this third attempt, I tried to vary the back length because I found that if I lifted up the back center waistband, a lot of the excess fabric in the back leg seemed to disappear.
- I removed 1/2 inch from the top center of the back waist, tapering to nil at the side seams.
- Then I scooped out the back crotch curve 1/2 inch to make it more of a U shape than an oval to compensate for removing length at the top.
- I cut in the center at the princess seam from the backside drop off to the rear knee.
- I added 1/2 inch height at the front to bring the waist higher.
- I removed a small amount at the center back to make the waist a little smaller and make the pants fit a little higher at the waist instead of just under.
 |
  |
A lot of the diagonal folds have disappeared.
Everything is still hanging straight where it should be.
The back leg is still fairly loose but smoother than the other versions.
Walking, sitting and moving about is comfortable.
  |
  |
I also completed the trousers with the top stitching, zip, waistband as good practice for the real fabric. Clearly I need some practice at putting in a zip….
For now I am satisfied that this is good for me. Maybe in the future I might make another attempt, watch the videos again, start from a fresh pattern piece and see how it comes out. But now I am keen to make these up in a suitable fabric. There doesn't seem to be anything in my stash that will work, and my local fabric shop has limited affordable options, so I'm ordering something from overseas.
I've ordered a faux suede, a cotton twill, and a linen twill. I don't know a lot about fabrics so I hope these will work out.
And now I wait……
I've come a long way in a short time thanks to the Pants Fitting Techniques course and all the helpful suggestions from fellow students and other Craftsy members. And I never gave up trying which has previously been my problem when I didn't know how to make corrections to poor fitting. I've learned that making small adjustments can make a big difference and will use the techniques I've learned in a lot of other projects I'm sure.
If you want to find out more about the course, this banner will take you right there.


Hi Deby,
I know I’m late to this party, but…
I totally agree with your entire assessment of Sarah Betzina’s course, even though I’ve been sewing for 50+ years and made plenty of pants. After reading about the Craftsy All Access pass on your website (thank you very much!) I took it in October, hoping to achieve the ultimate fit once and for all, but ended up discouraged and nearly ready to go back to “good enough”. However, I had much better success with Jennifer Stern-Hasemann’s class: The Perfect Jeans:Fitting Techniques for Every Body. I found the somewhat slower pace and well organized approach made the fitting issues and pattern adjustments much clearer and easier to follow. Yes, it pertains to making jeans, but many of the fitting issues and adjustments will apply to trousers as well. That said, I still need to make another muslin, but I’m much closer to a successful fit. I’m guessing that by now, about 3 years later, you’re making perfectly fitting trousers like a well seasoned pro!
I just found your blog on your experience with fitting pants, I would like to make this suggestion. Go to Silhouette patterns the designer Peggy Sagers gives excellent instructions on how to fit pants in several of her videos. She uses length, circumstance and depth. I think you will be happy with the information,
Your part 3 pants look good! Pants are so hard because of all the different curves. I think you could get from good to perfect in the back by dropping the crotch curve and taking up the slack at the center back waist. Patti Palmer’s method (Pants for Real People) shows diagrams to make that adjustment. Perfect fit is my favorite reason to sew. Have fun!
Hi, I followed your link from a pin party at just us four, and have really enjoyed reading your blog. I am so impressed at how fast you caught on to sewing and altering patterns to fit you. I have always found that to be such an obstacle. But I’ve never seen store bought pants with seams in the center of the legs. I wonder if that is because they aren’t made to fit anyone in particular or if it is a comfort issue. How comfortable did you find the extra seams?
These are described as princess seam pants. Its rather like having the princess seams down the front and back of a dress front, adds shaping without darts, and allows for easier adjustment to shape and fit. I don’t notice any difference when wearing them, but I think they are a good pair of trousers to start with, especially for this fitting course.
I’m still not sure what fabric to use for my finished trousers – I’m still a bit unsure about the fit – and I’m so busy with all my other sewing projects and work this month. I really must get around to these soon….
Wow, those look really good! Thanks for giving me the links to read the rest.
I grew up in front of my grandma’s old sewing machine so reading your experiences as a beginner have really been inspiring! We made newspaper patterns by measuring body parts and adding more here and there to create bell bottoms or puffy sleeves. Or combined store bought patterns to create a unique look. A lot of trial & error, but fabric & notions were so cheap in the 60’s and free time wasn’t such a luxury. I’m amazed at how you have followed a tutorial online and been able to have the patience to make the fit work. You are a true craftswoman/seamstress/tailor!!
Welldone, looking good!
Thanks for sharing on Tutorial Thursdays.
I hope to see you again this week for some more amazing fun 🙂
x
Natalie
http://www.marigoldsloft.blogspot.com
Good job! & I saw you got featured somewhere too- congrats!!!
Hi, I just found your blog and will visit it again. I am short and fitting pants has been a “hit or miss” situation! I appreciate your tips here. I also appreciate the comment from Roxie. It has never occurred to me to use men’s clothes from a thrift store. What a great idea!
As you are new to sewing and do not want to spend a lot of fabric I will share an idea I use all the time for GOOD quality fabric for just a little money. I like to sew, I make a lot of clothes for myself. I like wool and linen for pants. I buy men’s suits at the thrift store. Spend an hour or so UNSEWING them while I watch TV. (I just use my seam ripper) Remove the zipper, buttons, and lining. Press the pieces of fabric flat. Then lay them out and cut YOUR pattern from those pieces. (a woman’s pants are smaller than a man’s. Also you have the jacket to use too. I have also cut a skirt for myself from a man’s suit. It works well. If you want fabric that is not expensive check the thrift store for clothes. You can always take them apart and make something else from them.
Just found your fabulous blog. Your fit is really great. I recently followed the Craftsy course to make these same pants. My fit is just ok. I will be revisiting the pattern soon. I really didn’t like the side zippper ~
The side zipper is a bit unusual but it does make for a nice smooth finish. I am sure in the pants construction course (https://so-sew-easy.com/pantscons) there would be more about setting in a proper trouser zipper – but as I don’t know how to do that yet, I was happy to just go with this and leave that added complication for later! I’m still waiting to find the right fabric then I’ll have a go at making these up for real.
Persisstence pays! You did a great job on a difficult task — i think fitting pants is hard!
Well done on getting the right fit!!!