


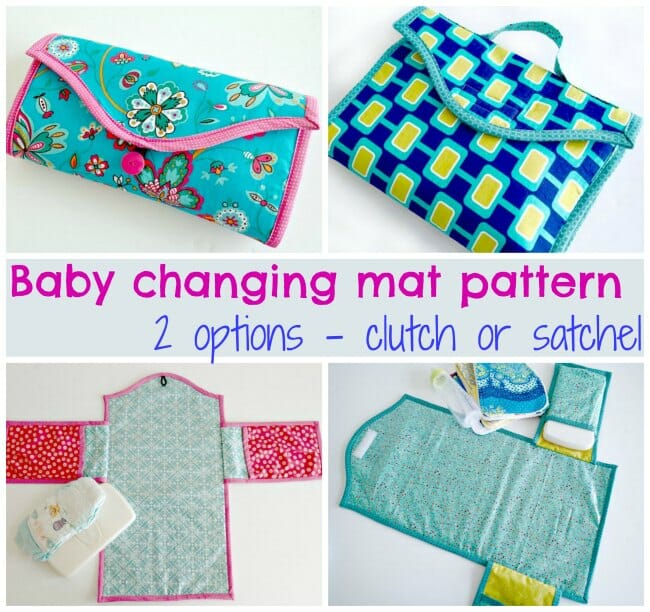
Babies will soon be popping out everywhere so my sewing for all the new babies continues. There's one thing I know, when they aren't sleeping / feeding / screaming, babies are pooping. One of my expecting friends showed me the changing mat she used first time round and just told me – it's just so big. I don't need all these pockets and things, all these bells and whistles. Just make it simple and small enough to carry about, but big enough at the same time. And it needs a wipe clean inner surface.
So I made one, and although it's great and is already on its way to a new home, I wanted to make one that closed up even smaller so I made a second version too. Here is the pattern and brief instructions for both.
Making up the baby changing mat pattern
You will need:
- 1 yard of fabric total – all the same or mix and match prints
- Piece of vinyl – 12 x 24 inches (optional)
- Low loft batting or fusible fleece – 12 x 24 inches
- Ready made bias tape or make your own from 1 fat quarter
- The pattern – download below
- Closures – sew on velcro or button and elastic loop
Download your Baby Changing Mat pattern pieces and instructions here. The pattern can be downloaded from my design account at Payhip.
If you have any trouble downloading, opening or printing the pattern, please see this post - How to download PDF sewing patterns.
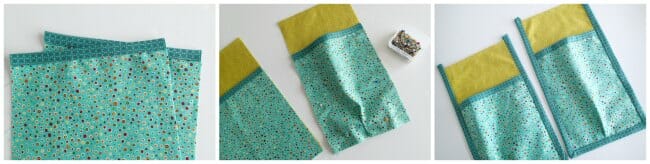
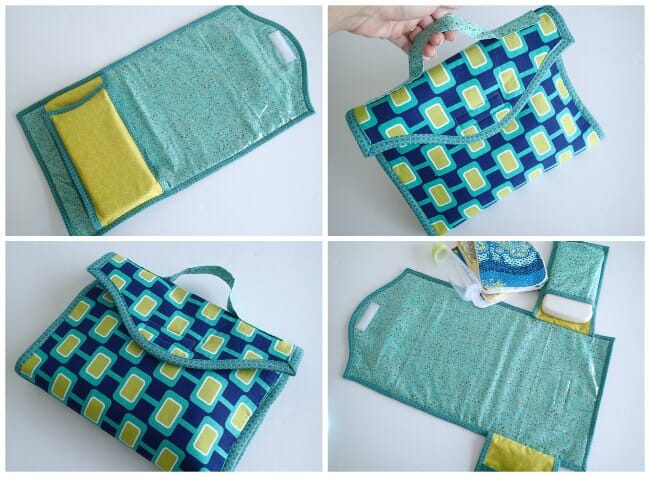
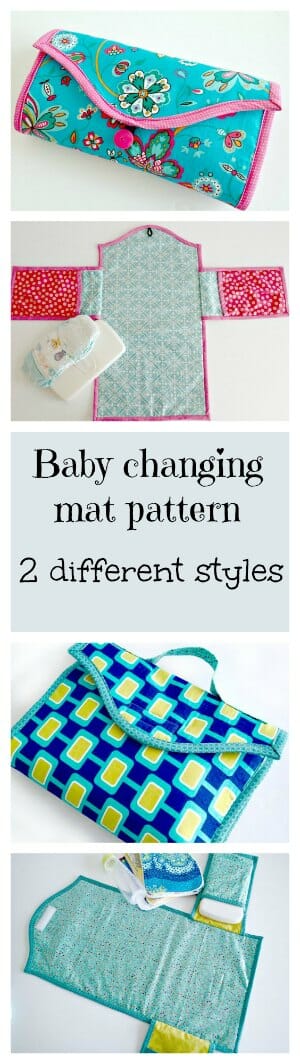
Option 1 – satchel style with handle
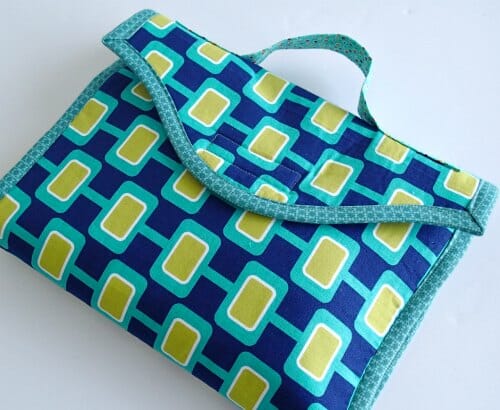
This bag is a little more open and loose in style than the second. It has a carrying handle and the pockets are placed at the bottom of the bag for easier access when you have a wriggling baby on there. But because of the lower pocket placement it doesn't wrap up as tightly as option 2 below. Pick which one you like best – both are made from the same pattern, and instructions for both are included in the download.
Download the pattern and check out the fabric sizes needed. Assemble the pattern piece for the top shaping. If you are making your own bias binding tape – start with this. You will need approx 4 yards if you use it efficiently. A little more is better. You can find tutorials on how to estimate, make and use bias tape on the tutorials page.
 |
 |
 |
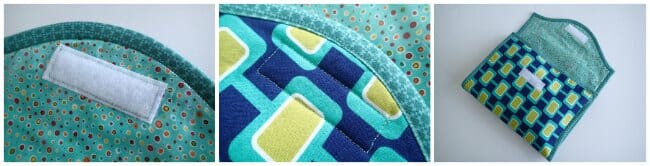
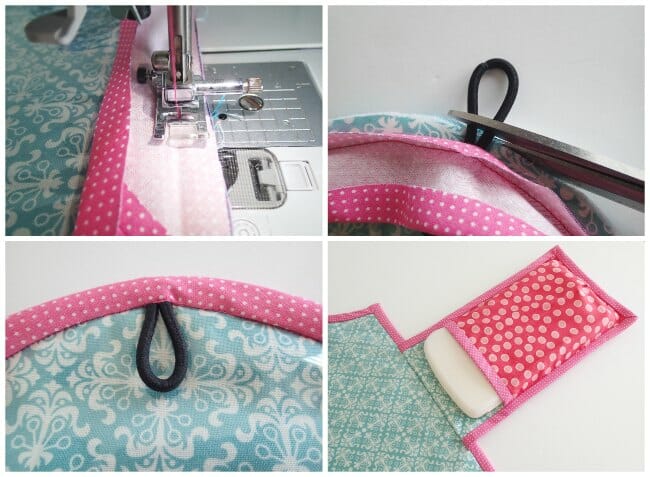
Start by assembling the pockets. Fold the fabric in half press. On the smaller pieces, trim the folded edge with your bias tape.
Match the raw edges of the smaller piece with the larger piece, at the sides and bottom. The pocket front is slightly wider so at the center bottom, create and pin a small pleat. Keep your pins away from the edge so you can sew past them, and then add your binding along the bottom and the two long sides. Repeat for the other pocket and set them aside for now.
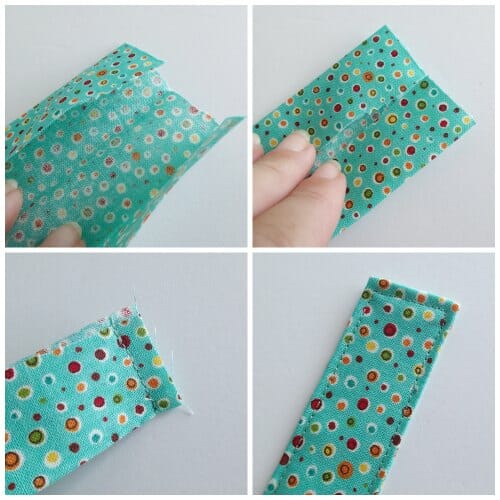
Make your handle. Fold the fabric in half length-ways and press, then fold each side into the center and press, and fold again through the middle to get 4 layers. Once pressed, open out at the ends and fold the center fold back the other way so the raw edges are on the outside. Stitch with a 1/4 inch seam at each end, then turn right sides out again and turn out the corners neatly. Stitch all around the outside of the strap close to the edge.
Use your pattern piece to place the strap on your outer fabric. Leave a 1 inch gap from each side seam, and place the strap butting up to the bottom of the pattern piece. Pin in place and then stitch a 2.5 inch long rectangular box over your previous lines of stitching to hold it in place. (If you are using a fusible fleece, apply this to the outer fabric before sewing on the handle.)

Press the fabrics for the main body of the mat. All the fabrics are cut unshaped to start with and layered before cutting. Place the outside fabric face down. You can either use a fusible fleece on this fabric for a little padding, or a layer of low loft batting. Then add your inner fabric face up. If you are using a vinyl for a wipe clean finish, add this as the top layer. Match up all the edges and either pin in place (within the seam allowances so you don't pierce the vinyl), or use your Wonder Clips.
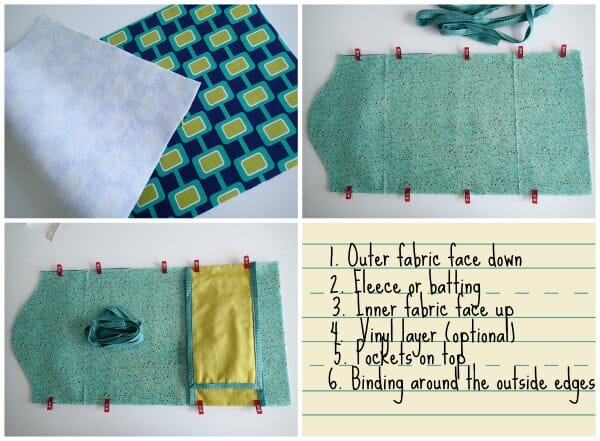
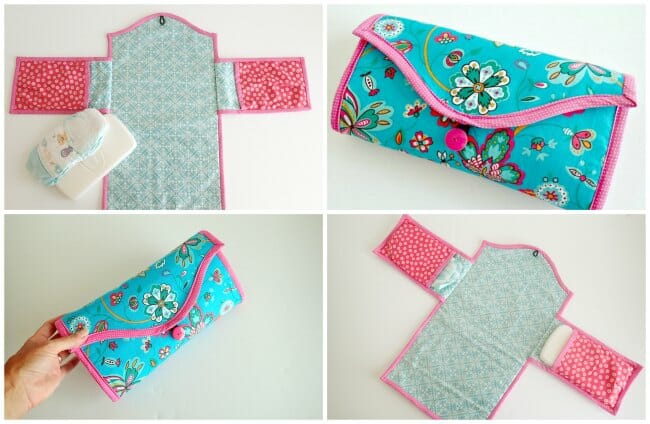
Use your pattern piece to shape the sandwich at one end. Place the pockets now so they'll be sewn in with the binding. For option 1 – the pockets were placed at 2 inches up from the bottom edge. Place them so the pocket front (the short side) is face down on the mat when folded.
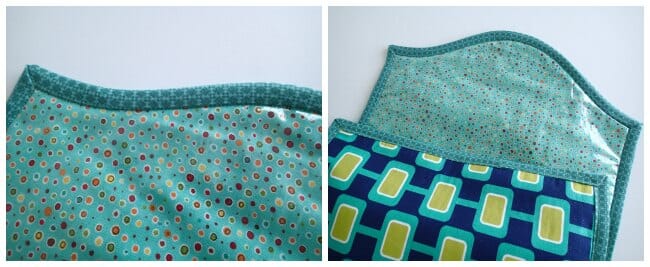
Apply your bias tape all around the edge of the mat, catching and enclosing all raw edges and securing the pockets in place.
Once everything is sewn, its time to add your wipes and diapers and fold up the mat. Once you are happy with how you have it folded and made sure the handle is at the top, mark the placement of your velcro. Match up the pattern in the fabric if you can for a cool look. Stitch it in place making sure the soft fuzzy part is by baby's head and the rough scratchy side is on the outside. Completed!
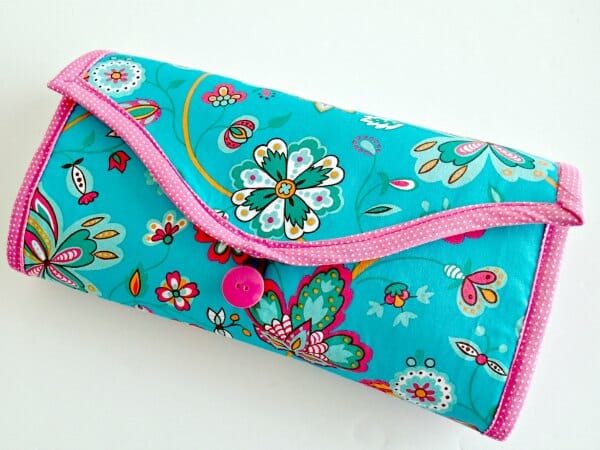
Option 2 – the clutch style
Option 2 is almost the same, uses the same pattern etc, but has some small variations. See which one you prefer.
- Make the pockets the same.
- Don't add the handle to the outside
- Pin the pockets at 3 inches down from the top corners
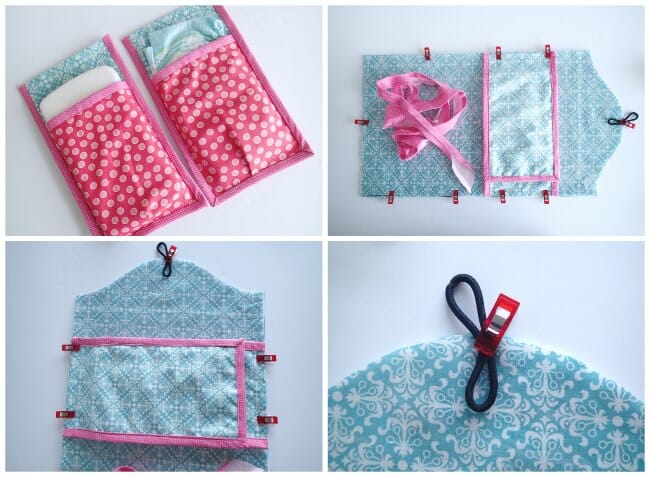
When adding in the bias tape around the outside, make sure to slip a short piece of elastic or a hair elastic at the center top underneath the binding. Or, you can still close this one with Velcro – it's up to you.
Add your wipes and diapers to the pockets and fold up the bag. With the pockets in the upper position, it folds up much tighter and creates more of a clutch. If using Velcro, mark where to sew on both pieces. If using the elastic and button, mark where your button will go.
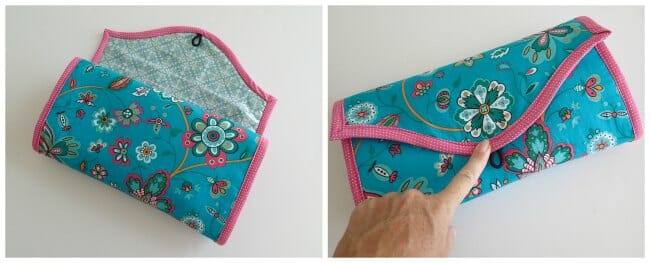
Sew on your velcro, or your button, close up your clutch and go. Oh, and don't forget the baby.
I'm already working on a third one of these and am thinking of adding some kind of wrist strap or hanging strap. What do you think? And which option do you prefer – 1 or 2?
Download your Baby Changing Mat pattern pieces and instructions here. The pattern can be downloaded from my design account at Payhip.
If you have any trouble downloading, opening or printing the pattern, please see this post - How to download PDF sewing patterns.
PIN ME FOR LATER –>


I am going to use your pattern but omit the pockets. Roll the mat up in thirds and fasten. Easy to fit in diaper bag; already have wipes , diapers etc. in diaper bag. Thanks. 🙂
Just completed this with some difficulty and I’d rate myself as an advanced beginner/early intermediate sewer. I have done a few other projects with using bias tape/binding but this part was the most difficult step of the project – the vinyl was so slippery and getting around the curve at the top (has both an “inner” and “outer” curve without looking sloppy was difficult. If I make another I would definitely 1.) use premade bias tape 2.) use iron on vinyl or printed vinyl fabric 3.) sew the velcro prior to putting it all together so the stitching didn’t show on the finished sides.
Made this for my granddaughter 2 years ago. Decided to add some length to it at the time so it could be used for longer. Changed a 2 year old and a 17 day old in the back of our 4runner yesterday! Awesome mat and highly recommend adding some extra length! Thanks for the great pattern!
Haven’t tried this yet but I think this pattern would be great for a small, traveling ironing surface for classes. Use reflective batting used in hot pads plus the silver reflective fabric sold by the yard and use the pattern with the handle for larger interior area. Going to try it soon!
I asked my niece what she wanted…I added snaps on the side and a button in the middle. Padded handle and an extra pocket. They love it!!!! I even had extra fabric so I made a waterproof bag to go with the mat! Thanks for the pattern. You can see it on my Facebook page.
I will have a look Thanks!
This has quickly become my “go to” baby shower gift! I’ve made it the favorite sports team fabric, so dad will carry it in their cars. It goes together quickly and all couples really like them!
loved it, im makin one for a friend who just had a baby, what are the measurements for the pockets? thanks
I like the pockets being near the bottom like the one with the handle, but I prefer the foldability of the one. I guess there’s really no top or bottom when it’s laid out, it could easily lay the other direction. Thanks for the pattern.
love this ! my grandchildern are starting to have children and want to give them useful and nice things that will remind them of me when they use it. this is perfect.
Thank you for this idea and tutorial, be making for my granddaughter she will be arriving soon can’t wait to make this. God bless you and family.
Okay, what am I missing? How can the pockets be 22″ wide if the center pad is only 12″ wide?
You fold the pockets in half.
What iron-on vinyl do you like? Can the pad still be laundered? Thanks.
i have the same exact question.
I answered your question on Instagram.
Mayra, I can’t find anything related to this project on your instagram – can you please direct me?
Hi Kristi, Instagram does not allow direct links yet, so here it is https://so-sew-easy.com/baby-changing-mat-pattern/ press on the orange button and you will be redirected. Kind regards,
I had something like this 20 years ago with my first baby. I haven’t seen anything like it since. I loved it to “death”. It survived 9 years of use. It was so perfect because as a nursing mom, I didn’t need to carry a lot of stuff. I eventually made a pouch that hooked onto the strap to put pacifiers and a toy or two in.
I can’t wait to make a few of these for my nieces and nephews who are starting to have families if their own. I plan on using the vinyl-backed fabrics that can be used to make diapers k the inside and putting an adjustable shoulder strap on it. The outside fabric will be something a proud daddy wouldn’t mind carrying.
Thanks for this pattern made it for my first grandchild. I used pvc coated cotton with a “kiddie” print, it worked very nicely. If I were to make another one, I think I’d sew the front and back RST and then turn it out thereby avoiding the bias ….
I love the idea of these changing mats, I’d like to make the satchel version, but I don’t see finished measurements within the patterns – or have I just missed them?
I’m making #2 and am adding a strap as well. I’m just not sure if it’s going to be a wristlet or shoulder strap yet. Can’t wait to see how it turns out!
Thank you so much for sharing. This pattern looks beautiful and I can’t wait to make it for my best friend baby shower. A couple of questions because I’m a very beginner.
1. If I can find a vinyl with the design I like, can I use the vinyl layer without the inner layer? Do you have any recommends for vinyl that look like fabric?
2. Has anyone try laminate or iron-on vinyl?
3. What if I put the vinyl under the inner layer? Yes, I realize that means the inner layer can still get dirty but at least the other 2 layer are still protected.
I guess my concern if that adding a layer of vinyl on top of the inner layer fabric will make the pad less pretty somehow. So please let me know what you all think. Thank you.
I use the iron-on vinyl all the time. It’s very easy to work with and work so great for a project like this. I also skip all the bias and top stitch instead
[…] Found it here >> So Sew Easy […]