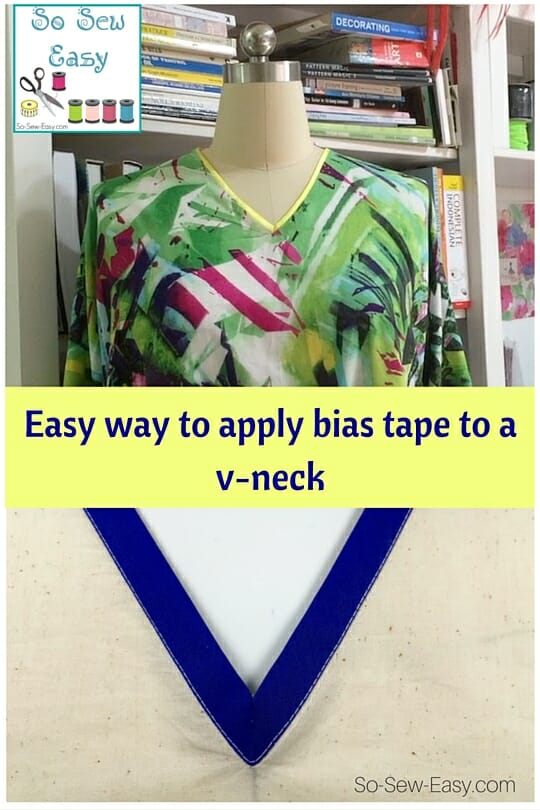
Have you ever wanted to apply a bias tape to a v-neck and did not know how? This quick and easy tutorial will show you how to do this and is appropriate for woven and knit fabrics.
This kind of technique can be use when you do not want to sew a collar to your garment, making the garment lighter and easier to style –which is perfect for the warmer days of summer.
Materials
- fabric of your choice
- bias tape. I'm using Wrights Double Fold Quilt Binding, 7/8 by 3-Yard, Blue in this tutorial.
- thread to match your your bias tape
- sewing machine
I am using calico fabric and cotton/poly bias tape for illustration purposes so you can see clearly what I am doing. However, for better results please match the thread to the bias tape and the bias tape to the fabric.
Directions
Most patterns have a 5/8″ seam allowance, so the size of the bias tape is entirely your choice. To keep with the pattern directions and to not alter the size of the neckline, sew a stay stitch line to 5/8″. This will be your guideline on where to place the fold of the bias tape and it will also be a great help if you decided to make your own bias tape. Please have a look at this tutorial for a review on how to make your own.
Start by taking the front side and stay stitch around the neckline to 5/8″.
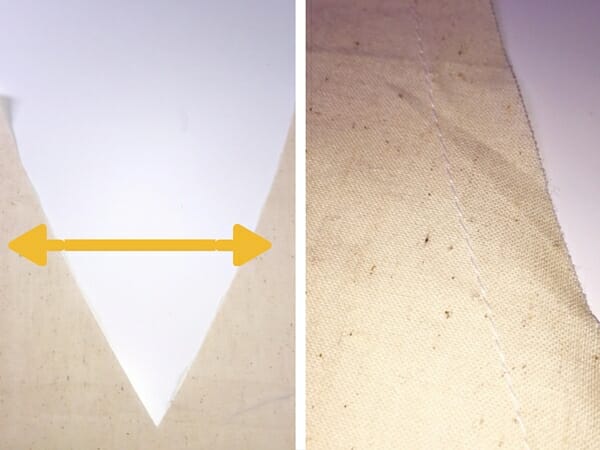

Draw a line straight down the middle of the V. This will be your cutting line. This cut will allow the V to open so you will be able to sew the bias tape in a straight line.
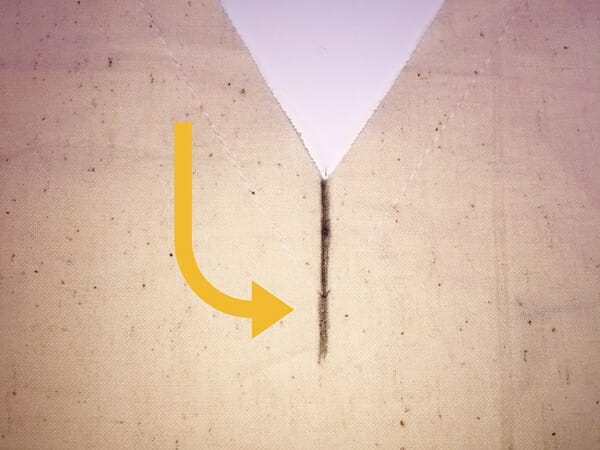

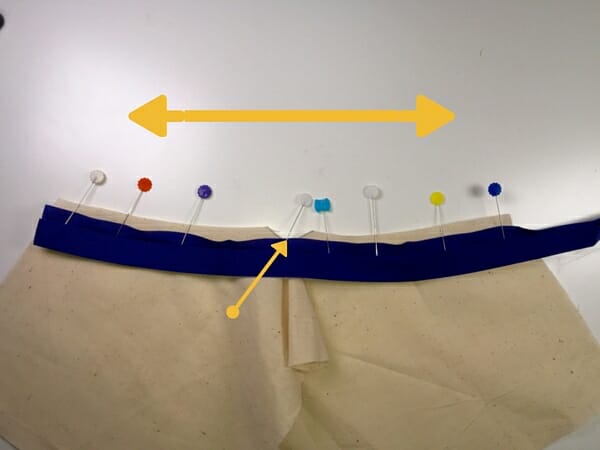
Cut the V to the point stopping 1/8″ before the stitching line. The pins are just there to illustrate the 1/8″ measurement.


If you are using a store bought bias tape, notice that one part is usually longer than the other as shown in the picture below. Pin the shorter side of the tape to the right side of the fabric.
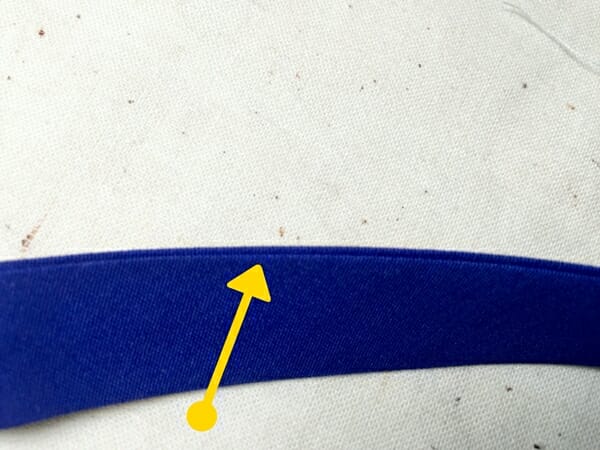

Pin the tape on top of the stay stitching line.


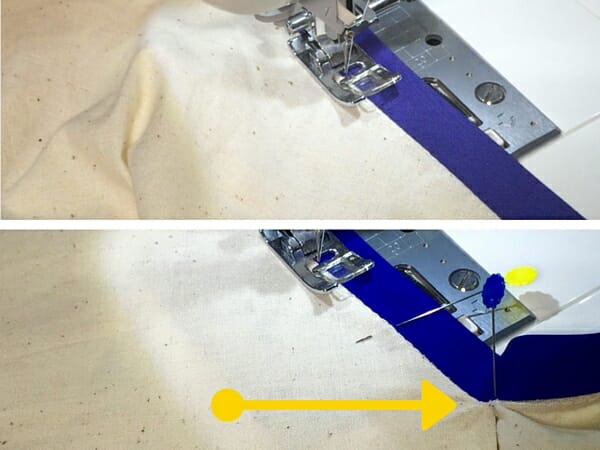
Sew the tape and when you get to where you cut the V, straighten the fabric by pulling to the left and continue sewing. Use the stitching line you made as a guide.

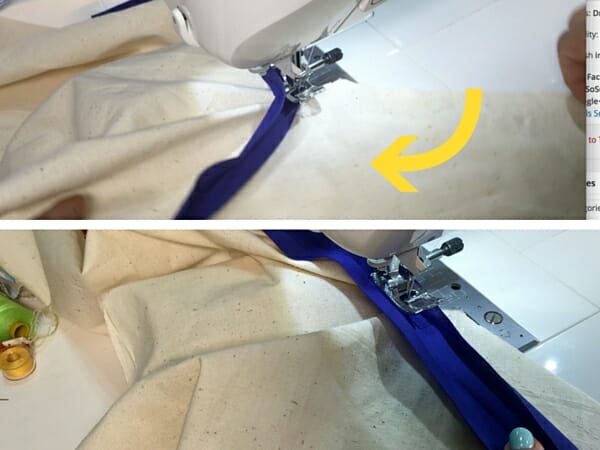

Continue sewing the tape on a straight line making sure that when you pass by the the point where you made the cut (marked by the yellow arrow) you sew over the stay stitching line.
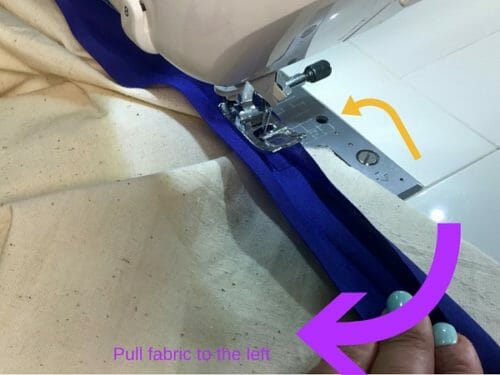

Once you have finished sewing on the front side of the bias tape fold it back making sure the edge of the tape falls below the stitching line.
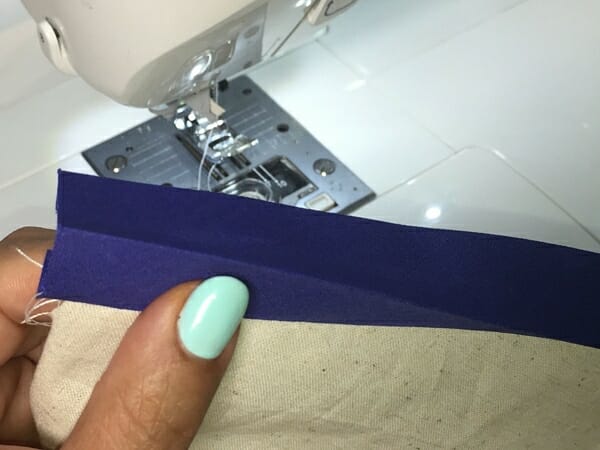

Sew very close to the fabric, taking special care on the point marked by the yellow arrow. It is important to make sure you catch the tape on the back.

Turn your work to the wrong side and fold the V-neck. You will sew a straight line on the tape following the yellow arrow direction.
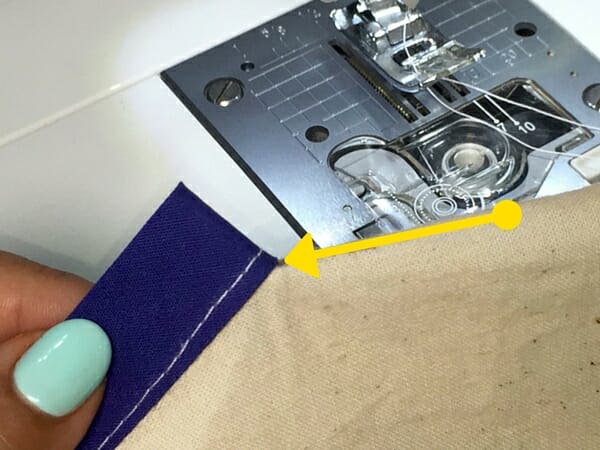

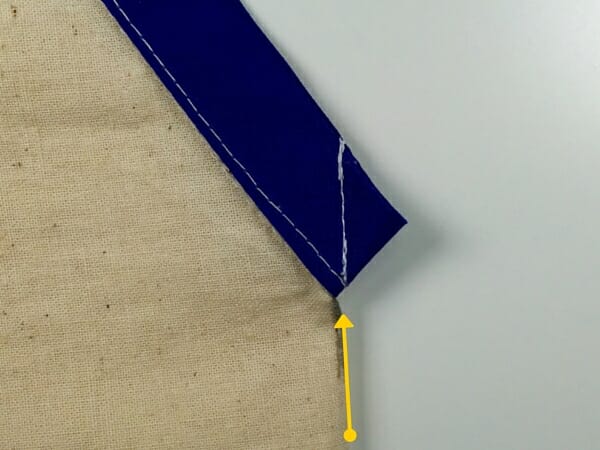

Flatten the little triangle with your iron so it lies flat.
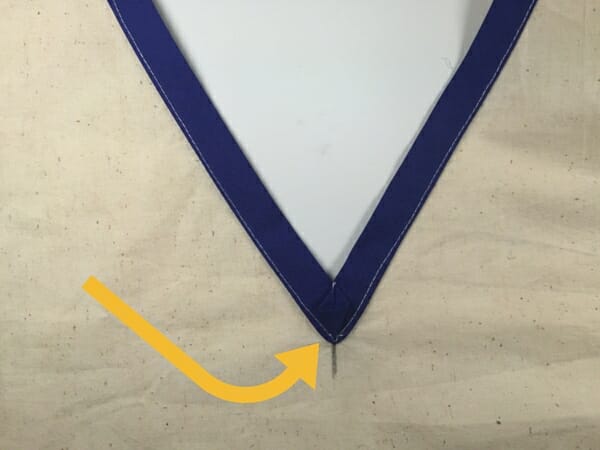

Front view of V-neck, remove your stay stitching line and iron the entire work.
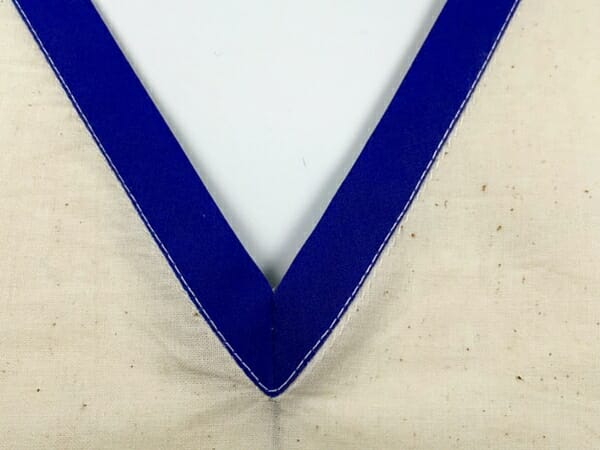

As you can see, it is very easy to apply bias tape to a V-neck. Using satin bias tape will give your top a touch of elegance and lightness. We will be using this technique in future projects so please stay tuned!
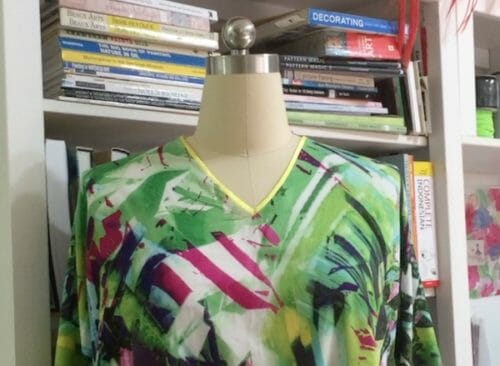

Special note for beginners
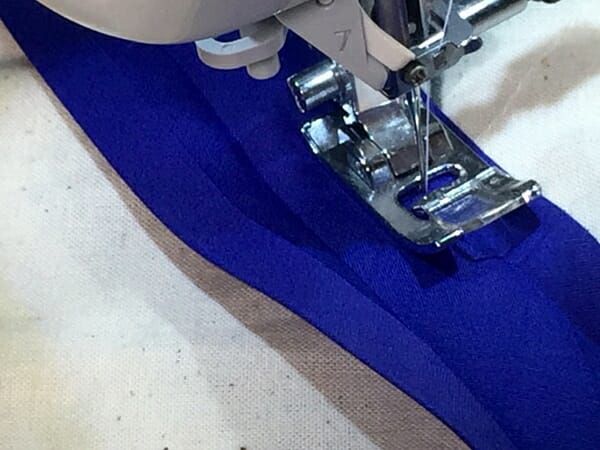
If you are using a very soft and easy to unravel fabric like silk or rayon, sew the bias tape first sew until you get to the point of the V, lift the foot of the machine, then make the cut. Pivot the fabric,
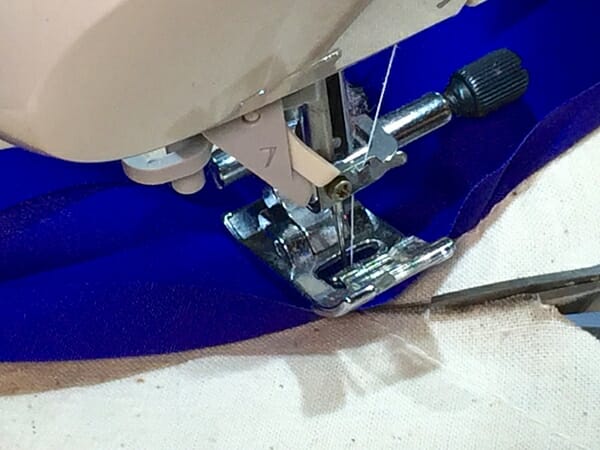

and continue sewing. This way you will minimize unraveling the fabric.


Your care to give the clearest possible instructions is so helpful for beginners. After many years sewing I still pop in here to check out your tutorials and latest patterns/ideas.
I loved your explanation and I normally try out different ideas on a piece of paper. And low and behold it came out great so now I will try it on a scrap of material before I try it on the dress. This is how I do things I don’t know how others do it. Do they go directly to the pattern?
I hope not, I always ask them to make a muslin first. Great ideas though thanks for sharing.
So helpful, I am going to cut a practice V front sample and can’t wait to see how great this look, thank you for this helpful hint.
My pleasure Sharon! Let me know how it turns out.
Very clear instructions. I’ve been sewing since I was 4 years old (I won’t say how long that is) and I haven’t tried your method, now I will.
Ignore the Alices of the world. It’s not like she had to pay for the tutorial.
As my dear hubby used to say, “Some people would complain if they were hung with a new rope”. LOL
LOL! That is a nice saying. Thank you Marion for your support.
My attempt didn’t turn out quite right, but I am not picking it out again. I think I need a video tutorial as I had trouble following the pictures. Guess its just me as all the previous comments sound like they got it just fine. I will have to try again another time. Don’t want to let myself get too frustrated.
I hear you Shari, I will make and effort and show this technique on a video.
I’m a visual learner as you are. A video always helps me more.
Noted thanks!
Thank you for the great tutorial. And for people who want to complain about excellent and FREE tutorials, they need to run along and go elsewhere. I love what you do Mayra and I especially love your videos. They are calming and give me a great confidence boost!
Thank you from the bottom of my heart Katrina for your feedback you are very kind.
cant you see white thread on dark blue think you need your eyes tested dont usualy get involved but realy not needed to be rude
Great tutorial. So, what happened to Deby? Are you related? I think I saw a couple of posts a while back from both of you, but didn’t realize that you were now doing this solo. Good for you! Great job!
Hi Adrienne, what you see are reposts from the past prior to 2016, They are part of SSE a very good, relevant content written by Deby and part of SSE purchased agreement. After December 2015, it has been just me and a small team, my son doing the editing and the history articles. My husband helping with security (very important) my daughter occasionally serves a model, and VA takes the load of Sewing4Free and charing the content in different places. Deby is retired traveling through Europe before the virus. No, we are not related, we meet when I flew to the Cayman Islands to get trained to take over SSE. I never told the story perhaps I should. I actually hate talking or taking pictures of myself (the reluctant blogger) as I called myself. I rather let my work speak for me. yes I know it is not the best practice when it comes to blogging.
As I said, I think you are doing a great job. Also, congratulations on being very diplomatic in your responses to negative comments…and yes, for those of us who have followed SSE for years, it is nice to know the story behind the transition from Deby to you and your team. Keep up the good work! I know I’ll enjoy reading and learning what you publish in your posts.
Thank you Adrienne for your words of encouragement.
Thanks for the info on Deby. You are doing an excellent job!
Thank you, Marianne, I appreciate your kind words.
I love you guys! Always sharing and helping us figure out things we can’t get straight in our heads. Thanks for all the lovely patterns and tutorials. My hat off to both of you.
Hi Diane, it is only me, so I hope you don’t mind, I republish the old content from 2014 and 15, but after November 2015 it has been me on my own, it has been hard but then again a lot of fun sharing what I know…So thank you for your support! Kind Regards,
Oh my gosh! I’m so sorry Mayra. I had no idea but being alone makes me realize how hard you work to give us the beautiful projects. Thank you again from my heart.
Hi Dianne, sadly it is only me since late 2015, I republish Deby’s content from time to time because it is still good and relevant. Sewing does not change much over the years. Thank you for your appreciation.
Excellent instructions!!! Well done and I appreciate the detailed pictures.
It is my pleasure Beth!
It is my pleasure Beth.
Thank you for sharing your knowledge and it was FREE YAY
yes this is a place where you can learn for free, there are 189 free patterns and more than 120 tip and sewing tricks so yes stay a while:)
Why are people getting so NASTY?? This isn’t a life or death situation! It would pay to practice a new, tricky technique as a sample until you’re confident doing it.
I think this is a great tutorial. Much easier than the way I was going to do it. Thank you.
My pleasure!
Well..I am making a v neck top that I should have cut the front fold .but did not due to the beautiful design so I wanted to keep it whole one piece ..so now the V neck binding has to be done diffrent than original instructions..it has been put away until I could figure it out…and low and behold… Hot diggity dog.. I came across this tutorial…Thank you so much and I am just flabbergasted at the rude comments. Sewing is an universal friend..so many many was to create garments..it is not 1 tutorial fits all..take what works ..be thankful for the hard work creating..editing and posting the tutorial and move on ….great tutorial for me .thank you for posting!
this was a very easy to follow tutorial Thank you so much wonderful easy to follow instructions
Yes, I think it would have been better to use a light colored bias tape.
Not for a beginner sewer that’s for sure. This is a very intricate and delicate area which can be ruined quickly if not doing it correctly. I think the beginning is good but gets a little vague when actually stitching and pivoting the tape on.
This tutorial saved my day when I was having trouble getting the v neck in with another method. I was about to throw it out the window!
Thank you for sharing. It really made the difference for me today.
I am so happy it worked for you.
I think Alice and Patricia need to take up fishing instead of sewing. This is a great tutorial. I’ve been sewing for 40 years and I like to review techniques I don’t do very often. Thanks for a great tutorial!
I hardly ever respond to these things but I just hate it when a comment seems mean spirited–life is too short for unnecessary acrimony. I’ve been sewing a lifetime but I’m not too old to learn something new everyday. In my opinion, this was a great tutorial. It reminded me of things I’ve forgotten and the comment re reversing the application process was also helpful–would be great on a more casual garment. All in all it’s been a win-win for me. So I applaud all the givers, sharers and receivers.
Wow! Thank you so much for this tutorial. I have messed up v-neck bias binding so often, I can’t tell you. I think I can actually do this technique successfully. It was all very clearly stated, and I appreciate the work that went into it. Thanks again.
Thank you so much for this tutorial. I did get lost on the last few steps regarding the triangle…so sewing along one direction, then it looks like I would stop and move the garment to sew from the other direction? I’m not sure…lol
Nevermind I took another look and get it!
HI Launie, you need to snip the fabric where the v is and straighten the fabric to sew on the other side of the V. Have a look at the picture with the two pins and the yellow arrow in it.
I must say I agree with Alice Crawford. It is quite impossible to see the stitching. And there are some places where you assume I know what I am doing. E.g what do you do with the small triangle. And are you sewing the folded over tape from the right side?
You are right I do assume, this is better explained on a video.
Hello Mayra. What a lovely find! Easy sewing, pleasant blogger, I feel at home! I’m designing fabric for quilters mostly. My sister had her first grand child and couldn’t find a quilt panel with Canadian theme. So I designed one for her, got it printed and now I’m working hard on my 5th design. Sewing has become an everyday activity now and YOU just showed me how to put bias tape on a v-neck shirt! Thanks for the free pattern! Next pattern I get from you, I will BUY!❤️????????❤️
Congratulations! I read your comment and headed straight to your site, what fun you must be having! please stay in contact. I have been thinking about making some interviews either on Instagram Live or on Youtube I haven’t decided yet which platform would be best. let me know if you would be interested in participating. Kind regards…
Fabulous. I’ve learnt so much from you and would like to thank you for your very clear and concise instructions. You do make sewing a joy. Sheila
You are most welcome Sheila 🙂
Piss off Alice Crawford, you are as subtle as a bag of hammers! Shame on you!
Keep up the great work some of us really appreciate all your efforts, am going to sew the Faviola dress and thanks for all your hard work. Most of us really appreciate you, Rose
Thank you Rose!
This site is an endless source of the best information! Thank you so much ladies, I appreciate the time and effort you spend in sharing your knowledge.
Thank you Juls, hope you stay for a while 🙂
Mayra, I love how you used the dark bias, and used WHITE thread, it was easy to see and fantastic instructions. I will save this for my future needs.
Thank you for a great tutorial. Very clear, easy to see and follow!
After years of not catching the other side when topstitching, I decided to reverse this process. Start and stitch on the wrong side of the fabric. Turn and topstitch on the FRONT of the fabric. That way, if stitching isn’t perfect, its on the wrong side and not the right side! Hope this helps someone.
Why on earth did you use such a dark bias binding, it’s impossible to see the stitches because of that dark color?? If I were teaching this, I’d have used either white or yellow and then sewn with a dark thread. This tutorial is useless if it can’t be seen!
Hi Alice, thanks for the feedback. Much appreciated.
Wow, Mayra. You were a saint with your reply. I love your tutorials. Thanks for sharing.
Don’t be a douchebag. It’s a free tutorial. If you’re so good at it, why don’t you start your own website so ***** people can leave terrible messages on that instead?
Alice you should be teaching this as you know so much more and then people could be mean to you! Shame on you!!
you do realize she used WHITE thread on a BLUE bias. Why can’t you see that?????????