


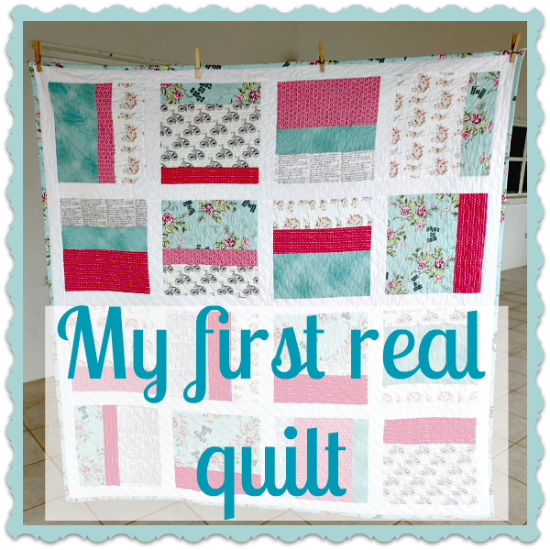
 I did it. And I love it. My second ever quilt is finished. My first one was just a jelly roll strips quilt, but this one was following a proper (beginner) quilting pattern, and I made proper blocks and sashing and I suppose you could say it's my first ‘real' quilt. When I made the first one, I said I probably wouldn't do it again, but I actually really enjoyed the whole process (well almost all) this time around so I know I'll certainly do it again.
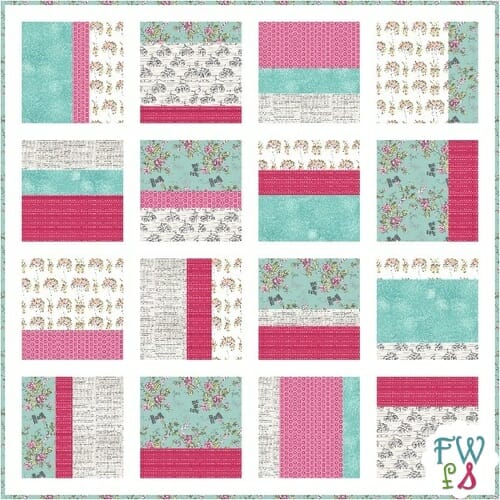
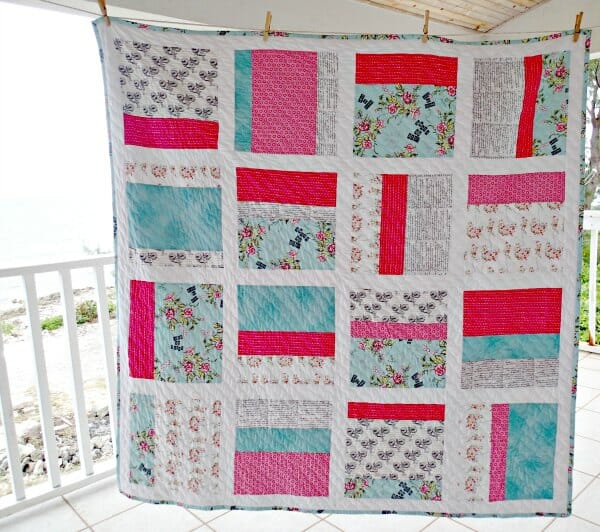
Having the ready designed quilting kit made life so much easier. I used this Cherie Jubilee from Fort Worth Fabric Studio – it's a kit they put together themselves and includes the pattern and all the fabrics you need to make the quilt top and the binding. Makes it nice and easy when starting out and I had LOTS of fabric left over for other projects.
Layering the quilt
In my first quilt I had just laid everything out on the patio and spray basted it to death, and it still ended up a little wonky on the back. This time I had a quilting mentor to help me. Lucy is one of my husbands scuba diving customers and visits the Cayman's regularly so this time she helped me out making a proper quilt. She even brought me the right supplies to get the best finish. She is an expert quilter, with hundreds of finished quilts and even has her own long-arm quilting business. So I knew I was in good hands.
Tools for layering the quilt:
- Large binder clips
- Curved quilt basting pins
- Pinning tool – Kwik Klip – you NEED this!
Steps to making a quilt sandwich
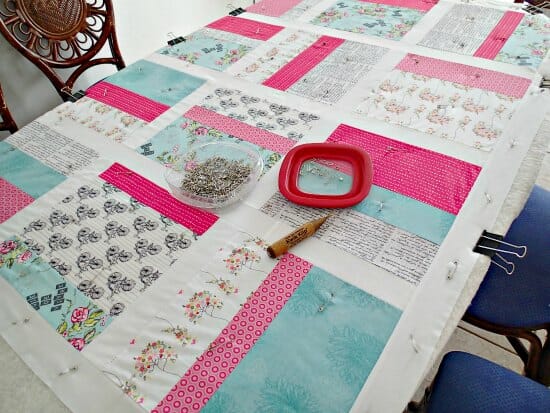
Lie out the backing, make it smooth but not taught and use the large binder clips to clip it to the edges of the table. A table with straight edges obviously works best so working on my oval dining table was a bit more of a challenge.
Repeat with the batting on the top, smooth and clip to the table at the edges. Try to avoid cats between your layers where possible as these can leave large lumps in the quilt later on 🙂
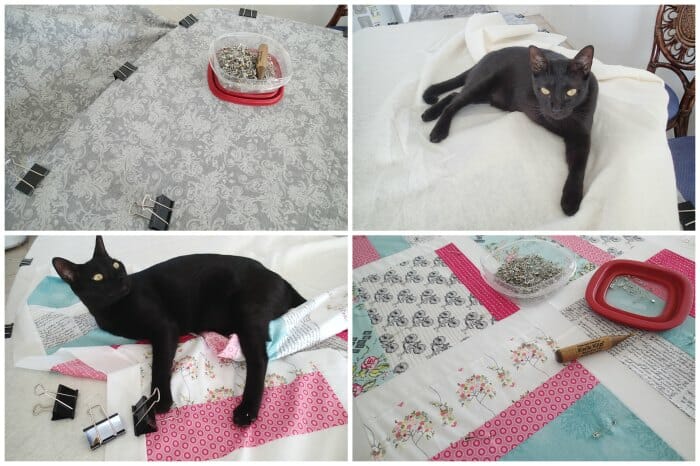
Lastly add the quilt top over the other layers. Make sure there is some space around the outside for a little shifting during the quilting process, then smooth and clip the quilt top in place too. Again, watch out for those cat-shaped lumps! I gave up trying to get a picture without a cat. As I've said before – a person can quilt or have cats, but doing both is very difficult.
Now everything is layered and cliped, its time to pin the layers together. Lucy brought me a big tub of these curved quilting safety pins. The curves make it easy to slide them through all the layers and then they pop out the other side.
Then the magic comes in with this Kwik Klip tool – it makes the whole pinning process so much quicker, easier and safer. This funny looking tool stops you sticking yourself with the pin and lets you do it all with the one hand. I had the whole thing pinned in no time without getting blood on the quilt top or sore hands!
The quilting process
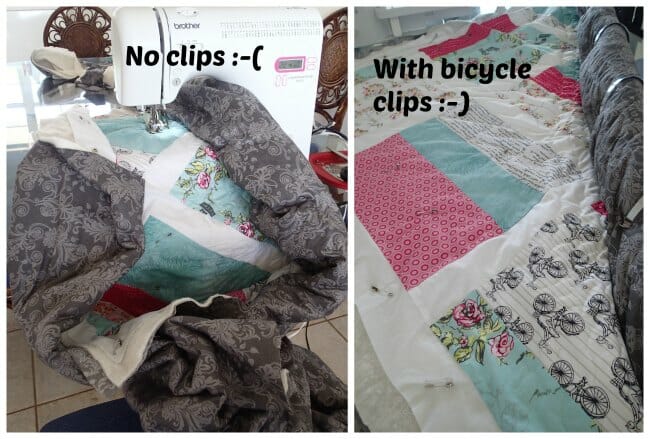
Now to my least favorite part of the process – the actual quilting. I think in part its a problem with the heat here. Sitting for hours draped in a quilt while I sew is hot work. And again I have cat hazards to work around. But Lucy came to the rescue again with her bicycle clips – yes honestly – bicycle clips for quilters!
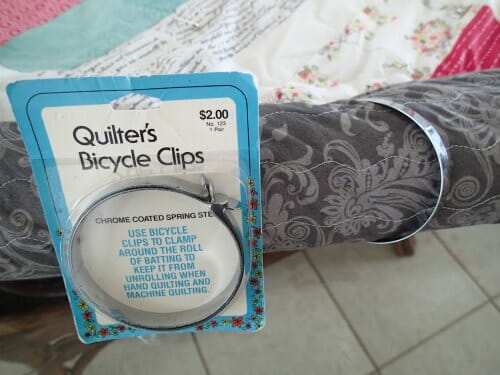
It helps when you have a small machine to be able to roll up the quilt on either side of the area you are working on, so its easier to handle and fit through the harp of the machine. I tried without the clips and it was hot, heavy, and I was constantly moving fabric around. Not so much fun. But with everything neatly rolled and clipped, it was easier to run it through the machine and keep all the extra fabric in order.
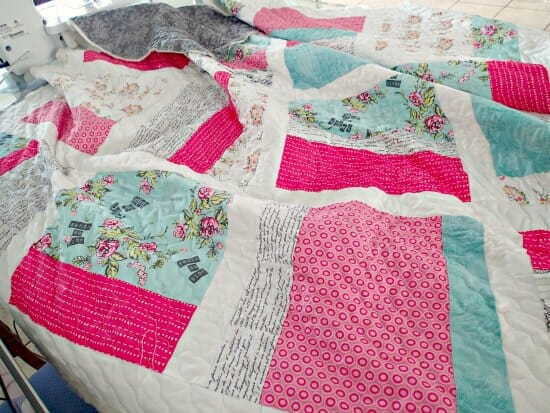
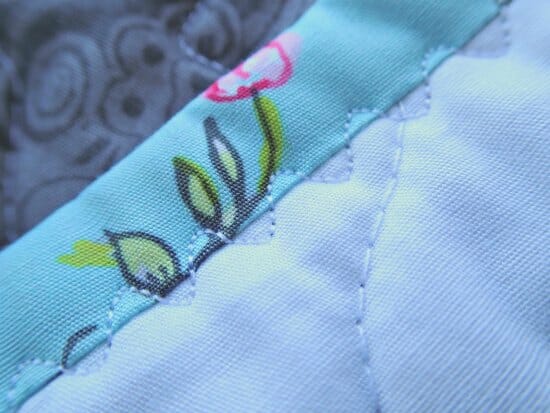
I used a large serpentine stitch for the quilting. It comes as standard on my machine so I set it to the maximum stitch length and maximum width and quilted the whole thing on the diagonal with my walking foot.
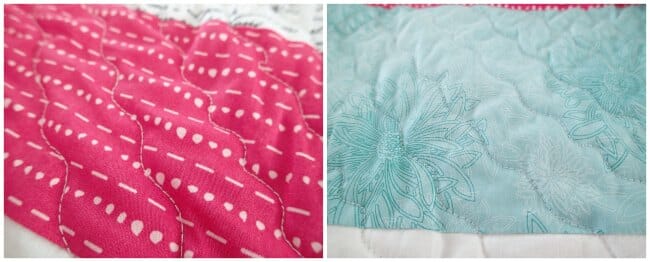
Thanks to the tips I had from Lucy, it all quilted up beautifully and I was very happy with it. It still took me a long time though and I wish she lived much closer and I could avail myself of her awesome long-arm quilting service by mail in future. I really like piecing the quilt top, quite enjoy the finishing with the binding, but the quilting on a small machine – well, I could happily pay someone to do that part for me!
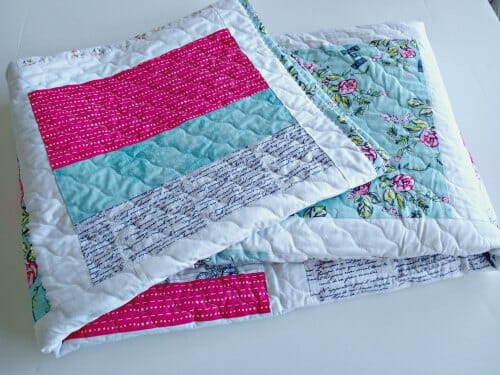
I do love how it looks through once all the quilting is finished. It suddenly comes to life, feels soft and snuggly.
Finishing the quilt
The home stretch and its a quick finish. I enjoy the trimming and binding part. Off come all those rough and messy edges, all the threads get trimmed away and the binding completes the pretty picture.
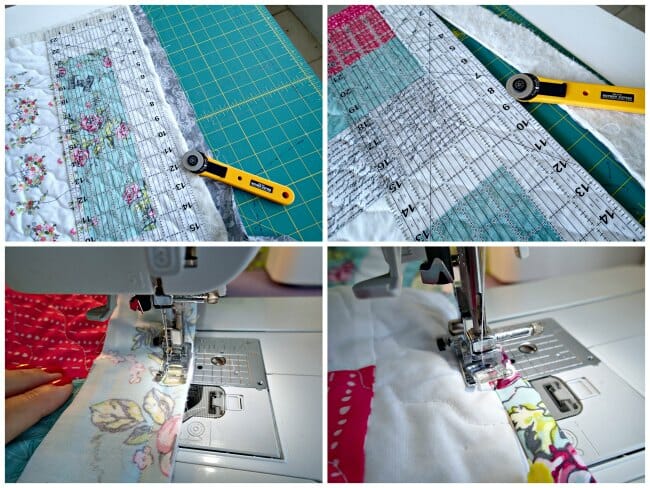
I've done quite a lot of edge binding on various projects now, but I still get nervous about it and often will hand stitch the second side to make sure everything is neatly caught. I hate it when I set up everything and pin and then when I stitch from the front, I turn over and a little bit of the binding has been missed in one of two places. Arrrghhh.
I didn't want that to happen here so I ‘cheated'. I sewed on the front in the regular way, then I pressed the binding and folded it over to the back, held it in place with pins in the ditch from the front to make sure the stitching line was covered on the back and then used my serpentine stitch again from the front to make sure it was all caught. Phew – easy and no missed binding. I don't think it looks too out of place as it follows the same quilting pattern I used.
What do you think? Have I carried out a quilting sin? Will I never be allowed to quilt again, or hold my head up high in a fabric store? Bah – who cares!
A delicate wash and the quilt is ready. I'm so happy with it – love the colors, the fabrics and the feel and it really has the part vintage / part modern look I wanted. So soft, so snuggly and destined to be always covered in cats, where ever I put it. This one is going to stay with me, live on my bed and make me very happy 🙂
If you would like to give a beginner quilting project a try, check out the Cherie Jubilee quilt kit from Forth Worth Fabric Studio, or indeed any of their other amazing quilting kits and fabrics they have on offer.


Yup, ya done been bit!!! You did a fantastic job as this quilt is gorgeous!
As a result of your posting the quilt kit you bought I went onto Fort Worth’s website and ordered fabrics, it’s always WONDERFUL to have yet another fabric source! And I had never heard of the Kwik Klip and I WILL be buying one of those. I have an alternate type/brand of rings and I wonder if your pictured brand work better….will soon find out about that as well!!!
I use the serpentine stitch to quilt all the time and I love machine binding. I think I will “borrow” your idea for using the serpentine stitch to finish your binding. Genius idea! I teach sewing and quilting and I always tell my students that the quilt police are NOT in your bedroom!
You know, I think you may have caught the quilting bug. Its very addictive.
Hello Deby,
what a wonderful artwork!
It’s great!
Kisses
Absolutely fab (as we say in the UK). I really enjoyed reading your process and learnt lots from it. I am a self taught quilter so all the layering tips were facinating and certainly something I will be trying with my next project.
Congratulations on the finished product. You can certainly hold your head VERY high
Deby, The quilt is beautiful and you did a terrific job on it! The pink and aqua are beautiful together. I couldn’t quite tell what the Quik Clip is though. Keep up the good work.
Looks great! I’ve never seen the bicycle clip trick, that is so clever.
Love these colors and the blues I bet match those clear blue waters where you live! Congrats on finishing your quilt! I have two UFO quilts (unfinished objects) and one only needs the binding. They are both my first attempts. My sister is a newbie long arm quilter and she quilted it for my birthday last year (June…gulp…… I’m embarrassed to say I just finally got the binding pinned on!). Maybe I’ll try your method rather than by hand, though I kind of enjoy the hand sewing part. I love the simplicity of your quilt.. .and do love your sewing videos.. I just discovered you and am going back and watching everything! I even just made today one of your teeny tiny keychain pouches and love it.Everyone is going to get one for their upcoming birthdays.
Welcome Marilyn and glad we connected. Thanks for saying such nice things. Hope everyone enjoys their tiny pouches.
Lovely quiltl! Looks like you enjoyed the process as well as the end result! Time to start another!
You’ve done a great job! The binding works really well. I don’t mind hand sewing the binding because I can do it while watching TV. Making a quilt from scratch is quite a lengthy process so any shortcuts you take just mean you can get on to your next project even quicker. I recently retired, bought myself a new machine and had a go at quilting for the first time. I found a kit for a quilt-as-you-go quilt which was quite easy. It involved layering each block separately, quilting the block and then stitching the blocks together side by side with a triple zigzag stitch. Then just add sashing with applique fusing to back and front to cover the zigzag stitch and then stitching down the sashing.
Here is a link using a similar method. It helps to avoid getting really hot with the whole quilt hanging over you. I also had fun using my embroidery stitches to do the quilting.
Quilt as you go tutorial
http://youtu.be/ji8BLS2rNHA
I will try to work out how to add photos to show you.
That certainly does avoid quilting the whole thing afterwards, I’ll take a look. Thank you for the link. You can add photos into the forum here – http://soseweasy.ning.com
Hold your head up high, Deby. You should be so proud of this quilt. I used a zig zag to attach the binding on my first quilt and I was very happy with the look. Now I’m confident with stitching in the ditch in a straight line. I do love the effect of the stitch you’ve used. Really ties in with the rest of your quilt. I’m pleased you are keeping it for yourself. I have yet to keep one of mine. I absolutely must find some of the bicycle quilters clips and also the Kwik clips.
Great job glad you did not give up after one. I have done three quilts.
Love your quilt! I put down cardboard to protect my table when pinning. I’ve been know to scrape finishes with the pins so it just works better for me. The Kwik Klip is the best tool ever invented. I used to use an old butter knife until someone told me about it.
I’m so sorry, Deby, but I will have to report you for your quilting “crimes.” Like your other readers, I have ethics, you know.
But I won’t be reporting you to any Quilting Crimes Commission or any international authority on Travesties in Quilting. I’ll be reporting you to family and friends who will probably rush to your So Sew Easy website to see exactly what you’ve done to make your gorgeous quilt. They may commit a few crimes of their own “stealing” your clever ideas and making their own beautiful and unique quilts. Can you live with inspiring others to cross new boundaries?
Ha ha, I should start a new site called the International Authority on Travesties in Quilting. I love that !
Marvelous! I nominate you Chairwoman of the Board for the International Authority on Travesties in Quilting, which I certainly hope pays at least a six- or seven-figure annual salary. No one would be better in the job! Crack that homemade whip (tutorial available soon, I hear) and enforce awesome standards of quilting and sewing delights!
By the way, I hope your other followers (a.k.a. “fans”) have nominated you for best blogger on Craftsy.com. If they haven’t, they have a few more days to do it. Please don’t let the onslaught of nominations wear you down. It’s just another cross you have to bear for being so popular and so successful in your crafting adventures that entertain and educate us all.
I hate to ask people to nominate me, but every vote counts and I hope someday to win something! Maybe in 2015. Thank you so much for all of your support, comments etc. It really means a lot to me.
You don’t have to ask anyone to do anything. I’ll do it because it’s something I believe in with all you’ve done and all you’ve accomplished. My goodness, something like 80 tutorials is nothing to sneeze at especially when you consider the high quality of the written instruction, the excellence and clarity of the photos including layout and the visual and audio superiority of the videos. Here is my request:
To all humans who ever met, knew, heard of Deby or enjoyed her patterns, instructions, videos and tutorials, I’m asking you to please nominate Deby for Craftsy.com’s 2015 Best Blogger Awards at http://bit.ly/1DTYiWz. My request goes to all Deby’s readers, followers, fans, family, friends, coworkers, neighbors, associates, acquaintances, students, customers, government officials, vendors, retailers, partners, fellow bloggers and all world citizens. And as soon as you nominate Deby, please ask everyone you know to nominate Deby on the Craftsy.com website.
It’s okay to look at the total picture: It would be a shame for Craftsy.com not to recognize all Deby has done and how well she has done it with an award, so please nominate Deby promptly for a 2015 Best Blogger so Craftsy.com doesn’t look bad. Thank you, and we’ll celebrate soon!
Ha ha you really made my day. Thank you! If there was a prize for the most devoted readers and the best followers, then I’m happy to say I think we would win that one no competition!
Hey Deb……I love it…..a job well done!!! You should be very proud of yourself. Slightly different from sewing clothing. The quarter in seams seem sooooo tiny compared to the 5/8″ seams used in making clothes. You make so many beautiful pieces of clothing. Watch out…..quilting can be very addicting. You will be making all kinds of quilted items. Have a look at Connecting Threads. They have many beautiful fabrics and kits all reasonably priced. I have purchased from them and their fabrics are very nice. You can send for their catalog. From My Heart……Continued success in your quilting endeavors.
Lovely quilt! There are no quilting police unless you enter into a show. And the more you do the better and easier it will be. Also there are a lot of ways of achieving the same result. Enjoy!
I normally hand-stitch my quilt binding, but the serpentine stitching looks great. I’ll try it next time. Beware! Quilting can become addicting!
It’s beautiful! Have yet to experience quilting, but more inspired now.
Oh, good job! Love how you made use of your machine’s decorative stitches. I wish my machine had more! I enjoy your blog. Someday I will be brave enough to try sewing some of the dresses and tops!
Good job, quilt looks great, I only hand-stitch my bindings on heirloom quilts if you are going to use your quilt the machine stitching is stronger.. Oh and I love my serpentine stitch too. Now some of my quilt guild members look down their nose at machine quilting (only hand quilting “looks” right to them) but I like the looks and when I bought my machine one of the reasons was all those fancy stitches waiting for me to play with.
Right, those fancy stitches are there for us to use.
Loved your quilt. I’ve only made 4 quilts up to now but gaining experience with each one. I have a ‘3 stitch’ zig zag stitch on my machine which I’ve used on the top for the quilting process, so next time I’ll try it when it comes to the binding 🙂 Thanks
Oh dear I don’t want to start a ‘cheating at quilting’ movement here!
It looks wonderful. You should be proud!
Thanks Pamela
Deby, I think you did a great job! I love the colors of the fabrics. I also think you’re brilliant for thinking of a new way to sew the binding on! I hate when some of the binding isn’t caught.
congrats on a great job !
Beautiful. However, I must ask how is that serger coming? I can’t wait to see the serger incorporated into your garment patterns. I am also new to a serger (well one year) and I am enjoying learning more and more. Can’t wait to follow you on that too!
I STILL haven’t turned it on. Running with a big project backlog and a bit of remaining nervousness. But sometime soon – I hope.
Ha ha.. I loved watching your box opening video! Totally identified with how you were feeling. I was in the same boat 12 months ago. Some simple advice – turn it on NOW and just use it to neaten your seams on a simple cotton garment to start with. You said it’s threaded ok so you’ll be ready to go. You will absolutely love how professional your clothes will look straight away. You can find out about all those dials later. Enrol in the craftsy beginner serger class and then you’ll find out some more tricks. Stop procrastinating and that backlog will be even easier to manage
You did great! I have been machine binding like that for years. As long as you use a decorative stitch that has a lot of sideways motion, you’re pretty safe. I really dislike hand stitching the binding.
Congratulations on a beautiful quilt finished. And you can relax and be proud, there are no such things as Quilt Police!
hew, I was worried there would be a big loud knock at the door and I’d be hauled off to answer for my crimes against quilting!
I love it! Looks great!