


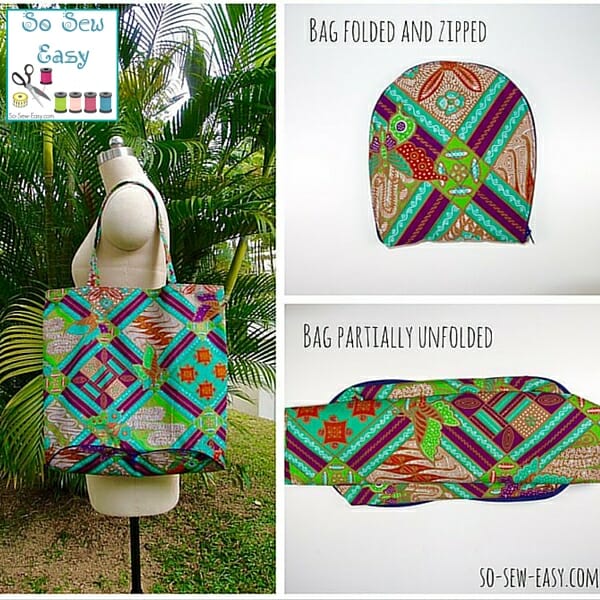
Here's a fun and practical sewing project –a folded shopping bag– that you can make with Batik fabric. Frankly, you could do this project with almost any colorful fabric (or even not-so-colorful..) but I love how it looks with beautiful Batik.
I don't know if this is happening in your community, but where I live, stores are beginning to stop providing plastic and even paper shopping bags in favor of reusable bags. I've bought so many reusable bags but I never seem to have one with me when I need it so I end up buying more and more (which probably isn't too good for the environment either, although the retailers who now charge for these bags seem to like it..) My solution is this super easy folded shopping bag that will turn into a flat pouch small enough that you can put it in your handbag. Now I'll never be without a shopping bag when I need one!
The project is simple and should take you about 30 minutes to an hour and the end product is extremely versatile. It will make the perfect gift for a friend on Mother's Day or addition to your Etsy store. I purchased a small treasure of Batik fabrics on a recent trip and would like to show you a few ways to use Batik as accessories, clothing, and home decoration. You don't have to use Batik but it is always nice;)
In a recent article, we talked about the ancient art of Batik Printing Technique,
If you'd like to make this from real Batik fabric, we've found a wonderful supplier in the US that ships through Amazon called Java Batiks. These are authentic Batik fabrics from Indonesia. In future tutorials, we'll show you how to make your own Batik, but if you want to start working with the fabric, it may make sense to get a supply now.
Materials
- 1 yard of Batik fabric from Java Batiks
- 1 zipper 18″ long.
- 1 rectangle of quilting fleece, very soft 12″ x 6″
- 1 rectangle 12″x 6″ of fusible interfacing
- sewing thread to match the fabric
- loop turner (optional)
- spray fabric adhesive (optional). I used Therm O Web Spray N Bond Quilt Basting Adhesive Spray.
- sewing machine
We have made available the FREE template for this project at our account on Payhip.com
You can download it FREE there.
Batik Fabric Suggestions from Amazon.com
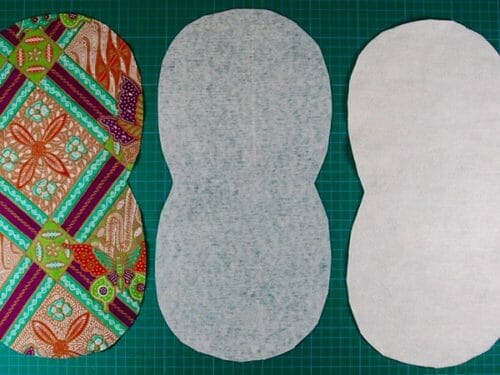
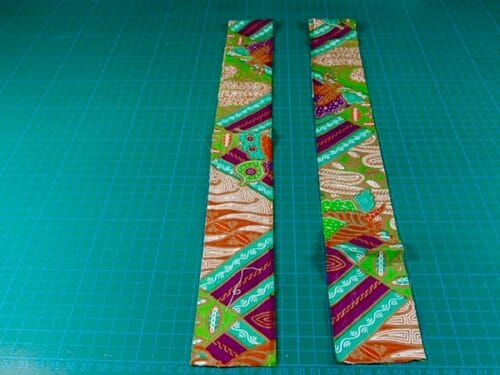
Folded Shopping Bag Pieces
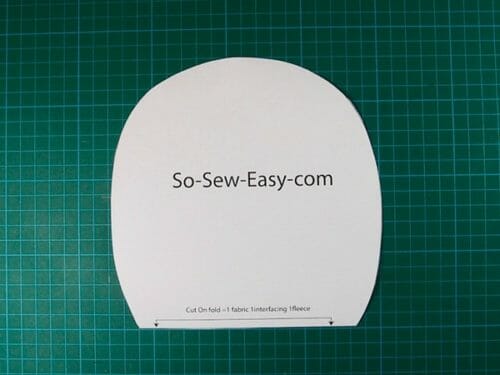
Cut one pouch piece of fabric, one of fusible interfacing, and one of fleece.
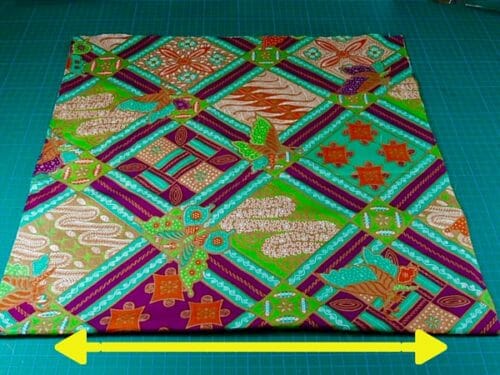
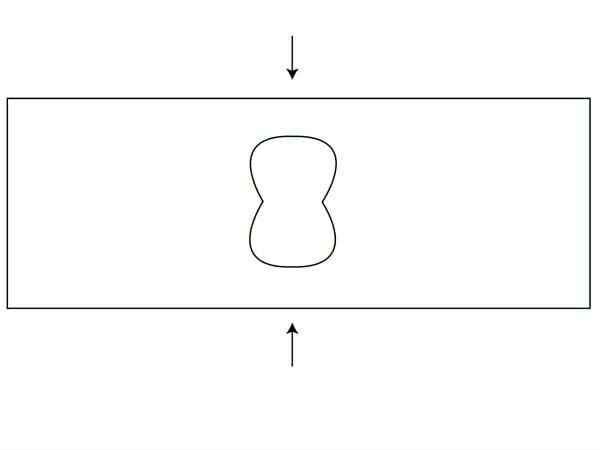
Make a rectangle that is 17 1/2″ in width and 36″ in length. Fold in half lengthwise and mark the middle.
Cut two strips of 24″ in length and 2″ wide (this will become the handles).
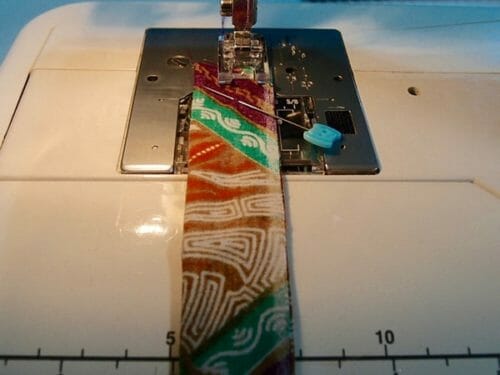
Assembling the Bag Handles
Take your strip of fabric, (24″ by 2″) folded in half, sew at 1/4″, turn inside out, and iron. You may find it useful to use a loop turner to do this. Then and sew a stitch in the middle. Put aside for later.
Making the Pouch
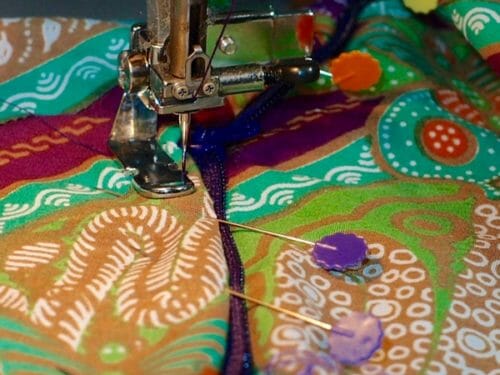
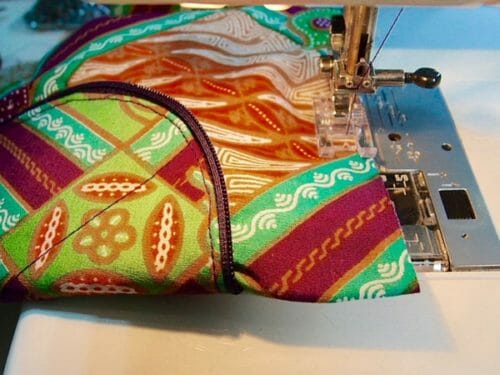
Fuse the interfacing to the fabric with the use of an iron. Then attach the fleece either by sewing or by using spray glue. Take the zipper and lay it open and upside down on the right side of the fabric. Align it to the first notch.
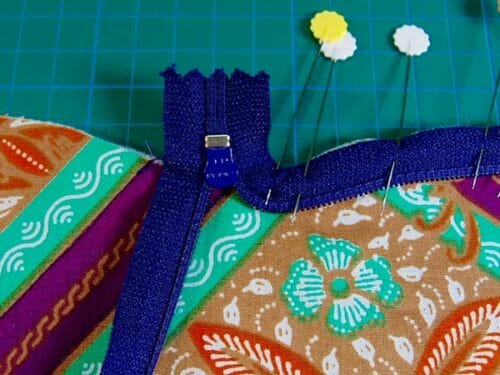
Pin the zipper to the fabric, use as many pins as you can to shape the zipper around the fabric.
Start sewing at the right-hand side notch. You start sewing 1 cm from the head of the zipper. This gap is important to be able to flip the zipper around. Make sure you keep sewing the zipper with your zipper foot around the bag following the edge of the fabric.
Note: please make sure you are sewing at the same distance around the zipper. Any deviation will distort the zipper and it will not look good when you zip up the bag. Start sewing the other side at the notch as well.
For a refresher on using zipper feet, please read our tutorial on the subject:
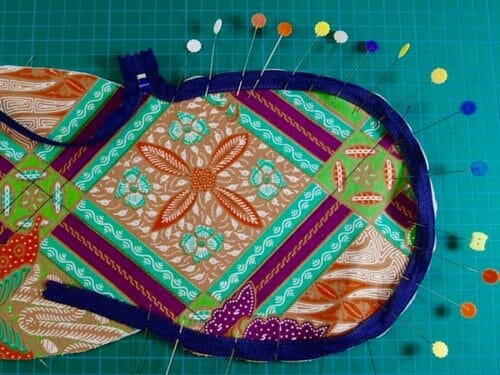
Trim the fabric with the fleece to allow the zipper to curve smoothly.
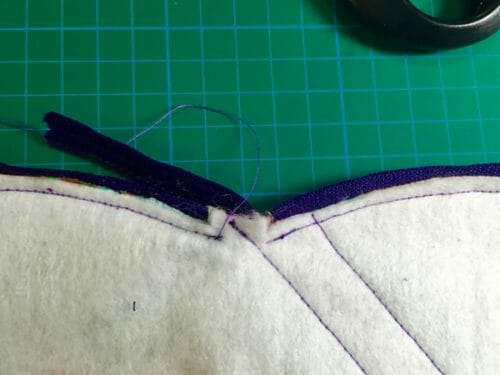
Sew the ends of the zippers.

Make sure the zipper ends lay toward the fleece side.
Lay the rectangle lengthwise and pin the pouch to the rectangle print side up. Tuck both ends of the zipper under the pouch.

Sew the pouch using your zipper foot by topstitching around the pouch make sure you follow the zipper perfectly as to not distort the shape of the pouch.
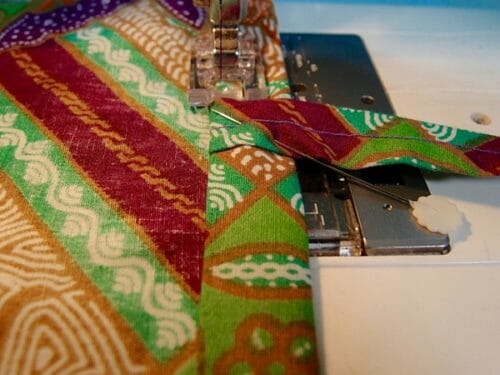
Making the Bag
You can use your serger for this step. I am using a French seam to close the sides. Sew on the right side of the fabric on both sides. For a refresher on how to make French seams, please review this tutorial:
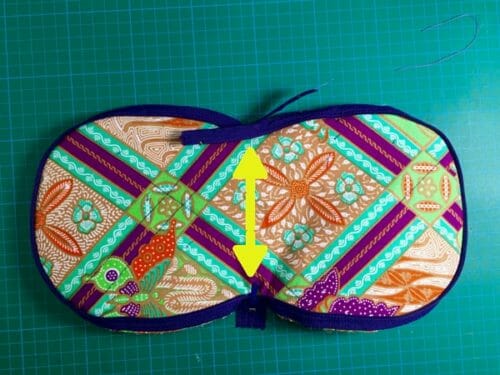
Cut half of the seam allowance, turn your bag inside out, and iron.
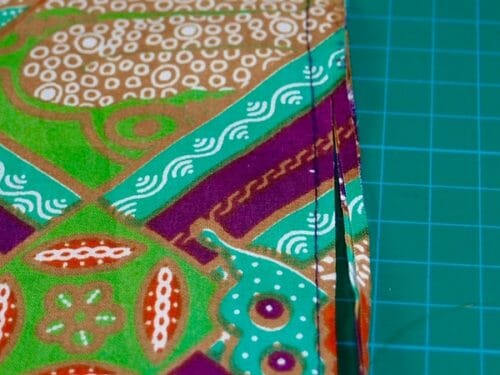
Sew again 3/4″ again and iron the sides once again.
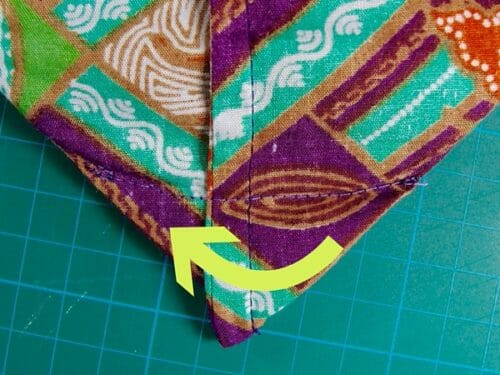
Round up the corners with the use of your zipper foot. Follow the shape of the pouch. Make sure you do not catch the zipper.
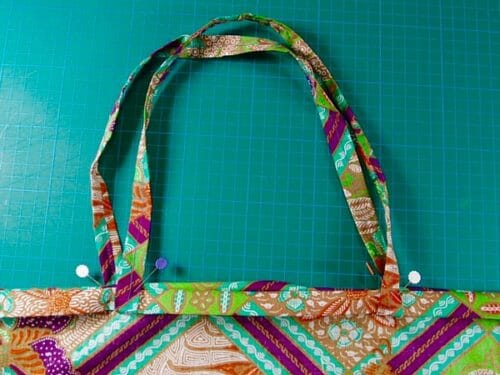
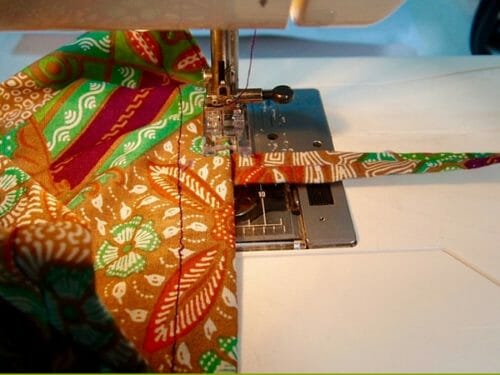
Attaching the handles
Lay the rectangle horizontally with the handles on either side.

Fold again this time 3/4″.
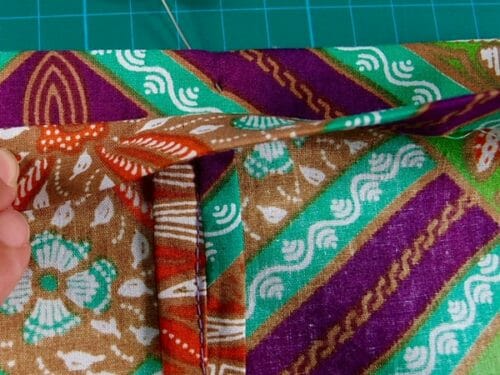
Make sure your handles are hanging down fold the handles upward and pin.
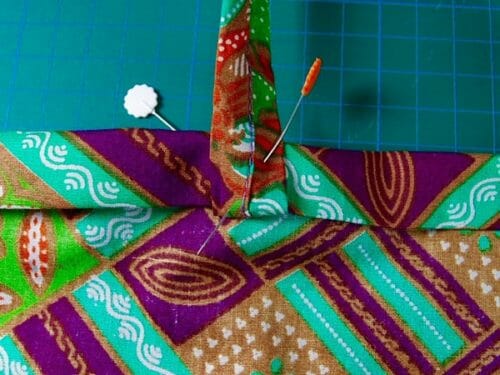
Sew the handles and the hem all together.
So there you have it, the perfect bag to hide your crime or another purchase from the fabric store…
If You'd Like To Support Our Site
If you want to help us continue to bring you a wide selection of free sewing patterns and projects, please consider buying us a coffee. We'd really, really appreciate it.We have made available the FREE template for this project at our account on Payhip.com
You can download it FREE there.


You did stencilling with paint.
I’m hoping to make this soon. As some others have said, the first step of attaching the bag handles is missing as there is already 1 fold and the handles pinned on the bag in the first picture. The next instruction ssay to fold again but this time 3/4″. What depth is the first fold that is pinned in the photo?
Thanks. love your website
I would use zipper chain (by the inch). Notch or mark the curves at the half-way point and mark zipper pieces as well. then as you sew you have a goal – to line the zipper up at the notches.
Hi ! Great tutorial – everyone in my family need this!
I have a bunch of vinyl banner material – do you think it would work well with this pattern? (using webbing for the straps)
It could work, the bag will not fold as flat put that does not stops it from being useful.
Hi Randi, fold the fabric carefully in about three parts then fold the ends on top that should make it lay flat.
is there a video for the folded shopping bag yet?
I need help with the zipper. I’m on my 2nd bag and am having the same issue as I did on the 1st bag.After the zip is turned, it’s time to sew the zipper ends. I cannot get the zip end stop and the fabric get close to meeting. After attaching, the pouch does not lay flat at the zipper attachment. Help!
My assumption is that it the problem is caused from not lining the zip up before sewing it initially. I did start an stop at the 1cm mark.
and here it is folded!
Thanks you do much for this pattern and tutorial. I’ve had so much fun making it!
To be honest: it did take me longer than the described hour but hey, no problem. I love the result!
A super job!!! Love the fabric! Congratulations!
I downloaded this pattern from craftsy, but the only pattern piece is the bottom of the bag that is zipped. Please help!
Hi, Sherry, this is a super easy project, please read the blog article to be able to make the rest of the bag. it is literally just a rectangle. It is that easy!
Hi,
great bag, please do a video.
This would be a terrific addition to travel baggage, for those items you just “had” to purchase, but have no other way to get them home! Sure beats having to buy another suitcase! So many great uses for it! Thank you!
Thank you so much! One of my favorite bags can be zipped up into a heart shape. It’s falling apart after many years but I couldn’t figure how to make another with the zipper.
That is so clever, Mayra. Love the idea of the bag folding into a pouch – takes up much less room.
It does Pam, greetings from Chile! Still hoping to catch up with you next time in Sydney.
Hi, I can’t seem to find the PDF of the pattern for the Folded Shopping Bag. I can find the direction of how to sew the bag, and how to download the pattern…just not the actual PDF to download and print. Could you please help me.
Thank you
Lisa
Hi Lisa, please follow the link in the yellow box which will take you to our account at Craftsy where the free pattern is hosted. Please give it a go and let me know. Kind regards, Mayra
Love this. thank you
You are most welcome!
Think you need to do a youtube video of that one –
Looks complicated
I would love to make one of these, but cannot find the full sized template. Is there a link I’m missing, or another place to find it?
Thank you!
I’m sorry, I just saw the link to Craftsy.
Hi Nancy, please click in the yellow box. This will take you to our account on Craftsy where the free pattern is hosted. Please give it a go. Happy sewing!
Buenísimo y original este modelo! Gracias por compartir.
Mil gracias Ingrid, que lo disfutres, no olvides que puedes subir una foto de tu bolsa cuando la ternines. Me encantaria verla. Un abrazo!
Am I allowed to show this and and give a demo at my quilting guild.
Sure Janice. Please enjoy and happy sewing!
There is part of a sentence missing in Assembling the Bag Handles. Would you clarify, please? Looks like a great project!
I agree! The first fold instructions appear to be missing. Please help!
Hi Sandy, not sure I understand your question, you are having trouble folding the finished bag or is there a step not clear to you?
Hi Myra, I agree with Sandy and Karen. If you look at your tutorial, it says
And, I assume you should fold to the inside of the bag, but you don’t specify that.
Nor do you specify how far over from the sides that you recommend that the handles be attached.
I think this may be why so many people have requested a video because you are missing some steps.
Thanks,
Kris Kuhl
Thank you so much. I think I may make several and give as gifts to friends. And it uses up my stash of fabric.
Thank you, great idea and instructions are very helpful. I have 3 smAll projects then it’s this bag. I have someone is missing d for it besides myself ?
I love this. Is there a video tutorial for this?
Hi Ami, not a full video yet, unfortunately. I think you can probably do it with the written instructions on the site. Please give it a try.
I love it. What a great idea. Thanks so much for sharing this. Going to try to make one now.
went to Indonesia with Quilt Seminars at Sea (been with them 4x an 2 more booked – visit them on line!!!!) visited 3 batik operations an bought a suitcase of batik fabric. Can’t wait to make one of these for my next cruise to Alaska and the next to Hawaii!!
Kudo’s to the designer and many thanks for sharing. A Happy shout out to all those who wrote in with their questions. It helped me avoid some issues and resolve a few mysteries I ran into. Looking forward to the video. My motto, if you love it, don’t give up. try, try again and always read the comments!!
Lovely pattern but on the picture the top of the bag has a folded seam. I dont think this is in the pattern. Am I right. ??!! Ann
Hi, Ann, please read attaching the handles carefully, I use an unconventional method to make 2 things at once.
This is so cool, thank you so much for the pattern 🙂
This is a great pattern and a great gift. The first time I saw this was in 1969 when an aunt made one for me to go to university. I still have the original bag and still use it to go grocery shopping. Over the years I have made over 50 bags, my friends all love them. The base can be made with heavy vinyl or as I prefer a small mini quilt, that way you never see the fleece. Enjoy the bag.
Hi Yvonne, thanks for sharing.
Hi, I love this bag pattern and I have made a couple, so thank you for posting. I’m having a couple of problems with small details. When you sew the zipper, are you sewing close to the edge of the fabric or close to the zipper teeth? In both of my bags, after finishing, I can still see the edge of the white quilting fleece when the bag is open and in use, and I’m wondering if I could solve this problem by sewing closer to the zipper teeth. But then I thought if I sewed too close to the zipper teeth there might not be enough space for the pouch to expand and close up when I try to stuff the bag. Thank you!
Hmmm, You should not be able to see the white fleece at all, because it would be hidden under the bag, and yes you can not sew to close to the teeth because you will not be able to close the bag. I think I should make a video, I will let you know when I have it ready. Thank you Jenny for your question.
Kind Regards,
Mayra
You know what, I was just making another and I think I realized what I might be doing wrong. I didn’t trim the fleece and fabric the whole way around the bag once I had sewn the zipper on. I had thought that maybe this step was meant for right around where the zipper head sits. It just dawned on me that this was meant for the whole border of the bag. I will give this a try on this next one and see what happens. Thanks again.
So I remade the bag with trimming, and I can still see the very edge of the fleece peaking out in some places. When I attach the pouch to the bag, I’m trying to sew as close to the zipper tape (close to the edge of the fabric) as I can, I think I’m sewing closer than you do, in order to try to make sure that the bag covers the whole fleece, but I don’t quite get everything covered. In any case, the trimming did help, and this is by far my best one!
I hear you girl, I think a video is in order, as soon as I can I upload it and let you know. Thank you for your feedback,
Kind Regards,
Mayra
Thank you so much for the update Mayra! The placement of the pouch is very clear now. As I said before, we love your patterns and are grateful that you share them with us. Thanks again. -D
Dear Mayra
Following on from previous comments I would also like to add I very much appreciate your time and effort taken to put the instructions together and to reply to all of us! These tutorials and blog posts have given me great sewing inspiration.
I love this folded bag pattern but got the pouch on the wrong way around so will give it another go this week. Thanks again for your work.
You are welcome Jane, and thank you for your support. It means the world to me! Kind Regards,
Mayra
First let me say that my friend and I love your patterns. We especially love this tote but after two tries have to contact you. We understand folding the tote fabric in half and mark the middle along the bottom line. When we place the pouch, do we center it horizontally across the folded bottom line and that’s where it is stitched around? 1st time we did vertically – didn’t work, 2nd time we did it even with the fold and turned out lopsided so assuming it has to be centered horizontally across the fold line? Should the zipper be extended a little before sewing to the pouch. We have been putting ours even with the pouch and it doesn’t lay flat so thinking we have to extend on both ends so there is a little give? After the seams are sewn, we should fold and follow the lines of the pouch to round it out? We really love this project but suggest if you make a video to use one patterned fabric and one solid and also to be able to see around the project so that one can see the directions the fabric are laid out vs. close up picture. We will wait for your reply and then try again because we really love this project. Thanks!
Hi Diane, yes a video will put all your doubts to rest so i will work on it. I have added one drawing to the post that will help you understand how to place the pouch before you sew it on the fabric. About the zipper, yes you have to leave the head of the zipper hanging out and the tail. Once you are ready to sew the zipper to the bag you need to tuck in both ends. Thanks for your comment it has help me update the tutorial and I will definitely be releasing the video. Kind Regards,
Mayra
Dear Mayra
Thank you so much for your reply! That explains the mystery stitching for me!
I’m going back to my room now to get it finished!
Thanks again
Jane
Hi Maya
I am trying to make this project but finding it tricky! I think there may be some instruction missing ? I can clearly see a line of stitching across the pouch even before the bag is attached? This is not mentioned. I can see it on the fleece when trying to follow the part about sewing the ends of the zippers. This is where I am stuck. I guess you mean zip not zippers as there is only one? It’s just both parts of the zip (each open part) you mean? If you can offer any help I’d be grateful.
Many thanks
Jane
Hi Jane, the line you see across is to keep the fleece from moving from fabric, I could glue the fleece but I didn’t, I was working late at night inside the apartment and to use the glue I have I need to work in a well ventilated area like my balcony. The zipper is sewn open one side goes to the left and the other to the right. Let me know if this helps otherwise I think i will just do a video. Thank you for your comment and hope you can get to make the bag.
Girls from my children’s high school are going on an emersion tour to spend 2 weeks in an orphanage in the Solomon Islands. I think I’m going to make a dozen of these to take with for the kids. With long term use in mind, would it be better for me to use twill or canvas?
I would use twill, you can also explore the use of nylon or parachute fabric. The trip sounds amazing!
That is a great idea Myra. I have some parachute type nylon in my cupboards! Thanks for the great pattern!
You are welcome! Enjoy the project!
I love this and am going to make it. Do you think it would be too thick with a lining since I’m only using cotton fabric??
Hi Ann, that should be absolutely fine. Good luck and happy sewing!
Thank you Mayra, starting it today!!
This is brilliant! Thanks for all you do!
Thank you Rose, I hope you make one!
I like this very much, but I can’t take my computer to the sewing machine. Is it possible to download the instructions as a PDF?
Hi Chilebeanz, unfortunately we haven’t done the PDF yet for this one. We’ll put that on the list and try to issue it in the near future.
If you have a cellphone, you can take a picture of the screen, then
take that to your sewing machine.
The concept is great, and I have purchased several at the office supply store. But those do not have the oddly shaped bottom/pouch. Is there a specific reason the bottom of the bag has to be shaped like a peanut? I tried to print out this page so to follow the instructions at the sewing machine, but the pictures do not print. 🙁
That is just the way I designed it, but you can modify it if you don’t like it. To print the pattern you need to use Adobe Reader, if you still having problems this article can help https://so-sew-easy.com/print-assemble-pdf-pattern/
great, going to try to make one.
Thanks great Inge. Let us know how you go. Happy sewing!