


One of the comments/questions from the recent survey we did was about PDF patterns. I forget of course that there are a lot of people out there who haven't used many PDF's – since I only started sewing recently PDF patterns were already common and I've used far more home-print patterns than tissue paper ones. I very much prefer them, but understand they can be confusing.
There are a lot of things you have to get right, and in the right order, for your pattern to be correct. Let's have a look at all the steps and I'll try to answer all of your questions I've had.
What's so good about PDF print-at-home patterns?
- Usually, all the sizes come in the same file to make grading easier
- If you tear it, cut the wrong size, the dog eats it, or you spill your tea on it – you can just print a new one
- They can be cheaper to buy than printed patterns because you aren't paying for professional printing, packaging, storage, and postage
- You can get the pattern instantly when you feel the urge to sew
- You can easily buy from International sellers – like me
- You support smaller independent pattern makers who couldn't afford to produce patterns otherwise
Here are some of my patterns that you can get your hands on right away, for example:
 Boxy Bag
 Super Simple Wallet
 Slouchy Sweater/t-shirt
 Classic straight leg knit pants
 Reversible apron
 Cowl neck top
 Carry All Bag
 Leggings
 Easy Breezy Blouse
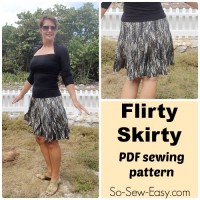 Flirty Skirty
 Color block dress
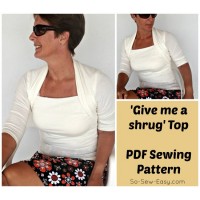 Give me a shrug top
 Cuddle Me Cardy
 The Ultimate Wallet
 Show Some Flare Skirt
 Lucy tote bag
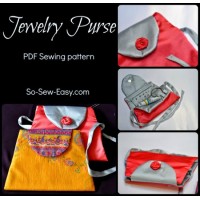 Jewelry purse
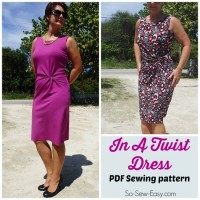 In a Twist Dress
How to Download PDF Patterns
Downloading is tricky before you even think about printing. A regular PDF file will probably work for most people and computers, but introduce a ZIP file or a mobile device, and frustration will probably start to drive you crazy. I wrote an earlier article on downloading here and if you have questions or problems – go back and start there.
How to Download and Print PDF Sewing Patterns.
This article has just recently been updated because now it should be possible to download a ZIP file to your mobile device if you have the right ‘app' or software. If downloading isn't working for you, try the tips in this article and video first.
Once the file is downloaded, you are ready to go if it's already a PDF. If it's a ZIP file, unzip first to get to the PDF files inside. See this earlier article if you need to learn about unzipping.
Printing issues – all of them!

Before we start, a few general guidelines, to do and not to do.
- Don't use an old version of Adobe Reader. Always update to the latest version if possible. Download the latest version of Adobe Reader here. If the pattern was created in the latest version and you are using an old version to try to print, there may be problems.
- Printing a file from Google Drive? Don't! That doesn't work well either. Always download the file to your own computer first, then open it and print it locally.
- Using Mac Preview? Again – don't! Printing can be random. Use Adobe Reader for best results.
- DO – read the printing instructions that come with your pattern. Each pattern can be different and certainly, each pattern company or designer will be different. Open the instructions and read how to print before proceeding.
Typical print settings
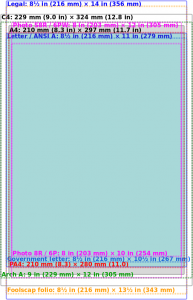
Did you know that different countries use different sizes of paper? In the UK, Europe and most of the world, standard paper is called A4 and measures 210 by 297 millimeters, but in the US/Canada/Mexico they use a paper called Letter which is 8.5” x 11”. According to Wikipedia “Today the standard has been adopted by all countries in the world except the United States. In Mexico, Costa Rica, Colombia,Venezuela, Chile and the Philippines the US letter format is still in common use, despite their official adoption of the ISO standard.”
Make sure you have the correct paper size selected for your printer. Most patterns should be designed to fit correctly on either size paper, or be able to be ‘poster printed' on either size.
You will typically be required to print your PDF pattern without any fancy settings, so unless the instructions tell you otherwise, DO NOT SELECT:
- fit to paper
- scaling at any percentage other than 100%
- centering options
- shrink oversized pages
DO SELECT – actual size.

Printing just selected pages
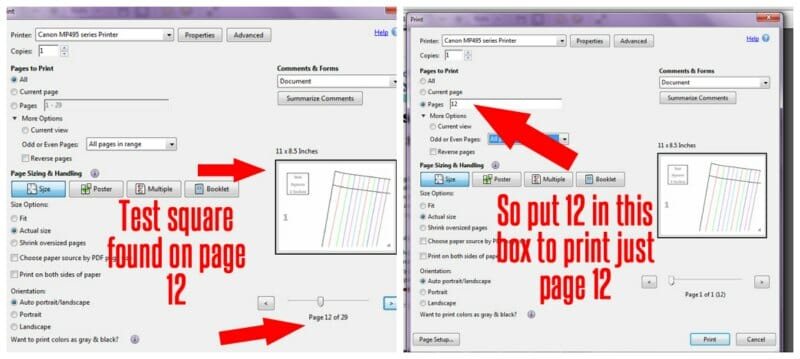
So you just want to print one page, or the pattern pages only if they are included in the same document as the instructions. We need to know the page number or numbers of the pages we want to print. That's where this preview box on the right will come in useful.
When your document is open, select the little print icon on the top menu to bring up the printing options box you see above. The preview box on the right has arrows underneath and using the arrows, you can scroll through the pages. Perhaps you want just the page with the test square, or you want to skip the instructions and just print the pattern pages.
If you want to print just a single page – enter just that page number in the ‘Pages to Print' box, like this:
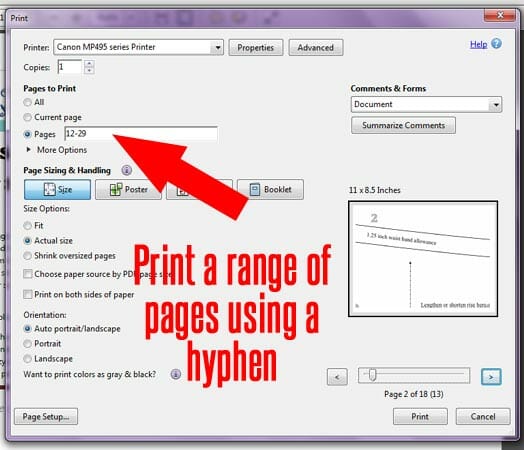
If you want a range of pages, then you can include the first and last page number with a dash or hyphen in between to show the range to be printed, like this:
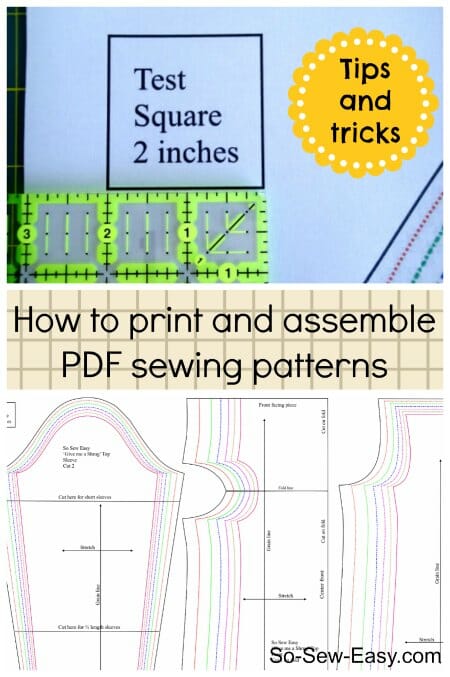
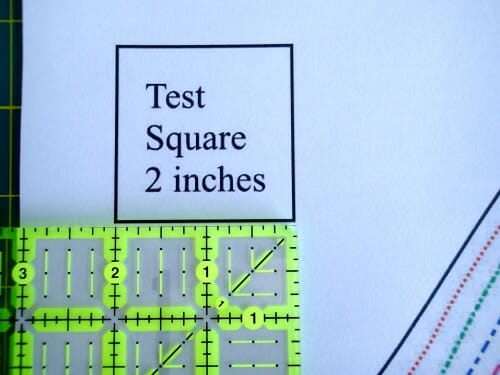
Before you print – the test square
Before you waste all of your ink and paper on a pattern that comes out the wrong size, you should always start by looking for the test square. Often this will be on page 1 of the pattern, but it can be elsewhere if there wasn't space. Preview through the pattern sheets until you find the test square. Print ONLY that sheet first.
Check the measurement on the test square before printing the other pages. If it's ‘out', then recheck your print settings before trying again. Only when your test square is correct should you print out all the sheets.
Important – your pattern pages will print out in the order in which they should be taped together so don't mix them up. Let the whole lot print, then remove from the printer as a batch.
How to assemble a PDF pattern
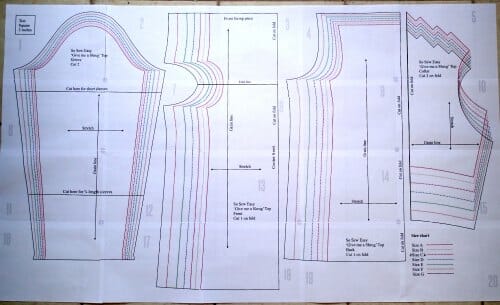
Some patterns will have page numbers, some will have marks in the margin and some may have guides where the pages should be lined up. You will find a lot of variety, but basically the process is the same. It's simply like putting together a jigsaw – except at least you already have your pieces in the right order.
Most patterns will give you a picture of what your finished jigsaw will look like.

In this example, you can see there are 20 pages in total, 5 per row. So start by getting together sheets 1 to 5 for your top row.
Most patterns will overlap one sheet with the other to help with lining up, and usually have an unprinted margin around the outside. You'll need to get rid of this margin on either the left or right and the top or bottom. I like to cut off the left hand side of my sheets and the top. So start with this.
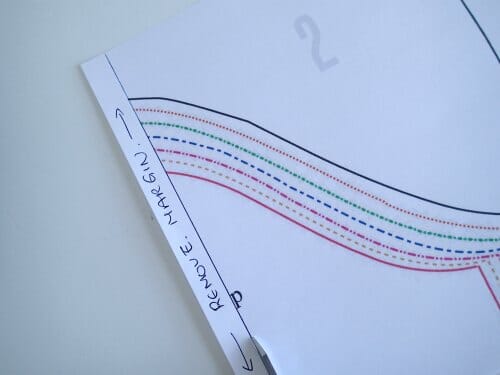
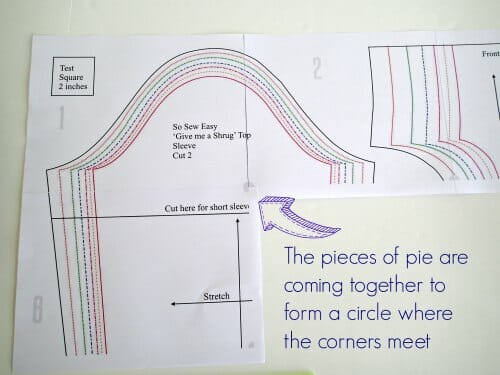
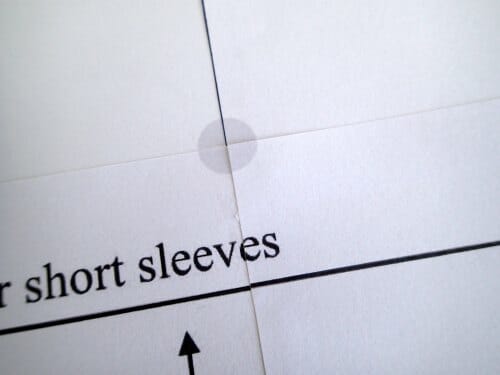
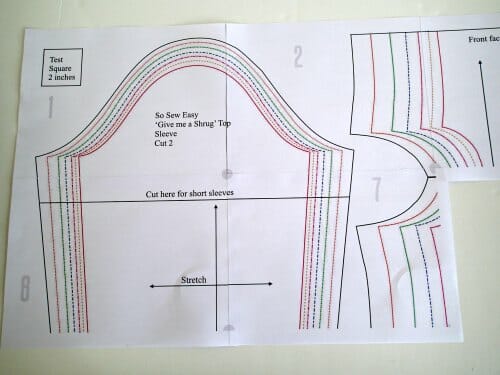
Lie out sheet 1. Take sheet 2 and cut off the left hand margin. There may be a line to follow, or guides. In my most recently patterns, I've been including a grey ‘piece of pie' which indicates the corners of each sheet. When all 4 pieces of pie are assembled at the corners, you get a circle where they all meet. If you aren't sure where to cut, draw a line (real or imaginary) between the pieces of pie!
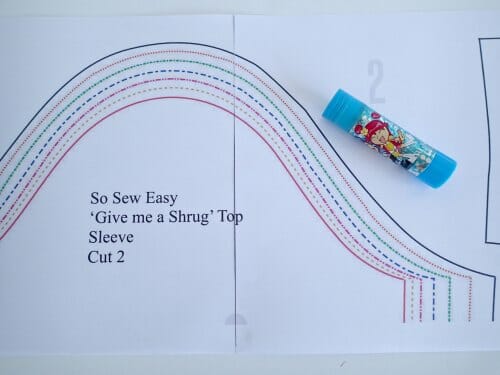
Match up the edges and lines on sheet 2 with the lines on the right hand side of sheet 1. How you join is up to you. Some people like to use tape, some use a glue stick. Anything that you can easily re-position a little later is best. I'll use a glue stick in this example and just lightly press my sheets in place, so that I can pick back up and re-position just a little if I need to.
Remember that our home printers are not necessarily designed for precision printing, and its quite common for the sheet to ‘wiggle' a little bit as it feeds in and goes through the rollers so finding some of the lines don't always meet up perfectly is quite common. They are usually close enough.
When you have sheet 2 in place, cut off the left margin on sheet 3, stick that in place and repeat for 4 and 5 and the top row is ready.
Now start with sheet 6, cut off the top and match it to sheet 1. Cut the left and top margins from sheet 7 and attach it to sheets 2 and 6. Now you get the idea. Keep adding the sheets one at a time, re-positioning a little where you need to.
Once all the sheets are stuck, you can go over with some tape for a more permanent finish.
Time savings tips
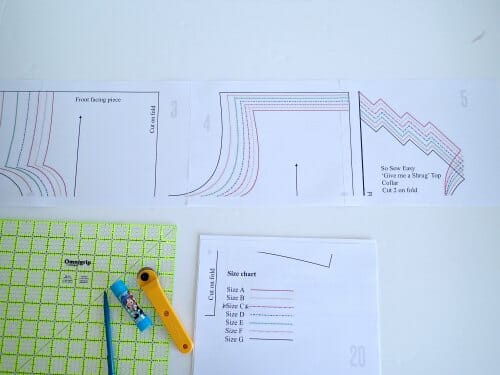
If you have one of these, or similar, you can stack your sheets together and cut off all the margins much quicker, cutting several at a time.
Or, save the old blades from your rotary cutter and use that with a ruler to quickly strip off all those margins.
Tracing or cutting your pattern
From now on, things should be familiar and work the same as a regular tissue paper pattern. Either trace your pattern over the lines for your size, or cut it out to use.
I hope this has been useful and if you've been mystified or worried about using PDF patterns, that now you'll be willing to give them a try.
Do you have any tips and tricks you want to add that might make it easier for other tackling this for the first time?


I downloaded the small backpack pattern. I am now left with a heap of bits that don’t seem to fit together. I cannot see any instructions on how to do this. Can you please help
Where did you download the backpack from? YOu can find the instructions right here where you left the comment or in the newsletter, I sent with the link to the page in this blog. Use the button on the left of the screen that says Print Friendly, and you can have the instructions without the ads. I hope that helps.
Hi, the Tina Summer Top pattern doesn’t seem to be properly calibrated; the sheets won’t come together as described above. The pattern lines just don’t match. I’ve printed them at actual size on 81/2 x 11 sheets, and the test square is accurate, but the setup is all wonky. I have to abut the pages with no overlap for the lines to match, but the pattern lines are missing from every page margin because printers don’t print to the paper edge. I have to work with a ruler and French curve to complete the pattern. Advice?
Don’t know how long ago this was posted, but when I printed my test sheet today that happened as well, UNTIL I changed Page Orientation from Landscape printing to Auto.
How do I print the instructions to the walking shorts? I have the pdf for the pattern but I dont see where or how to print how to sew the pattern together?
Hi there! I’m trying to make the sports bra and have all the printouts of the pattern pieces, but a couple of them are eluding me. There is no page that shows what the pieces look like once assembled, so I’m really struggling. I understand about the little gray things that should form circles or half circles, but I’m still not getting this right. Is there a page that shows the assembled pieces and I just didn’t get that page?
I cannot fit the pieces together for the simple long-sleeved T-shirt – piece 5 is out of whack! Help! I know I can just draft the rest of the sleeve, but why is this happening? The diagram that shows how the pieces fit together is missing piece 5 (the integral piece) because of the SoSewEasy logo over it. What to do?
Sorry to be a bother, but I am having trouble lining up the pattern pieces for the Office Hours Blouse. I have printed them off at “actual size” on A4 paper, and have confirmed that the test square is printing at exactly two inches square. So far, so good.
I now have 20 pattern pages showing the heavy pattern lines for the different sizes, and a lighter “frame” line rectangle on each page with a grey square at each corner. The Pattern Lines cross the lighter “frame rectangle” lines and come close to the edge of the paper.
My question is this: is part of the pattern line duplicated across neighbouring pages, so some of the pattern line should be trimmed away, or should the pattern lines join up exactly where they stop on one sheet and begin on the next sheet? If so, my trimmings should never have pattern lines on them. I am asking whether there is any overlap across neighbouring sheets. I do not understand the purpose/significance of the rectangular “frame” on each sheet. I guess it’s supposed to be helping me, but I don’t understand how.
Should the grey squares be superimposed on top of one another, for example the right hand squares of sheet 1 would sit on top of the left hand squares of sheet 2, or do they go side by side? That way, when I had assembled two rows of printing, I would have 4 grey squares forming a bigger grey square.
I am sorry to be having trouble with this, but if I get it wrong and trim away the wrong part of the pattern, it will significantly alter the size and shape of the pieces to cut out.
I hope I have explained my problem clearly.
Thank you so much for the work you do. As a newcomer to sewing, you are making it less daunting to approach what looks quite scary from the outside! I really would like to become a confident member of the sewing world.
Hi Julia, the grey square measure one square inch. You need to tape the pages by row first (5 pages at a time) (1-5) (6-10)(11–15)(16-20). Then tape them together from top to bottom that way everything lines up and there is no need to trim any pages. Hope that helps, if not [ls send me an email mayra@so-sew-easy.com Kind Regards,
Julia, I am having exactly the same problem with the Tina Summer Top pattern. I am using the US paper size, 8 1/2 x 11, and the sheets just don’t match, although the test square is accurate. The grey/black lines are missing or don’t line up correctly and the grey squares don’t help no matter how I try to overlap or align them. Its seems the PDF is not properly calibrated for printing. I think i found a work-around: abut the pages, i.e. align the sheets along the outer edges, without any overlap, and then tape together. But I’ll have to true the pattern lines, and I am still not sure my approach correct.
My granddaughter ordered the Wide Leg Pants and her mom printed the file. This is my first time with this type of pattern, but have been a sewer for many years. I believe I can get the pattern together, but there are no instructions that printed (i.e. rows, or what to sew first, etc.). Can you help me? I like to have all pieces, instructions, etc. before I start. I’m thinking I need to have her measure her waist for sure and wondering how wide of elastic is recommended. Just a lot of questions at this point. Thank you. Donna
HI Donna here are the instructions https://so-sew-easy.com/wide-leg-pants-pattern-palazzo-pants/
Here’s a tip for fellow Europeans when printing from a phone: often phones won’t let you select “true to size” or something like that, it just stretches out to fill the paper. However! If you select “landscape” and then paper format “letter”, it will print true to size even on A4 paper.
I just downloaded the wide legged pant. It does not have pieces of pie, it has squares and rectangles. Are they supposed to touch or overlap? The
Do your patterns include a seam allowance and we cut it out right in the lines, or must we add a seam allowance before cutting?
Depends on the pattern so you must read the instructions before you print the pattern.
Flag patterns are free I’m just trying to learn I have been wanting to learn for a long time but no one would teach me now I’m looking for classes and I just love your patterns looking forward to the day when I’m good enough to start buying from you thanks for the newsletters and free patterns
I’ve just purchased (yes, put $ in, not just the free version) and printed the track pants pattern. And though I’ve printed and used many pdf pattern files, this one is the hardest to figure out. Sewing process should be easy enough, pretty straight forward. But you mention doing crotch measurements and compare with the pattern. I see waist, hip, length. Made sure of latest adobe version, settings as you suggested for print. But the pages show none of the notations as the pattern pieces show. No numbers, some have just the smallest lines. I’d hate to have dropped the pattern coming off of the printer. As it looks like just what I’ve been looking for in a pattern lately, I hope it will come together. Thanks for all of the patterns you’ve posted in the past.
HI Jolan, thank you for your donation and for letting me know. Please tape in rows 1-6, 7 to 12, 13 to 18, 19 to 24. Then stack rows on top of each other using the thinnest line to measure a distance of 1″, the grey boxes are also 1 square inch. Hope that helps, let me know if you are still having trouble.
[…] this is your first time here and you need help to download and to assemble a pattern please read this article. Open the pattern file using Adobe Reader and print on actual […]
[…] is your first time here and you need help to download and to assemble a pattern please read this article. Open the pattern file using Adobe Reader and print on actual […]
[…] is your first time here and you need help to download and to assemble a pattern please read this article. Open the pattern file using Adobe Reader and print on actual […]
[…] For help downloading and printing PDF patterns, please CLICK HERE. […]
Do you ever include the pattern so you can have it printed on large sheets at a print shop?
I will on paid patterns only.
Hi! I’m loving your site. I recently printed the pattern for the culottes and I cut out the pattern and the pieces of material don’t look right. Was I supposed to cut the pocket of the leg on the the right hand side?
Yes you are supposed to trace your pockets. I did not added the pockets because it take so many pages of paper. As it is, it is a huge amount don’t you think?
I printed the pattern but having a hard time connecting it makes no sense to me. what am I doing wrong?
What pattern are you talking about I have close to 400 on this site.
Hi! Can you please tell me the diameter of the grey pie? It would help me a lot! Thanks
1″ please use Adobe Reader only
I have printed many patterns successfully BUT recently I went to reprint a bag pattern I have used before – printed on the same printer. The scale square measures correctly but some of the pattern edge is missing. I have printed at actual size and at 100% – same issue. I have even tried on 2 other printers with the same edge missing issue. Any suggestions?
Hi Jan, This is most unusual. Take a look at the page loader sometimes the pages move and the patter prints crooked.
Hi Jan
Something similar happened to me and it was because the printer setting was on PORTRAIT instead of LANDSCAPE. Take a look and check and then just print off one page to test.
Glynis
Unfortunately my computer won’t allow me to get through if I click the links you give so I am unable to access the actual pattern. Is there another way of getting it please – the small backpack I have tried today.
Hi Kate, sad to say It is the only way for know.
I love all your help. Heres a question. If test square is perfect but some of pattern lines in a pattern piece dont line up unless you for example leave a wider gap between pages or overlap more is that to be accepted sometimes in a pdf pattern?
yes, it is possible that you are using a larger or smaller size of paper than the one used in the PDF. Most patterns have a marking uniting the pages, this is to help you align the pieces and not change the proportions of the pattern.