


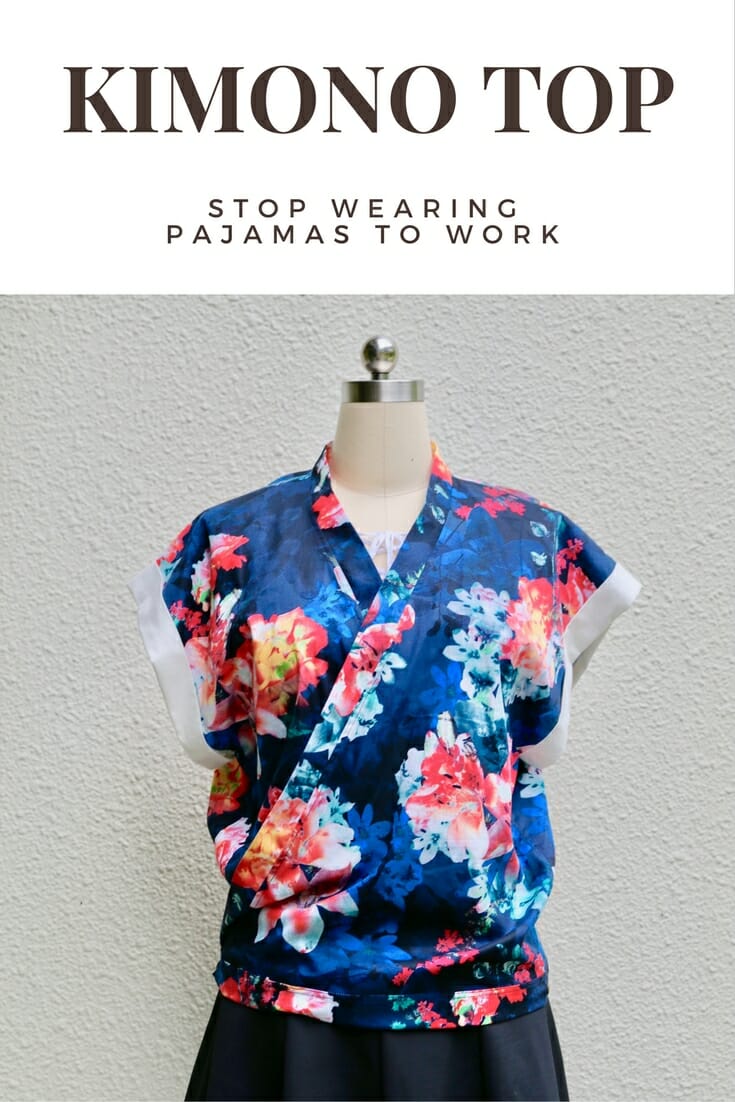
About a year ago I began to see a disturbing trend on the streets. Some of the young ladies were walking around in what to me resembled pajamas. Now, I think when it comes to clothing, I am pretty opened minded. If I see anyone at the 7/11 buying milk wearing pajamas, I think he or she really hates coffee without milk which is totally understandable. However, walking under a scorching sun in the middle of a busy city street in what appears to be pajamas is a little odd, don't you agree? I thought one of the “kids” I saw like this probably felt they were young and cool and were trying to be noticed. But, for the rest of the mortals like me, well, pajamas just won't cut it to go anywhere other than to bed.
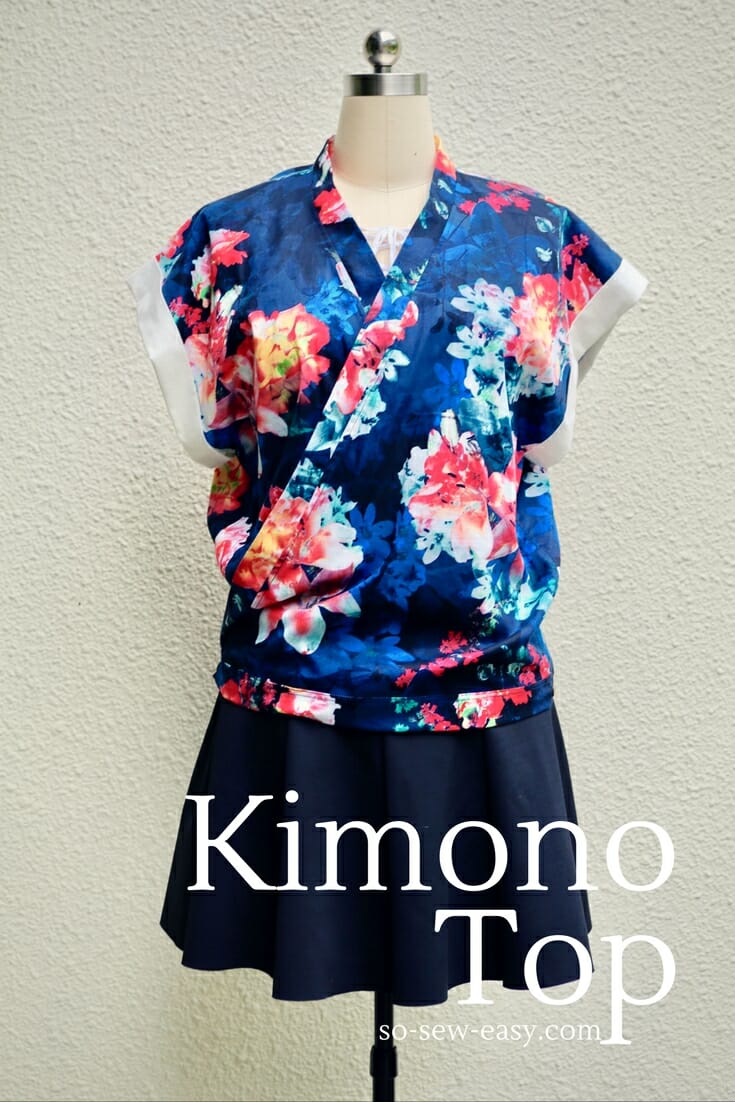
So I set about to come up with something much, much better. I do love comfortable wearing clothing and I am happy to share an easy kimono top project for many occasions that won't even require a serger. A kimono design is functional and stylish. It has all the comfortable and loose-fitting features of pajamas while looking elegant and professional enough for business or pleasure.

The kimono top is the perfect alternative for a casual Friday at the office. It is super easy to make and a great holiday gift. You can also wear it over a swimsuit, a turtleneck, or a pretty tank top to add a layer to your outfit. Also makes a good breastfeeding or maternity top.
Key Features:
- Versatile uses, both professional and casual
- Perfect beginner to intermediate project
- Can be made in many different fabrics
Materials:
- Main fabric (1 1/2 yards to 2 yards depending on size, 60″ wide)
- Contrasting fabric for sleeves and optional belt (1/2 yard)
- Thread
- Thinnest fusible interfacing
- Pattern tracing paper
- Two snaps
Tools
- Sewing machine
- Scissors
- FriXion pen or pencil
Pattern Download
You can find the complete pattern for this kimono top on our Payhip webstore where we distribute our patterns.
Our patterns are still free, but now you now have the option of making a small contribution if you like our work! We'd really appreciate it and it will help is keep going with new and fun designs like this. Even a dollar or two really goes a long way.
Thanks so much in advance for helping us out. You can use any credit card and you don't need a Paypal account, although you can use one if you have one.
Download the FREE Pattern HERE
Recommended Fabrics
Pattern layout
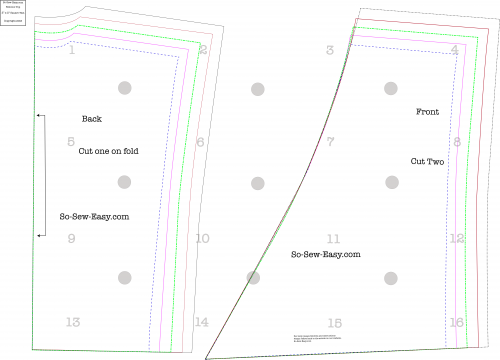
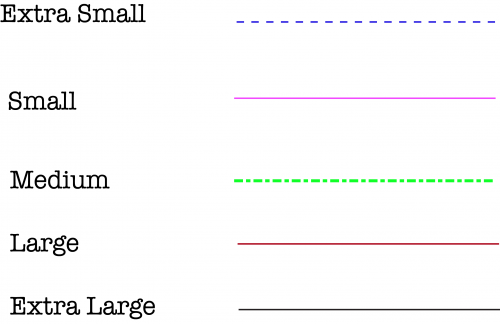
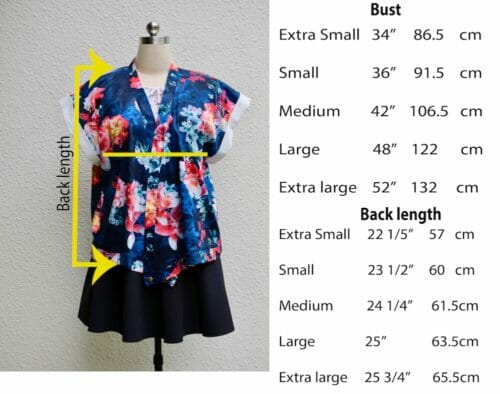
Pattern Sizes
Finished Garment Measurements
Step One: Preparing the material and supplies
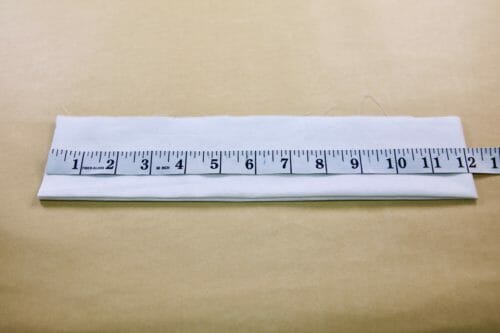
There is not much to prepare other than cutting the pattern to the size you require. Seam allowance is included and it is 5/8″.
Step Two: Sewing the shoulders
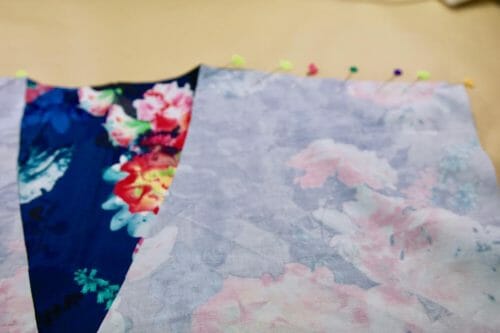
Pin the shoulders and sew the shoulder at 5/8″.
Pin into place.
Iron the seam allowance open. Fold each side of the seam allowance under and iron.
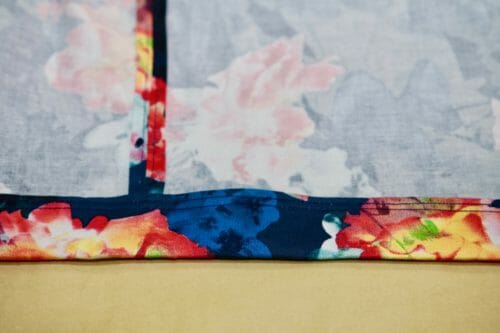
This is how the kimono top side stitches will look.
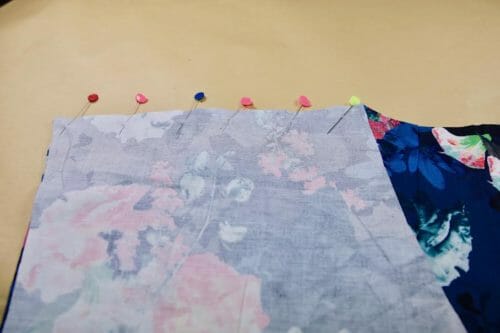
Step Three: tips for fitting your kimono top and sewing the sides.
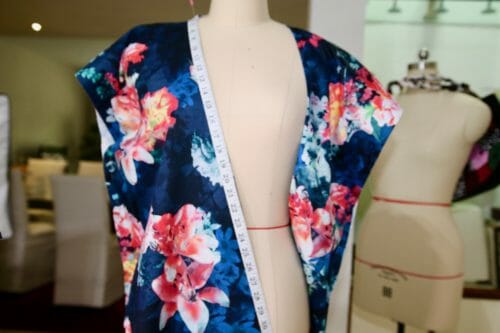
Find a full-length mirror and place the kimono top over your shoulders. Find the smallest part of your torso. This is where the belt would go if you chose to use one.
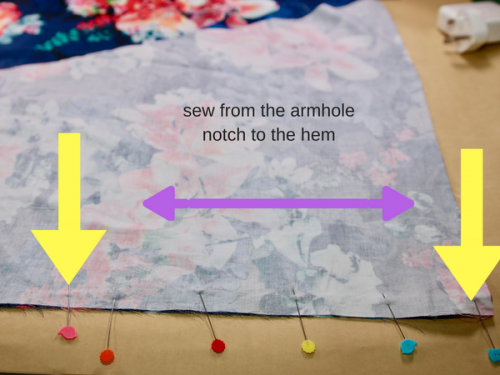
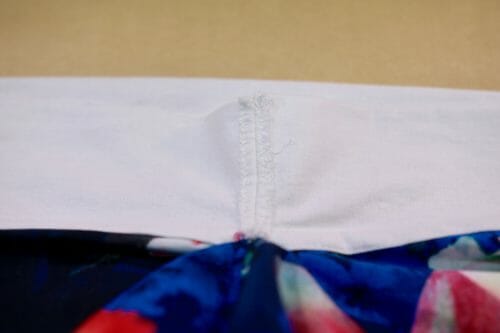
We are not all built the same way. I have a short torso and you are probably tall. So my waist is not where yours is. The best way to make sure the top is going to fit you well is to create a waistline even if you think you do not have one. Find where you would normally wear a belt and mark it with a pin. Take the top to the sewing machine and sew from that pin to the hem at 5/8″.
If you are a true hourglass figure, meaning your chest and hips are about the same and your waist is considerably smaller than those measurements, then sew from notch provided on the pattern to the hem.
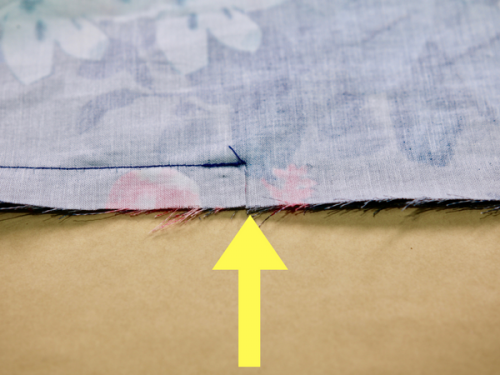
Cut the seam allowance straight to the stitching line but not through it.
Fold each seam allowance just like you did on the shoulder seam.

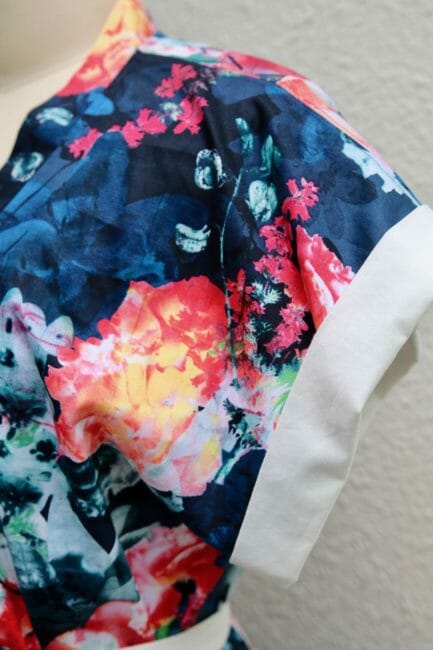
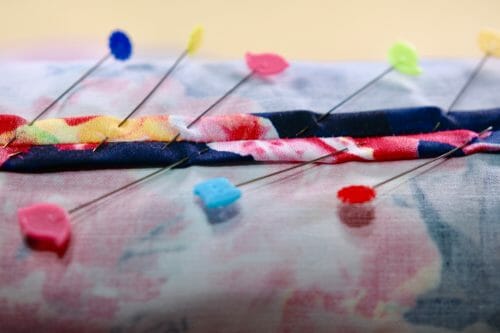
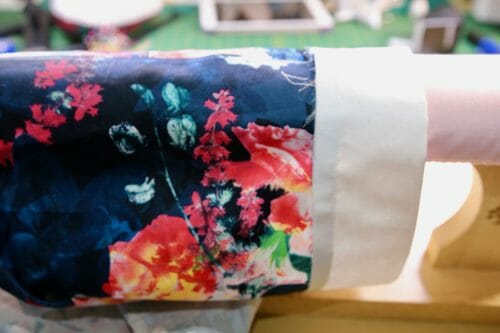
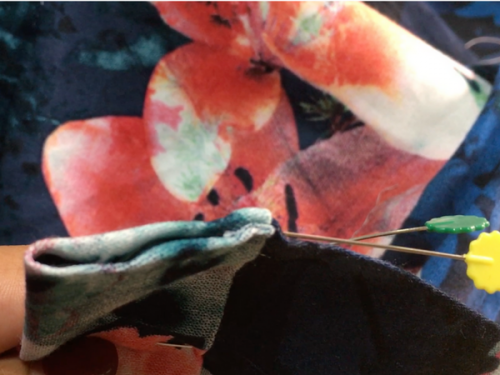
Step Four: sewing the armbands
Measure where the side stitching ends and the armhole begins to the shoulder.
Cut a rectangle the same size as the measurement above plus 1/4″ by 5 1/4″ wide.
Fold this rectangle right side out and pin to the wrong side of the top.
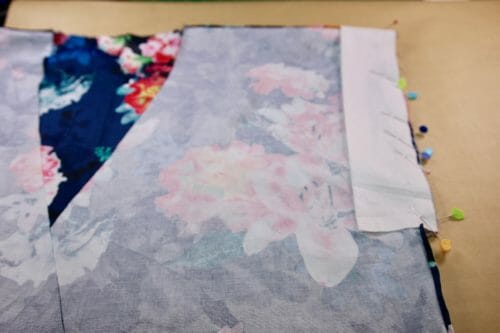
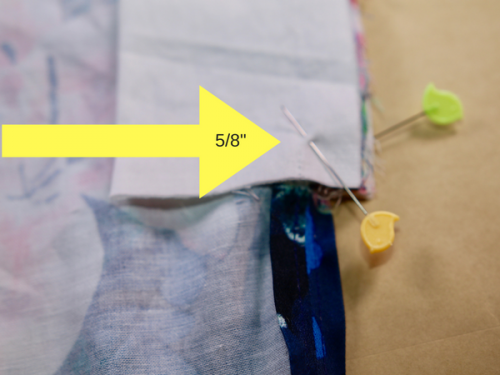
Repeat the process with the other side of the top. Sew at 5/8″.
Sew the armhole binding at 5/8″.
Cut the first two layers of the seam allowance closest to the main fabric.
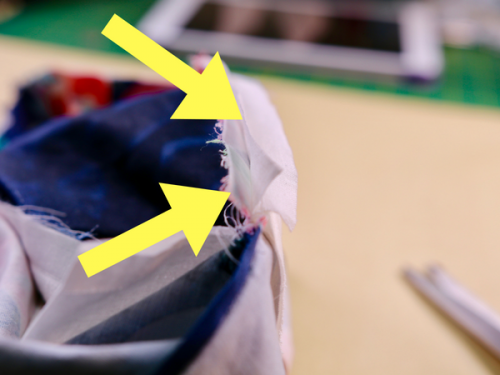
Fold back the first layer of fabric and cut the other two.
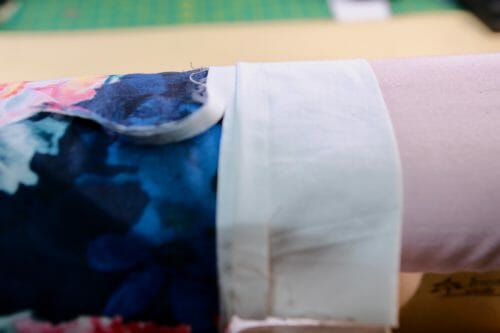
Stitch close to the edge.
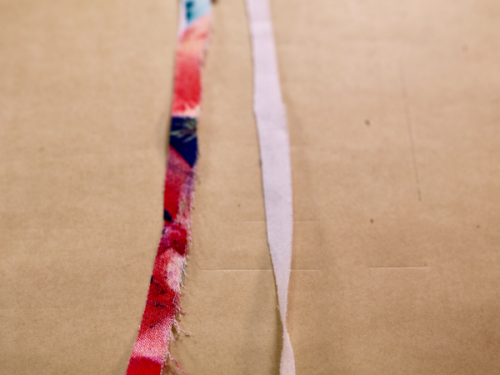
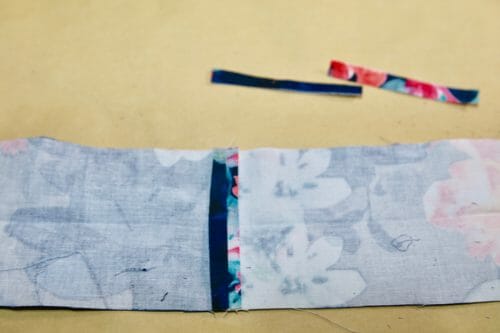
This is what your offcuts should look like.
Fold and iron the other side of the seam allowance.
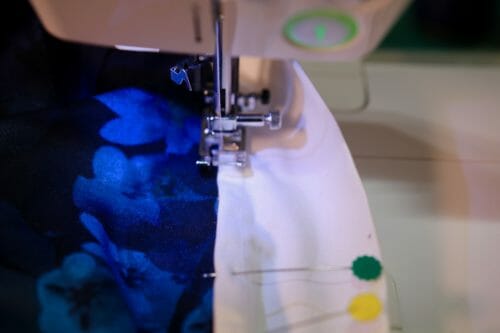
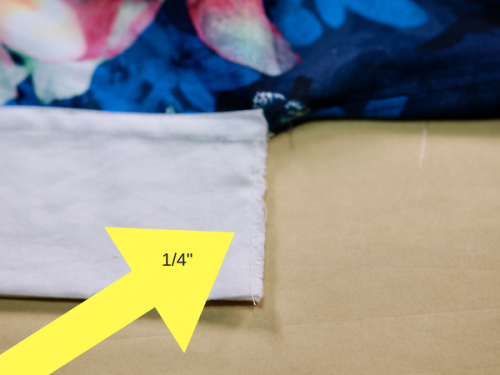
Sew the bottom of the sleeve at 1/4″ and iron the seam open.
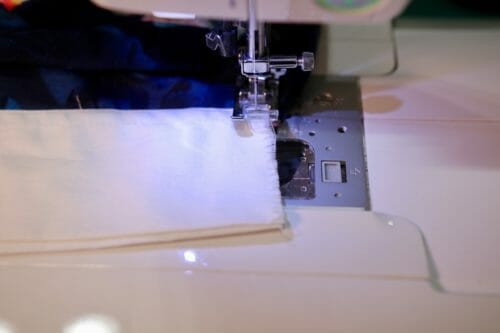
Stitch each side to keep the seam flat.
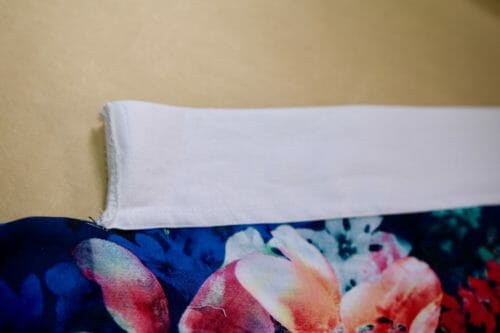
Fold the sleeve up and repeat on the other side.
Step Five: making the kimono top neckline

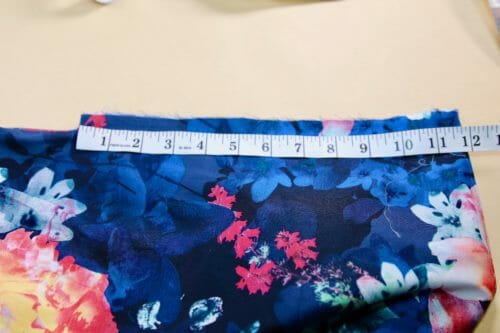
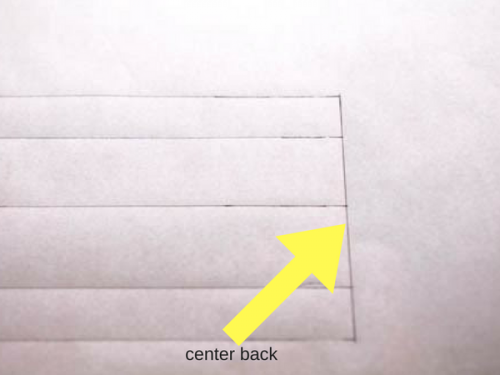
Measure from the center back at the neckline, to the end of the front side.
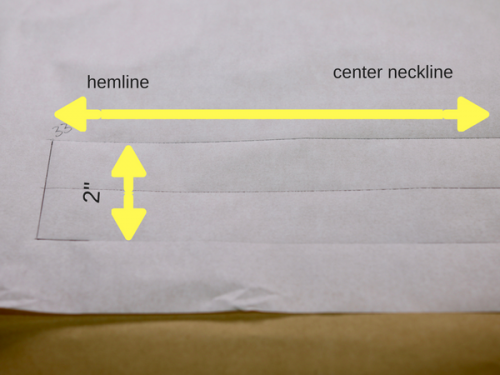
Use your pattern tracing paper and trace a rectangle that is the length of the measurement you just took by 2″ wide, in my case is 33″ in length and 2″ wide.
Add the 5/8″ seam allowance on each side. Draw the seam allowance at the end of the binding as well shown here as a vertical line.
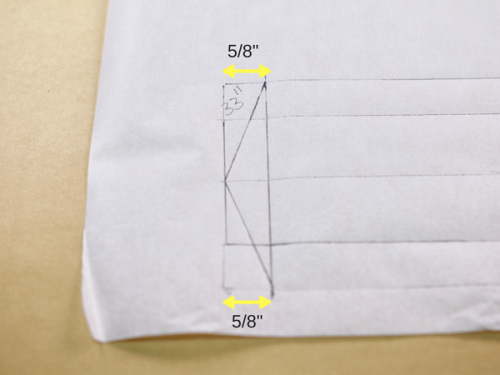
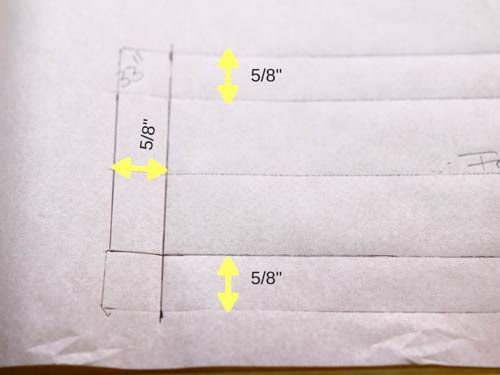
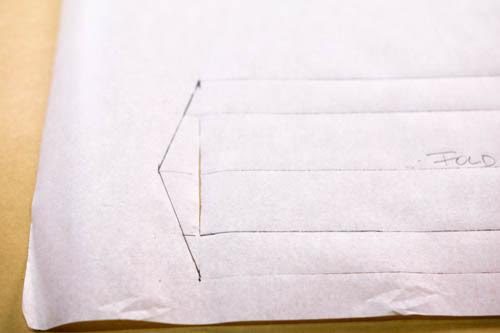
Trace the cutting line from the center of the binding to the edge as shown in the photo creating a triangle at the end of the neck binding.
Erase the unnecessary lines and you are left with a triangle at the end that will match the shape of the front of the kimono top. Mark the fold line, which is the middle of the neck binding. This line will also act as the grain line. Cut on a bias.
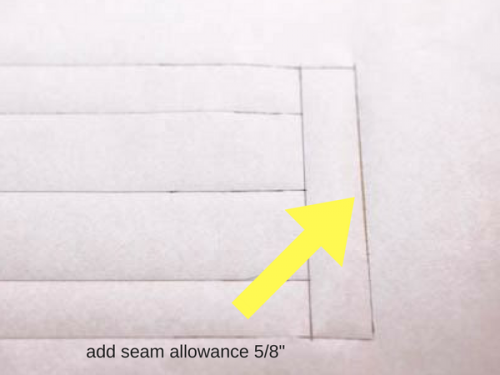
At the end of this neck binding add 5/8″ for the seam allowance. Label your pattern “Cut two” and remember to cut two of this neck binding.
Congratulations you have drafted your first collar, well at least on this site!
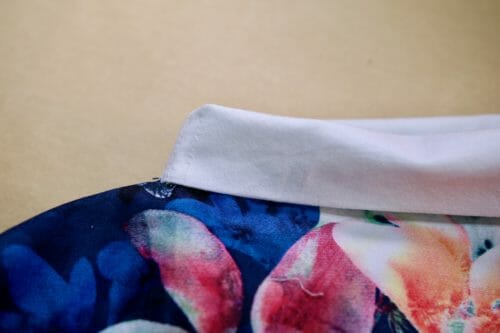
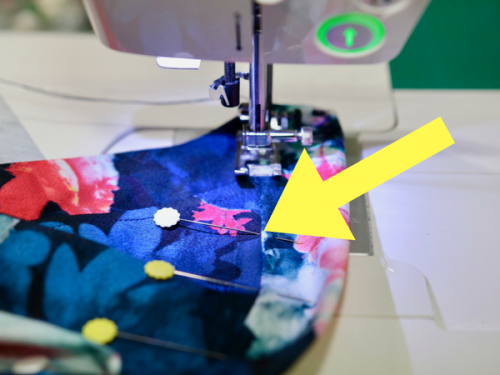
Step six: hemming the kimono top with a binding
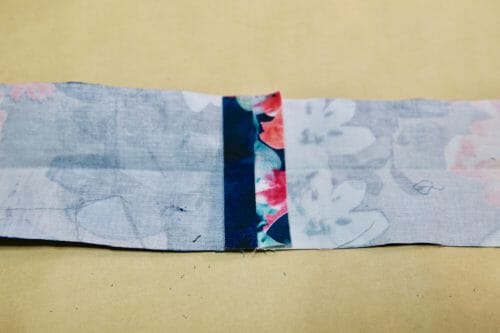
Measure the bottom of the top. Make a band of that length plus 1″ by 3 1/2″ wide. Mine is 62″ so I am going to have to cut two strips and join them at the back.
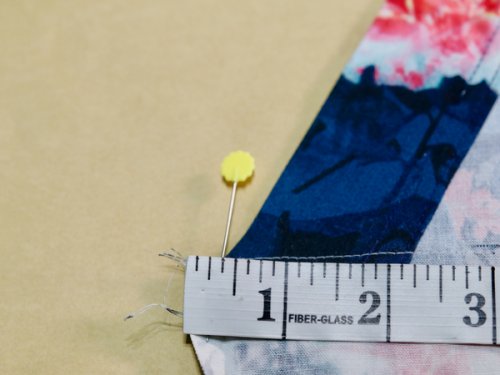
Iron the seams open and cut half of the seam allowance. Align the center of the band with the center back of the top. Fold what is now a band in half. This is basically just a big bias tape. Pin the band 3/8″ from the corner of the top. If your band is longer than 3/8″ this is fine. Just do not let it go beyond 5/8″ as it will be hard to fold.
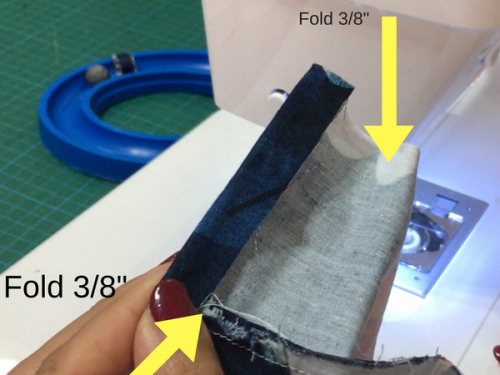
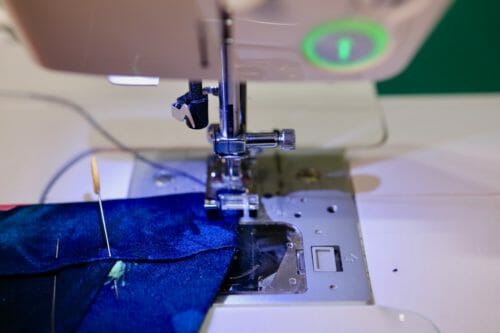
Fold the end of neckband 3/8′. Fold the neck binding in half.
Topstitch all around the neck binding, starting on one end of the collar and finishing on the other end of the collar.
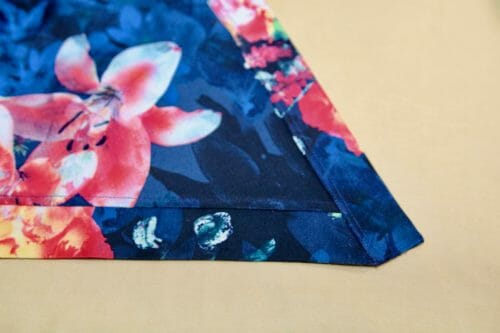
I have added a double stitching line as a decorative detail. You can either use a double needle or just repeat the step. Starting at the corner of the hem, sew to the next corner and pivot your work. Inside view. I have added another stitching line to simulate a decorative detail.
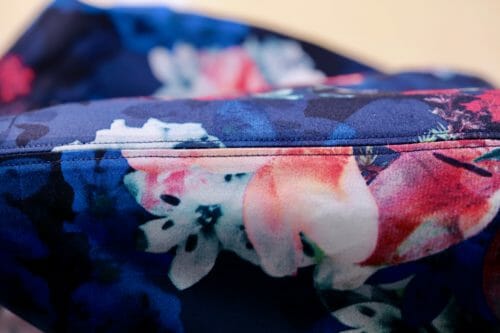
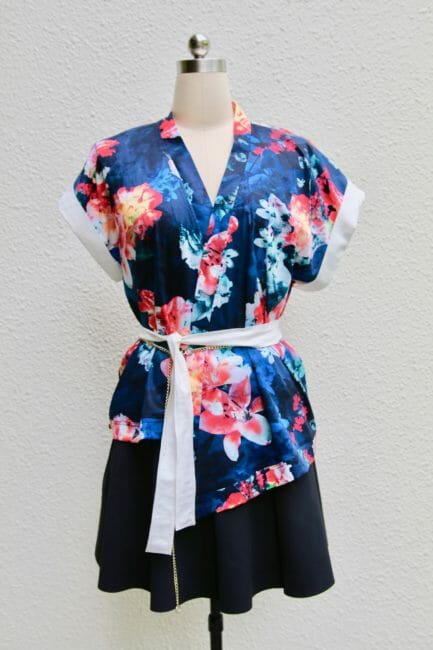
If you want to have exactly the exact look in the feature image, I recommend that you add snaps to the sides of the top so that the garment stays closed without a belt. You can measure yourself where you want to put these snaps depending on how tight you want the fit.
Alternatively, you can just use a belt to keep the kimono top closed. In the picture below, cut a strap of fabric the color of the armbands the length of your waist plus 28 to 30″ by 5″. Sew at 5/8″ leaving one end open to turn the belt inside out. Close the belt using a double stitch to match the rest of the blouse finish.
I hope you found this project easy to make. I really love the print since it's youthful and makes me feel young.
This top is a great overlayer. You can wear it with a pencil skirt or skinny jeans, to the movies, a picnic or over your swimsuit. This also makes a great breastfeeding or maternity top!
Leave your comments below. I'd love to hear what you think. Until next time!


how do I add longer sleeves?
I think it will change the proportions of the top and may not look right. However if you do decide to it the white trim in the picture is the part you need to increase to the length you require. If you can wait a couple of weeks, I will be sharing a long version with sleeves that end above the elbow.
I really like this idea. But i would have to have a larger size , im a 3x so how would i make it to fit me
Nancy Zieman has a pattern slide technique that may work well to size this pattern up. She calls them pivot and slide techniques. Check her site for the technique. I do this with many patterns as I have your same problem!
Beautiful fabric and pattern, thanks!
Beautiful design and fabric! You may consider naming the pattern something else, as many have done recently. I didn’t know a year ago what I do now about how sacred an item kimonos are.
Along with so many of your other beautiful patterns this one will also go the lust Thank you…
P s. Would you anytime in the future be doing a tutorial class on how to make men short sleeved shirt ive been wanting to make one for my hubby but i cant understand the darn patterns im more a visual learner…please…ill pay for the class…thank you…
Your instructions say, “Take the top to the sewing machine and sew from that pin to the hem at 5/8″. Yet the picture says to “sew from the armhole notch to the hem”. Which is correct?
Both please read the whole paragraph, the pin is to mark the waist, which changes from people to people. Mine is higher than most because I have a very short torso.
Perfect for nursing moms toooooo
I love this top but I wish you had a single pdf file that could be downloaded rather than having to go through each of these pages to get the instructions. The printer friendly view only does one page at a time and when I went to page 2 it showed the page 1 info again. I had to print each out using my Chrome “Print” button and then scan to have a PDF. I downloaded the pattern, but no instructions are included with that.
Very cute and very easy! Thanks
Thank you for this pattern. Looks very cute.
Dear Mary,
I’ve wanted to make this top for a while now. I’ve lost some weigth and I’m struggeling to find the right size. Can you help me? You’ve posted the measurements of the mannequin before, what size did you make it?
Thank you
I make size medium. I would recommend to leave a 4” ease so the top drapes well across your chest.
I cannot thank you enough for ALL of your lovely free patterns and instructions. Our finances are very tight so I cannot afford to buy the expensive patterns. You are an angel! <3
Enjoy Mary, it is my pleasure.
Bonjour,
je ne trouve pas les métrages nécessaires pour chaque taille de kimono. Serait-il possible de les avoir ?
Merci
Bonjour, Isabelle,
La quantité dépend de la largeur de votre tissu. Le mieux que vous pouvez faire est d’imprimer votre taille et de calculer combien de tissu vous avez besoin. Merci…
Hi Myra,
I’m preparing to cut the pieces for this project and I’m trying to figure out if I have enough fabric in a remnant/end of roll piece I have.
A few questions:
Did you cut a different strip of fabric for the waist hem as it looks like in the cover picture?
Is the collar strip cut on the grain or cross the grain (as in bias binding)?
Which way should the grain be on the front bodice pieces? (As it’s not marked on the pattern pieces. I’m assuming the bottom hem?)
Thanks!
Hi Florence, great questions thank you, I overlooked both issues. Frist the neck binging should be cut on a bias. Next, the grain line should run straight from the shoulder to the hem. I used the same fabric for the waist and cut a band the instructions are on step six. Anything else you need, please do not hesitate to ask, load a picture when you are done, Kind Regards,
Hi Mayra,
I have just downloaded the PDF file for this kimono top. I am a beginner in this. I can’t seem to find the video link in the 4 pages of web instructions. Can I trouble you to post the link in your reply?
Thanks !
Hi Koh, unfortunately, there’s no video for this one yet. Give it a try with the instructions on the site. It’s a relatively easy project. Good luck and happy sewing!
Hi Myra, i hhave just made y our boat neck tee.and love it. I now want to make this Mimono top but can not find any reference to tell me the size range. Where would i find the layout chart and instructions to sew it please. I made the high low t shirt and over winter it was my go to pattern. Excellent but i never found any instructions for that either. Seems like there is domething basic I’m not getting!!
Cheers, Lois
Hi Lois, always revert back to the blog, it is where the instructions are for free. Just do a search with the name of the pattern and you will be able to follow along. Normally my posts are long so there will be 3 to 4 pages. The info you are looking for is on the second page, here is the link:https://so-sew-easy.com/kimono-top-alternative/
Your kimono top looks so comfortable, and stylish too. I’ve featured it today, Mayra.
Hi Pam, thanks so much. Hope you’re well. Kind regards and happy sewing!
I haven’t ever sewn and don’t own a machine but seeing your patterns, I downloaded 2 of them to try sewing with a friend. I don’t know if I will like it but who knows? Thank you for giving me a chance to try it before investing in expensive material.
Hi Helen, just wondering how you went with the projects? Did you made them? Let me know if there is anything I can do for you.
This is Great! I just bought the fabric to make this for my wife – but do I need to cut it larger for the seams, or is this included in the pattern?
William David
Hi William, the seam allowance is included in the pattern. Enjoy! Your wife is a lucky girl!
I’m a little confused about the sewing the sleeves onto the top. In the end, is the piece of white fabric folded in half or fourths?
Hi Jessica the white rectangle is folded in half. When you are done sewing you fold it back up again.
Hi Mayra, Can I make the sleeve like 8-9 inches instead of 12 inches as per your instruction? With a 12 inch sleeve I will need to wear something inside.
HI, Maya, it’s me again. I’m at the point where I need to bind the neckline and the hem, but I am confused about your instructions. I get mixed up about when you are talking about the hem band and when you mean the neckline band.
I have cut out both the neckline and hem bands. But now I don’t understand when you say “align the center of the band with the center seam of the top”. Which band is this, neckline or hem? There isn’t a center seam of my top since the back was cut on the fold. I’m assuming you mean to align the center seam of the band (I had to piece two pieces together to get my desired length) with the center of the back of the top.
Is the hem band sewn on at this point? Is it sewn on folded, or is just one edge sewn on and the other side later folded over and sewn over the seam line?
When you say “pin the band 3/8″ from the corner of the top”, I think you are talking about where the hem and front opening meet, but I’m not sure.
Maybe I would understand better if I really knew if the bottom hem or the neckline band were done first.
I’m not a new seamstress, but I am really confused by your instructions.
I am assuming you cut 2 pieces for the neck band. After sewing the pieces together, you need to align the center seam of the band with the center of the neck line in the back of the blouse. The same for the hem. Do attach then fold. Let you know when the video is up.
hi, I am doing this project now and I am confused as you were. I can see you commented this project 5 years ago but you may able to help me 🙂 So did you add the neck band first or the hem at the bottom? I can not find the answer for this and the pictures were taken so close, the instruction is not clear and I am stuck.
I am confused on the sewing of the sleeve where the white cloth is attached. Could you explain in more detail or perhaps in a video? Or you can direct me to a video in YouTube teaching how to sew the sleeve like how you did it? Thanks.
HI Lai, I will finish editing the video, will send in the newsletter the link to it. Thanks!
May I have the link to the video, please? Would love to make one of these tops for myself!
Hi Christine, unfortunately, I haven’t made a video for this one yet. On my list but I have a few others to do first. Please stay tuned.
Hi. Thank you for the pattern. I don’t see where the interfacing goes. The entire top, or just the band? I am making this as a gift for my daughter.
I never used interfacing. I find there is no need.
thank you so much for this wonderful pattern. I’ll hope to make it soonest!!!!
I love the top-do you have a picture of someone wearing it?
Not at the moment, I have donated the top to be used in a pageant, when the pictures are available, I will update the article. However, my mannequin is Size 12, 39″ (99cm) 29″(74cm) and 39(99cm).
Thank you for this nice pattern. However, I cannot find a link to the instructions. The blog says, next page, but there is no next page. Help!
Sorry about that. I did find the link for directions. Thanks again.
Glad you found them Marcy, enjoy!
I cannot find the instructions, please can you help
Hi They are on page 2, under the Pinterest button.
Hello,
thanks for sharing the pattern. It looks great. I would love to sew this 🙂
I printed the pattern, but I can`t find a clue about which colour is which size. Could you help me, please?
Nicole
HI Nicole, thank you for pointing that out, I did forgot to include the sizes, they are in the article right after pattern layout. Please Enjoy! Kind regards,
Mayra
Hi Mayra, thanks for your Response. But I must be blind. I can`t find the sizes in the article. There is one link for an additonal page,but this doesn`t work on my Computer.
Could you copy the sizes into the thread? (Sorry to cause Trouble).
Best regards
Nicole
It looks great and I have downloaded the pattern with intention of making it, but we are about to move house! So, like many things in my sewing room will go in a box and on the back burner for a while; only hope after move is over and an over full sewing room is reorganised that my mojo is less chaotic and I can start to sew and create my head full of ideas. Thank you so much for sharing?
I think onsies should be for babies, pj’s for bedroom or relaxing at home.
Wearing Day clothes to be in public isn’t dressing to the 9’s it is very possible to dress in casual clothes that don’t look as though you tumbled out of bed.
Lovely Kimono top and in the right fabrics great as day or night clothes
i LOVE this and have enjoyed ALL the patterns you have presented. Thank You Thank you for your willingness to share and your amazing talents.
Pj’s have been a thing since the 90’s. Lol! I think it’s here to stay. When your options are uncomfortable skinny jeans or jammies with fun prints, well, fun prints win out every time. There is actually pride in that! It’s just a generational difference. People under 45 don’t generally wear wool slacks or a top other than a t-shirt. We even wear jeans to work! This top is cute. I might make it for work. but unless there is a work dress code, the majority of us will stick to our comfort-for-errands look. No need to belittle us for not dressing to the 9’s to mage a run to the store. We find clothing to have different importance than you. You wear clothes as a reflection of your beliefs and character. We do not. We prefer to rely on our actions overall to present ourselves to the world. When you belittle us for something we see as superficial and meaningless, like the clothes we wear, and it is not a question of modesty (which is a valid discussion), you are introducing a sharper divide between the generations. In other words, we see you as old and irrelevant.
This is so pretty! Thanks a lot! Guess what? I’m actually going to use this pattern to make actual pajama tops and partner them with pajama shorts. I have 5 yards of fine linen just waiting for this pattern, and I’m excited to start sewing them. I promise not to wear the pajamas outside my bedroom 🙂 Thanks again Mayra and Deby!
LOL! I think you will be safe wearing them outside! Fine linen that will look fantastic!
Thank you for the free kimono top pattern. The people I see wearing pajamas unfortunately would be too lazy to make this. We have many people in my area doing this and it is not for style but laziness. Looks like they crawled out of bed and decided to go shopping. I even see kids out with in pajamas as if mom was too lazy to get them dressed. I do not mean babies. To top it off, they even wear slippers out…HOW LAZY IS THAT!
I think it is sad to see all this & then kids growing up to do the same because they don’t know any better. I even see guys doing it here. Not cool!
So many people have lost sense of pride and I am glad to see all the great things you do to keep in style.
Thank you so much for sharing all these pretty things to make.
Good idea, I will try it. Thank you.
A versatile top for so many times. My first Kimono Top will be made in a light sweater knit to be used as a vest on these cool fall days.
Nice tip. Can’t agree with you more about these people wearing pajamas on the street. I don’t get it. I once saw a woman in the grocery store with her kids and everyone of them (including Mom) in pajamas. Was raised to believe that pajamas were for lounging in the evening or bed.
I agree, leave the PJ’s at home-have some pride.
Never mind. I just read all the way through the post and now see the info regarding snap detail. Thanks for the great pattern! My hubby is building me a sewing corner today and I can’t wait to add this to my list of projects.
Just curious. The original picture looks like the blouse is banded at the bottom and one of the last pictures with the white belt looks like it is open. Are the directions for either option? Thanks!
Hi Kristie, is the same blouse, you can wear it three different ways. All instructions on the article.
Kind Regards,
Mayra
[…] Kimono Top: an alternative to wearing pajamas to work… – 1 freebie(s)? […]
I love it!!! Thank you!