


Welcome to Episode 2 in the How to Sew A Skirt Sew-along series. The subjects for today are: Drafting your custom fit pattern, and all about ease and seam allowances.
Drafting your custom fit skirt pattern
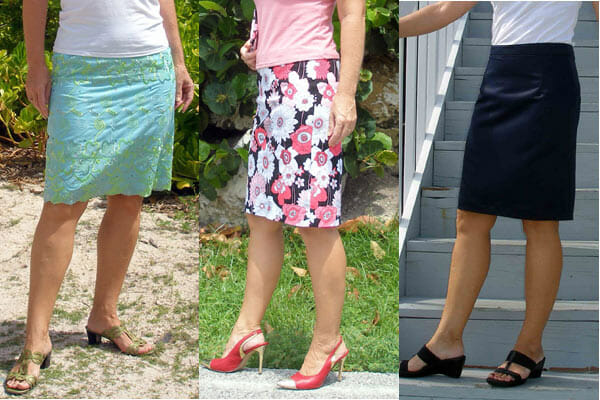
I admit it – I'm a funny shape. No hourglass figure for me – I'm a total rectangle. And this means I can't get ready-to-wear skirts to fit me properly. They are either far too loose in the hip if they fit at my waist, or fit at the hip and are far too big in the waist. Many of us don't conform to the standard body shape for regular clothing and patterns. Especially as we get older, perhaps a little broader, and our body shape and proportion changes.

So in this part of the Sew A Skirt, we will look at making your very own skirt pattern that is going to fit to your own set of measurements, and your own body shape. By following the simple step by step instructions, you can end us with a basic skirt pattern that you can use time and time again to quickly make up a skirt that you know is going to fit you properly without any alterations.
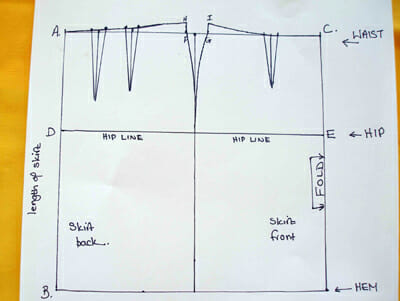
Drafting the Skirt Pattern
I already have a step by step photo tutorial on how to draft a custom fit skirt pattern, so I'm not going to repeat all that here. Just point you in the direction of the earlier post – Draft Your Own Pencil Skirt Sloper.
This post includes photos and directions on how and where to measure yourself, and how to make up the pattern that we are going to use in this series.
Recommendations for success:
- You will get a better result if you can measure accurately. I recommend trying to use centimeters rather than inches – your tape probably has both.
- It's easier to work in decimals with centimeters. 29.4 centimeters is easier to draw out as 29 cm and 4 mm than trying to draw 3/10th of an inch.
- There is a spreadsheet you can download in the earlier post where you enter your basic measurements and it does all of the maths for you, and tells you how long to make each of the lines for your pattern.
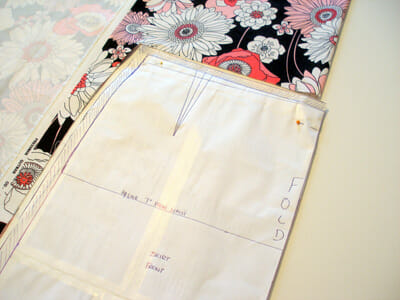
- Draw out the basic pattern shape first. Then cut it out and stick it down on another large sheet to add your seam allowances around the outside. This makes the seam allowances easier to identify and change later if you need to. It also makes the pattern a little thicker and more durable so you can keep it and reuse it in future.
All about ‘Ease'
What is ease? When we take our body measurements, if we drew out a pattern to exactly match those measurements then we would end up with skin tight clothing. That's OK if you are using knit fabrics with good stretch and want to look like you are from the crew of Star Trek or some science fiction film. But most of us want our clothes to skim the body and flatter, not show every single lump and bump! And not every item of clothing will be made from super stretchy fabrics.

photo credit: icantcu via photopin cc
So we will need some ‘ease’ in our skirt if it is not to be skin tight and then split when we sit down and our bottom and thighs expand. There are typically two types of ease added to a pattern – wearing ease and design ease.
Wearing ease is the amount of extra fabric you need to move comfortably in a garment. Design ease is the amount of extra fabric the designer has built in to give the garment its shape and style. The total amount of ease is the difference between the measurement of the finished garment and the measurement for your body.
This skirt is supposed to be close fitting at the hips so no design ease is used, just a little wearing ease.
What about ease at the waist? Well think about it. The skirt is designed to sit at the waistline. If you add an inch of ease to the waist measurement, then it won't just be loose at the waist, the skirt will actually drop until the new waistline now sits where your body is an inch wider, therefore the whole skirt sits lower, the hips won't be in the correct place etc. So we don't normally add a lot of ease at the waist in a skirt, although you might add some in a dress.
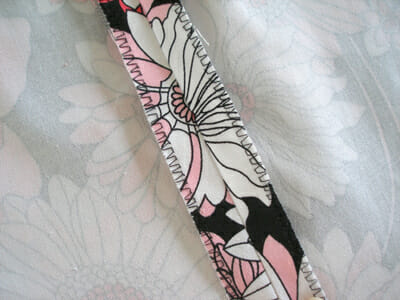
What are seam allowances?
A seam allowance needs to be added around the pattern pieces, except for the part that is cut on the fold of the fabric. The seam allowance is the fabric that you see on the inside seams of the skirt and should be a standard width throughout.
It's not the same as ease, but if you didn't add a standard seam allowance and then sewed up the skirt, it would be too tight. Standard seam allowances in a commercial pattern tend to be 5/8th of an inch and your sewing machine cover plate most likely has a line at this distance from the needle. You line up the edge of the fabric when you sew and the needle stitches the seam 5/8th of an inch from the fabric edge.
By setting a standard seam allowance on your skirt, you always know how far in to make your seam and thereby leave the skirt at the size you measured and intended.
Cut out your pattern pieces separately and then stick them down on a large sheet of paper and draw in your seam allowances around the outside. 5/8th of an inch is standard.
You may want to add 2 inches for the bottom hemline to allow for this to be turned up twice and a deeper hem also looks nicer too. Do not add a seam allowance to the front center as this is cut on the fold.
Testing your basic pattern
Now you have your basic pattern. And you are ready to sew your skirt. But stop! Don't rush in just yet. Any good sewist will tell you that when making up a new pattern, you should always make a test piece first.
In the US called a ‘muslin' and in the UK called a ‘toile'. This is a quickly run up test garment using some leftover fabric, cheap yardage, muslin or even an old sheet. The idea is that you make up the pattern sewing in the darts, seam allowances etc as you would in the finished skirt. But then leave out the zip, don't do any fancy finishing and just try it on to see how it fits.
If you have a pretty standard body shape, then the pattern you have drafted should fit pretty well ‘right out of the box'. But if you are very tall, very short, have a short or long measurement between waist and hip or a very big variation in measurements – then you might need to tweak your pattern to make it just right. Plus, we all have a personal preference as to how a skirt should fit so adjust for this now.
So before you cut your nice fabric, do make up a test garment and give it a try, pinning the back closed, to see how it fits. You can also try on the skirt inside out so the seam allowances are on the outside. Then if you need to pin any alterations, take in a little, change the darts a little, you can see this easily and pin on the inside.
Sew up your alterations and check again for fit. And don't forget to transfer any alterations over to your paper pattern so you can sew the skirt next time without any need to re-do those alterations.
Our next steps
Join me soon for the next step in our Sew A Skirt series – Cutting your fabric and pattern matching.
If you want to know when the each post in the series is published, do sign up for the newsletter to get it right into your inbox.


Hi I can’t find the spreadsheet you are referring to. Is it on your site?
Hi Deb,
You are not funny-shaped, you are you and that makes you beautiful! I am the hourglass type, and believe me, none of the skirts on the stores fit me either. If it fits in the waist, it’s tight in the hips and vice versa. I feel like women’s clothing are still made for teenagers! While I have a book on patternmaking, it’s too technical and gears towards fashion designers while I’m just a self-taught girl who wants properly fitted clothes. I’m enjoying your blog, thank you for sharing!
Thank you very much for this. I have so far made 2 slopers and 2 mock-ups, and each time when I test sitting down, the back rips. I think it is because my fabric has no stretch at all. I was very careful with my own measurements and the measurements in the sloper/pattern pieces.
Should I increase the ease for fabrics with no stretch? I really want to have a well-fitted skirt, but I am terrified to cut into my beautiful fabric just to have it rip when I sit down. Thank you!
Hi, Rambling Pig? lol love the name, you need to add ease to the pattern, 1/8″ will make a difference of 1 more inch at the hips. If you prefer to have more room then add 1/4″.
Thank you so much for your quick reply! Can’t wait to get back at it.
i came across here by chance and am glad I found ideas on making a skirt since I have a funny figure- wide hips , small waist . I cant wait to try making a skirt for myself. Have always had problems getting skirts that fit . thanks for this
Hi Deby,
Firstly, I really enjoy your blog and newsletter, I am fairly new at sewing. I just found your tutorial on how to make a pattern for skirts. You mention that it is easier to work in metric tham imperial, and I totally agree! However, when talking about the seam allowance, you indicate a seam allowance of 5/8 of an inch! In order to get a good fit for the skirt, what do you recommend I should use in cms for the seam allowance?
Many thanks in advance for your help,
Suzanne
Haha yes I see the dilemma! My machine bed is marked in inches, with a 5/8th line for the seam allowance so that is why I switched. Then if I set a seam allowance that matches one of the lines on the machine, I know it will be accurate. I would suggest doing the same. If you have a guide on your machine at 1.25 cm perhaps, then add that as a seam allowance, or some other width that you know you can follow accurately, such as the width to the edge of your presser foot.
i am very happy for this easy method
Hi Deby, I am new to sewing and started making a simple skirt but got stuck with the waistband. Then I found your sew-along and realize that I may need to take the skirt apart and start all over from the beginning. Like you, I love skirts but I have an odd shape and need to make my skirt a little longer in the back because of my stomach and my butt. Can you help me? thank you
If you lived near me Felicia, I’d say come on over and we’d work together to get your skirt fitting nicely. But over the internet that is sadly just not an easy task. There was a great series I saw on another sewing site about how to deal with skirt fitting for a more prominent behind or tummy, but at the moment I can’t find it again. Wish I’d book marked it. (Found it – there is a great series here on advanced skirt slopers and fitting – http://www.coutureschmiede.com/2014/01/ssda-2-hip-circumference-and-fit.html?m=0) I hope you’ll be able to make the adjustments you need based on these tips.
Aawww. Thanks Deby, the link you sent was pretty helpful. Appreciate it. I will also go through my sewing handbook, “complete guide to sewing”, by readers digest to figure out how to do darts.
Hi Deby, downloaded this from craftsy and I’m finally able to start. But I am having a problem. I am trying to use your link to enter my measurements and it is not working. I’ve downloaded as directed to Dropbox but it will not let me type in my measurements. I have an ipad is this what the problem is? Any insight would be great…..if it doesn’t work for ipad could I send you my measurements? You can respond via email
Thanks Claudia
Hi Claudia. It’s a spreadsheet so you need to open it in a spreadsheet program such as Excel, Works or Open Office Calc. Then you’ll be able to input the numbers. You probably don’t have the right software on your iPad to do this, it’s more of a web browser than a computer. You can open it probably no problem on a regular computer, laptop, or one at work perhaps. If you can’t get to it any of these ways, just drop me an email with your measurements.
i think this process is very important for us
Hi!i’m stopping by from the DIY Sunday showcase. I’m just learning how to sew and haven’t attempted anything for myself yet. This might be it! Thank you!
Your skirts are turning out fantastic! Its great watching you improve on your skills. I’m pinning this. Thanks for sharing with us!
Awesome! I have a few dress to skirt refashions coming up.
Thanks for sharing – I might actually attempt this skirt!