


 Sewing with fur is relatively easy (and fun!), but every beginner should know these tips before starting a project. Bear in mind we will be talking about faux fur and not the real thing.. Working with this special material does require patience, however.
You can make many fun and interesting things with faux fur. While it's very inexpensive, it can add beautiful accents to garments or bags you may make. We'll be using it in a few projects in the future so it is worth having a look through these tips now.
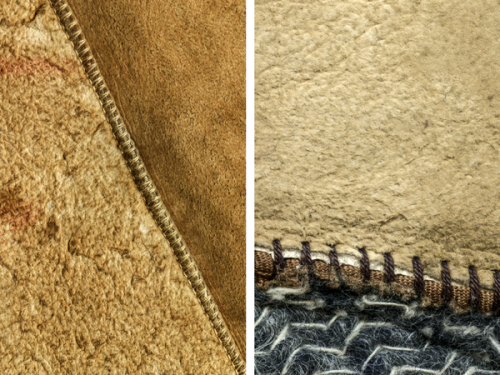
Faux fur is also known as fake fur, synthetic fur, or fun fur. Whatever the name given, today sometimes is very difficult to know the difference between fake and real. Looking at the back of the fur is the only way to distinguish between the two. Real fur is backed by animal skin. The picture below shows the back of a sheepskin.
The picture below shows the back of fake fur. The backing is a special knit jersey where long and short fibers are passed through the stitches while the fabric is knitted. Fake Fur is also sometimes known as a pile knit and because of that, shares many characteristics with other pile fabrics like corduroy, velvet, velveteen, and terry cloth to name a few. 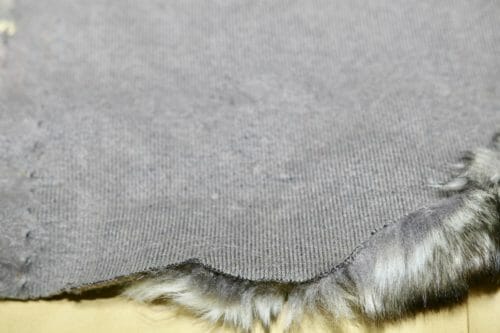
Tip: what is pile nap and why mark it
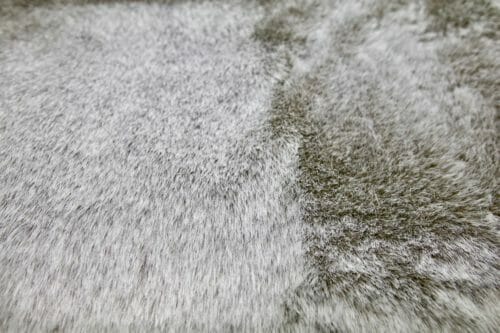
Fake fur falls under the classification of pile fabrics. The nap of the fur is the direction in which the pile falls giving a distinctive look to its texture. The nap pile brushed in the direction of the hair catches more light and renders the fabric soft to the touch. The left side of the picture illustrates the nap pile direction. The hairs can catch more light giving the fur a softer texture. The right side of the picture shows the direction against the nap. The right side of the picture shows the down hair making the nap pile change to a more intense color. It is worth noting that fabrics used against the nap direction will have a shorter life span and less water permeability and less ability to control the temperature.
Tip: scissors and how to use them
A sharp pair of scissors are the most important tool when working with fake fur. You will be using the tip of the scissor to cut the fur. The picture below demonstrates the wrong and right way of cutting fake fur. Insert the tip of the scissors under the knit jersey fabric and cut a small amount at a time.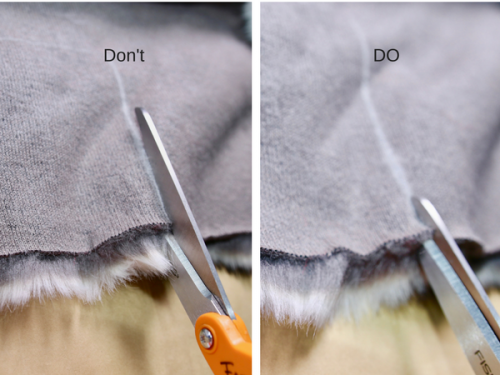
Tip: best pins and the right way to pin
Long pins are the best ones to use with fur. The extra length of the pins makes it ideal for handling fur due to the thickness of the material. Pin the fur at an angle and use as many as you can, perhaps one every inch. Brush the hairs down between the layers of jersey
Tip: labeling pieces
The right way to cut fur is to do it one piece at a time so label the back of the pieces of fur once cut. Label whether the pieces are back, front, sleeves or collar and the direction of the nap.
Tip: marking stitching lines
Mark the stitching after cutting the pieces. You might think this is overkill but believe me, this tip is not. In order to sew two thick layers of fur, pinning is not enough. Your machine will struggle to accommodate the layers of the material under the presser foot, so the stitching line will make this job a lot easier.
Tip: stitching and needle size
Use a large stitching size. The machine will cope better with the thickness of the fur if you use a larger stitch. My sewing machine goes from 1-5 and I use 4 if I am attaching a lining to the fur and 5 if I am sewing two layers of fake fur together. The correct needle size is 14.
Tip: adjusting your feed dog or use a walking foot
The ability to cope with thick fur changes from machine to machine, so test on a piece before starting the project. You may need to adjust the feed dog which is located under the needle plate and must always be up for normal sewing. 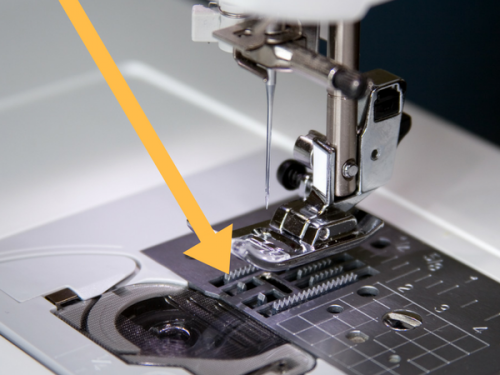 Check the manual of your sewing machine for the location of your drop feed lever. If you are using a very basic machine the use of a walking foot like the one below will be required.
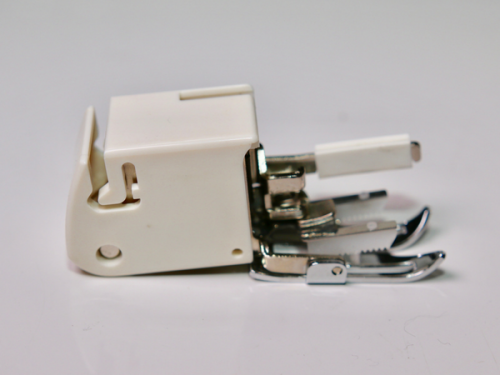
Tip: sewing fake fur.
Patience is key, but the best seam allowance for fake fur is 1/4″. If the pattern is drafted to 5/8″ reduce it to 1/4″. There will be no need to neaten the seam allowance since the fur does not ravel. Use polyester thread because it will last longer. Do not use cotton thread.
Tip: lining fake fur
Fake fur is not as warm as real fur, so good quality and soft lining material are important. If your budget allows it, the use of silk is advisable to make the garment warmer. When attaching the lining to the fur using a zigzag stitch, this will prevent the lining from becoming undone with time.
Tip: closures and buttonholes
There are a few ways to make a closure for a fur coat or vest. By far the easiest one is a belt made out of the same material. Depending on the pattern, the other closures to consider are a hook and eye. The hook and eye are sold either covered or uncovered. You could also use a large button or my preferred method –a leather belt. It really depends on the look you are going for. 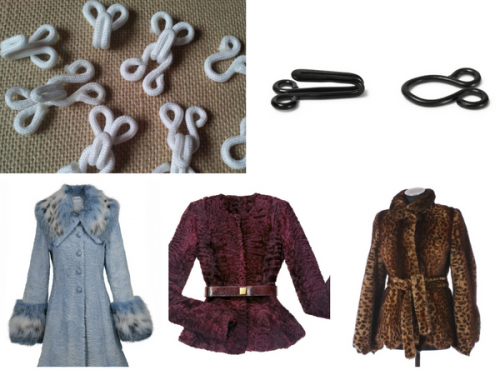
Tip: best patterns for sewing with fur
The best patterns for beginners are the ones with non-complicated details and relatively few pieces to assemble. 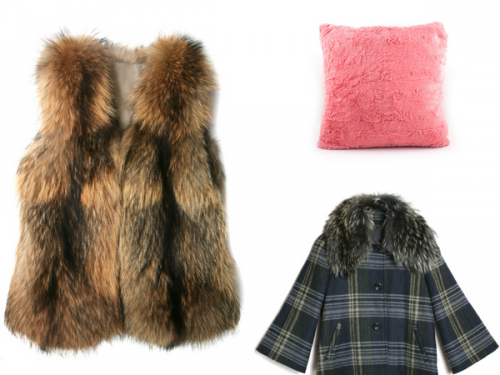 People with a bigger budget and intermediate to advance skills can try more stylish and time-consuming styles.
Tip: cleaning and storing fur
Fake fur needs to be brushed after every use with a soft bristle brush to avoid the buildup of debris and matting of the fibers. Dry clean the fur after the winter season has ended and is time to store. When storing, do not just cram your coat into a corner of your wardrobe. Give it plenty of room so that the hair does not become unnaturally flattened. Store it in a garment bag, especially in humid conditions. If the hairs have flattened or distorted use a slightly wet brush to brush the hair in the direction of the nap and allow it to dry thoroughly before storing.
Tip: Use scraps of fur
Like leather and any expensive materials, there are a plethora of small things you can make with the scraps of fake fur. Here are a few ideas, in the weeks to come, join me for a few projects in which we'll be making some great gifts for your loved ones this Christmas using faux fur. Until next time! 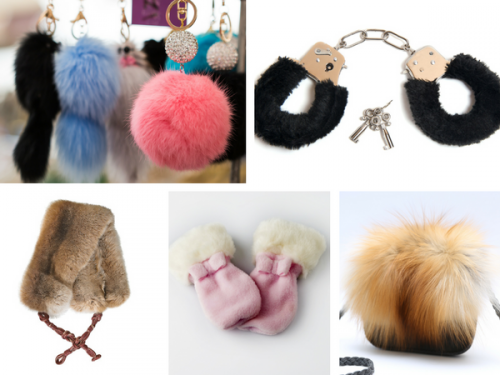


I use Faux Fur to make numerous doll wigs… a 5 inch diameter circle with a 3 inch inner circle cut from it, attached to a second 5 inch circle makes a “bowl cover” style wig that fits over the doll head and around the face. What a mess the first times I tried cutting the Faux Fur circles! I tried several good hints about using lint rollers!
Then I realized the fabric is simply polyester and it is ok to get it wet! So now I prepare my work space and wear an apron and face mask. Then moisten/wet the fabric, spread it out, mark and cut my circles. I can remove the circles and overcast or bind the edges even while they are damp. Damp paper towels and a waste basket collect almost all the scraps with little mess.
Wow! I never thought of making wigs with fur but what a great idea. Very interesting how you handle the mess as well.
I made a pillow quilt with Cuddle fabric (Faux Fur) it had a huge mustang applique and part reverse applique. It was sew with three colors. My best tip for cutting is after I used my rotary cutter, I did not move the fabric. I used a Scotch Bright Sticky Lint roller. It picked up all loose fur and I had almost no mess. I found I could not get that silky fur to stay in place even with a thousand pins. So I discovered that if I spayed it with hair spray and pressed the fur sides together and let it dry a few moments. I could sew with no movement and didn’t even need pins. The bottom did not stretch longer than the top. Which it did even using my walking foot. I did still start sewing from the center out as I did when trying with a walking foot. I didn’t want to use Jack the ripper again. If I got the positioning wrong when the hair spar was wet I could move it. If it dried I had to respray. It did not harm the fabric. I didn’t even notice the hair spray after I pulled it apart. Anyway this process was a must.I was sewing 72″ strips.
Jack the Ripper…LOL!!! great tips Christine
Might have been helpful to label it fake fur in the title !
When making fake fur vests for children, I’ve cut the fur away in my seams before sewing them, making the sewing less bulky while still keeping the full thickness of the fur everywhere else. Cindy
Great tip Cindy!
These are great tips, thank you!
My pleasure!
Another tip I spotted, for someone who wanted a shorter fur, was the use of electric clippers – I’m not certain whether they used animal clippers (which are stronger, because animal fur’s thicker) or human hair clippers, though. These days they come with a graduated “lift” comb allowing you to correct for height.
And yes, I think for that working outdoors when the neighbours are away and the birds are nesting is a MUST.
Great article!
I saw several tips suggesting people cut fur outside due to the mess. I strongly urge people NOT to cut faux fur outside. It is east to forget, but faux fur is plastic. It takes 500-1000 years to breakdown, and before that it gets ingested by many creatures, humans included. If you think it is wrong to throw your trash into the street or the woods or in a lake, then please do not cut faux fur outside.
As an alternative, wear a basic mask or respirator if the fibers bother you. Cut the fur inside your bathroom, preferably in the bath tub with the shower curtain drawn and drain plugged. Vacuum the room after you’re done and use a damp paper towel to collect fibers in an areas the vacuum couldn’t reach.
If you aren’t vegan, another option is to use real fur, which biodegrades very quickly outside. If you are looking for ecologically sound options, rabbit, sheepskin, or goat are good bets. Also American or Canadian-sourced “nuisance” animals (farmers pay trappers to kill nuisance coyotes, rices, and raccoons on their land). These animals would still be killed even if there was no value in their pelt. Roadkill fur is another option as well 🙂
What do you mean by “rices”?
Thank you so much for your article on short hair faux fur. I could only find articles on long hair & it was no help. I am making a jacket ever sewn with fur before, I haven’t sewn clothes since HS (long time ago). I ended up trimming the hairs in the fur shorter because I couldn’t keep the fibers from poking out (very time consuming). I did mark a 5/8″ stitching line though and that helped. I so appreciate you taking the time to write this article. It will help me continue this journey with my jacket. I am so outside my comfort zone (I make quilts). I just wanted to make this jacket, so I bit the bullet.
I so enjoy receiving your newsletters.
Dear Dianne, Hope you can finish your jacket and not get discouraged from sewing other than quilts. After sewing you might want to pull the fur out using a knitting needle. IF I can help you any further do send me an email. Good Luck!
[…] rectangle in fur following the pattern. If you have never worked with fur before be sure to read this article that will tell you a few tricks and tips on working with this […]
[…] is part of the nap fabric group, I have already talked to you lightly about nap fabrics in this tutorial. Have a read so you understand how to work with this type of […]
What about what to use for eyes on a teddy bear?
What I learned is to cut out fake fur OUTDOORS! lol That way you don’t have teeny-tiny pieces of hair all over the house.
This was a really useful article. I hope you intend to expand on the subject! I was wondering, other than silk, is there another lining option you’d recommend for someone who wants to be as warm as possible? A friend recommended velvet.
That would depend on the thickness of the fur. You can get silk velvet it is divine, breathable, warm and expensive.
I enjoyed this article. Wish I’d had some of this info when I was in college. =)
I make stuffed animals for fun. I whip stitch the pieces together before sewing the seams to prevent the pieces from shifting while sewing. Probably the most helpful for me is wearing a damp bandana over my face while cutting the fur, to keep the fibers out of my nose and lungs; helps reduce the allergy symptoms.
My son was a boy scout leader and he took these boys out and they stayed out side in below zero temps at a campsite and for that they got an award but the badge had to be made out of fur. He called me from the fabric store since he didn’t sew I think he planned it that way cause I said you don’t sew so I ended up making these badges. I had to make 14 badges with a cord in it so the boys could put them around there necks. I laid all the fur down and lined them with muslin. They were just small squares but the boys were so pleased! I knew enough just to cut the webbing and I was very happy when I finished! He had 2 son’s in the group.
You are a “Super Mom” Luella. This story is like a prefect advertising for VISA. Two days in below zero temps is not an easy task for anyone. Great character building exercise and they have a badge of fur as a reminder. Made by their mom, “priceless”.
My only tip on working with fur (real or faux) is to cut it outside of your house when possible. Even if you are careful, and only cut the backing, you will get little hairs EVERYWHERE.
Great article! The best extra tip I would like te share: don’t be scared! Just go ahead and give it a try. Perhaps you shouldn’t start with that one important ‘must work out’ project, but only practice makes perfect!
(I keep telling myself this all the time and have my husband remind me whenever I forget, since I usually expect myself to do everything perfect at the first try which of course is totally crazy! Lol!)
Thanks Mayra and Deb for this site – it’s always fun, inspirational and teaches me a lot!!!
Hi Inky, thanks for sharing this and for your kind feedback. We’re so happy you enjoy the site.
An alternate method for cutting fur, both real and faux, is to use a new single edge razor blade. You could also use an Xacto Knife, a utility knife, even a box cutter. I just find a razor blade inexpensive and disposable when it gets dull. Just be very careful when cutting to keep your body parts out of danger.
Thank you John, this is exactly the kind of comments I love to read. I learned something knew!
Nice job on those handcuffs, you’re real special, thanks!
Yes, what an idea! How much would you have in mind for selling those?
Thanks for the reminders. I am making a “huntress” fur trimmed hooded cape for my grand-daughters Halloween costume. It’s been years since I’ve worked with fur.
Sounds like a great costume!
I feel you should also mention the need to tease out any fur pile caught in the finished seam, from the right side.
Yes this is true. But if you pin correctly this step become unnecessary. I will show how in a video tutorial.
And will you do a video tutorial on those special handcuffs? You could pick up some great new followers, you might lose some too but maybe you’d really like that.
Matilda, time to grow up and just get over the fur handcuffs. You sound incredibly repressed. I gave my boyfriend a red fur pair for Valentine’s Day and he got a huge kick out of them. They are much nicer on the wrists than hard cold metal. Try it, you might like it, but be careful to keep the key handy so you don’t accidentally lock yourself up with no way to get free, as it seems with your attitude you’ll be using them alone.
Thank you for this article. I have never sewn with this material, now i want to make a vest
So enjoy I open up the JoAnns class schedule for November and December and there is a class to make a fur vest! Crazy how these things happen!
Stay tuned Bridgette, I will be posting a vest tutorial soon!
[…] Tips on sewing with fur every beginner should know – 1 freebie(s)? […]