


 This is the second part of the denim midi skirt pattern. I shared the first part with you last weekend, you can grab the pattern here if you haven't yet.
Many of you have expressed the intention of making the midi skirt in a fabric different than stretchable denim. This is possible, however, there are a few things I would like to say about using a different fabric than the one I have suggested.
Commercially printed patterns have specific fabric suggestions so that the customer can get the intended result. Often when you change the fabric, there are a few unintended problems that come up, as the pattern was not tested with every potential fabric in mind. This doesn't mean you shouldn't experiment, (it actually can be very useful for your skills) but you have to keep in mind that the pattern was not made for different fabric, and there is the potential for many complications. For this skirt, pay special attention to the slit in the drawing below as this is an area that could be affected.
The Midi Skirt
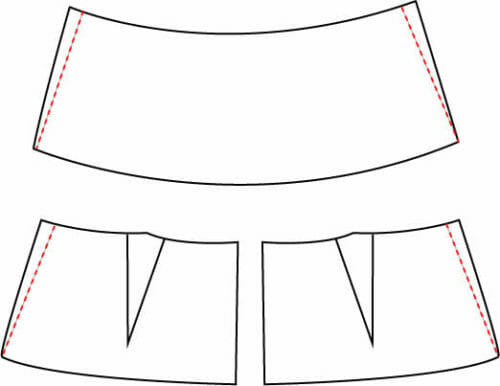
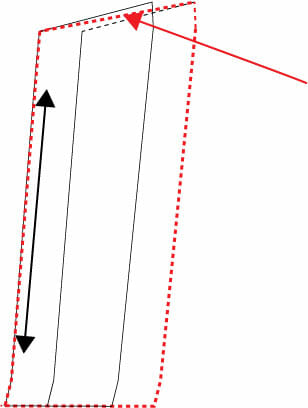
Plaid fabrics… When I refer to plaid I am talking about the print not the type of fabric. When using plaid you need to take into consideration the grain line and the direction of the print. The only piece cut on the grain line on the drawing below is the left side of the split (the smaller piece). If you want to match the rest of the skirt to the left side of the split you will need to cut the rest of the skirt on a bias. Therefore you will need at least a 1/2″ extra for every 1 yard more than the required amount of fabric.
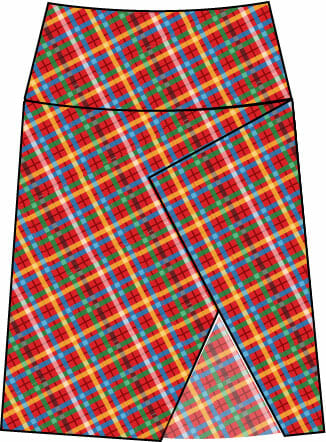 On the drawing below all the pieces are cut on the grain line and matching the lines except of course for the left side of the split.
I have used stretched denim and have suggested the use of medium weight twill with 5 to 10% stretch. I recommend this because of the type of waistband we are using. It is wide and ideal for those with a bump around the belly button and love handles.
What Other Fabrics can be Used if you do not Want a Denim Midi Skirt?
Medium weight Twill with 5% stretch
Corduroy is part of the nap fabric group, I have already talked to you lightly about nap fabrics in this tutorial. Have a read so you understand how to work with this type of fabrics.
Continued from Part 1
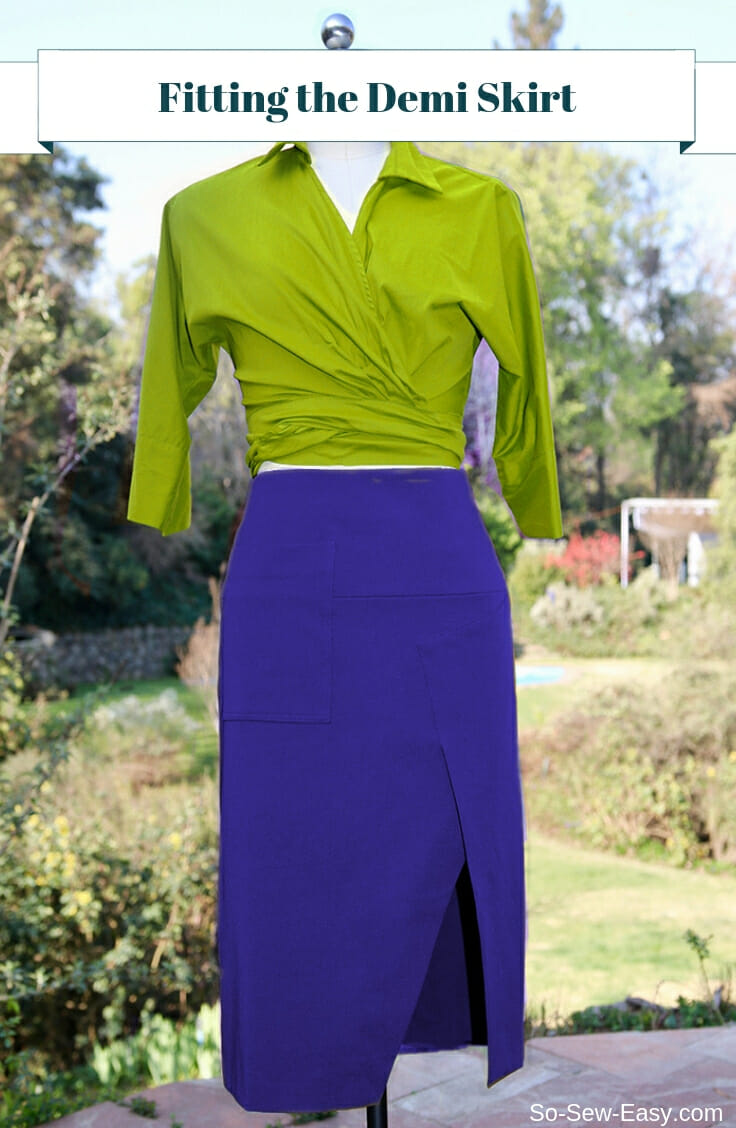
Step Five: How to fit your midi skirt
Sew the left side of the front of the skirt to the rest of the fabric.
Sew the front and back together. It is now time to fit your skirt to your body.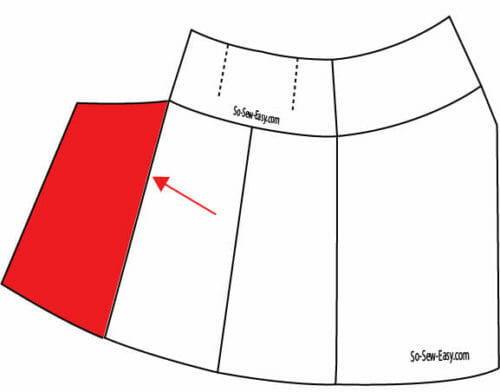
I am going to trust that you have made a muslin. Try the skirt pinning the left side on the front skirt then try it out.
Fitting Your Midi Skirt
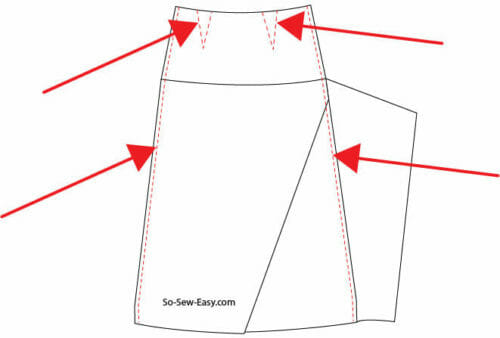
The first thing you need to remember when choosing a pattern is that it is easier to grade up than down. Pick a size close to your hips, because of the slit.
Waist too large but fits well at the hips
There are two possible ways to approach this fitting problem. The lazy way and the more professional way.
The lazy and for those that did not make a muslin; pin the excess of the fabric spacing it evenly. Transfer this marking to the pattern. 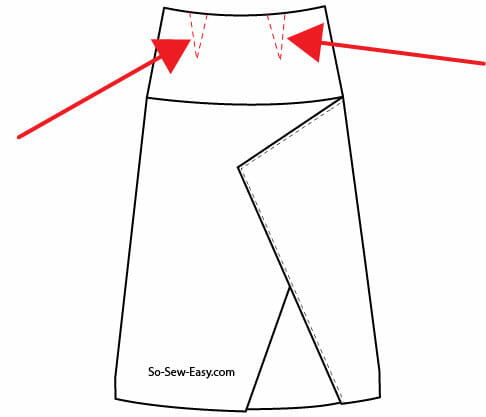 The proper way would be to eliminate the excess on the pattern in equal parts on the sides.
Waist too tight but hips fit well
This is the typical problem for women who are apple shaped or have a small difference between the hips and waist. This is easy to adjust. Use the space of the seam allowance and the darts on the back to give yourself wearing ease. You can eliminate the darts completely.
Raising or lowering the slit
As it is the slit will let about 2″ above your knee to show if this is too much for you. Slide the left side front piece to the right making sure the side seam and the bottom line never changes.
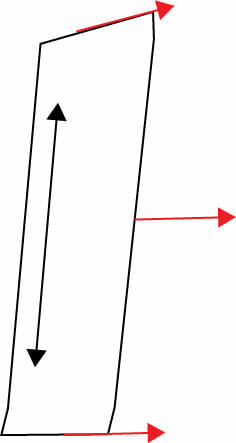 Trace the new pattern piece.
 Do the exact opposite if you want to show more leg.
Need the skirt a bit longer. For the ladies that are 5'8″ or more. Many of you who read this blog are indeed very tall and your requirements are the complete opposite of mine, (I am 5'1″ or 155cm).
I have touched on the subject before in another sew along tutorial for the Easy Pleated Skirt. Please have a look at the tutorial for more detailed instructions.
Altering the Easy Pleated Skirt pattern. How to increase or decrease the waistline: Part 4
Sew the front and back together, use the serger to clean the seam allowance.
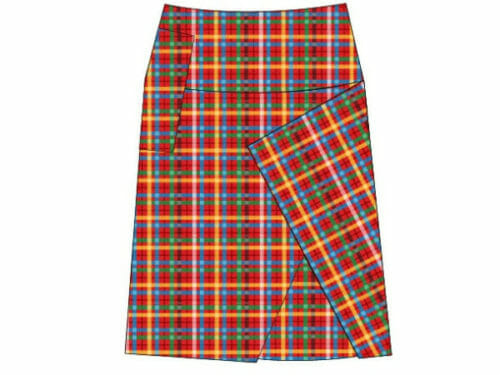
Using the pattern mark the placement of the pocket. This is a patch pocket. Sew the pocket on the side.
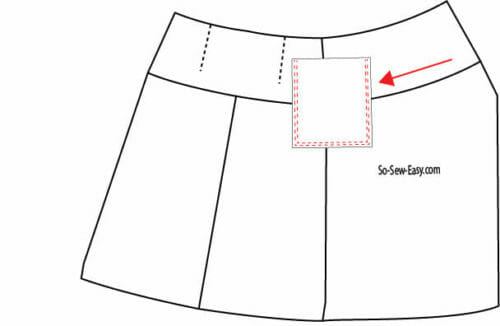
Attach the patch pocket using the following tutorial.
Unlined patch pocket tutorial – how to make the perfect pocket
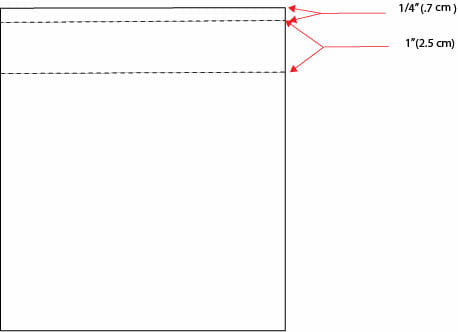
I forgot to mark the amount you need to fold the pocket, I am adding this to the drawing below.
This is the end of Part 2. Join me in the next article when we will be finishing this skirt.
Until next time, keep your scissors sharp and happy sewing!


I love the wrap blouse you have with this skirt. Do you have a pattern for it?
I do, planing to share for Autumn.
Hi Mayra, I hope you are doing good in these trying times! The MidiSkirt appeared in my Unfinished pile and I was wondering if you’ve had a chance to continue your work on it. I can imagine with all the designs you have going, you might have just not posted it yet! I can’t even remember when I started the skirt! If not, I’ll just put it at the bottom again! All the best
Hi Stella, with all that is going on with Craftsy I am going over my patterns, sad to tell you do put it back on the pile it will be a couple of months before I can finish with all the patterns that I have to move to Bluprint while keeping the site going. We will finish the skirt, mine made out of jeans fabric is still waiting…
Hi Mayra, just realized there is no markings on my pattern for the pocket placement???? Is the skirt finished using a lining???? Thanks, April
i did not put it because it depends on the length of your arms and legs. Just sew the pockets where you would like to have it. It can be finished with or without lining. I lost the file in my move from Singapore to Chile. I think the skirt ended in a box headed for storage. I am not very happy about the fact that I will have to start all over again.
Did part 3 ever get posted? I can’t seem to find it.
HI Sherry, Sadly not yet, I have moved continents and my things are still at customs, That includes my desktop and my sewing machine. I will do my best to publish using drawing only, it will push my capacity but I think I can do it otherwise I dont think I can do it before the end of January.
Hallo Mayra,
thank you for this beautiful skirt.
I have a question to the pattern: It says to cut two front waistbands, that should be inside and outside. But ist also says to cut only two back waistbands, that should be left and right. Do I need four back waistbands (left – right, inside – outside) or only one front waistband?
Gabi
Hi Gabi, that is clearly a typo on my part your do need four pieces for the waistband, thanks for your comment it helps others when making the skirt.
[…] Pingback: Midi Skirt – Fitting And Use Of Other Fabrics: Part Two – So Sew Easy […]
When is part 3 coming????? Can hardly wait to make it for my daughters baby shower…. made the Bali skirt and it turned out great, thanks for your generosity
Working on it April.
Waiting until April to complete this tutorial is a real disservice to the sewing community. That is over 6 months from releasing Part 1. You have already received a rather negative review on Pattern Review that has a subscriber network over 400k.
HI Alana, This is a free pattern, and I have spent many hours (32 hours) already in it. You don’t know what is going on in my family or my life to be so harsh. There are ungrateful and unhappy woman everywhere and I do not respect a website where the people that gets reviewed can not defend themselves. Six months ago a moved continents and my things just now were released from customs. I would like to invite the person who left the bad review in a network of 400K to leave it on this on of 12 million a year where I can defend myself won’t you agree? What I find a disservice is the person leaving a bad review does it behind my back instead of having the courtesy to send an email. But, you know for every nasty, unhappy woman there are thousand of grateful ones. So I keep doing what I love the most spreading the joy of sewing. It is almost christmas and I will not be publishing part 3 until February next year when I get my sewing machine back. In the meantime I wish you a Merry Christmas and the best life can offer in the new year. Thanks for letting me know about the bad review, part two is out BTW.
She didn’t say she was waiting until April to work on it she replied to April that she is working on it!
I am moving all my work out of Bluprint and going over the midi skirt, yo finish the sew along, I thank you for your patience,
I LOVE this blouse! Do you hashes a pattern for it??
Yes i have it on my size but have not graded it yet once I do I will share.
Myra, as usual, I want to thank your for being so generous with your designs. This is just a fabulous skirt. I am ready to go with the fabric. Can’t wait to finish it to wear with my boots. The weather here in the mountains of Arizona is getting nippy.
Dear Anne, It is my pleasure! Sounds like lovely weather, and boots are just the thing to wear this skirt with, make sure the skirt hugs your hips and team it up with a pretty blouse of turtle neck sweater. Come to think of it I should share a pattern. Kind Regards,
when is part 3 coming out
I have downloaded the Midi Skirt pattern to Craftsy. Does the tutorial come with the pattern or do I search your tutorial folder for instructions, especially since the tutorial comes in two parts, correction three parts.
You are a prolific designer and quite creative.
HI Carolyn, Thank you for your kind words. This is a sew along and I am in the process of filming the video which is why I have not included the instructions with the pattern. For now you can read on the site. Once the video is up you will be able to follow along.
I would also love the pattern for the green blouse pictured with the midi skirt! Love it! When will you be sharing that?
Very soon Jerri:) stay tuned please.
Is there a way to download part 2?
In your discussion of plaids, are you saying you need 1/2 – 3/4 YARDS more fabric to cut on the bias, or 1/2″ (INCH) more per yard of fabric? I think you mean yards.
Hi, Janet, yes, that’s correct. For some reason that line was repeated twice so I’ve corrected now.
I did not see where the amount of fabric needed was listed. Where may I find that information? Thanks!
1 to 1.5 yards 60″ wide denim.
I love the green shirt. Is there a pattern for this?
Yes there is I will share soon:)
Thank you for the skirt pattern. I really like the wrap around shirt you have with it. Do you have the pattern for that? Sorry if I’ve missed it, I’m new to your website. Nicole
Not shared yet, subscribe then you will not miss it:)