There are just now the first signs of summer coming here in Santiago after a long cold winter, so I was thinking about some warm weather designs this week. Here's a pattern that will be great for all our friends here and in Australia and New Zealand where summer is coming too or for the tropics where it is always warm. For our readers in the northern hemisphere, there's still time to enjoy a few warm days in autumn or make it for next summer.
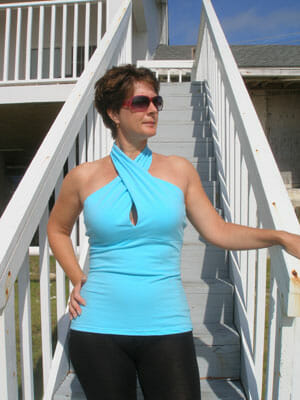
It's a sexy halter top that can also be a dress if you'd like to extend it. Designed for knit fabrics, this top crosses over at the front and the little keyhole at the front gives an interesting look while still actually being modest with full high coverage.

The design is double thickness at the top front and back to give extra support if you need it, or for modesty if it turns chilly! It can be worn with a strapless bra, or a halter neck bra if you use one of those clips to keep the straps closer together in front.
You can also choose to change the design for a cross-over and then tie behind the neck halter style if you prefer by extending the straps.
Where to get your free t-shirt pattern
As usual, to make downloading easy and reliable, the pattern is hosted in our account over at Payhip. You can download the pattern for free, with no sign up or accounts necessary although you do need to provide an email address. If you like the design and want to help support our site, you can also pay a small amount when you download the pattern. As always, we greatly appreciate your kind support.
The pattern comes in small, medium, and large as standard but is easily increased up or down in size as needed.


Constructing your PDF pattern.
First time you’ve used a digital pattern? Don’t worry, I’ll show you what to do. We've used downloadable patterns on the site before, so just drop on over to the Easy Summer Dress for full instructions on how to print and assemble the pattern.
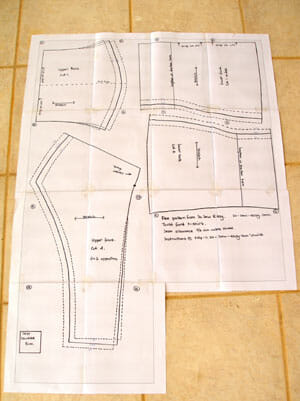
The pages are numbered 1-14. Start at the top left with page 1, and continue with 4 on each row until you get to 13 and 14 on the bottom left. The 5cm test square is on page 13 so print this one first and check the size to confirm your printer settings.
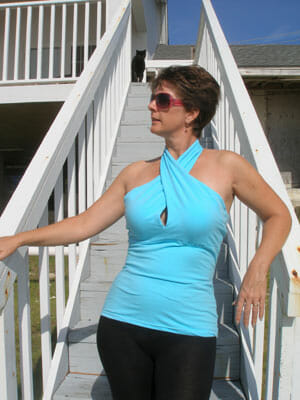
It should look like this when made up –>

What Size Do I Need?
The top is made from a stretchy knit fabric and is intended to skim the body and be fairly fitted. The size I made for myself I am calling the Medium, and I used a very soft cotton jersey from Girl Charlee. My measurements are bust 36, Waist 32. It wasn't at all tight around the bust so I could have gone down a size for a snugger fit and more support.
The amount of stretch in the fabric will alter the fit and feel of the top/dress so use this table as a guide only. If you have very stretchy fabric and need some support, consider going down a size, or at least making a test piece first.
| Bust | |
| Small | 33-34-35 |
| Medium | 36-37-38 |
| Large | 38-39-40 |
Resizing. To make your own alterations to the pattern, take a look at the way the existing sizes increase and decrease and follow this same example to increase or decrease another size if you need to. Always test the fit using the paper pattern pieces, or an inexpensive test fabric before cutting your expensive fabric for your top or dress.
Adjustments to length. If you want to make the top into a dress, simply add some length to the front and back pieces at the bottom. You decide if you want the dress figure-hugging, or widen the skirt from the waist outwards for a looser fit.
Large or small bust. The crossover sections are fixed length. If you have a small bust, you might consider making the length shorter by an inch, for a fuller than average bust, you may wish to extend the length an inch. Again, it depends on the amount of stretch in your fabric.
Tie straps option. Instead of having the fixed length strap, you could narrow and extend the straps and make it into a tie halter if you prefer. This would certainly help you get the best fit and more support for the bust. In this case, I suggest extending the straps by 18 inches and narrowing them for easier tying.

Cutting your fabric
The lower front and the upper back are designed to be cut on the fold of the fabric.
- To cut on the fold – fold your fabric along the grainline, just folding over enough to accommodate the size of your pattern piece. Then place the edge of the pattern piece on the fold of the fabric and hold it in place there. You can use proper pattern weights, pins, or even tins of tuna.
- Other pieces are cut from doubled fabric to cut 2 opposites. The cross-over pieces need to be cut 4 times, 2 for each side so make sure you cut opposites.
- Take note of the stretch of the fabric and make sure your pattern pieces are lined up the right way. The maximum stretch should go across and around your body not top to bottom.
- Before you cut ANYTHING, make sure that you have enough fabric for all of the pattern pieces.
- Once everything is laid out, cut out your pattern pieces.
If you need further directions for cutting out your fabric, follow the directions for the Summer Drape Top.
Step By Step Construction
Equipment and materials:
Essential
- Sewing machine and thread, sewing basics such as scissors
Optional but useful
Follow through these step by step instructions and enjoy!
Stitches for knits – if your machine has a stretch stitch (looks like a lightning bolt), you can use this one, otherwise, I suggest a long narrow zig-zag stitch which will allow your knit seams to stretch without breaking the threads. Test out various stitches on scraps of your fabric before sewing. For best results, use a needle designed for knit fabrics.
- Take two upper front pieces and with right sides facing, sew the short center back seam that goes behind the neck.

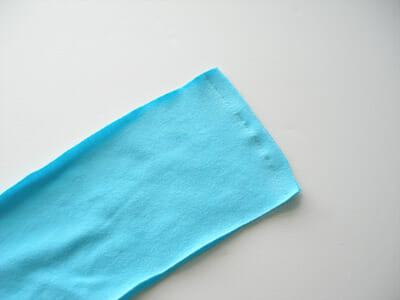
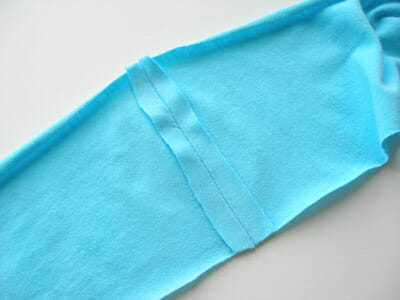
- Repeat for the other two pieces. Press the seams open.

- Lie one front piece on top of the other with right sides facing. Pin along the two long edges. Take note of the notches on one of the long edges and stop stitching at this point on each end.

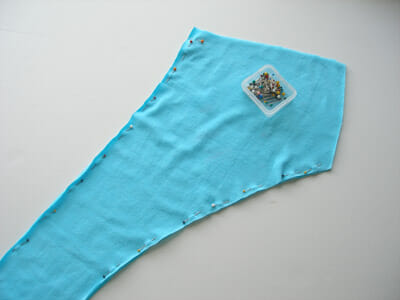
- Trim the seams down in size, then turn the tubes the right way out. Press.

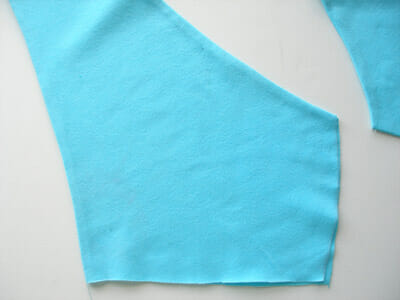
- Lie the long piece flat. Pick up one end and give it a complete 360-degree turn so you have two twists in the center.

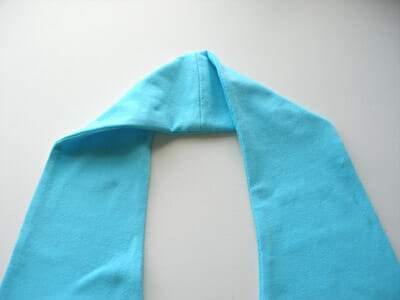
- Lie back flat and match up the small central area underneath the notches.

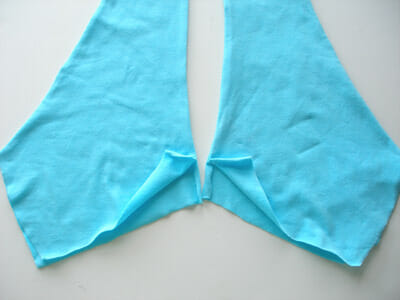
- Pin these two edges right sides together on either side of the central seam. Stitch both to the center, finishing at the previous line of stitching. Press.

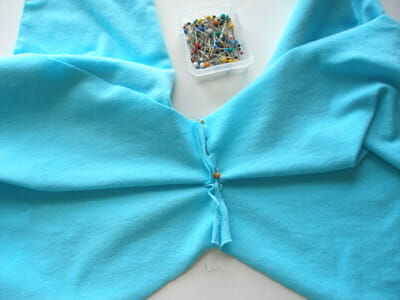

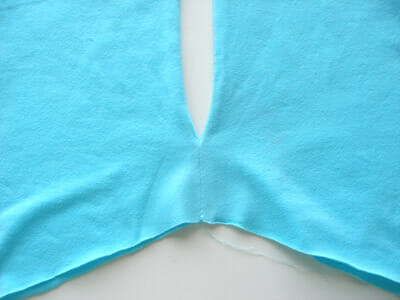
- Fold the center back piece along the fold line with WRONG sides together. Pin the bottom and sides, or loosely baste in place close to the edge.
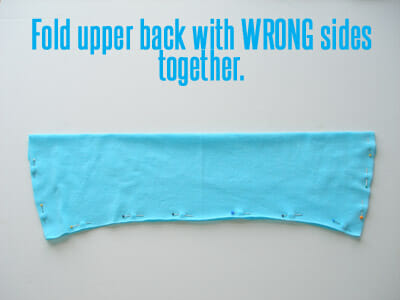

- Place the doubled over back piece on top of the bust piece with the right sides together. Match the fold line on the back with the seam line on the bust piece. Pin the back to the front ONLY through one layer of front fabric.
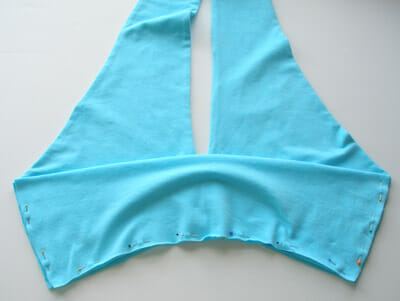

- Open up the other piece of fabric from the bust pieces, bring it over and in front and line up with the seam you have already pinned. One at a time, remove the pins and line up the 4th layer of fabric, pinning the through all 4 layers. It's going to look a bit strange – like this –>
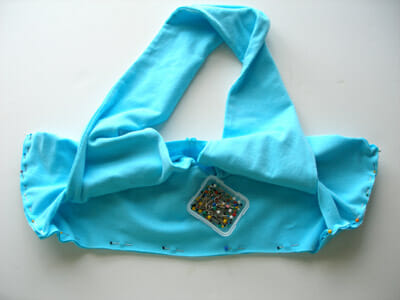

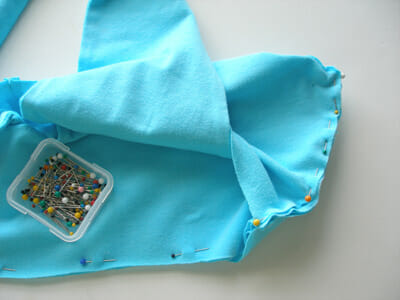

- Sew through all 4 layers. Trim the seams, turn the right side out and press.

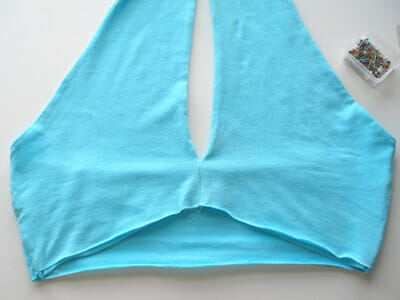
- You can now try on the top part of the top and check for fit. Adjust where necessary then resume.
- With right sides together, pin then sew the center back seam for the lower part of the top.
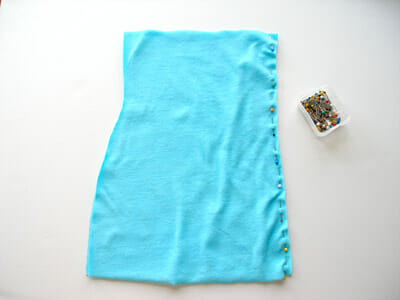

- Place the lower front on top of the back, right sides together, matching side seams. Pin, sew, and then trim the seams.

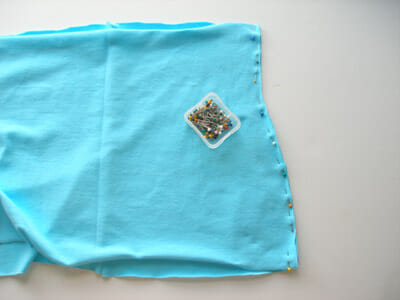
- With the lower part inside out, place the top pieces inside with the right sides together. Match up the center front and center back and the two side seams. Match up raw edges, pin and then sew through all layers.

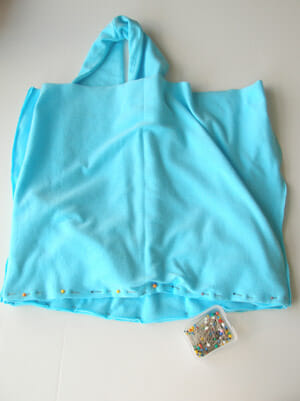
- Trim the seams and press.

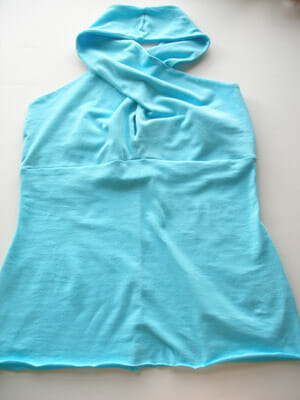
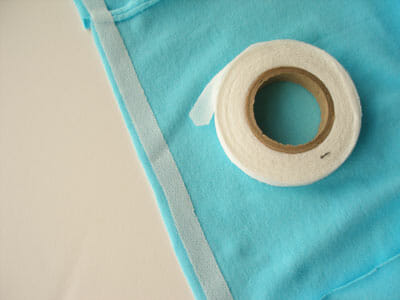
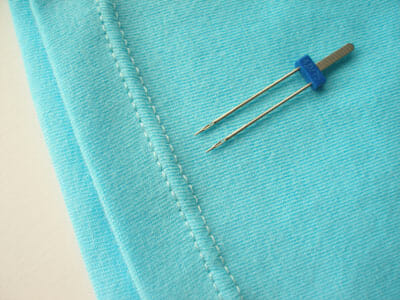
- Time to try on your top/dress and check you are happy with the fit and see if you want to adjust the final length. Hem the bottom using your favorite method for knits. I like to stabilize the bottom hemline with fusible stay tape, then stitch with a twin stretch needle.


I think this unusual twist front top would look great in a print too.

I’d love to hear your feedback on this free t-shirt pattern and tutorial, and see your photos and links to your finished t-shirts or dresses – please leave a comment below, or drop me an email using the link at the top of the page.
Need some ideas for fabrics for this project?


If you love to sew and love free patterns, then you'll love being on the mailing list at So Sew Easy. Join me and never miss another fab free pattern!
No spam promise. A once a week round up of new posts and patterns.


Ok so I printed up the pattern and the test box is the correct size. But putting the pattern together is not kosher. Nothing lined up properly. I have to fidget the pattern. If I could show you a picture I would.
Sorry, Annette, this is a very old pattern (7 years) I would have to make the top again to be able to show you the picture. I will because this top is in at the moment.
Thank you for answering! I have a question: the back doesn’t stay up. It rolls down, I was curious if I did darts on the back piece would it stay up? It is a slightly snug fit on the back but I think it may work. I’m just hoping once I do the darts that it does stay up.
Not sure if that would work, but I am always open-minded where it comes to finding a solution. This is happening possibly because the fabric does not recover well. I would add a (1″) elastic just stretching enough to keep the back from hanging. Let me know how you fix the problem.
I’ve been looking high and low for this type of halter neck pattern! I am wondering what pattern adjustments I would need to make when using a woven cotton instead of a stretch fabric. Ps I am small busted.
Many thanks
Sian
Hi, I would like to sew the top in a size S or M, but I don’t know how much fabric I need. I don’t have any at home so how much should I buy? Thanks in advance!
HI Gerlinde, the best thing is to print and assemble the pattern, find the fabric you like and then you work out how much you need. it will all depend on how wide your fabric is.
Love this top! So Cute! I may have missed it, but how much fabric do you need to make this top?
Best thing to do Julie is to print the pattern and work out how much you need for the size you are making and the width of your fabric.
Hi there, what seam allowances does this pattern call for? 1/2″ or 1/4″? Many thanks!!
The seam allowance is 1/2″, Happy sewing!
I was looking forward to trying this pattern….BUT the download file is ZERO BYTES in size….totally blank. I can’t find any way to reach Craftsy to let them know the file is damaged. Hoping you will see this and help get the problem resolved. Thx, DJ
Hi Deborah. I just downloaded the file and it worked fine for me. Have you unzipped it first? It’s a zip file so you need to unzip to get to the PDF docs inside. That might be why you have trouble. Or maybe it didn’t download correctly. Please try it again and let me know how you get on.
There must have been something related to my tablet. All my other downloaded zip files work fine, but that one refused to cooperate. So I found a PC and the file downloaded perfectly on the first try. Thanks Deby.
Love how simple yet effective this pattern is. I made it in a glitter lycra, making it a bit smaller and longer and added a ruffle trim to the bottom to make a fantastic tap-dancing costume for a tween!
fancy that pattern will try one this weekend. thanks for the pattern.
You must be a genius to figure out how to do this! I amazed. Thank you so much!
Love this pattern. I just need to hem it and im done, But this pattern is amazing. Thank you.
That’s great Ashley. With the great examples shown on the chat group recently, I’m thinking I should make a few more too, in some summery prints. Will you share yours when its finished?
Just downloaded this patter and cannot wait to make it this weekend! Thank you for sharing!
Thank you for sharing this with us. <3
I always thought that this kind of top would be difficult to make but I was wrong. With your wonderful tutoring it all make sense now. =)
I finally made this top and it was so easy!!! Except I messed up. (Sigh) I sewed the bottom bodice part back to front and I’m not changing it! mostly because seam ripping jersey is a nightmare for me but also because my print is busy so it’s barely noticable. Also I intend on making about 2 more so Ill be more careful next time. Yay! And THANK YOU!
I have made this top and your easy sundress as I am going on a cruise next week thought they would be perfect, thank you for allowing the use of your patterns
This is a beautiful design 🙂 im just learning how to sew and will be trying this pattern when im a bit more confident!
The top looks gorgeous and can really look nice dressed up or down. It doesn’t hurt that you are both a beautiful and elegant model. Keep up the awesome work.
You’ve made me blush Ilena – I was holding my tummy in so bad for those photos! Thank you.
Congratulations! You are one of our Top 5 Features from our our Pattern Party at Get Your Crap Together! Stop by and get a feature button! Thanks for linking up!
i love your desings and would love to make them but for some reson i cant down load them as the link doesnt work 🙁 could you let me know if there is any other way i can down load them ?
HI Ellie – I checked the link and it seems to work OK for me. Not sure why you are having a problem – it simply redirects to the download page on Craftsy. You can try this link instead. http://www.craftsy.com/pattern/sewing/clothing/twist-front-top—free/61560?SSAID=682801. If you are still having a problem, can you email me using the envelope link at the top right of the header, and let me know what doesn’t work for you. And I’ll see if I can sort it out. Thanks, Deby
This is so pretty … I wonder if it would look weird on me given that I have a short neck and broad shoulders. Oh well, bookmarking it anyway! I’ll just make it in a color that looks good on my sister as well.
Do you know Kollabora, the crafting/DIY site? I’m wondering if you’d be interested in posting this over there … a lot of members are making tank tops these days, but this one is different and eye-catching, and I don’t think I’d be the only one who wanted to try it.
Thanks for the invite over to Kollabora. I added in all of my patterns and tutorials. Its a great site.
Such a cute top! Amazing tutorial. Thank you so much for sharing,
Jamie
Deby! That looks so great on you! I love the color too. Just wanted to let you know I’m featuring this in my weekend round-up. I really appreciate you linking to my Tasteful Tuesday party. I would love for you to share, tweet, or +1 the feature… thanks a bunch!
Emily @ nap-timecreations.com
Thanks so much Emily. It means a lot to be featured on your site. I’ll certainly be dropping into the party to share.
Ooh I love free patterns! Thanks for sharing!
What a great looking top. Nice to see a sexy unfrumpy pattern out there!
Hi Deby,
I just wanted to tell you that I made your top this morning and absolutely LOVE it!! Your instructions were very easy to follow and the pattern is perfect! Thank you so much for sharing it with everyone. I’m definitely going to make another top and probably a dress as well. Thanks again!
Dawn
Wonderful Dawn, I’m glad it turned out well for you. It’s easy right? If you want to share, I’d love to see any photo. You can send it using the email link above, and with your permission I’d feature it on the site too if you like.
That would be great! I will email you a photo as soon as I can. Maybe it will inspire other people to want to make this top as well! I am already starting on a second one for my best friend and I know she’s going to love it. Thanks again, Deby!!
fabulous as always! looking great too girl! loved it
Hi Deby,
Great tutorial! 🙂 Thank you for the mention.
~Janet @ girlcharlee.com
Think this would work as a swim top, assuming you used the proper fabric, and support for the top?
Cute top, thanks for sharing a pattern!
Great idea – I’m sure it would work. But you would certainly want to use the correct fabric, line it, and probably go down a size. And adding some elastic under the bust, perhaps shortening the straps a little, to give some extra support. I’d be interested to see this – do send in some details if you make your own.
I love this top! It’s super sexy and looks so comfortable, you look amazing!
Blush, thank you so much.
Beautiful top! I love how halter tops look. This one is really flattering. And you designed it? How talented of you! Pinning it!
Such a versatile pattern with the different strap options. Looks fabulous on you, Deby!!!
Hi Deby, I’ve featured your top today…
http://www.threadingmyway.com/2013/07/threading-your-way-features_20.html
This is such a cute top, thanks for the tutorial and pattern! I really think I will make this!
AMAZING! I’ve always wanted to make myself a shirt/dress like this because NOWHERE carries a size that doesn’t either hang or stretch too tight in the chest. I’m a 40″ bust/ 30″ waist. I was thinking of adding pleats or darts to the top to accommodate this… suggestions?
Hi Jillian and thanks for dropping by. You have quite a big difference between bust and waist measurement so it all depends on how you want the final garment to look. You should certainly use the larger size for cutting the bust. But below the bust is up to you. If you have a small back, you could cut the back pieces in a smaller size. Then cut the corresponding sizes for the bottom pieces so that the two seams will be the same size where they meet. Then you can adjust the fit at the sides to make it slimmer around your smaller waist if you like. There is also a center back seam you can use to take in the back where this may be too loose too. Of course if you wanted to make it dress length, the loose fit may be more flattering to skim over waist and hips and be more flowing.
My suggestion – use some cheap or left over fabric to make a test of the bodice part before you cut into your final fabric – the bodice will be more difficult to adjust if the fit isn’t right. The fit will very much depend on how much stretch you have in the fabric, and also to some degree your personal preference as to have close a fit you would like. I hope it works out, and that you will send me some pictures once you are done!
Will try. Thanks! I want it to be covering and supportive without being too large that its saggy (or the under-bust is so big that I look pregnant because it hangs straight down) and not so small that I’m in danger of a wardrobe malfunction. 😛 I’ll try the large top with medium or small bottom, and maybe pleat the extra fabric under the bust (my biggest problem is usually having enough give in that area to not spill out over the sides). Test bodice is definitely a good idea. I’ll get a photo up when I’m done!
This is awesome! Thanks for the pattern, I will certainly try this!