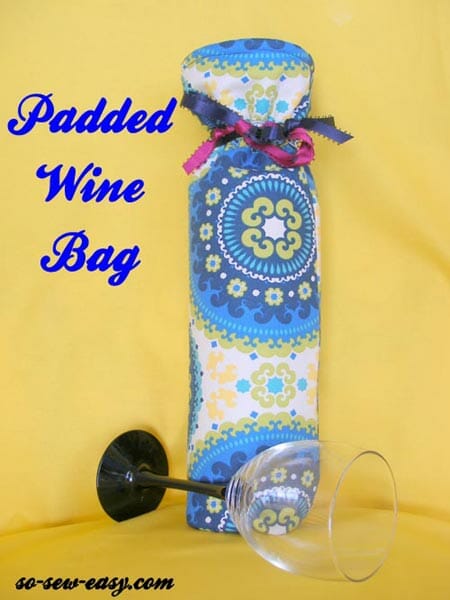
It's that time of year when you might be taking a bottle of wine to a party or giving a nice bottle of wine or brandy to a neighbor for Christmas. But how to wrap it? This quick-to-sew padded wine bag pattern will protect the precious contents, and keep them cool on the way to dinner.
It doesn't even have to be for Christmas – make these in your favorite fabrics for any time of year.

Nothing too complicated or time-consuming for the free pattern this month – we're all too busy! So enjoy this simple project that fits everyone! 😉
Where to get your free wine bag pattern?


As usual, to make downloading easy and reliable, the pattern is hosted in my design account with Payhip. If you don’t already have an account, you will need to sign up to download, but don’t worry, it’s free, quick and easy. Add the pattern to your cart, and then checkout – no payment/address details etc needed.
Directions
This is an easy project suitable for beginners. You don't have to be 100% accurate, the bottle won't mind if you are a little wonky and by the time you've drunk the contents – neither will you! I'll show you how to make this in the video below.
[Note – once the video starts to play, click on the little ‘gear' button to increase the resolution for a clearer picture.]
Subscribe to the YouTube channel:
Prefer photo instructions?
1. Print out your pattern, prepare the pieces, and cut out your fabric. You need two outer pieces, two inner pieces, and two casing pieces.
2. Iron fusible fleece to the reverse side of the outer pieces. If you want a very padded bag for that extra special bottle, you can also add fleece to the reverse of the lining pieces. To keep wine cool during transport to dinner, use a thermal lining such as Thermolan or Insul-Bright instead of the fusible fleece.


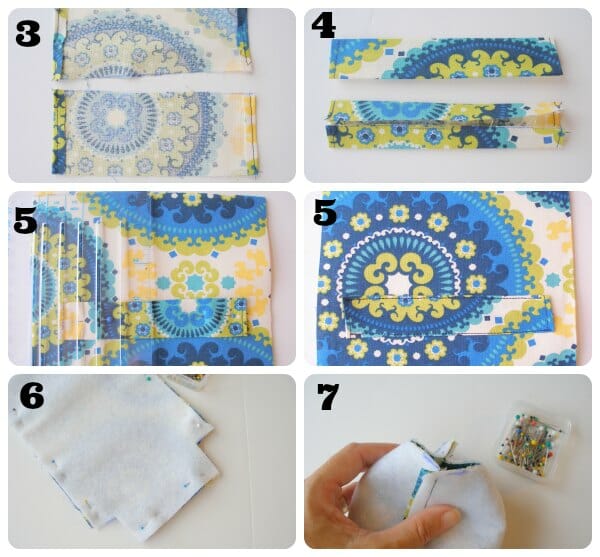
3. Turn in 1/4 inch on the short end of each of the casing pieces, press, and stitch.
4. Fold the casing pieces lengthways in half, press, then fold the outsides to the centerline, meet them in the middle, and press again.
5. Line up the casing pieces on the outside of your outer fabric, 3 inches down from the top edge and centered with an even gap on each side. Pin in place and then stitch close to the top and bottom folded edges. Do NOT stitch the short sides!
6. If you want to give your bag a quilted effect, sew even lines of stitching on your outer pieces now before stitching them together. With right sides together, pin then stitch your outer pieces together with a 1/2 inch seam allowance. Stitch down both long sides and across the bottom.
7. Match up the bottom seam with the side seams and stitch across the bottom to create the flat part of the bag – refer to the video if you get stuck here. Then turn the bag right sides out.


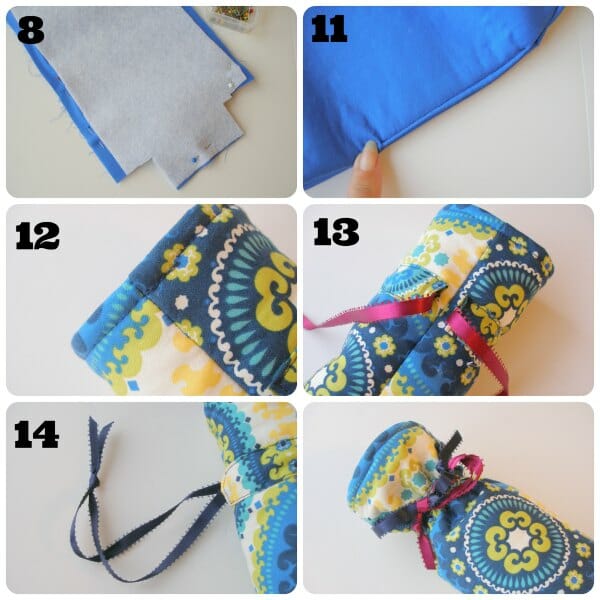
8. Sew your lining together, right sides together, all down one side, across the bottom and on the other side. BUT on one of the side seams, leave a 4-inch gap for turning the bag later on.
9. Box the bottom corners the same as you did for the outer piece.
10. Slide the outer tube inside the lining with the right sides together. Match up the side seams and the top raw edges. Pin then stitch with a 1/2 inch seam allowance. (Sorry, I'm missing a photo here. Check the video if unsure.)
11. Turn the bag the right side out through the gap in the lining, then close the lining. Either neatly hand-stitch, or be lazy like me and simply top stitch the gap closed by machine. I figure your recipient will be more interested in the inside of the wine bottle than the inside of the bag!
12. Press around the top and then topstitch 1/4 inch from the top edge.
13. Slide your cord, ribbon or rope through the casing using a safety pin or paper clip. Each ribbon goes through both casings, but they stop and start on opposites sides to one another.
14. Knot the ends of the ribbon to stop them from pulling through. Pop in your bottle, pull the cords to close and your bottle is both beautifully wrapped and protected.
Cheers and a Merry Christmas!


i made my own pattern just by wrapping fabric around the wine bottle to get the size and drew traced the bottom of the bottle on paper . i did use batting and a lining for my wine bag .a bottle wine and the wine bag makes a great gift .
The tutorial is great! Very easy to follow, but I need the dimensions because I could not get the pattern to print the exact size. Thanks for the help!
Hi Diana, Use Adobe Reader, it is free and it is what is used in this site to print all the patterns.
What are the dimensions for this pattern? the print out on letter paper looks very small
I understand all the pattern instructions, however my printer isn’t working so could you give me the measurements of the cut out size of the pieces please. I am anxious to try this project. Thanks, Donna
Thanks for sharing Deby, great pattern. The video is especially helpful.
Excellent tutorial. However i am a little confused with the point 5 and 6. Can someone help me with it??
Arfa,
It is probably too late. However, regarding step 5: Earlier in the video (about 2 minutes) Deby demonstrates how to sew on the casings. Near the end of the video, you will see how Deby threads the ribbon through the strips.
Step 6: The first part is optional, to give the bag a quilted look. You can stitch any way you want, for example sew a bunch of random lines across before sewing the two separate pieces of the outside of the bag together. Straight lines are much easier for beginners, but you could do patterns using circles or zigzag. There are many examples of basic quilting techniques online.
For the second part of step 6, you sew the sides together and the bottom. Don’t sew the corners until you watch the video above or look up how to create a “boxed corner”. The boxed corner is what makes the bottom of the bag flat so a bottle will fit in much more easily.
Hope that helps.
I am just beginning my first wine bag with the idea of using your pattern for Christmas gifts next year. I am very confused about one thing, however. In the directions it appears the size of the bag is 7.5 x 19.5. Yet, when I print it out, I get a pattern for 7″ with the bag itself being about 17″. Can you help me with this please? I tiled the pattern when I printed it.
HI Laurel, you need to use Actual Size printing settings, when you tile it the pattern was scaled and it is why it is a different size.
Love it but my printer can’t handle poster size so I can’t print the pattern. I would make my own, but there are no measurements given that I can find anywhere…. so unfortunately until I make my own pattern, this is useless for me.
But I love the project, and the video tutorial is excellent.
Great,
Great idea for a wine bag. Love the casing on the outside. Can you tell me what finished size should be? Thanks
This fits a standard 75cl wine bottle Grace. All the pattern dimensions that you need are in the download, but I don’t have one around the house at the moment, I gave all mine as gifts, so I can’t measure it to tell you the exact finished size. Sorry.
I always enjoy your blog and patterns.
Super cute! Thanks for linking up to check me out saturday!
iamonly1woman.blogspot.com
A great idea to make the wine bag padded, Deby. Looks great!!!
Very nice video and pattern. 😀