


If you've ever dressed a little baby, you'll know how much they like to wiggle; making it really difficult to put any clothes on them. Any item of clothing which needs to go over the baby's head, or has lots of fiddly buttons can be especially cumbersome. That's why I love baby clothes with a front opening, such as this baby kimono onesie.
My baby girl, Umi, has been wearing a kimono as her pajamas ever since she was born. She's recently grown out of the kimono I bought for her in Japan, so I decided to make my own baby kimono in a bigger size.

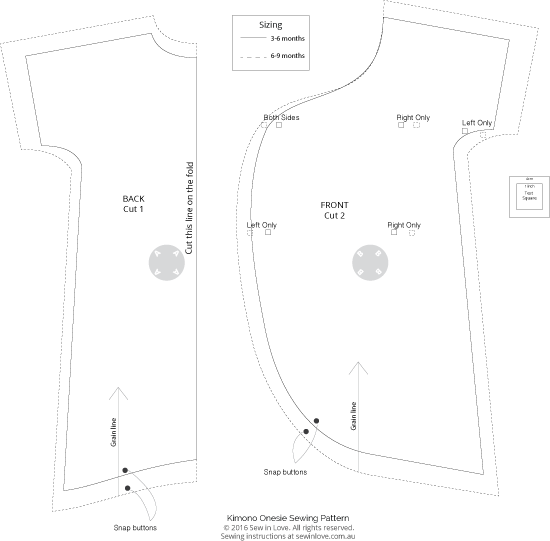
The Sewing Pattern
This baby kimono onesie sewing pattern comes in two sizes, 3-6 and 6-9 months. Umi is 7 months old and she is wearing the 6-9 months size. Make sure you print the sewing pattern WITHOUT adjusting the size. You can check if you have printed correctly by measuring the test square with a ruler.
If you need any help with down How to download and print PDF patterns or How to print and assemble a PDF pattern, please check out the linked tutorials.
Cut off the border and glue the 6 pages of the sewing pattern together so it looks like this:
You can download the pattern for the Baby Kimono Onesie from Sew In Love from our account at Payhip.
For help downloading and printing PDF patterns, please CLICK HERE.
You Will Need
- 0.5m (0.55 yds) knit fabric
- 1.1m (43″) of 10mm (0.4″) wide cotton tape (optional)
- 2x snap buttons
How To Make Your Baby Kimono Onesie
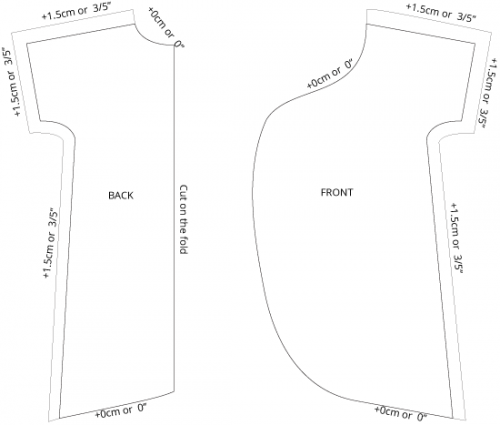
Step One
Add the seam allowances as shown below before cutting the fabric. In case the diagram below is hard to read, you just need to add 1.5cm (3/5″) to all edges, except for the neckline and hem. Also cut approx. 85cm (25″) of 2cm (4/5″) wide bias tape from the same fabric.
Step Two
Cut 6 pieces of cotton tape, 18cm (7″) long each. Optional Step: You could make your own ties from your fabric, instead of using purchased cotton tape.
Step Three
With the wrong sides facing, stitch the shoulder seams together. Trim half the seam. Zigzag stitch the shoulder seam down towards the back. See Step 3 of my Baby Kimono Top sewing tutorial for photos.
Step Four
Fold sleeves twice and stitch.
Step Five
Baste cotton tape to left side seam where marked. With the right sides facing, stitch side seams 0.6mm (1/4″) from the edge. Trim close to the edge. Carefully snip seam along the curve.
Turn garment so that the wrong sides are facing each other. Stitch 0.6mm (1/4″) from the edge, encasing the raw seams. See Step 5 of my Baby Kimono Top sewing tutorial for photos.
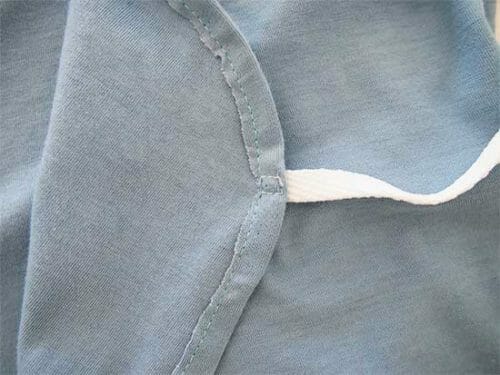
Step Six
Press the bias tape in half lengthways. Starting at the back of the neck, attach bias tape along the raw edge of kimono by inserting raw edge into folded bias tape. Baste stitch the bias tape by hand first, then machine stitch. Remove basting stitches.
Step Seven
Attach cotton tape to the front of kimono, where marked. Stitch a small square to hold the cotton tape in place. Stitch the free end of the cotton tape to prevent fraying.
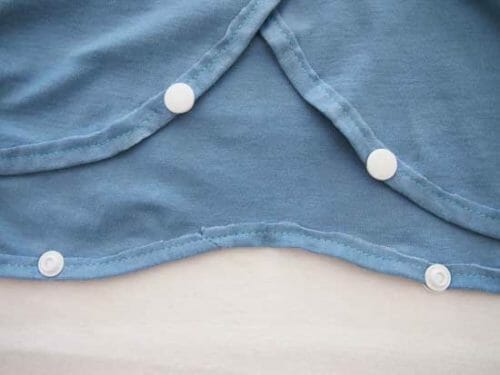
Step Eight
Attach snap buttons where marked.
I used a soft, light denim colored knit fabric for my baby kimono. I think this would make a lovely gift, especially as a set with the baby kimono top (free sewing pattern) available for download over at my blog, Sew in Love!
If You'd Like To Support Our Site
If you want to help us continue to bring you a wide selection of free sewing patterns and projects, please consider buying us a coffee. We'd really, really appreciate it.


This is perfect for the donations I make for the babies in the Neonatal intensive care unit. It will be much easier to run the tubes and wires through them. Thank you so very much for this pattern.
Thank you so much I can’t wait to sew this pattern.
Hi Rin, this is a beautiful design. I can’t wait to make one for my grandson. Thanks sew much.
Thanks so much for this. My brand new grandson(1 mth old) live in sunny Queensland and this will be perfect for cooler nights.
It’s great the pattern n all but my grand son is 18 months old how can I make a bigger size please do let me know Thanku
I live in cairo(Egypt)
Durriya